
WD40 for Cleaning Rusty Tools: Are your trusty garden tools looking more like relics from a shipwreck than instruments of horticultural joy? Don’t despair! Before you resign them to the scrap heap, I’m here to share a simple, yet incredibly effective DIY trick that will breathe new life into your rusty companions.
The battle against rust is an age-old one. For centuries, blacksmiths and artisans have sought ways to protect their metal creations from the relentless corrosion caused by moisture and oxidation. While modern rust removers are readily available, sometimes the most effective solutions are the ones hiding in plain sight – like that can of WD40 sitting in your garage.
Why is this trick so essential? Well, beyond the obvious cost savings of restoring rather than replacing your tools, there’s a certain satisfaction in reviving something old and making it useful again. Plus, properly maintained tools perform better, making your gardening tasks easier and more enjoyable. Nobody wants to struggle with a rusty shovel when they could be effortlessly turning the soil! So, let’s dive in and discover how WD40 for cleaning rusty tools can transform your gardening experience and save you money and frustration. I’ll walk you through the process step-by-step, ensuring you can reclaim your tools and get back to creating your dream garden.
Revive Your Rusty Tools with WD-40: A DIY Guide
Hey there, fellow DIY enthusiasts! Are your trusty tools looking a little worse for wear? Covered in rust and not performing like they used to? Don’t despair! Before you think about replacing them, let me share a simple and effective trick I’ve been using for years: WD-40. Yes, that can of magic in your garage isn’t just for squeaky hinges; it’s a fantastic rust remover and can breathe new life into your rusty tools.
This guide will walk you through the process of cleaning your rusty tools with WD-40, step-by-step. It’s easier than you think, and you’ll be amazed at the results!
What You’ll Need
Before we dive in, let’s gather our supplies. Here’s what you’ll need:
* **WD-40:** The star of the show! Make sure you have a can handy.
* **Wire Brush:** A sturdy wire brush is essential for scrubbing away the rust. I prefer a brush with both steel and brass bristles for different levels of abrasion.
* **Rags or Paper Towels:** For wiping away the WD-40 and loosened rust.
* **Safety Glasses:** Protect your eyes from flying debris. Trust me, you don’t want rust in your eye!
* **Gloves:** Protect your hands from the WD-40 and rust.
* **Container (Optional):** A container to soak smaller tools in WD-40.
* **Sandpaper (Optional):** For stubborn rust, sandpaper can provide extra abrasion. I recommend a medium-grit sandpaper (around 120-grit) and a fine-grit sandpaper (around 220-grit).
* **Oil (Optional):** After cleaning, applying a light coat of oil will help prevent future rust. I like using mineral oil or a specialized tool oil.
Step-by-Step Instructions: Cleaning Your Rusty Tools
Here’s the breakdown of how I tackle rusty tools using WD-40.
1. **Prepare Your Workspace:** Find a well-ventilated area to work in. WD-40 has a distinct odor, so good ventilation is key. Lay down some newspaper or a drop cloth to protect your work surface from rust and WD-40.
2. **Initial Assessment:** Take a good look at your tools. How rusty are they? This will help you determine how much effort you’ll need to put in. For lightly rusted tools, a simple spray and scrub might be enough. For heavily rusted tools, you might need to soak them.
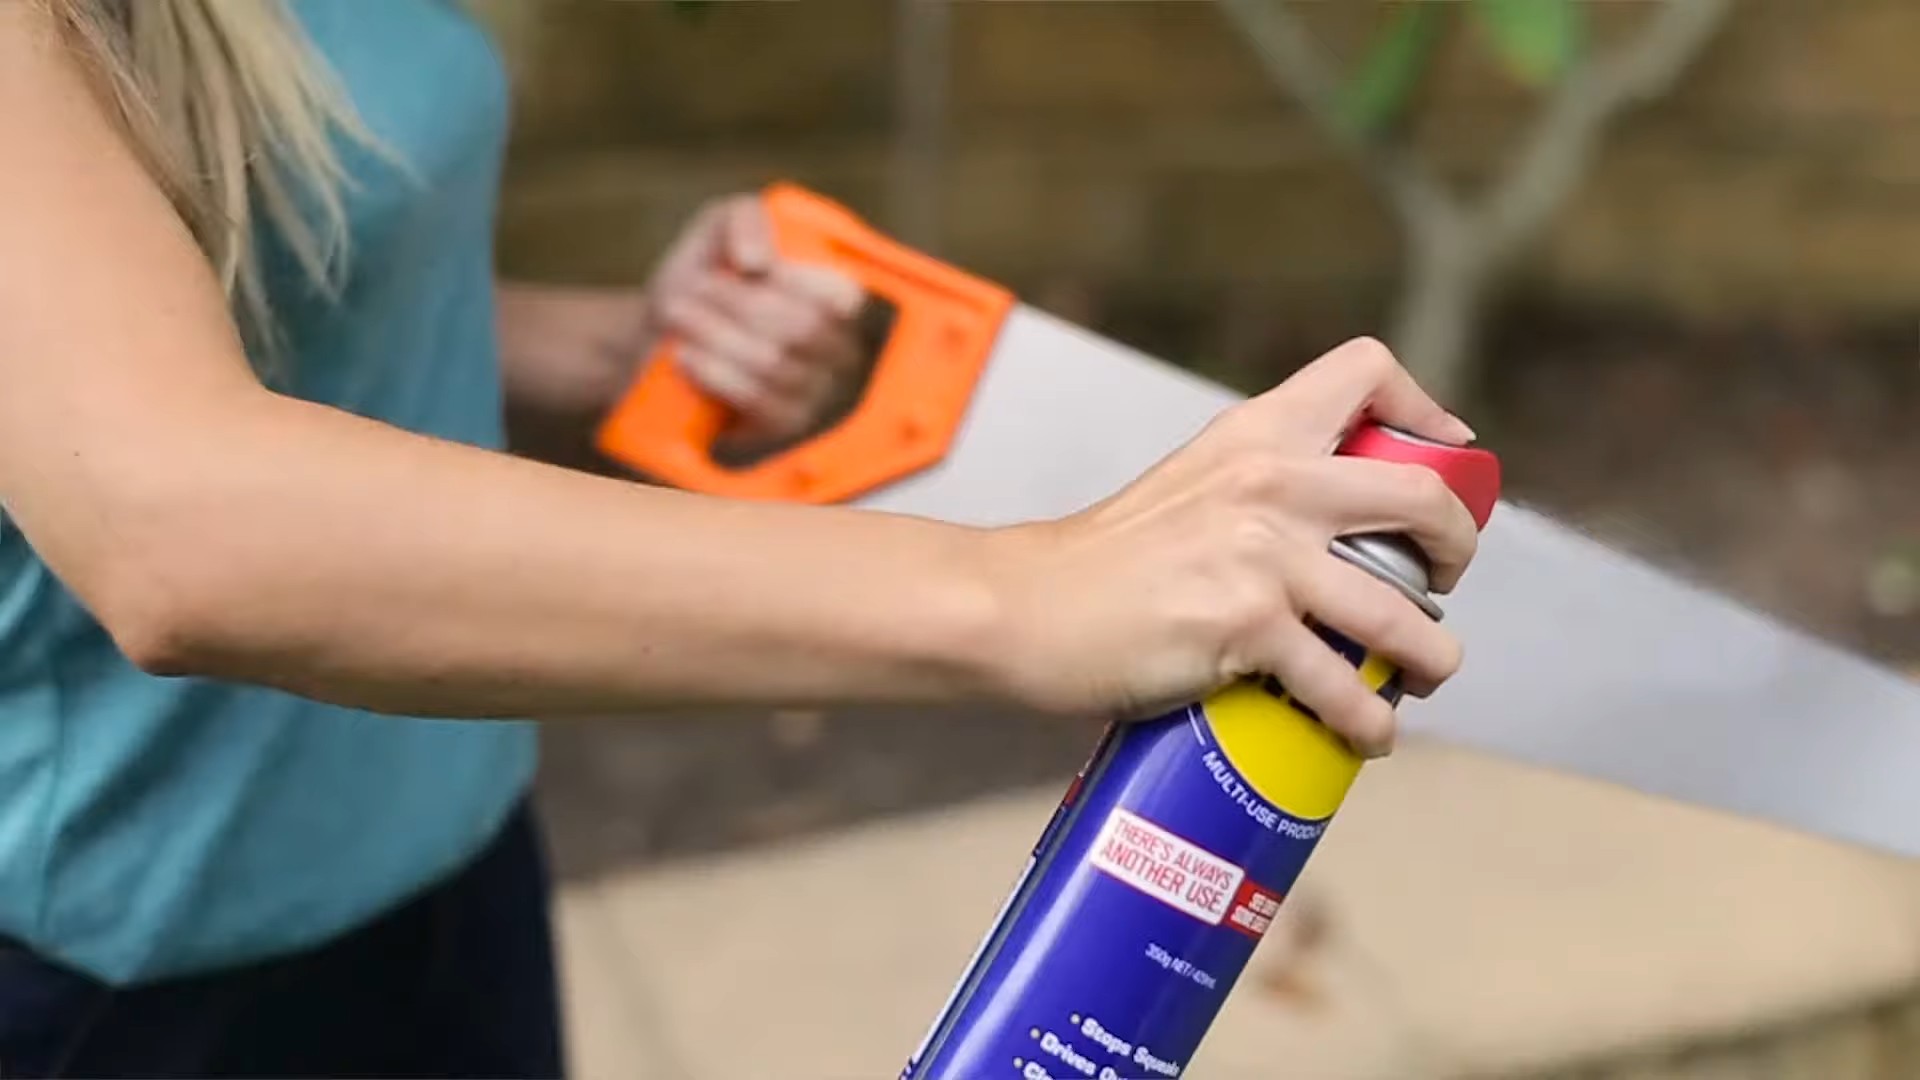
3. **Apply WD-40:** This is where the magic begins! Generously spray the rusty areas of your tools with WD-40. Make sure to coat all the affected surfaces. For smaller tools, you can soak them in a container filled with WD-40. Let the WD-40 sit for at least 10-15 minutes. This allows it to penetrate the rust and loosen it up. For heavily rusted tools, I recommend letting them soak for several hours, or even overnight.
4. **Scrub Away the Rust:** After the WD-40 has had time to work its magic, it’s time to start scrubbing. Use your wire brush to scrub away the loosened rust. Apply firm, even pressure. You’ll see the rust start to flake off. For hard-to-reach areas, use a smaller wire brush or a toothbrush.
5. **Wipe Clean:** As you scrub, wipe away the loosened rust and WD-40 with a rag or paper towel. This will help you see your progress and prevent the rust from simply being redistributed.
6. **Repeat if Necessary:** For heavily rusted tools, you might need to repeat steps 3-5 several times. Don’t be discouraged if the rust doesn’t come off completely on the first try. Persistence is key!
7. **Sandpaper for Stubborn Rust (Optional):** If you’re dealing with particularly stubborn rust, you can use sandpaper to help remove it. Start with a medium-grit sandpaper (around 120-grit) and gently sand the rusted areas. Be careful not to scratch the underlying metal. Once you’ve removed the bulk of the rust, switch to a fine-grit sandpaper (around 220-grit) to smooth out the surface.
8. **Final Wipe Down:** Once you’re satisfied with the level of rust removal, give your tools a final wipe down with a clean rag or paper towel. Make sure to remove any remaining WD-40 and rust particles.
9. **Apply Protective Oil:** To prevent future rust, apply a light coat of oil to your cleaned tools. I like using mineral oil or a specialized tool oil. This will create a protective barrier against moisture and help keep your tools in good condition. Simply apply a small amount of oil to a rag and wipe it over the surfaces of your tools.
10. **Proper Storage:** Store your cleaned and oiled tools in a dry place. Avoid storing them in damp or humid environments, as this can accelerate rust formation. A tool chest or cabinet is ideal. You can also use desiccant packs to absorb moisture.
Dealing with Specific Types of Tools
The general process outlined above works for most tools, but here are a few tips for dealing with specific types:
* **Hand Saws:** For hand saws, pay special attention to the teeth. Use a wire brush to clean between the teeth and remove any rust or debris. You can also use a specialized saw file to sharpen the teeth if necessary.
* **Wrenches and Pliers:** These tools often have intricate parts and crevices where rust can accumulate. Use a small wire brush or a toothbrush to clean these areas. Make sure to lubricate the moving parts with WD-40 or oil after cleaning.
* **Garden Tools:** Garden tools are particularly susceptible to rust due to their exposure to soil and moisture. After cleaning, consider applying a rust-resistant paint or coating to the metal parts.
Preventing Future Rust
Cleaning your rusty tools is important, but preventing rust in the first place is even better! Here are a few tips to help you keep your tools rust-free:
* **Clean Your Tools After Each Use:** This is the most important thing you can do to prevent rust. Wipe down your tools with a clean rag after each use to remove any dirt, moisture, or debris.
* **Store Your Tools Properly:** As mentioned earlier, store your tools in a dry place. Avoid storing them in damp or humid environments.
* **Apply Protective Oil Regularly:** Apply a light coat of oil to your tools every few months, or more often if you live in a humid climate.
* **Use a Desiccant:** Place desiccant packs in your tool chest or cabinet to absorb moisture.
* **Consider a Rust Inhibitor:** There are a variety of rust inhibitors available that can be applied to your tools to provide extra protection.
Safety First!
Before I forget, let’s talk about safety. When working with WD-40 and wire brushes, it’s important to take precautions to protect yourself.
* **Wear Safety Glasses:** Protect your eyes from flying debris.
* **Wear Gloves:** Protect your hands from the WD-40 and rust.
* **Work in a Well-Ventilated Area:** WD-40 has a distinct odor, so good ventilation is key.
* **Dispose of Rags Properly:** Rags soaked in WD-40 can be flammable, so dispose of them properly.
Troubleshooting
Sometimes, despite your best efforts, you might encounter some challenges. Here are a few common issues and how to address them:
* **Rust is Too Stubborn:** If the rust is extremely stubborn, you can try using a rust converter. These products chemically convert the rust into a stable compound that can be painted over. Follow the manufacturer’s instructions carefully.
* **Tool is Too Damaged:** In some cases, the rust damage might be too severe to repair. If the tool is severely corroded or broken, it might be time to replace it.
* **WD-40 Isn’t Working:** While WD-40 is effective for removing light to moderate rust, it might not be strong enough for heavy rust. In these cases, you might need to use a stronger rust remover or a rust converter.
Final Thoughts
So there you have it! A comprehensive guide to cleaning your rusty tools with WD-40. It’s a simple, effective, and affordable way to breathe new life into your tools and keep them performing at their best. Remember to take your time, be patient, and always prioritize safety. With a little elbow grease and the magic of WD-40, you can keep your tools in tip-top shape for years to come! Happy cleaning!
Conclusion
So, there you have it! Using WD40 for cleaning rusty tools isn’t just a quick fix; it’s a game-changer for anyone who values their tools and wants to keep them in top condition without breaking the bank. We’ve explored how this readily available household product can effectively dissolve rust, protect against future corrosion, and even lubricate moving parts, extending the life of your valuable equipment.
Why is this DIY trick a must-try? Because it’s simple, affordable, and incredibly effective. Forget about expensive rust removers and complicated processes. WD40 offers a straightforward solution that anyone can implement, regardless of their experience level. It’s a time-saver, a money-saver, and a tool-saver all rolled into one. Plus, the satisfaction of restoring a rusty tool to its former glory is a reward in itself.
But don’t just take our word for it. We encourage you to experiment with different applications and variations. For instance, if you’re dealing with particularly stubborn rust, try letting the WD40 soak for an extended period, perhaps even overnight. You could also combine the WD40 treatment with a wire brush or steel wool for added scrubbing power. For delicate tools, consider using a soft cloth or toothbrush to avoid scratching the surface. Another variation is to apply WD40 as a preventative measure on tools that are frequently exposed to moisture. A light coating after each use can significantly reduce the risk of rust formation.
Remember to always work in a well-ventilated area and wear appropriate safety gear, such as gloves and eye protection, when handling WD40. While generally safe, it’s always best to err on the side of caution.
Ultimately, the best way to discover the full potential of this DIY trick is to try it yourself. We’re confident that you’ll be amazed by the results. So, grab that can of WD40, select a rusty tool, and get ready to witness the transformation.
We’re eager to hear about your experiences! Share your before-and-after photos, tips, and tricks in the comments below. Let’s create a community of DIY enthusiasts who are passionate about keeping their tools in pristine condition. Your insights could help others discover the magic of using WD40 for cleaning rusty tools and unlock its full potential. Don’t hesitate to share any challenges you encounter or any innovative ways you’ve found to use WD40 for rust removal. Together, we can learn and improve our tool maintenance skills. So, go ahead, give it a try, and let us know what you think!
Frequently Asked Questions (FAQ)
What exactly is WD40, and why does it work so well on rust?
WD40 is a water displacement spray, hence the “WD” in its name. It’s a blend of various hydrocarbons that work together to penetrate rust, loosen its grip on the metal surface, and displace moisture. The key is its ability to seep into the tiny crevices of rust, breaking down the bonds that hold it together. It also leaves behind a thin protective layer that helps prevent future rust formation. While it’s not a dedicated rust converter, its penetrating and lubricating properties make it an excellent choice for removing and preventing rust on tools.
Is WD40 safe to use on all types of tools?
Generally, WD40 is safe to use on most metal tools, including those made of steel, iron, and aluminum. However, it’s always a good idea to test it on a small, inconspicuous area first, especially if you’re dealing with antique or delicate tools. Avoid using WD40 on tools with rubber or plastic components, as it can sometimes degrade these materials over time. If you’re unsure, consult the tool’s manufacturer’s instructions or seek advice from a professional.
How long should I let WD40 soak on a rusty tool?
The soaking time depends on the severity of the rust. For light rust, a 15-30 minute soak may be sufficient. For more stubborn rust, consider soaking the tool for several hours or even overnight. You can also reapply WD40 periodically during the soaking process to keep the surface saturated. The longer the WD40 has to penetrate the rust, the easier it will be to remove.
What’s the best way to remove the rust after soaking the tool in WD40?
After soaking, you can use a variety of methods to remove the loosened rust. A wire brush or steel wool is effective for removing heavy rust deposits. For more delicate tools, a soft cloth, toothbrush, or nylon brush may be more appropriate. You can also use a rust eraser or a specialized rust removal tool for targeted rust removal. Remember to apply gentle pressure and avoid scratching the surface of the tool.
Can WD40 prevent rust from forming in the first place?
Yes, WD40 can be used as a preventative measure against rust. After cleaning your tools, apply a thin coat of WD40 to the metal surfaces. This will create a protective barrier that helps repel moisture and prevent rust from forming. Reapply WD40 periodically, especially after using your tools in wet or humid conditions.
Is WD40 environmentally friendly?
WD40 is not considered an environmentally friendly product due to its petroleum-based composition. When using WD40, it’s important to take precautions to minimize its environmental impact. Work in a well-ventilated area, avoid spraying WD40 directly into the environment, and dispose of used rags and containers properly. Consider using alternative rust removal methods that are more environmentally friendly, such as vinegar or citric acid, when possible.
Are there any alternatives to WD40 for cleaning rusty tools?
Yes, there are several alternatives to WD40 for cleaning rusty tools. Vinegar is a natural rust remover that can be effective for light rust. Simply soak the tool in vinegar for several hours or overnight, then scrub away the rust. Citric acid is another natural option that can be used in a similar way. Commercial rust removers are also available, but be sure to follow the manufacturer’s instructions carefully. For more severe rust, electrolysis can be an effective but more involved method.
What safety precautions should I take when using WD40?
When using WD40, it’s important to work in a well-ventilated area to avoid inhaling the fumes. Wear gloves to protect your skin from irritation and eye protection to prevent splashes. Avoid spraying WD40 near open flames or sources of ignition, as it is flammable. Keep WD40 out of reach of children and pets. If you accidentally ingest WD40, seek medical attention immediately.
Can I use WD40 to lubricate my tools as well as clean them?
Yes, WD40 has lubricating properties that can help keep your tools working smoothly. After cleaning your tools with WD40, you can apply a light coat to moving parts to lubricate them and prevent friction. However, WD40 is not a long-lasting lubricant, so you may need to reapply it periodically. For tools that require heavy-duty lubrication, consider using a specialized lubricant or grease.
What if WD40 doesn’t completely remove the rust?
If WD40 doesn’t completely remove the rust, you may need to try a more aggressive method. Consider using a wire brush or steel wool with more pressure, or try a commercial rust remover. You can also repeat the WD40 soaking process multiple times. In some cases, severe rust may require professional restoration.


Leave a Comment