
Sweet Potato Harvesting Tips: Unearthing Hidden Treasures in Your Backyard!
Have you ever felt the thrill of discovering buried treasure? Well, get ready to experience that same excitement in your own backyard! This article is your ultimate guide to sweet potato harvesting tips, transforming you from a novice gardener into a seasoned pro. For centuries, sweet potatoes have been a staple crop, enjoyed by cultures around the globe. Originating in Central and South America, these vibrant tubers have journeyed across continents, becoming a beloved ingredient in countless dishes.
But knowing when and how to harvest your sweet potatoes is crucial for maximizing your yield and ensuring the best flavor. Imagine the disappointment of digging up small, underdeveloped potatoes, or worse, discovering they’ve been damaged by pests or frost! That’s where these DIY tricks and hacks come in. I’m here to share my tried-and-true methods, so you can avoid common pitfalls and enjoy a bountiful harvest of delicious, homegrown sweet potatoes.
Whether you’re a seasoned gardener or just starting out, mastering these sweet potato harvesting tips will empower you to cultivate a thriving garden and enjoy the sweet rewards of your labor. Let’s get digging!
DIY Sweet Potato Harvesting: A Beginner’s Guide
Okay, so you’ve nurtured your sweet potato plants all summer, and now it’s time for the grand finale: harvesting those delicious, orange treasures! Don’t worry if you’re a newbie; I’m here to guide you through the entire process. Harvesting sweet potatoes is actually pretty straightforward, but there are a few key things to keep in mind to ensure you get a bountiful and bruise-free harvest. Let’s dive in!
Knowing When to Harvest: Timing is Everything!
The most crucial part of harvesting sweet potatoes is knowing *when* to do it. Harvest too early, and you’ll end up with small, underdeveloped potatoes. Wait too long, and you risk frost damage, which can significantly impact their storage life. Here’s how I determine the perfect harvest time:
* **Days to Maturity:** Check the seed packet or plant tag for the “days to maturity.” This is an estimate of how long it takes for the sweet potatoes to reach full size. Generally, it’s around 90-120 days after planting slips (the sprouts that grow from sweet potatoes). Mark your planting date on a calendar and count forward.
* **Weather Forecast:** Keep a close eye on the weather forecast. Sweet potatoes are very sensitive to frost. If frost is predicted, it’s time to harvest, even if they haven’t reached their full maturity date. A light frost might only damage the foliage, but a hard frost can damage the potatoes themselves.
* **Foliage Condition:** The leaves of your sweet potato plants will start to turn yellow and brown as they mature. This is a natural sign that the plant is redirecting its energy into the tubers. Don’t wait until all the leaves are completely dead, though, as this could indicate rot.
* **Test Digging:** The best way to know for sure is to do a test dig. About two weeks before your estimated harvest date, carefully dig around one plant and check the size of the potatoes. If they’re a good size and the skins are firm, you’re good to go!
Tools You’ll Need
Before you start digging, gather your tools. Having everything ready will make the process much smoother. Here’s what I recommend:
* **Garden Fork or Spading Fork:** This is my preferred tool for lifting the sweet potatoes from the ground. A garden fork is less likely to damage the potatoes than a shovel.
* **Gloves:** Protect your hands from dirt and potential scratches.
* **Pruning Shears or Garden Scissors:** To cut the vines before digging.
* **Trowel:** For carefully uncovering potatoes close to the plant.
* **Wheelbarrow or Garden Cart:** To transport your harvest.
* **Soft Brush:** For gently removing excess dirt.
* **Cardboard Boxes or Baskets:** For curing and storing your sweet potatoes.
Harvesting Sweet Potatoes: Step-by-Step
Alright, let’s get our hands dirty! Here’s the step-by-step process I use for harvesting sweet potatoes:
1. **Cut the Vines:** Using your pruning shears or garden scissors, cut the vines a few inches above the ground. This will make it easier to dig around the plants and prevent you from accidentally pulling up the potatoes by the vines. I usually do this a day or two before I plan to dig, which allows the skins to toughen up a bit.
2. **Loosen the Soil:** Carefully insert your garden fork about a foot away from the base of the plant. Gently loosen the soil around the plant, being careful not to stab the potatoes. Work your way around the plant, loosening the soil in a wide circle.
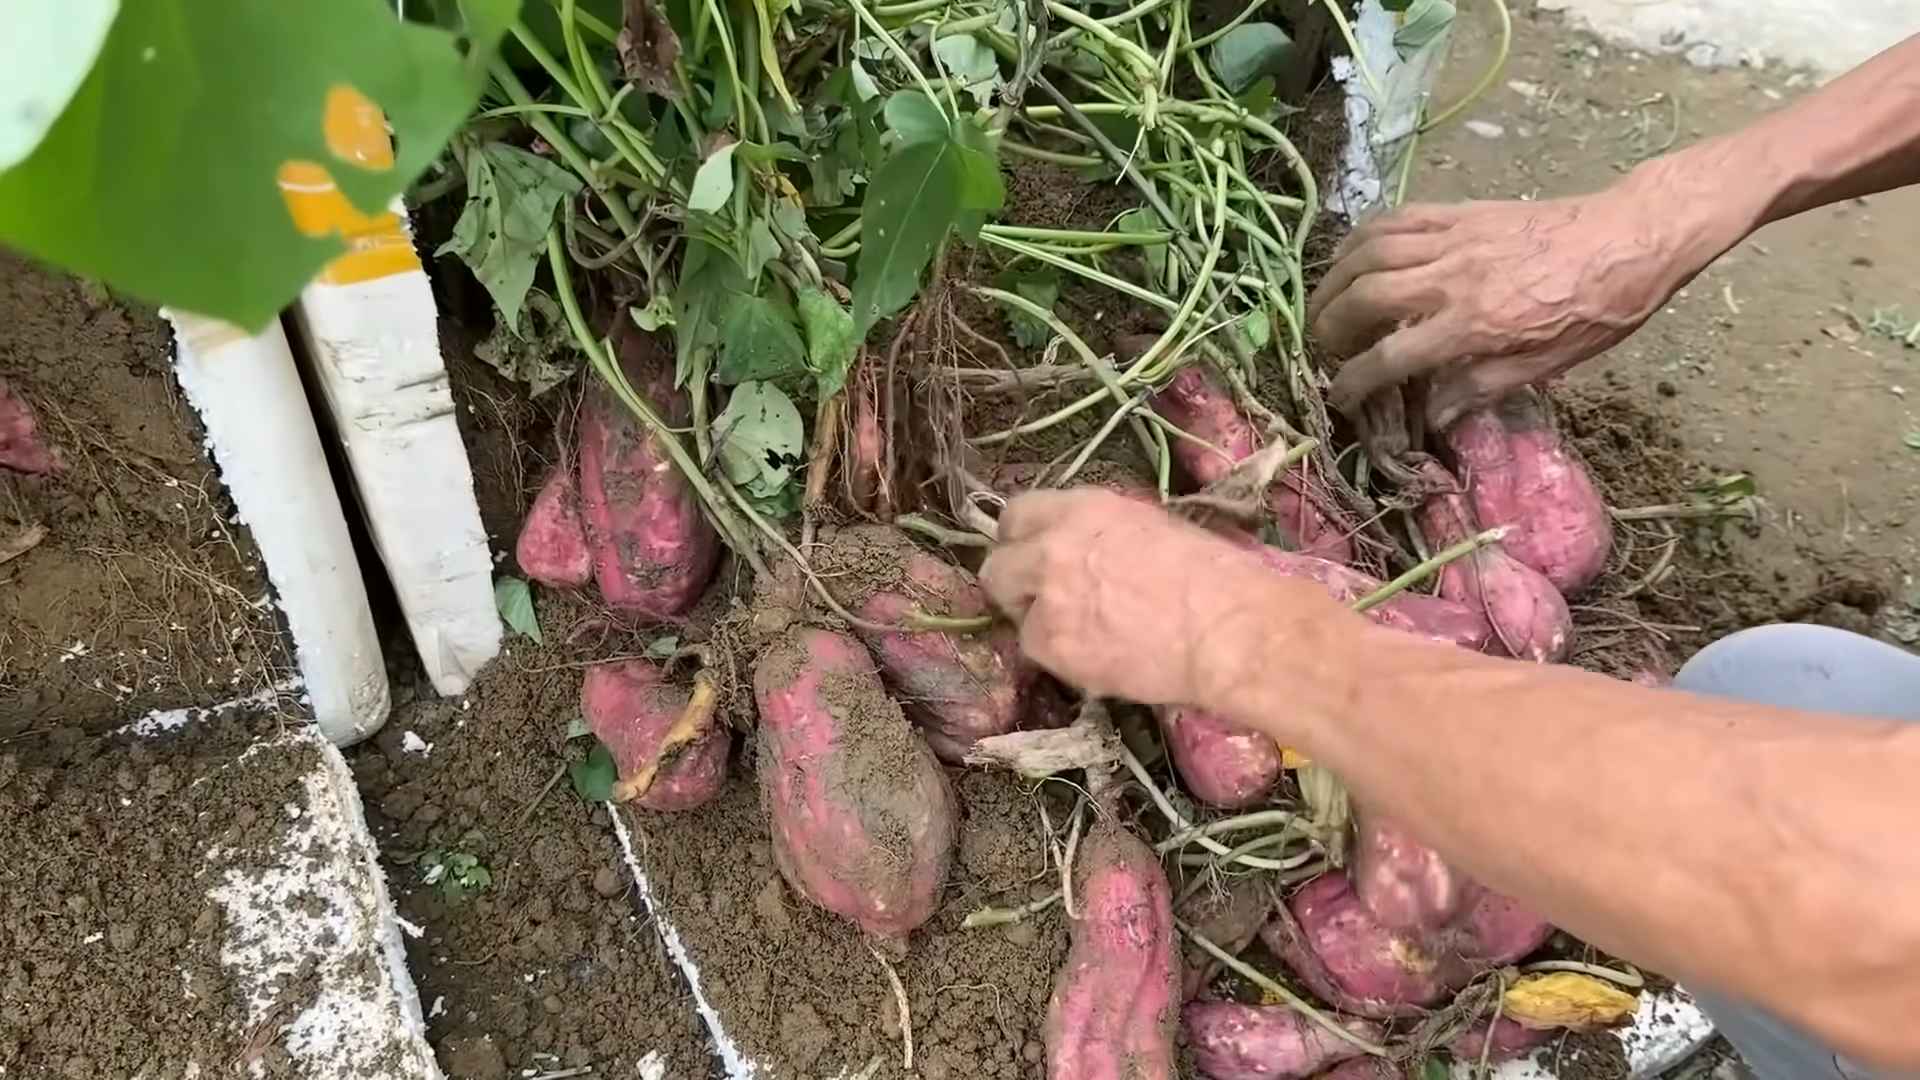
3. **Lift the Potatoes:** Once the soil is loosened, gently lift the plant from the ground using the garden fork. Be careful not to force it, as this could damage the potatoes. You might need to use your hands to help lift the plant and separate the potatoes from the soil.
4. **Uncover Hidden Potatoes:** Sweet potatoes can grow quite far from the main plant, so use your trowel to carefully dig around the area where the plant was growing. You might be surprised to find some hidden treasures!
5. **Handle with Care:** Sweet potatoes bruise easily, so handle them with care. Gently brush off any excess dirt with your soft brush. Avoid washing them at this stage, as this can promote rot during curing.
6. **Sort Your Harvest:** Separate the potatoes into three categories:
* **Perfect Potatoes:** These are the ones that are undamaged and have a smooth skin. These are ideal for curing and long-term storage.
* **Slightly Damaged Potatoes:** These are potatoes that have minor cuts or bruises. These should be used within a few weeks.
* **Heavily Damaged Potatoes:** These are potatoes that are severely cut or bruised. These should be used immediately.
7. **Curing Sweet Potatoes:** Curing is essential for improving the flavor and storage life of your sweet potatoes. It allows the skins to harden and heal any minor wounds.
* **Find a Warm, Humid Place:** The ideal curing environment is a warm, humid place with a temperature of 80-85掳F (27-29掳C) and a humidity level of 85-90%. A greenhouse, sunroom, or even a warm bathroom can work.
* **Arrange the Potatoes:** Place the perfect potatoes in a single layer in cardboard boxes or baskets. Make sure they are not touching each other to allow for good air circulation.
* **Maintain Humidity:** If the humidity is too low, you can increase it by placing a pan of water in the curing area or using a humidifier.
* **Cure for 7-10 Days:** Cure the potatoes for 7-10 days, or until the skins are hard and the flesh is slightly sweeter.
8. **Storing Sweet Potatoes:** After curing, store your sweet potatoes in a cool, dark, and dry place with a temperature of 55-60掳F (13-16掳C). A basement or root cellar is ideal.
* **Avoid Refrigeration:** Do not store sweet potatoes in the refrigerator, as this will cause them to develop a hard core and lose their flavor.
* **Store in Baskets or Boxes:** Place the cured sweet potatoes in baskets or boxes, making sure they are not touching each other.
* **Check Regularly:** Check your sweet potatoes regularly for signs of rot. Remove any potatoes that are starting to spoil to prevent the rot from spreading.
Troubleshooting Common Problems
Even with the best planning, things can sometimes go wrong. Here are a few common problems you might encounter and how to deal with them:
* **Potatoes are too small:** This could be due to several factors, including planting too late, not enough water, or poor soil. Make sure to plant your slips at the right time, provide adequate water, and amend your soil with compost or other organic matter.
* **Potatoes are cracked:** This is often caused by inconsistent watering. Try to maintain consistent soil moisture throughout the growing season.
* **Potatoes are rotting:** This could be due to frost damage, improper curing, or poor storage conditions. Make sure to harvest before frost, cure your potatoes properly, and store them in a cool, dark, and dry place.
* **Pest Damage:** Sweet potatoes can be susceptible to pests like sweet potato weevils. Use row covers to protect your plants from pests, and inspect your potatoes regularly for signs of damage.
Enjoying Your Harvest
After all your hard work, it’s time to enjoy the fruits (or rather, vegetables!) of your labor. Sweet potatoes are incredibly versatile and can be used in a variety of dishes, from sweet potato fries and casseroles to soups and stews.
Here are a few of my favorite ways to enjoy sweet potatoes:
* **Roasted Sweet Potatoes:** Toss sweet potato cubes with olive oil, salt, pepper, and your favorite herbs, and roast them in the oven until tender and slightly caramelized.
* **Sweet Potato Fries:** Cut sweet potatoes into fries, toss them with olive oil and spices, and bake or air fry them until crispy.
* **Sweet Potato Soup:** Blend cooked sweet potatoes with broth, spices, and cream for a creamy and comforting soup.
* **Sweet Potato Pie:** A classic dessert that’s perfect for holidays or any time you’re craving something sweet.
I hope this guide has helped you feel confident about harvesting your sweet potatoes. With a little planning and care, you can enjoy a bountiful harvest of these delicious and nutritious vegetables. Happy harvesting!
Conclusion
So, there you have it! Mastering these sweet potato harvesting tips isn’t just about pulling vegetables from the ground; it’s about unlocking the full potential of your garden and enjoying the fruits (or rather, roots!) of your labor. We’ve covered everything from recognizing the telltale signs of readiness to employing the gentlest digging techniques to ensure a bountiful and bruise-free harvest.
Why is this a must-try? Because store-bought sweet potatoes simply can’t compare to the vibrant flavor and freshness of homegrown ones. Imagine the satisfaction of serving a sweet potato pie made with ingredients you nurtured from seed to table. Think of the delicious roasted sweet potato wedges, the creamy sweet potato soup, or even sweet potato fries, all bursting with a natural sweetness that you just won’t find in the supermarket. Plus, knowing exactly where your food comes from and how it was grown provides a peace of mind that’s priceless.
But the benefits extend beyond just taste. Harvesting your own sweet potatoes allows you to control the entire process, from choosing organic fertilizers to avoiding harmful pesticides. You’re not only feeding yourself and your family healthier food, but you’re also contributing to a more sustainable and environmentally friendly way of life.
Don’t be afraid to experiment! Try different varieties of sweet potatoes to discover your favorites. Beauregard, with its classic orange flesh, is a reliable choice, but consider branching out to try the Japanese sweet potato with its purple skin and white flesh, or the Okinawan sweet potato, known for its vibrant purple interior and subtly sweet flavor. You can also adjust the curing process to achieve different textures and sweetness levels. Some people prefer a shorter curing period for a firmer sweet potato, while others prefer a longer cure for a softer, sweeter result.
And speaking of variations, consider companion planting next year to further enhance your sweet potato harvest. Marigolds can help deter nematodes, while beans can fix nitrogen in the soil, benefiting your sweet potatoes.
The key takeaway is this: Harvesting your own sweet potatoes is a rewarding experience that connects you to the earth and provides you with delicious, nutritious food. It’s a skill that you can pass down to future generations, fostering a love of gardening and a respect for the natural world.
We encourage you to put these sweet potato harvesting tips into practice and share your experiences with us! Did you try a particular variety? Did you encounter any challenges? What are your favorite ways to prepare your homegrown sweet potatoes? Let us know in the comments below! Your insights can help other gardeners learn and grow, creating a community of passionate sweet potato enthusiasts. So, grab your gardening gloves, head out to your patch, and get ready to reap the rewards of your hard work. Happy harvesting!
Frequently Asked Questions (FAQ)
When is the absolute best time to harvest my sweet potatoes?
Determining the precise moment for harvesting sweet potatoes is crucial for optimal flavor and storage. While the general guideline is around 90-120 days after planting, several factors can influence this timeline. Keep a close eye on the foliage. When the vines begin to yellow and the leaves start to turn brown, it’s a strong indication that the sweet potatoes are nearing maturity. However, don’t rely solely on the foliage. A light frost can also signal harvest time, even if the vines are still relatively green. The frost will damage the vines, halting the growth of the sweet potatoes. It’s best to harvest before a hard freeze, as this can damage the potatoes themselves. To confirm readiness, carefully dig around the edge of a plant and gently unearth a few sweet potatoes. Look for smooth, firm skin and a good size. If they appear small or the skin is thin and easily damaged, give them a bit more time. Remember, it’s better to harvest slightly early than to risk frost damage.
How do I properly cure my sweet potatoes after harvesting?
Curing is an essential step in the sweet potato harvesting process, as it allows the skins to harden and the starches to convert to sugars, resulting in a sweeter, more flavorful potato that stores better. The ideal curing environment is warm and humid. Aim for a temperature of 80-85掳F (27-29掳C) and a humidity level of 85-90%. This can be achieved in a well-ventilated room, a greenhouse, or even a shed with a heater and humidifier. Gently place the unwashed sweet potatoes in a single layer in crates or boxes, ensuring they are not touching each other. Avoid piling them on top of each other, as this can hinder proper air circulation. Cure them for 7-10 days, monitoring the temperature and humidity regularly. After curing, store the sweet potatoes in a cool, dark, and well-ventilated place, such as a root cellar or a cool pantry. The ideal storage temperature is around 55-60掳F (13-16掳C). Avoid storing them in the refrigerator, as this can cause them to develop a hard core and lose their flavor.
What are some common mistakes to avoid when harvesting sweet potatoes?
Several common mistakes can negatively impact your sweet potato harvest. One of the biggest is being too rough when digging. Sweet potatoes are delicate and easily bruised, so handle them with care. Use a spading fork or garden fork to gently loosen the soil around the plants, and then carefully lift the potatoes out of the ground. Avoid using a shovel, as it’s more likely to damage the potatoes. Another mistake is washing the sweet potatoes immediately after harvesting. Washing them can remove the protective layer of soil and increase the risk of rot. Instead, gently brush off any excess dirt and allow them to dry before curing. Failing to cure the sweet potatoes properly is another common error. Curing is essential for proper storage and flavor development, so don’t skip this step. Finally, storing sweet potatoes in a cold or damp environment can lead to spoilage. Ensure they are stored in a cool, dark, and well-ventilated place.
Can I eat sweet potatoes that have been slightly damaged during harvesting?
Yes, you can eat sweet potatoes that have been slightly damaged during harvesting, but it’s important to handle them properly. If the damage is minor, such as a small scratch or bruise, simply cut away the damaged area before cooking. However, if the damage is more extensive, or if the sweet potato shows signs of rot or mold, it’s best to discard it. Damaged sweet potatoes are more susceptible to spoilage, so it’s important to use them as soon as possible. Don’t store them with your other sweet potatoes, as they can contaminate the entire batch. Instead, cook them immediately or freeze them for later use. When cooking damaged sweet potatoes, be sure to cook them thoroughly to kill any bacteria that may be present.
What if I don’t have a root cellar for storing my sweet potatoes?
Not everyone has the luxury of a root cellar, but don’t worry, you can still successfully store your sweet potatoes without one. The key is to find a cool, dark, and well-ventilated space in your home. A cool pantry, an unheated basement, or even a closet in a cool room can work well. The ideal storage temperature is around 55-60掳F (13-16掳C). Avoid storing them near heat sources, such as ovens or radiators. Place the cured sweet potatoes in a single layer in crates or boxes, ensuring they are not touching each other. You can also wrap them individually in newspaper to help prevent them from drying out. Check them regularly for signs of spoilage, and remove any that are starting to rot. With proper care, you can store your sweet potatoes for several months without a root cellar.


Leave a Comment