
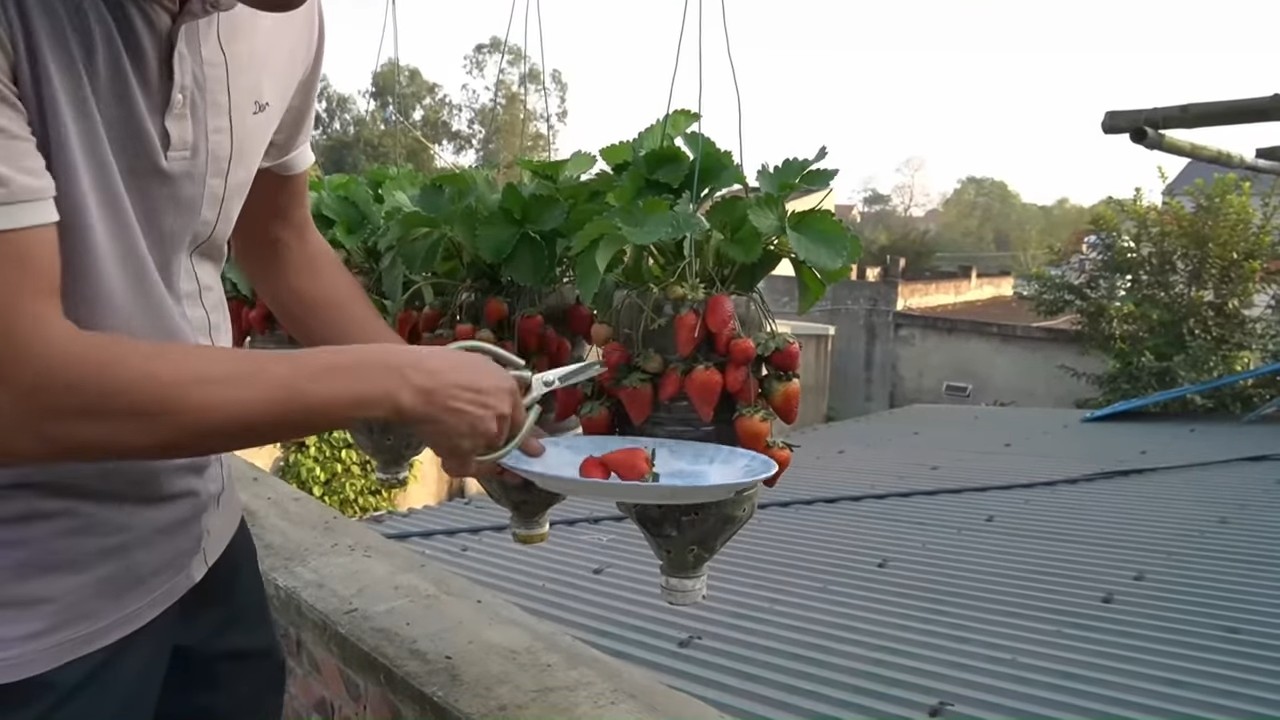
Strawberry plastic bottle gardening: who knew turning trash into treasure could be so delicious? I’m so excited to share this incredibly rewarding and surprisingly simple DIY project with you! Forget those expensive planters and cramped garden beds – we’re about to unlock a world of fresh, juicy strawberries using something you probably already have lying around: plastic bottles!
Vertical gardening, the concept behind our plastic bottle strawberry patch, has roots stretching back centuries. Think of the Hanging Gardens of Babylon, one of the Seven Wonders of the Ancient World! While we might not be building anything quite so grand, we’re tapping into that same ingenious spirit of maximizing space and bringing nature into our lives. For centuries, people have sought creative ways to cultivate plants in limited areas, and this method is a modern, eco-friendly twist on that tradition.
Why should you try this strawberry plastic bottle gardening hack? Well, imagine stepping outside your door and plucking a sun-ripened strawberry straight from your own homemade garden. No more trips to the grocery store for those often-disappointing, flavorless berries! Plus, this project is perfect for anyone with limited space, whether you live in an apartment with a small balcony or just want to add a touch of green to your patio. It’s also a fantastic way to recycle those plastic bottles, reducing waste and doing your part for the environment. I’m telling you, it’s a win-win-win! Let’s get started and transform those bottles into a thriving strawberry paradise!
Erdbeer-Garten aus Plastikflaschen: Eine DIY-Anleitung
Hallo liebe Gartenfreunde! Habt ihr auch so wenig Platz im Garten oder auf dem Balkon, aber trotzdem Lust auf frische Erdbeeren? Dann habe ich hier die perfekte Lösung für euch: einen Erdbeer-Garten aus Plastikflaschen! Das ist nicht nur super platzsparend, sondern auch eine tolle Möglichkeit, Plastik wiederzuverwerten und gleichzeitig leckere Früchte zu ernten. Los geht’s!
Was du brauchst:
* Mehrere Plastikflaschen (am besten 1,5 oder 2 Liter)
* Ein scharfes Messer oder eine Schere
* Einen Bohrer oder einen Nagel
* Erde (am besten Erdbeer- oder Gemüseerde)
* Erdbeerpflanzen (am besten immertragende Sorten)
* Kies oder Blähton (für die Drainage)
* Eine Schnur oder Draht (zum Aufhängen)
* Gießkanne
* Handschuhe (optional, aber empfehlenswert)
Vorbereitung der Flaschen
Bevor wir mit dem Bepflanzen loslegen können, müssen wir die Plastikflaschen vorbereiten. Das ist aber gar nicht so schwer, versprochen!
1. Reinigung: Zuerst solltet ihr die Plastikflaschen gründlich reinigen. Entfernt alle Etiketten und spült sie mit warmem Wasser und Spülmittel aus. Achtet darauf, dass keine Spülmittelreste zurückbleiben.
2. Löcher bohren: Jetzt kommt der Bohrer oder Nagel zum Einsatz. Wir brauchen Löcher für die Drainage und für die Erdbeerpflanzen.
* Drainagelöcher: Bohrt oder stecht mehrere kleine Löcher in den Boden jeder Flasche. Das ist wichtig, damit überschüssiges Wasser ablaufen kann und die Wurzeln nicht faulen.
* Pflanzlöcher: Schneidet oder bohrt Löcher in die Seiten der Flaschen. Die Größe der Löcher hängt von der Größe eurer Erdbeerpflanzen ab. Sie sollten groß genug sein, damit die Pflanzen gut hineinpassen, aber nicht so groß, dass die Erde herausfällt. Ich empfehle, mit kleineren Löchern anzufangen und sie bei Bedarf zu vergrößern. Plant die Löcher so, dass sie versetzt angeordnet sind, damit die Pflanzen genügend Platz haben.
3. Aufhängung vorbereiten: Wenn ihr die Flaschen aufhängen möchtet, müsst ihr jetzt Löcher für die Aufhängung bohren. Bohrt zwei Löcher in den oberen Rand jeder Flasche, gegenüberliegend voneinander. Durch diese Löcher fädelt ihr später die Schnur oder den Draht.
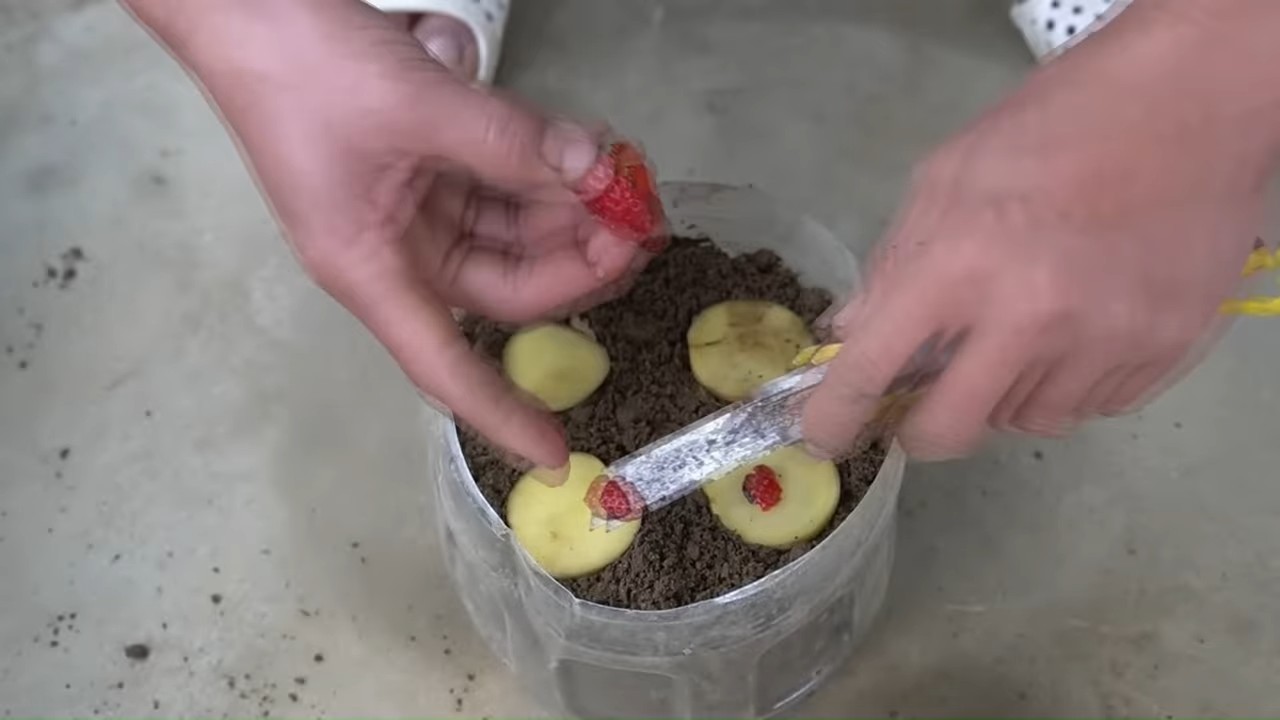
Bepflanzung der Flaschen
Jetzt kommt der spaßige Teil: das Bepflanzen!
1. Drainage einfüllen: Füllt eine Schicht Kies oder Blähton in den Boden jeder Flasche. Das sorgt für eine gute Drainage und verhindert Staunässe.
2. Erde einfüllen: Füllt die Flaschen mit Erde. Lasst oben etwa 2-3 cm Platz, damit ihr beim Gießen nicht gleich alles überschwemmt.
3. Erdbeerpflanzen einsetzen: Nehmt die Erdbeerpflanzen vorsichtig aus ihren Töpfen und lockert die Wurzeln etwas auf. Setzt die Pflanzen in die vorbereiteten Löcher an den Seiten der Flaschen. Achtet darauf, dass die Wurzeln gut mit Erde bedeckt sind. Füllt bei Bedarf noch etwas Erde nach.
4. Obere Bepflanzung: Pflanzt auch oben in die Flasche eine Erdbeerpflanze. Hier könnt ihr die Pflanze mittig setzen und die Erde gut andrücken.
5. Angießen: Gießt die frisch bepflanzten Flaschen gründlich an. Das hilft den Pflanzen, sich zu akklimatisieren und die Wurzeln zu festigen.
Aufhängen oder Aufstellen
Je nachdem, ob ihr die Flaschen aufhängen oder aufstellen möchtet, gibt es jetzt verschiedene Möglichkeiten.
* Aufhängen: Fädelt die Schnur oder den Draht durch die Löcher am oberen Rand der Flaschen. Knotet die Schnur oder den Draht fest, sodass die Flaschen sicher hängen. Achtet darauf, dass die Aufhängung stabil ist und das Gewicht der bepflanzten Flaschen tragen kann. Ihr könnt die Flaschen an einem Balkongeländer, einem Zaun oder einem stabilen Ast aufhängen.
* Aufstellen: Wenn ihr die Flaschen aufstellen möchtet, könnt ihr sie einfach auf den Boden stellen oder auf einem Regal platzieren. Achtet darauf, dass sie einen stabilen Stand haben und nicht umfallen können. Ihr könnt die Flaschen auch in einer Reihe aufstellen, um einen kleinen Erdbeer-Garten zu schaffen.
Pflege der Erdbeerpflanzen
Damit eure Erdbeerpflanzen gut gedeihen und viele leckere Früchte tragen, ist die richtige Pflege wichtig.
1. Gießen: Erdbeerpflanzen brauchen regelmäßig Wasser, besonders während der Blütezeit und der Fruchtreife. Gießt die Pflanzen, wenn die Erde sich trocken anfühlt. Vermeidet Staunässe, da dies zu Wurzelfäule führen kann. Am besten gießt ihr die Pflanzen am Morgen, damit die Blätter über den Tag abtrocknen können.
2. Düngen: Erdbeerpflanzen sind Starkzehrer und brauchen ausreichend Nährstoffe. Düngt die Pflanzen regelmäßig mit einem speziellen Erdbeerdünger oder einem organischen Dünger. Achtet auf die Dosierungsanleitung des Herstellers.
3. Sonneneinstrahlung: Erdbeerpflanzen lieben die Sonne. Stellt oder hängt die Flaschen an einen sonnigen Standort, an dem die Pflanzen mindestens 6 Stunden Sonne pro Tag bekommen.
4. Schutz vor Schädlingen: Erdbeerpflanzen können von verschiedenen Schädlingen befallen werden, wie z.B. Schnecken, Blattläuse oder Erdbeermilben. Kontrolliert die Pflanzen regelmäßig auf Schädlinge und bekämpft sie bei Bedarf mit geeigneten Mitteln. Ihr könnt auch natürliche Feinde der Schädlinge einsetzen, wie z.B. Marienkäfer gegen Blattläuse.
5. Ausgeizen: Entfernt regelmäßig alte und vertrocknete Blätter, um die Pflanzen gesund zu halten und die Bildung neuer Früchte zu fördern.
6. Überwinterung: Immertragende Erdbeersorten können auch im Winter draußen bleiben, solange sie vor starkem Frost geschützt werden. Stellt die Flaschen an einen geschützten Ort oder deckt sie mit Vlies ab. Gießt die Pflanzen auch im Winter gelegentlich, aber weniger als im Sommer.
Zusätzliche Tipps
* Sortenwahl: Wählt am besten immertragende Erdbeersorten, da diese den ganzen Sommer über Früchte tragen. Es gibt viele verschiedene Sorten, die sich in Geschmack, Größe und Ertrag unterscheiden. Informiert euch vor dem Kauf, welche Sorte am besten zu euren Bedürfnissen passt.
* Erde: Verwendet am besten spezielle Erdbeer- oder Gemüseerde, da diese die richtigen Nährstoffe für Erdbeerpflanzen enthält. Ihr könnt die Erde auch selbst mischen, indem ihr Gartenerde mit Kompost und Sand vermischt.
* Dekoration: Ihr könnt die Plastikflaschen auch bemalen oder mit anderen Materialien dekorieren, um euren Erdbeer-Garten noch individueller zu gestalten. Lasst eurer Kreativität freien Lauf!
* Vertikale Gärten: Wenn ihr noch mehr Platz sparen möchtet, könnt ihr mehrere Flaschen übereinander anordnen und einen vertikalen Erdbeer-Garten schaffen. Befestigt die Flaschen einfach mit Draht oder Kabelbindern an einer Wand oder einem Zaun.
Ich hoffe, diese Anleitung hilft euch dabei, euren eigenen Erdbeer-Garten aus Plastikflaschen zu gestalten. Viel Spaß beim Gärtnern und guten Appetit!
Conclusion
So, there you have it! Transforming ordinary plastic bottles into a thriving vertical strawberry garden is not just a fun project; it’s a sustainable, space-saving, and incredibly rewarding way to enjoy fresh, homegrown strawberries. This DIY trick offers a multitude of benefits, from reducing plastic waste to providing you with a constant supply of delicious berries right at your doorstep (or balcony!).
Why is this a must-try? Because it’s accessible to everyone, regardless of their gardening experience or the size of their living space. You don’t need acres of land or expensive equipment to cultivate your own little strawberry paradise. All you need are some plastic bottles, soil, strawberry seedlings, and a little bit of patience. The satisfaction of harvesting your own juicy, red strawberries, knowing you nurtured them from tiny seedlings in repurposed materials, is truly unparalleled.
Beyond the basic setup, there’s plenty of room for creativity and customization. Consider painting your plastic bottles with vibrant colors to add a touch of personality to your vertical garden. Experiment with different types of strawberries, such as everbearing varieties for a continuous harvest throughout the growing season. You could even incorporate other herbs or small vegetables into the same system, creating a miniature vertical ecosystem. Think about adding companion plants like basil or marigolds to deter pests naturally.
For those with limited sunlight, consider using grow lights to supplement natural light and ensure your strawberries receive the energy they need to thrive. You can also adjust the watering frequency based on your local climate and the type of soil you’re using. Remember to monitor your plants regularly for any signs of pests or diseases and take appropriate action to keep them healthy.
We wholeheartedly encourage you to embark on this exciting DIY adventure. It’s a fantastic way to connect with nature, reduce your environmental footprint, and enjoy the simple pleasure of growing your own food. The beauty of this project lies in its adaptability and the opportunity to learn and experiment along the way.
Don’t be afraid to get your hands dirty and embrace the challenges that may arise. Gardening is a journey, not a destination, and every mistake is a learning opportunity. The rewards, however, are well worth the effort. Imagine the joy of sharing your homegrown strawberries with friends and family, knowing that you created something beautiful and sustainable with your own two hands.
So, gather your supplies, unleash your creativity, and get ready to transform those plastic bottles into a flourishing **strawberry plastic bottle gardening** masterpiece. We’re confident that you’ll be amazed by the results.
And most importantly, we want to hear about your experience! Share your photos, tips, and stories with us in the comments below. Let’s create a community of passionate DIY gardeners who are committed to making the world a greener and more delicious place, one strawberry at a time. We can’t wait to see what you create!
Frequently Asked Questions (FAQ)
What type of plastic bottles are best for strawberry plastic bottle gardening?
The ideal plastic bottles are those that are sturdy and can hold a good amount of soil. Two-liter soda bottles or larger water bottles work well. Make sure to thoroughly clean the bottles before using them to remove any residue that could harm your plants. Avoid using bottles that have contained harsh chemicals. Clear or translucent bottles are preferable as they allow you to monitor the soil moisture levels. Darker bottles can heat up excessively in direct sunlight, potentially damaging the roots.
How do I prepare the plastic bottles for planting?
First, thoroughly wash and dry the bottles. Then, cut holes in the sides of the bottles for planting the strawberry seedlings. The size and number of holes will depend on the size of the bottle and the number of plants you want to grow. Make sure the holes are large enough to accommodate the roots of the seedlings but not so large that the soil falls out. You’ll also need to create drainage holes in the bottom of each bottle to prevent waterlogging. A few small holes will suffice. Finally, consider painting the bottles with a light-colored, non-toxic paint to reflect sunlight and prevent overheating.
What type of soil should I use for my strawberry plastic bottle garden?
A well-draining potting mix is essential for successful strawberry plastic bottle gardening. Avoid using garden soil, as it can become compacted and doesn’t provide adequate drainage. A mix of peat moss, perlite, and vermiculite is a good option. You can also add compost to enrich the soil and provide essential nutrients. Ensure the soil is slightly acidic, as strawberries prefer a pH between 5.5 and 6.5. You can test the soil pH using a soil testing kit and amend it accordingly.
How often should I water my strawberry plants in plastic bottles?
The watering frequency will depend on several factors, including the climate, the type of soil, and the size of the bottles. Generally, you should water your strawberry plants when the top inch of soil feels dry to the touch. Avoid overwatering, as this can lead to root rot. During hot, dry weather, you may need to water more frequently. In cooler, wetter weather, you may need to water less often. A good rule of thumb is to water deeply and thoroughly, allowing the excess water to drain out of the drainage holes.
How much sunlight do strawberry plants need in a plastic bottle garden?
Strawberry plants need at least six to eight hours of direct sunlight per day to thrive. Choose a location for your plastic bottle garden that receives plenty of sunlight. If you don’t have a sunny spot, you can supplement with grow lights. Position the grow lights about 12-18 inches above the plants and keep them on for 12-14 hours per day. Rotate the bottles regularly to ensure that all sides of the plants receive adequate sunlight.
What kind of fertilizer should I use for my strawberry plants?
Strawberries are heavy feeders and benefit from regular fertilization. Use a balanced fertilizer specifically formulated for strawberries or other fruiting plants. Follow the instructions on the fertilizer package carefully. Avoid over-fertilizing, as this can burn the roots. You can also use organic fertilizers, such as compost tea or fish emulsion. Apply fertilizer every two to four weeks during the growing season.
How do I protect my strawberry plants from pests and diseases?
Regularly inspect your strawberry plants for signs of pests or diseases. Common pests include aphids, spider mites, and slugs. You can control these pests with insecticidal soap, neem oil, or diatomaceous earth. Diseases such as powdery mildew and gray mold can be prevented by providing good air circulation and avoiding overwatering. Remove any infected leaves or fruit promptly. Consider using companion plants like marigolds or basil to deter pests naturally.
How do I overwinter my strawberry plants in plastic bottles?
In colder climates, you’ll need to protect your strawberry plants from freezing temperatures. Move the plastic bottle garden to a sheltered location, such as a garage or shed. Water sparingly during the winter months, only enough to keep the soil from completely drying out. You can also insulate the bottles with burlap or bubble wrap to provide extra protection. In the spring, gradually acclimate the plants to outdoor conditions before moving them back to their sunny location.
Can I grow other plants besides strawberries in plastic bottles?
Yes, you can grow a variety of other plants in plastic bottles, including herbs, vegetables, and flowers. Some good options include lettuce, spinach, kale, basil, mint, and petunias. Choose plants that have similar growing requirements to strawberries, such as well-draining soil and plenty of sunlight. Consider the size of the plants and the size of the bottles when making your selection.
How long does it take for strawberries to grow in a plastic bottle garden?
The time it takes for strawberries to grow and produce fruit will depend on the variety of strawberry, the growing conditions, and the size of the seedlings. Generally, you can expect to harvest your first strawberries within a few months of planting. Everbearing varieties will produce fruit throughout the growing season, while June-bearing varieties will produce a large crop in the spring. Be patient and provide your plants with the care they need, and you’ll be rewarded with a bountiful harvest of delicious strawberries.
Leave a Comment