
Growing Celery Indoors might seem like a challenge reserved for seasoned gardeners, but I’m here to tell you it’s totally achievable, even if you’re a beginner like I once was! Forget those bland, store-bought stalks – imagine crisp, flavorful celery, fresh from your own indoor garden, ready to add a delightful crunch to your salads, soups, and snacks.
Celery, with its origins tracing back to the Mediterranean, has been enjoyed for centuries, not just for its taste but also for its medicinal properties. Historically, it was used in ancient remedies and even as a decorative element. Now, you can bring this piece of history into your home and enjoy its fresh goodness year-round.
Why bother growing celery indoors? Well, for starters, you have complete control over the growing environment, shielding your plants from pests and unpredictable weather. Plus, it’s incredibly rewarding to nurture something from a humble stalk to a thriving plant. In this article, I’ll share my favorite DIY tricks and hacks to help you successfully grow celery indoors, regardless of your experience level. We’ll cover everything from choosing the right container and soil to providing the perfect amount of light and water. Get ready to embark on a fun and fulfilling gardening adventure!
Growing Celery Indoors: A Beginner’s Guide
Hey there, fellow plant enthusiasts! Ever thought about growing your own celery indoors? It’s totally doable, and honestly, there’s something incredibly satisfying about snipping off fresh stalks for your soups, salads, or just a healthy snack. I’m going to walk you through everything you need to know to get started, from choosing the right celery to harvesting your homegrown goodness. Let’s get our hands dirty!
Choosing Your Celery and Preparing for Planting
Okay, so the first step is getting your hands on some celery. You have a couple of options here:
* Option 1: Regrowing from a Celery Base (The Easiest Method!) This is my favorite because it’s basically free and super rewarding. You know that celery you buy from the grocery store? Don’t toss the base! That’s where the magic happens.
* Option 2: Starting from Seeds. This takes longer and requires more patience, but it gives you more control over the variety of celery you grow.
Let’s dive into each option:
Regrowing from a Celery Base
1. Eat the Stalks! Seriously, enjoy your celery! But when you get to the base, don’t throw it away. Cut off the stalks about 2 inches from the bottom. You should have a solid, intact base with the root end still attached.
2. Prepare a Shallow Dish. Find a shallow dish or bowl. A pie plate works great.
3. Add Water. Fill the dish with about an inch of water.
4. Place the Celery Base. Set the celery base in the dish, cut-side up. Make sure the bottom of the base is submerged in the water.
5. Find a Sunny Spot. Place the dish in a bright, sunny windowsill. Celery loves light!
6. Change the Water Regularly. Every day or two, change the water to keep it fresh and prevent mold.
7. Watch for Growth! Within a few days, you should start to see small leaves sprouting from the center of the base. This is so exciting!
8. Wait for Roots. Once the leaves are a few inches tall and you see a good amount of root growth (about an inch or two long), it’s time to plant it in soil.
Starting from Celery Seeds
1. Choose Your Celery Variety. Do some research and decide which type of celery you want to grow. Some varieties are more heat-tolerant than others, which is important for indoor growing.
2. Start Seeds Indoors (8-10 Weeks Before Last Frost). Celery seeds are tiny and need a head start. Sow them indoors about 8-10 weeks before the last expected frost.
3. Prepare Seed Starting Trays. Fill seed starting trays or small pots with a good quality seed starting mix.
4. Sow the Seeds. Sprinkle the celery seeds on top of the soil. Don’t bury them too deep; they need light to germinate. Gently press them into the soil.
5. Water Gently. Mist the soil with water to moisten it. Be careful not to dislodge the seeds.
6. Cover with Plastic Wrap. Cover the trays with plastic wrap to create a humid environment. This helps with germination.
7. Provide Light. Place the trays under grow lights or in a very bright windowsill. Celery seeds need light to germinate.
8. Keep the Soil Moist. Check the soil daily and mist with water as needed to keep it consistently moist.
9. Remove Plastic Wrap. Once the seeds germinate (usually in 2-3 weeks), remove the plastic wrap.
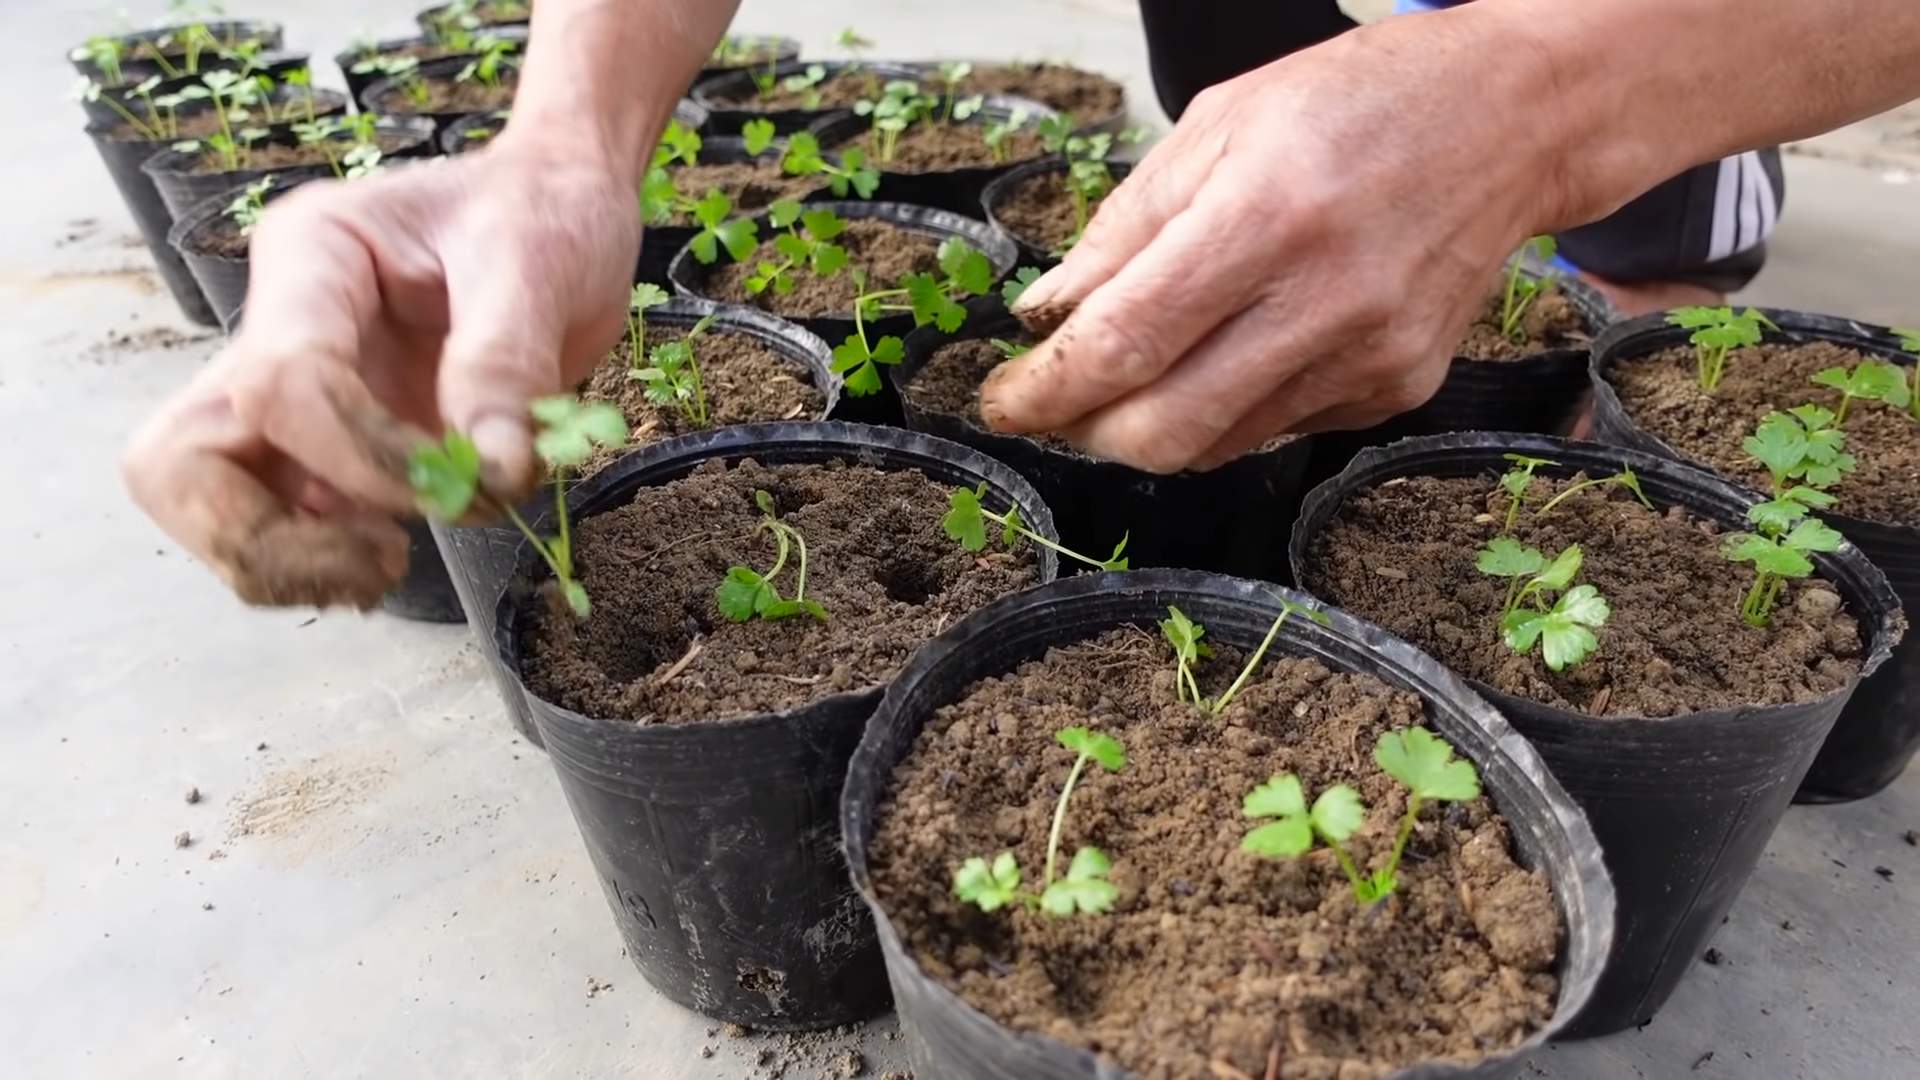
10. Thin Seedlings. Once the seedlings have a few true leaves, thin them out, leaving the strongest seedling in each cell or pot.
11. Harden Off Seedlings. Before transplanting the seedlings outdoors or into larger pots, you need to harden them off. This means gradually exposing them to outdoor conditions over a period of a week or two. Start by placing them outside for an hour or two each day, gradually increasing the time.
Planting Your Celery
Okay, whether you’re transplanting your regrown celery base or your seedlings, the planting process is pretty much the same.
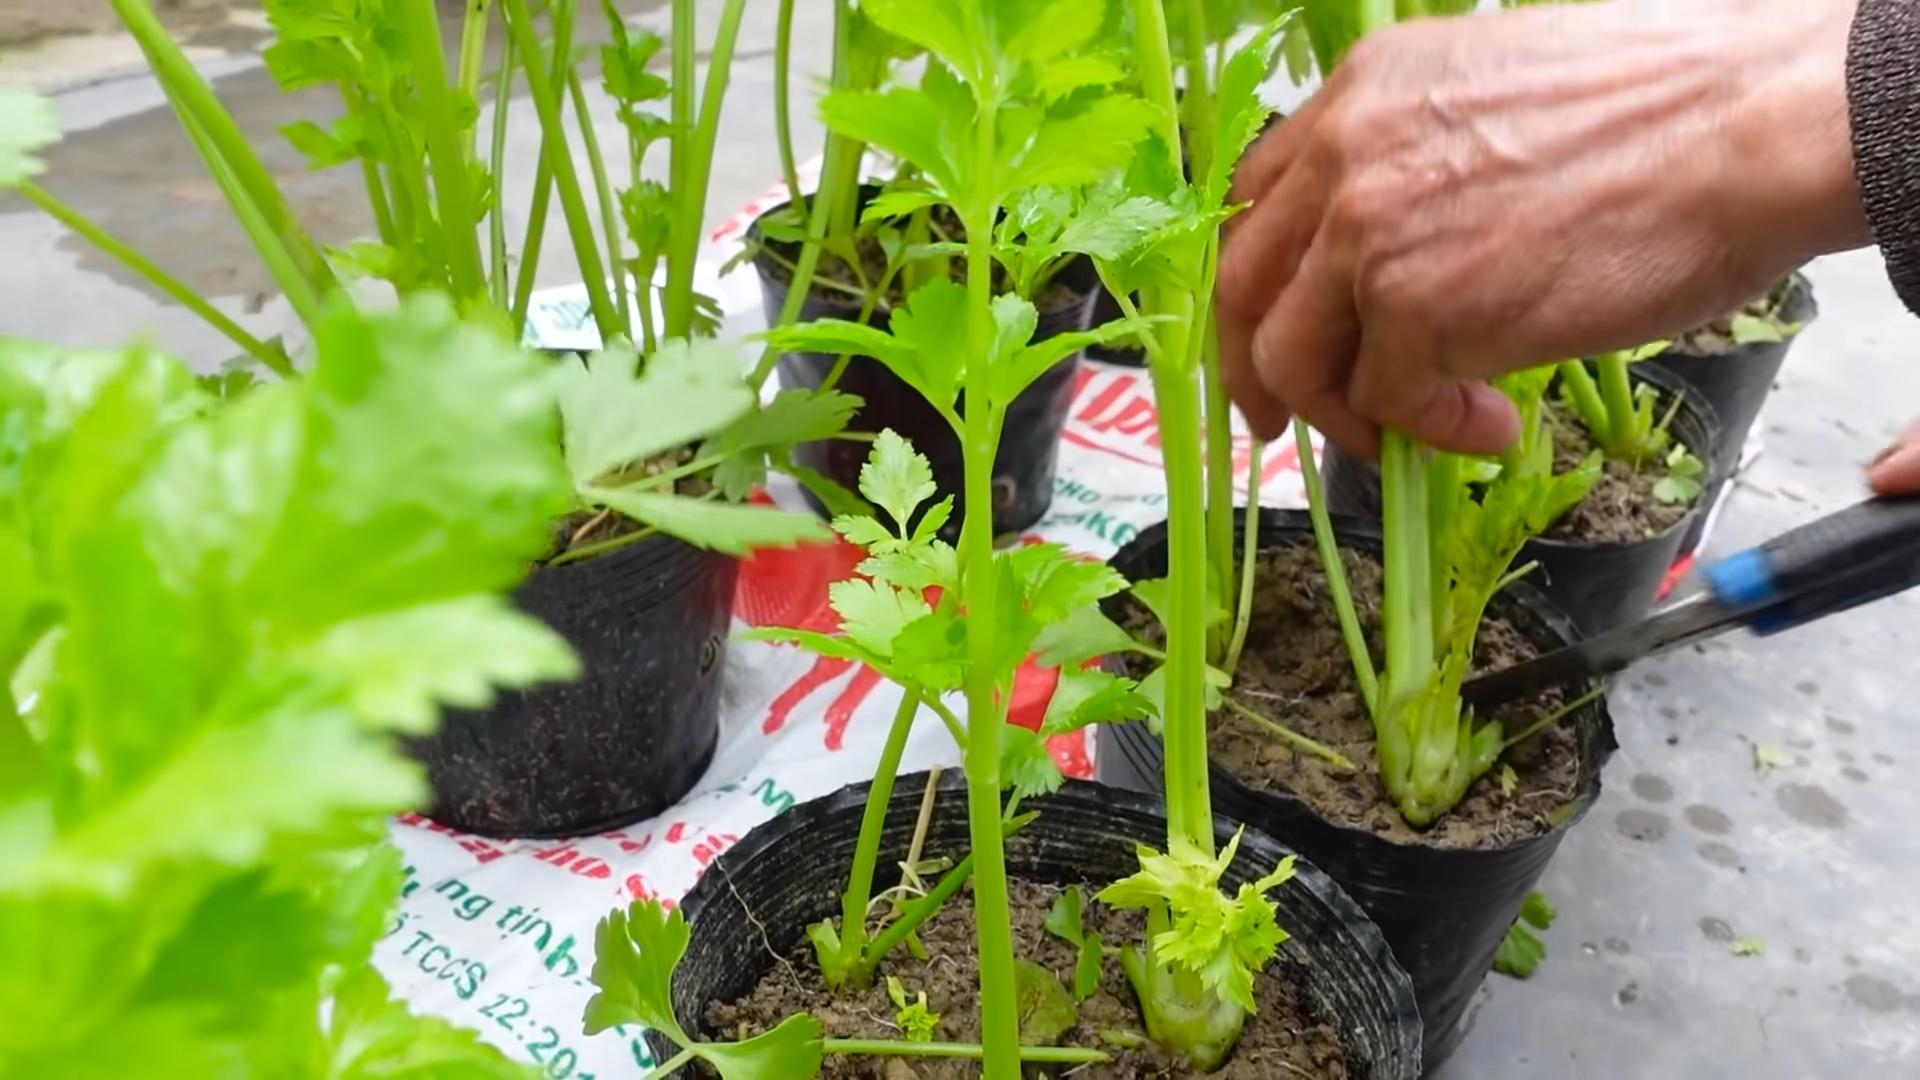
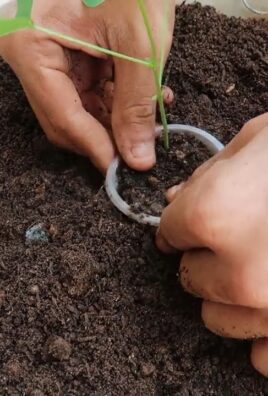
1. Choose the Right Pot. Celery needs room to grow, so choose a pot that’s at least 8-10 inches in diameter and depth.
2. Use Good Quality Potting Soil. Don’t use garden soil; it’s too heavy and doesn’t drain well. Use a good quality potting mix that’s well-draining and rich in organic matter.
3. Prepare the Pot. Fill the pot with potting soil, leaving about an inch of space at the top.
4. Make a Hole. Dig a hole in the center of the pot that’s large enough to accommodate the celery base or seedling.
5. Plant the Celery. Gently remove the celery base or seedling from its container and place it in the hole. Make sure the top of the root ball is level with the soil surface.
6. Fill in with Soil. Fill in the hole with soil and gently pat it down.
7. Water Thoroughly. Water the celery thoroughly until water drains out of the bottom of the pot.
Caring for Your Indoor Celery
Now that your celery is planted, it’s time to give it the TLC it needs to thrive.
* Light: Celery needs at least 6 hours of sunlight per day. If you don’t have a sunny windowsill, you can supplement with grow lights.
* Watering: Keep the soil consistently moist, but not soggy. Water when the top inch of soil feels dry to the touch.
* Fertilizing: Celery is a heavy feeder, so fertilize it every 2-3 weeks with a balanced liquid fertilizer. Follow the instructions on the fertilizer label.
* Temperature: Celery prefers cooler temperatures, between 60-70°F (15-21°C). Avoid placing it near heat sources.
* Humidity: Celery likes humidity, so mist it regularly with water or place a tray of water near the plant.
* Blanching (Optional): Blanching celery stalks makes them milder and less bitter. To blanch, wrap the stalks with newspaper or cardboard a few weeks before harvesting, leaving the top leaves exposed.
Dealing with Pests and Diseases
Even indoors, your celery can be susceptible to pests and diseases. Here are a few things to watch out for:
* Aphids: These tiny insects suck the sap from plants. You can control them by spraying the plants with insecticidal soap or neem oil.
* Spider Mites: These tiny pests create webs on plants and can cause the leaves to turn yellow. You can control them by spraying the plants with insecticidal soap or neem oil.
* Celery Blight: This fungal disease causes brown spots on the leaves. To prevent celery blight, provide good air circulation and avoid overhead watering. If you see signs of celery blight, remove the affected leaves and spray the plant with a fungicide.
Harvesting Your Celery
The moment we’ve all been waiting for! You can start harvesting your celery when the stalks are at least 6 inches tall.
1. Harvest Individual Stalks. The easiest way to harvest celery is to simply cut off individual stalks as you need them. Use a sharp knife to cut the stalks at the base of the plant.
2. Harvest the Whole Plant. If you want to harvest the whole plant, cut it off at the base.
3. Enjoy Your Harvest! Wash the celery stalks and enjoy them in your favorite recipes.
Troubleshooting Tips
* Celery is leggy and weak: Not enough light. Move it to a sunnier location or use grow lights.
* Leaves are yellowing: Overwatering or nutrient deficiency. Adjust watering and fertilize regularly.
* Celery is bitter: Lack of blanching or growing conditions are too hot. Try blanching the stalks or moving the plant to a cooler location.
Growing celery indoors is a fun and rewarding project. With a little patience and care, you can enjoy fresh, homegrown celery all year round. Happy gardening!
Conclusion
So, there you have it! Growing celery indoors isn’t just a quirky gardening experiment; it’s a genuinely rewarding way to enjoy fresh, crisp celery right from your kitchen, regardless of the season. We’ve walked you through the simple steps, from rescuing that celery base to nurturing it into a thriving plant. Think about the satisfaction of snipping off stalks for your salads, soups, or even just a healthy snack, knowing you cultivated them yourself.
But why is this DIY trick a must-try? Beyond the obvious benefit of having readily available celery, consider the environmental impact. Reducing your reliance on store-bought produce, often shipped long distances, contributes to a smaller carbon footprint. Plus, you have complete control over the growing process, ensuring your celery is free from harmful pesticides and chemicals. It’s a win-win for your health and the planet.
And the possibilities don’t stop there! Once you’ve mastered the basic technique, feel free to experiment with different celery varieties. Try growing Pascal celery for its classic flavor, or venture into the world of red celery for a vibrant twist. You can also adjust the growing conditions to influence the taste and texture of your celery. For a sweeter flavor, provide slightly more sunlight. For a more tender stalk, ensure consistent moisture.
Furthermore, consider companion planting. Growing celery indoors alongside herbs like parsley or chives can create a mutually beneficial environment. The herbs can help deter pests, while the celery provides shade and moisture. It’s a miniature ecosystem right on your windowsill!
Don’t be intimidated if you’re new to gardening. Growing celery indoors is surprisingly forgiving. Even if your first attempt isn’t perfect, you’ll learn valuable lessons that will improve your success rate in the future. The key is to be patient, observant, and willing to adapt your approach as needed.
We wholeheartedly encourage you to give this DIY project a try. It’s an affordable, sustainable, and incredibly satisfying way to enhance your culinary experience. Imagine the pride you’ll feel when you serve a dish featuring celery you grew yourself!
But the journey doesn’t end here. We want to hear about your experiences! Share your tips, tricks, and triumphs in the comments below. Did you encounter any challenges? What varieties of celery did you try? What innovative ways did you incorporate your homegrown celery into your meals? Your insights will not only inspire other readers but also contribute to a collective knowledge base that benefits everyone.
So, grab a celery stalk, a container of water, and get ready to embark on a rewarding gardening adventure. You might be surprised at how easy and enjoyable it is to grow your own fresh, delicious celery indoors. Happy growing!
Frequently Asked Questions (FAQ)
1. What kind of celery is best for regrowing indoors?
The best celery for regrowing indoors is typically the common celery you find at the grocery store. Look for a head of celery with a healthy, intact base. Avoid celery that is wilted, discolored, or has a mushy base, as it’s less likely to sprout. Organic celery is often preferred, as it hasn’t been treated with chemicals that might inhibit regrowth. Pascal celery is a popular variety that regrows well.
2. How long does it take to see new growth when regrowing celery?
You should start to see new growth within 5-7 days. Initially, you’ll notice small leaves emerging from the center of the celery base. Be patient, as it takes time for the roots to develop and the plant to establish itself. The speed of growth can be influenced by factors such as temperature, light, and water quality.
3. What kind of light does regrowing celery need?
Regrowing celery needs bright, indirect light. Avoid placing it in direct sunlight, especially during the hottest part of the day, as this can scorch the leaves. A spot near a window that receives morning sun or filtered light is ideal. If you don’t have access to sufficient natural light, you can supplement with a grow light.
4. How often should I water my regrowing celery?
Keep the water level in the container consistently high enough to cover the base of the celery. Change the water every 1-2 days to prevent bacterial growth and ensure the celery has access to fresh water. Once you transplant the celery to soil, water it regularly to keep the soil moist but not waterlogged.
5. When should I transplant my regrowing celery to soil?
You should transplant your regrowing celery to soil once it has developed a good root system, typically after about a week or two in water. The roots should be at least an inch or two long. Choose a pot that is at least 6 inches in diameter and fill it with well-draining potting mix. Gently remove the celery from the water and plant it in the soil, ensuring that the base of the celery is just below the soil surface.
6. What kind of soil is best for growing celery indoors?
The best soil for growing celery indoors is a well-draining potting mix that is rich in organic matter. You can also amend your potting mix with compost or aged manure to provide additional nutrients. Celery prefers a slightly acidic soil pH, around 6.0 to 6.8.
7. Can I grow celery indoors year-round?
Yes, you can grow celery indoors year-round, provided you provide it with the right conditions. This includes adequate light, consistent moisture, and a comfortable temperature. During the winter months, you may need to supplement with a grow light to ensure the celery receives enough light.
8. What are some common problems when growing celery indoors, and how can I fix them?
Some common problems when growing celery indoors include:
* **Yellowing leaves:** This can be caused by overwatering, underwatering, or nutrient deficiencies. Adjust your watering schedule and consider fertilizing with a balanced liquid fertilizer.
* **Leggy growth:** This is usually caused by insufficient light. Move your celery to a brighter location or supplement with a grow light.
* **Pests:** Celery can be susceptible to pests such as aphids and spider mites. Inspect your plants regularly and treat any infestations with insecticidal soap or neem oil.
* **Root rot:** This is caused by overwatering and poor drainage. Ensure your pot has drainage holes and avoid overwatering.
9. How do I harvest celery that I’ve grown indoors?
You can harvest celery that you’ve grown indoors by cutting off the outer stalks as needed. The plant will continue to produce new stalks from the center. Alternatively, you can harvest the entire plant by cutting it off at the base.
10. Can I eat the celery that I regrow from a store-bought stalk?
Yes, you can absolutely eat the celery that you regrow from a store-bought stalk! It will have the same flavor and nutritional value as the original celery. Just be sure to wash it thoroughly before eating. Many people find that homegrown celery has a more intense flavor than store-bought celery. Enjoy the fruits (or vegetables!) of your labor!

Leave a Comment