
Square Watermelon Growing DIY: Ever dreamt of growing watermelons that are not only delicious but also conversation starters? Imagine serving perfectly cubed slices at your next summer barbecue, eliciting gasps of amazement from your guests. It’s not magic, it’s the art of shaping nature, and I’m here to guide you through the fascinating world of square watermelon cultivation!
The concept of shaping fruits isn’t entirely new. In Japan, farmers have been perfecting the art of growing square watermelons for decades, initially as a space-saving solution for smaller refrigerators and easier stacking. These unique melons quickly became a symbol of innovation and a sought-after novelty item, often gifted as a sign of prestige.
But why should you try this square watermelon growing DIY project? Beyond the sheer novelty, it’s a fantastic way to connect with nature, learn about plant development, and impress your friends and family. Plus, it’s a rewarding challenge that adds a unique twist to your home gardening experience. In this article, I’ll break down the process into simple, easy-to-follow steps, so you can cultivate your own geometrically perfect watermelons. Let’s get started and transform your garden into a showcase of horticultural artistry!
Growing Square Watermelons: A Fun and Quirky DIY Project
Hey there, fellow gardening enthusiasts! Ever wanted to impress your friends and neighbors with something truly unique? How about growing your very own square watermelon? It might sound like something out of a sci-fi movie, but trust me, it’s totally doable with a little patience and this guide. I’m going to walk you through the whole process, step-by-step, so you can have your own geometrically-shaped fruit.
What You’ll Need
Before we dive in, let’s gather all the necessary supplies. This will make the whole process smoother and prevent any frustrating mid-project runs to the store.
* **Watermelon Seeds or Seedlings:** Choose a variety known for its smaller size and round shape. Sugar Baby or Yellow Doll are good options.
* **Square Mold:** This is the key to the whole operation! You’ll need a transparent, sturdy, and food-grade square container. The size depends on the watermelon variety you choose, but a good starting point is around 8 inches x 8 inches x 8 inches. Make sure it has drainage holes!
* **Well-Draining Soil:** Watermelons need soil that drains well to prevent root rot. A mix of compost, peat moss, and perlite works wonders.
* **Fertilizer:** A balanced fertilizer (like 10-10-10) will provide the necessary nutrients for healthy growth.
* **Water:** Consistent watering is crucial, especially during the fruiting stage.
* **Sunlight:** Watermelons need at least 6-8 hours of direct sunlight per day.
* **Gloves:** To protect your hands while working in the garden.
* **Measuring Tape:** To monitor the watermelon’s growth.
* **Optional: Small Wooden Shims:** These can be helpful for fine-tuning the fit of the watermelon within the mold.
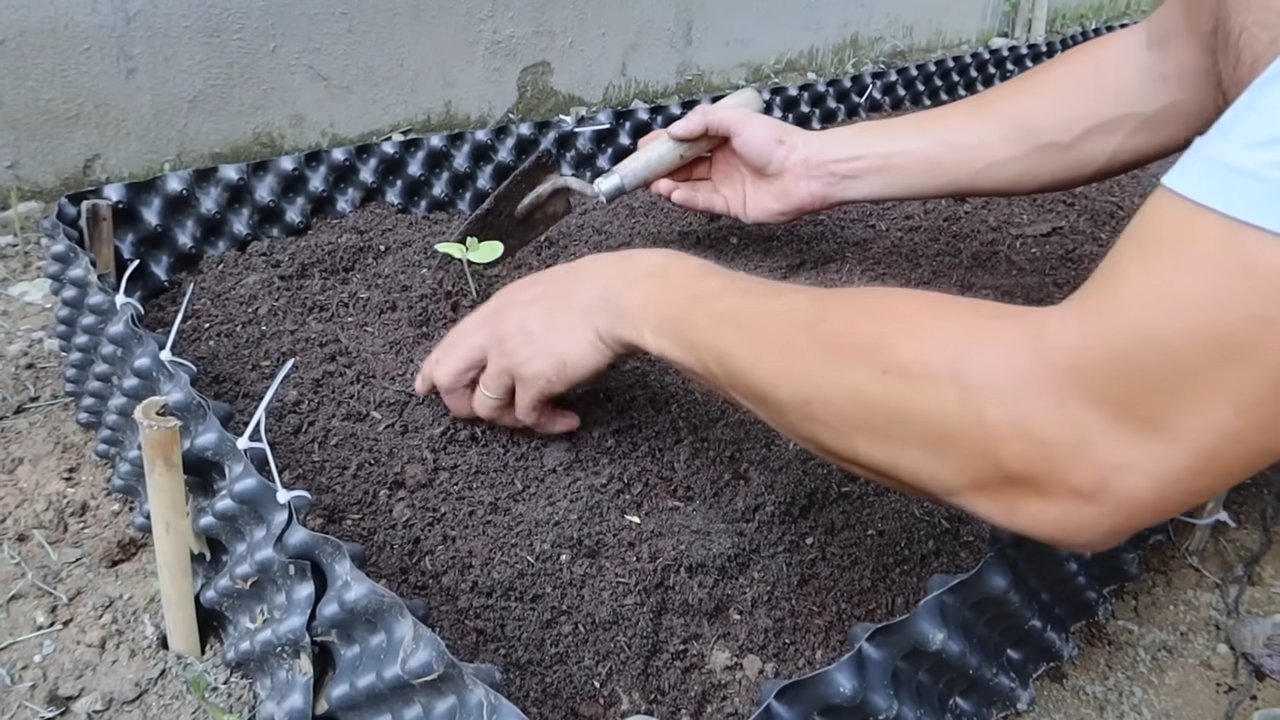
Phase 1: Getting Started – Planting and Early Growth
This phase is all about setting the stage for your square watermelon masterpiece. We need to get those seeds germinated and the seedlings off to a healthy start.
1. **Start Seeds Indoors (Optional):** While you can directly sow watermelon seeds in the ground, starting them indoors gives them a head start, especially if you live in a cooler climate. About 3-4 weeks before the last expected frost, sow the seeds in small pots filled with well-draining potting mix. Keep the soil moist and the temperature around 70-80°F (21-27°C).
2. **Prepare the Garden Bed:** Choose a sunny spot in your garden with well-draining soil. Amend the soil with compost to improve its fertility and drainage. Watermelons are heavy feeders, so rich soil is essential.
3. **Plant the Seeds or Seedlings:** If you started seeds indoors, harden off the seedlings by gradually exposing them to outdoor conditions for a week before transplanting. Plant the seeds or seedlings about 2-3 feet apart, allowing plenty of room for the vines to spread.
4. **Water Thoroughly:** After planting, water the area thoroughly to help the roots establish.
5. **Fertilize:** Apply a balanced fertilizer according to the package instructions. This will provide the young plants with the nutrients they need to grow strong.
6. **Monitor and Maintain:** Keep an eye on your watermelon plants, watering them regularly and weeding around them to prevent competition for nutrients.
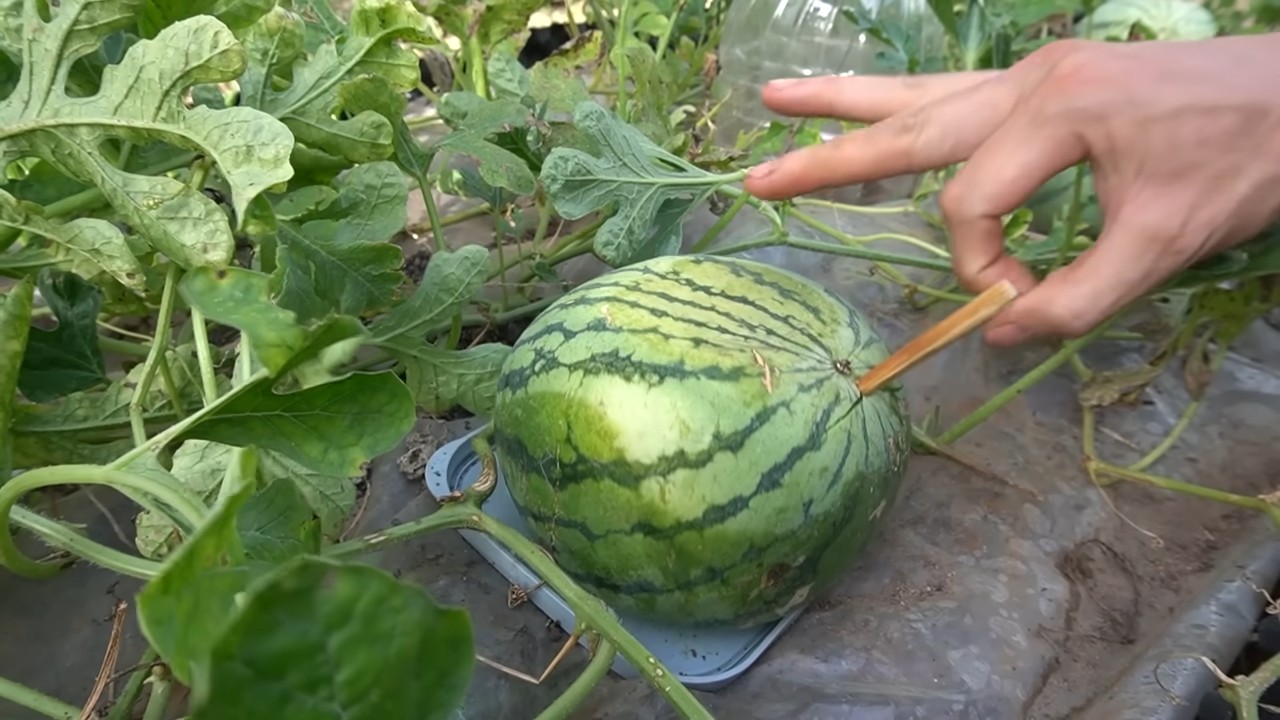
Phase 2: The Mold – Introducing the Square
This is where the magic happens! We’ll carefully introduce the square mold to the developing watermelon. Timing is key here.
1. **Choose the Right Watermelon:** Once your watermelon plants start producing fruit, select a young watermelon that is roughly spherical and about 4-6 inches in diameter. This is the ideal size for introducing the mold. It’s important to choose a healthy, undamaged watermelon.
2. **Prepare the Mold:** Clean the square mold thoroughly with soap and water to remove any dirt or debris. Ensure the drainage holes are clear.
3. **Carefully Place the Mold:** Gently position the mold around the chosen watermelon. You want the watermelon to be centered within the mold. This step requires patience and a delicate touch to avoid damaging the developing fruit.
4. **Secure the Mold (If Necessary):** Some molds come in two halves that need to be secured together. Use screws, bolts, or zip ties to securely fasten the mold around the watermelon. Make sure the mold is snug but not too tight, as this could restrict the watermelon’s growth.
5. **Monitor the Fit:** Over the next few days, check the fit of the mold regularly. As the watermelon grows, it will gradually fill the space within the mold. If the watermelon seems to be growing too quickly or is pressing too hard against the sides of the mold, you can use small wooden shims to create a little extra space.
6. **Sunlight Exposure:** Ensure the watermelon still receives adequate sunlight. If the mold is opaque, you might need to rotate it periodically to ensure even exposure. Transparent molds are ideal for this reason.
Phase 3: Nurturing and Monitoring – The Home Stretch
Now that the watermelon is in its square home, we need to continue providing it with the care it needs to reach maturity.
1. **Consistent Watering:** Watermelons need consistent moisture, especially during this phase. Water deeply and regularly, but avoid overwatering, which can lead to root rot.
2. **Fertilizing:** Continue to fertilize the watermelon plants according to the package instructions. This will provide the necessary nutrients for the watermelon to grow and ripen.
3. **Pest and Disease Control:** Keep an eye out for pests and diseases, such as aphids, squash bugs, and powdery mildew. Take appropriate measures to control them if necessary. Organic pest control methods are always a good option.
4. **Monitor the Watermelon’s Growth:** Regularly check the watermelon’s growth within the mold. You should be able to see it gradually filling the space.
5. **Listen to the Thump:** As the watermelon matures, you can use the “thump” test to check for ripeness. A ripe watermelon will have a deep, hollow sound when you thump it. This can be tricky to do accurately within the mold, but it’s worth a try.
6. **Check the Tendril:** Another indicator of ripeness is the tendril closest to the watermelon stem. When this tendril turns brown and dries out, the watermelon is usually ripe.
Phase 4: Harvest Time – The Grand Reveal
The moment we’ve all been waiting for! It’s time to harvest your square watermelon.
1. **Determine Ripeness:** Before harvesting, make sure the watermelon is truly ripe. Use the thump test and the tendril test to confirm.
2. **Carefully Remove the Mold:** Gently remove the screws, bolts, or zip ties that are holding the mold together. Carefully separate the two halves of the mold.
3. **Harvest the Watermelon:** Use a sharp knife to cut the watermelon from the vine, leaving a few inches of stem attached.
4. **Admire Your Creation:** Take a moment to admire your square watermelon! You’ve successfully grown a unique and impressive fruit.
5. **Enjoy!** Cut open your square watermelon and enjoy its delicious flavor. It’s sure to be a conversation starter at your next barbecue or picnic.
Troubleshooting Tips
Even with the best planning, things can sometimes go wrong. Here are a few troubleshooting tips to help you overcome common challenges:
* **Watermelon Rotting Inside the Mold:** This is usually caused by excessive moisture. Make sure the mold has adequate drainage holes and avoid overwatering. You can also try lifting the mold slightly off the ground to improve air circulation.
* **Watermelon Not Filling the Mold:** This could be due to a variety of factors, such as poor soil fertility, inadequate sunlight, or insufficient watering. Make sure you’re providing the watermelon plants with the care they need.
* **Mold Cracking or Breaking:** Choose a sturdy mold made from high-quality materials. Avoid placing the mold in direct sunlight for extended periods, as this can cause it to become brittle.
* **Pests and Diseases:** Regularly inspect your watermelon plants for pests and diseases. Take appropriate measures to control them as soon as you notice them.
Additional Tips for Success
* **Choose the Right Variety:** Some watermelon varieties are better suited for growing in molds than others. Smaller, round varieties like Sugar Baby or Yellow Doll are generally easier to manage.
* **Start with Healthy Plants:** Starting with healthy seeds or seedlings will give your watermelon plants a strong foundation.
* **Provide Adequate Support:** As the watermelon grows, it can become quite heavy. Provide adequate support for the vines to prevent them from breaking.
* **Be Patient:** Growing square watermelons takes time and patience. Don’t get discouraged if things don’t go perfectly the first time. Keep experimenting and learning, and you’ll eventually succeed.
* **Consider the Climate:** Watermelons thrive in warm climates with plenty of sunshine. If you live in a cooler climate, you may need to start your seeds indoors and provide extra protection for
Conclusion
So, there you have it! Transforming ordinary watermelons into perfectly square wonders is more than just a quirky gardening project; it’s a testament to the ingenuity and creativity that lies within every gardener. This square watermelon growing DIY isn’t just about aesthetics; it’s about maximizing space, creating unique gifts, and sparking conversations. Imagine the look on your friends’ faces when you present them with a geometrically perfect watermelon!
But beyond the novelty, this project offers a fantastic learning experience. You’ll gain a deeper understanding of plant growth, the impact of environmental factors, and the satisfaction of nurturing something truly unique from seed to harvest. It’s a hands-on lesson in patience, observation, and problem-solving – skills that extend far beyond the garden.
Don’t be afraid to experiment! While the basic principle remains the same – using a mold to shape the growing fruit – there’s plenty of room for personalization. Try different mold materials, from clear acrylic for optimal sunlight exposure to decorative wooden boxes for a rustic touch. Consider varying the size of the mold to produce mini square watermelons, perfect for individual servings, or even attempting rectangular or other geometric shapes. You could even try etching designs onto the mold’s interior, creating embossed patterns on the watermelon’s surface as it grows.
For those seeking an extra challenge, explore grafting techniques. Grafting a watermelon vine onto a more vigorous rootstock can enhance its growth and disease resistance, potentially leading to larger and healthier square watermelons. Research compatible rootstocks in your region and follow established grafting procedures for the best results.
Remember to monitor your watermelons closely throughout the growing process. Adjust the mold as needed to accommodate the fruit’s expansion and ensure proper ventilation to prevent moisture buildup and potential rot. Regular watering and fertilization are crucial for healthy growth and optimal fruit development.
This square watermelon growing DIY is not just a trend; it’s an opportunity to connect with nature, express your creativity, and enjoy the fruits (or rather, the square fruits) of your labor. We encourage you to embark on this exciting gardening adventure and discover the joy of shaping your own unique harvest.
We’re eager to hear about your experiences! Share your photos, tips, and challenges in the comments below. Let’s build a community of square watermelon enthusiasts and inspire others to try this rewarding DIY project. What mold materials worked best for you? Did you encounter any unexpected challenges? What creative variations did you try? Your insights will be invaluable to fellow gardeners. So, grab your seeds, build your molds, and get ready to grow some square watermelons! Happy gardening!
Frequently Asked Questions (FAQ)
What type of watermelon is best for growing in a square mold?
The best type of watermelon for this project is a variety that produces relatively small to medium-sized fruits. Look for varieties that are known for their good flavor and disease resistance. Some popular choices include Sugar Baby, Blacktail Mountain, and Bush Sugar Baby. These varieties tend to fit well within standard-sized molds and are less prone to cracking or splitting as they grow. Avoid larger varieties like Charleston Gray, as they may outgrow the mold too quickly. Consider the climate in your region when selecting a variety, choosing one that is well-suited to your local growing conditions.
When is the best time to place the watermelon in the mold?
Timing is crucial for success. You should place the watermelon in the mold when it is approximately the size of a softball or slightly smaller. This is typically a few weeks after the fruit has set. Placing the watermelon in the mold too early can stunt its growth, while waiting too long can make it difficult to fit the fruit inside without damaging it. Monitor your watermelons closely and check their size regularly. Gently insert the watermelon into the mold, ensuring that it is centered and has enough room to expand.
What material is best for making the square mold?
Several materials can be used to create a square mold, each with its own advantages and disadvantages. Clear acrylic or polycarbonate is a popular choice because it allows sunlight to penetrate, promoting even ripening. However, these materials can be more expensive and may require specialized tools to cut and shape. Wood is another option, offering a more rustic aesthetic and being relatively easy to work with. However, wood can absorb moisture and may require sealing to prevent rot. Plastic containers can also be repurposed as molds, but ensure they are food-grade and free of harmful chemicals. Consider the durability, cost, and ease of use when selecting a mold material.
How do I prevent the watermelon from rotting inside the mold?
Preventing rot is essential for a successful harvest. Proper ventilation is key. Ensure that your mold has adequate drainage holes to allow excess moisture to escape. Avoid overwatering the watermelon plant, as this can increase humidity inside the mold. Regularly inspect the watermelon for signs of rot, such as soft spots or discoloration. If you notice any problems, remove the watermelon from the mold immediately to prevent the rot from spreading. Consider using a fungicide if necessary, but always follow the manufacturer’s instructions carefully.
How long does it take for the watermelon to grow into a square shape?
The time it takes for a watermelon to grow into a square shape depends on several factors, including the variety of watermelon, the size of the mold, and the growing conditions. Generally, it takes about 2-3 weeks for the watermelon to fill the mold completely. Monitor the watermelon’s growth closely and adjust the mold as needed to accommodate its expansion. Once the watermelon has reached the desired size and shape, you can remove the mold and allow it to ripen fully on the vine.
Can I reuse the mold for multiple watermelons?
Yes, you can reuse the mold for multiple watermelons, provided that it is in good condition and properly cleaned. After harvesting a square watermelon, thoroughly clean the mold with soap and water to remove any dirt, debris, or fungal spores. Allow the mold to dry completely before using it again. Inspect the mold for any cracks or damage and repair them as needed. With proper care, your mold can last for several seasons, allowing you to grow a steady supply of square watermelons.
Will the square shape affect the taste of the watermelon?
The square shape should not significantly affect the taste of the watermelon. The flavor of a watermelon is primarily determined by its variety, ripeness, and growing conditions. However, the mold may slightly alter the texture of the rind, making it firmer or more uniform. Some gardeners believe that the confined space inside the mold can concentrate the watermelon’s sweetness, but this is largely anecdotal. Ultimately, the best way to ensure a delicious square watermelon is to choose a high-quality variety and provide it with optimal growing conditions.
What if the watermelon cracks or splits inside the mold?
Cracking or splitting can occur if the watermelon grows too quickly or if the mold is too restrictive. To prevent this, choose a mold that is slightly larger than the expected size of the watermelon. Monitor the watermelon’s growth closely and adjust the mold as needed to accommodate its expansion. Ensure that the watermelon receives consistent watering and fertilization to prevent stress. If a watermelon does crack or split, remove it from the mold immediately to prevent rot. You may still be able to salvage some of the edible flesh, but it will no longer be square.
Is this square watermelon growing DIY suitable for beginner gardeners?
Yes, this project is suitable for beginner gardeners, but it requires some basic gardening knowledge and attention to detail. Start by researching the best watermelon varieties for your region and familiarizing yourself with their growing requirements. Choose a sunny location with well-drained soil and provide your watermelon plants with consistent watering and fertilization. Monitor your watermelons closely and be prepared to adjust your techniques as needed. With a little patience and perseverance, even beginner gardeners can successfully grow square watermelons.


Leave a Comment