
Soil bag pumpkin growing: Ever dreamt of having a giant, prize-winning pumpkin gracing your porch this fall, but thought you didn’t have the space or the green thumb? Well, dream no more! I’m about to let you in on a little secret – a super simple, surprisingly effective method that even the most novice gardener can master. Forget sprawling gardens and back-breaking tilling; we’re talking pumpkins grown right in the bag!
Pumpkins, symbols of autumn and harvest festivals, have a rich history dating back thousands of years. Originating in North America, they were a staple food for indigenous populations long before European settlers arrived. Today, they’re not just for pies and jack-o’-lanterns; they’re a source of immense gardening pride. But let’s face it, traditional pumpkin growing can be intimidating. That’s where this DIY trick comes in.
Why should you try soil bag pumpkin growing? Because it’s a game-changer! It’s perfect for small spaces like balconies, patios, or even just a sunny corner of your yard. It minimizes weeding, improves drainage, and provides a nutrient-rich environment for your pumpkin to thrive. Plus, it’s incredibly satisfying to watch a tiny seed transform into a massive gourd, all thanks to your ingenuity and a little bit of dirt. So, ditch the overwhelm and get ready to grow your own pumpkin patch, one bag at a time! I’m excited to share all the tips and tricks I’ve learned along the way.
Growing Pumpkins in a Grow Bag: A DIY Guide for Giant Results
Hello, fellow gardeners! Do you dream of having a giant pumpkin in your own garden but have little space or poor soil? Don’t worry, I’ll show you how to grow your own pumpkin champions using a simple grow bag! This method is not only space-saving but also super effective, as we can give the pumpkins exactly what they need. Let’s get started!
What You Need:
- A large grow bag (at least 70 liters / 18 gallons, but 100 liters / 26 gallons or more is even better – the bigger, the better for the pumpkin!)
- Pumpkin seeds (a giant pumpkin variety like ‘Atlantic Giant’ is best)
- Compost
- Garden soil
- Slow-release fertilizer (pumpkins are heavy feeders!)
- Watering can or hose
- Knife or scissors
- Mulch (straw, wood chips, or grass clippings)
- Optional: A trellis or support (if you have limited space and want to train the pumpkin to grow vertically)
- Patience and love (the most important things!)
Preparing the Grow Bag: The Foundation for Your Pumpkin’s Success
- Choose the right location: Pumpkins love the sun! Find a sunny spot in your garden that offers at least 6-8 hours of direct sunlight per day. The location should also be sheltered from the wind, as large pumpkin plants are susceptible to wind damage.
- Prepare the grow bag: Place the grow bag in your chosen location. Using a knife or scissors, cut open the top of the bag. Be careful not to cut too deep, so the bag remains stable.
- Enrich the soil: Pumpkins need nutrient-rich soil. Mix the contents of the grow bag with compost and garden soil. The ratio should be approximately 1:1:1. The compost provides extra nutrients, and the garden soil provides good structure.
- Add fertilizer: Pumpkins are heavy feeders and need a lot of fertilizer. Mix a slow-release fertilizer into the soil. Pay attention to the manufacturer’s dosage instructions. I like to use organic fertilizer because it nourishes the plants gently and sustainably.
- Improve drainage: Pumpkins don’t like waterlogged soil. Poke a few holes in the bottom of the grow bag with a knife or scissors to allow excess water to drain out.
Sowing and Starting: The Beginning of Your Pumpkin Adventure
- Soak the seeds beforehand: To speed up germination, you can soak the pumpkin seeds. Place them in a glass of lukewarm water for 24 hours.
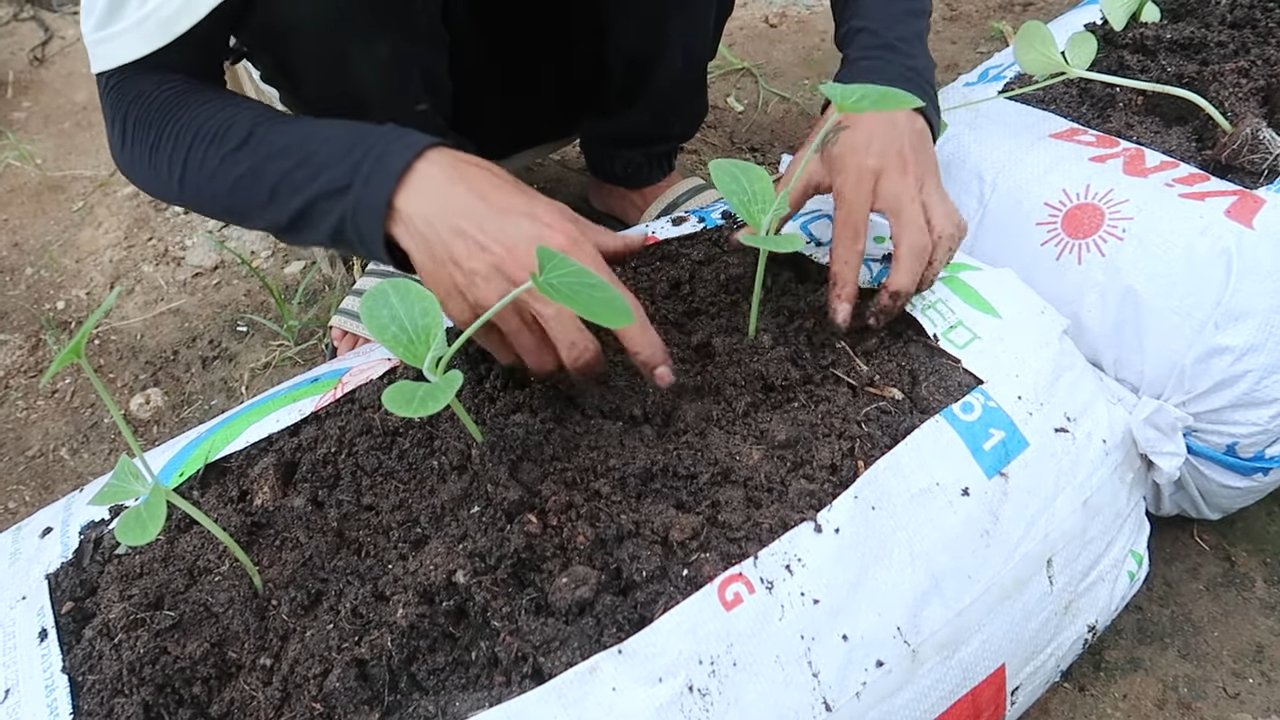
- Sowing: Press the seeds about 2-3 cm (1 inch) deep into the prepared soil. You can sow 2-3 seeds per grow bag. If all the seeds germinate, you can later select the strongest seedling.
- Watering: Gently water the soil so that it is well-moistened. Be careful not to make the soil too wet.
- Keep it warm: Pumpkins need warmth to germinate. Place the grow bag in a warm spot or cover it with a plastic sheet to increase the temperature.
- Be patient: Germination can take a few days to a few weeks, depending on the temperature and variety. Be patient and keep the soil moist.
Care and Growth: Turning Your Pumpkin into a Giant
- Watering: Pumpkins need a lot of water, especially during the growth and fruiting phases. Water regularly and deeply, preferably in the morning or evening. Avoid watering the leaves to prevent fungal diseases.
- Fertilizing: Feed the pumpkin plants regularly with a liquid fertilizer or an organic fertilizer. Follow the manufacturer’s dosage instructions. I fertilize my pumpkins every 1-2 weeks.
- Pruning: Regularly remove side shoots to concentrate the plant’s energy on the main vines and the fruits.
- Pollination: Pumpkins rely on pollination by bees and other insects. If there are few insects, you can also hand-pollinate the flowers. To do this, take the pollen from a male flower and brush it onto the stigma of a female flower. You can identify female flowers by the small, undeveloped fruit at their base.
- Protect the fruits: As the pumpkins get larger, you should protect them from direct sunlight to prevent sunburn. Place straw or other materials under the fruits.
- Mulching: Mulch the soil around the pumpkin plants with straw, wood chips, or grass clippings. The mulch material retains moisture in the soil, suppresses weeds, and protects the roots from extreme temperatures.
- Support (optional): If you have limited space, you can train the pumpkin plants up a trellis. Make sure the trellis is strong enough to support the weight of the plant and its fruits.
Harvest: The Reward for Your Hard Work
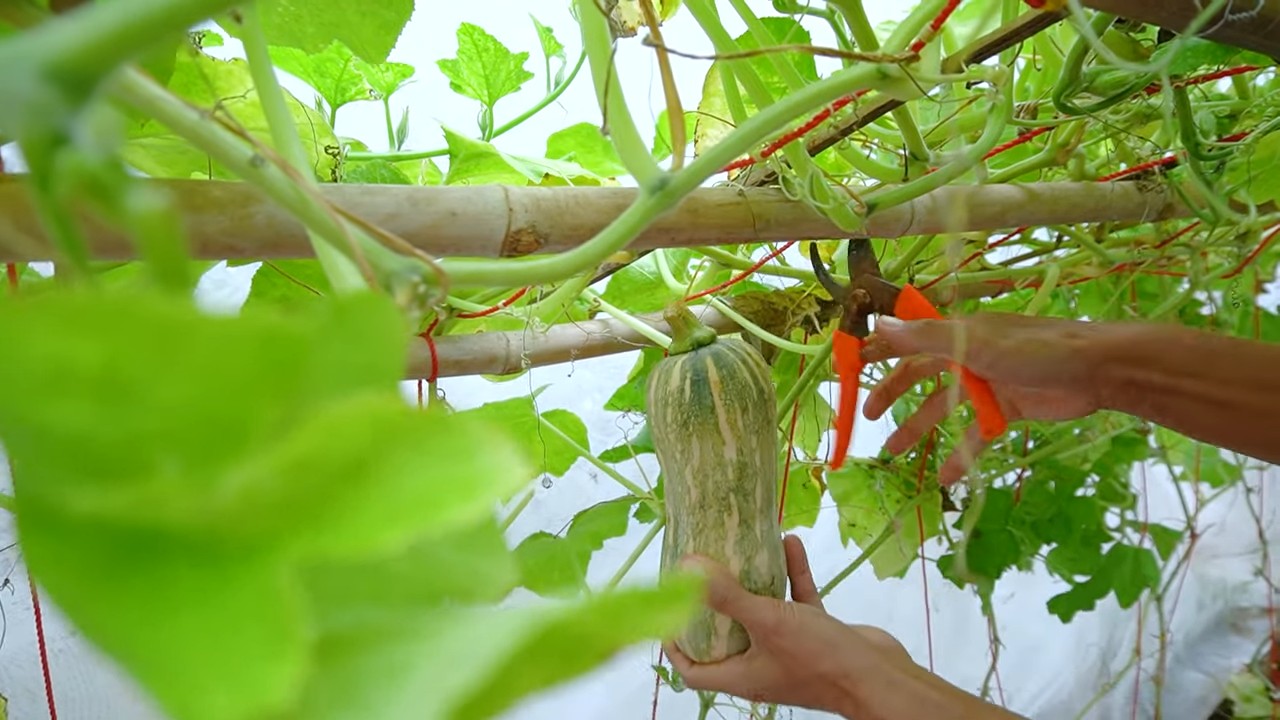
- Recognizing ripeness: Pumpkins are ripe when they have a hard rind and sound hollow when tapped. The stem should be dry and woody.
- Harvesting: Cut the pumpkin from the vine with a sharp knife or saw. Leave about 10 cm (4 inches) of the stem attached to the pumpkin.
- Storing: Store the pumpkins in a cool, dry, and well-ventilated place. They can last for several months this way.
Additional Tips for Giant Pumpkins:
- One fruit per plant: If you want to grow a giant pumpkin, you should only allow one fruit per plant. Remove all other fruits so the plant can put all its energy into that one pumpkin.
- Weigh regularly: Weigh the pumpkin regularly to monitor its growth.
- Special fertilizer: There are special fertilizers for giant pumpkins that are particularly rich in potassium and phosphorus.
- Protect from pests: Watch out for pests like slugs and aphids and combat them if necessary.
- Patience and perseverance: Growing giant pumpkins requires patience and perseverance. Don’t be discouraged if it doesn’t work out right away.
Common Problems and Solutions:
- Poor germination: Causes can be temperatures that are too cold, soil that is too wet, or old seeds. Ensure optimal conditions and use fresh seeds.
- Fungal diseases: Fungal diseases like powdery mildew can occur if the leaves are too wet. Ensure good ventilation and avoid watering the leaves. You can use a fungicide if necessary.
- Pests: Slugs and aphids can infest pumpkin plants. Combat them with appropriate methods.
- Fruit rot: Fruit rot can occur if the fruits are lying on damp ground. Place straw or other materials under the fruits to protect them from moisture.
I hope this guide helps you grow your own pumpkin champions in a grow bag!
Conclusion
So, there you have it! Transforming a simple soil bag into a thriving pumpkin patch is not just a fun project; it’s a game-changer for gardeners of all levels. Whether you’re short on space, battling poor soil conditions, or simply looking for a unique and rewarding gardening experience, this DIY soil bag pumpkin growing method is an absolute must-try.
Think about it: no more back-breaking tilling, no more wrestling with rocky or clay-heavy soil. Just a readily available bag of nutrient-rich soil, perfectly contained and ready to nurture your pumpkin dreams. The convenience alone is enough to make this technique a winner, but the benefits extend far beyond that. The elevated growing environment promotes better drainage, reduces the risk of soilborne diseases, and allows for easier weed control. Plus, the dark color of the bag absorbs heat, giving your pumpkins a head start in cooler climates.
But the beauty of this method lies in its adaptability. Feel free to experiment with different pumpkin varieties. From the classic Jack O’ Lantern to the adorable miniature pumpkins, the possibilities are endless. You can also tailor the soil mix to your specific needs. Consider adding compost, aged manure, or other organic amendments to further enrich the growing medium. For those aiming for truly gigantic pumpkins, incorporating specialized pumpkin-growing fertilizers can provide the extra boost needed to break records.
Don’t be afraid to get creative with your setup. You can place the soil bags directly on your lawn, patio, or even a balcony. Just make sure they receive plenty of sunlight and have adequate support as your pumpkins grow. As the vines spread, you might want to provide a trellis or other structure to keep the pumpkins off the ground and prevent rot.
We’re confident that you’ll be amazed by the results you can achieve with this simple yet effective technique. Imagine the satisfaction of harvesting your own homegrown pumpkins, knowing that you nurtured them from seed to magnificent gourd, all within the confines of a humble soil bag.
So, what are you waiting for? Grab a bag of soil, gather your pumpkin seeds, and embark on this exciting gardening adventure. We encourage you to document your progress, share your tips and tricks, and inspire others to discover the joys of soil bag pumpkin growing. Let’s create a community of pumpkin enthusiasts who are passionate about sustainable, space-saving gardening.
Don’t forget to share your photos and stories with us! We can’t wait to see the amazing pumpkins you grow. Happy gardening!
Frequently Asked Questions (FAQ)
What type of soil should I use for soil bag pumpkin growing?
The best type of soil to use is a high-quality potting mix or garden soil that is rich in organic matter. Look for a mix that contains ingredients like compost, peat moss, or aged manure. Avoid using heavy clay soil, as it can become compacted and restrict drainage. A well-draining soil is crucial for healthy pumpkin growth. You can also amend your existing soil with compost or other organic materials to improve its texture and fertility.
How many pumpkin plants can I grow in one soil bag?
It depends on the size of the soil bag and the variety of pumpkin you’re growing. For standard-sized pumpkins, it’s generally recommended to grow only one plant per bag. This will ensure that each plant has enough space and nutrients to thrive. For smaller pumpkin varieties, such as miniature pumpkins or gourds, you may be able to grow two plants per bag. However, be sure to monitor their growth and provide adequate support as needed. Overcrowding can lead to stunted growth and reduced yields.
How often should I water my soil bag pumpkins?
Watering frequency will depend on the weather conditions and the type of soil you’re using. Generally, you should water your pumpkins deeply whenever the top inch of soil feels dry to the touch. During hot, dry weather, you may need to water them daily. Be careful not to overwater, as this can lead to root rot. Ensure that the soil bag has adequate drainage to prevent water from pooling around the roots. A good way to check if your pumpkins need water is to stick your finger into the soil near the base of the plant. If it feels dry, it’s time to water.
Do I need to fertilize my soil bag pumpkins?
Yes, pumpkins are heavy feeders and require regular fertilization to produce large, healthy fruits. Start by incorporating a slow-release fertilizer into the soil mix at planting time. Then, supplement with liquid fertilizer every two to three weeks throughout the growing season. Look for a fertilizer that is high in phosphorus and potassium, as these nutrients are essential for fruit development. You can also use organic fertilizers, such as compost tea or fish emulsion. Be sure to follow the instructions on the fertilizer label carefully to avoid over-fertilizing, which can damage the plants.
How do I prevent pests and diseases from attacking my soil bag pumpkins?
Prevention is key when it comes to pests and diseases. Start by choosing disease-resistant pumpkin varieties. Inspect your plants regularly for signs of pests or diseases, such as aphids, squash bugs, or powdery mildew. If you spot any problems, take action immediately. You can use organic pest control methods, such as insecticidal soap or neem oil, to control pests. For diseases, ensure good air circulation around the plants and avoid overhead watering. You can also use fungicides to prevent or treat fungal diseases. Crop rotation and proper sanitation can also help to reduce the risk of pests and diseases.
How do I support the growing pumpkins in the soil bag?
As your pumpkins grow larger, they may need additional support to prevent them from breaking off the vine. You can use slings made from fabric or netting to support the pumpkins. Tie the slings to a sturdy trellis or stake. You can also place the pumpkins on wooden boards or straw to keep them off the ground and prevent rot. Be careful when handling the pumpkins, as they can be heavy and easily damaged.
Can I grow pumpkins in soil bags in a small space, like a balcony?
Yes, absolutely! One of the biggest advantages of soil bag pumpkin growing is its suitability for small spaces. Balconies, patios, and even small yards can be transformed into thriving pumpkin patches. Just make sure that the soil bags receive at least six hours of sunlight per day. You may also need to provide additional support for the vines, such as a trellis or railing. Choose smaller pumpkin varieties that are well-suited for container gardening.
What do I do with the soil bag after the pumpkin harvest?
After you’ve harvested your pumpkins, you can reuse the soil bag for other gardening projects. The soil will likely be depleted of nutrients, so you’ll need to amend it with compost or other organic materials. You can use the soil to grow other vegetables, flowers, or herbs. Alternatively, you can empty the soil bag into your garden beds or compost pile. The plastic bag itself can be recycled or reused for other purposes.


Leave a Comment