
Salt and Detergent Cleaning Power: Unleash the unexpected cleaning duo that’s probably already hiding in your pantry and laundry room! I’m about to let you in on a little secret that’s been passed down through generations – a DIY cleaning hack so effective, it’ll make you rethink those expensive, store-bought cleaners.
For centuries, resourceful homemakers have sought simple, natural solutions for keeping their homes sparkling. While the exact origins of combining salt and detergent are a bit murky, the principle is rooted in understanding the individual strengths of each ingredient. Salt, a natural abrasive and disinfectant, has been used for cleaning since ancient times. Detergent, with its grease-cutting and stain-lifting properties, is a more modern marvel. Together, they create a synergistic cleaning powerhouse!
Let’s face it, we all want a clean home without spending a fortune or exposing ourselves to harsh chemicals. That’s where this salt and detergent cleaning power trick comes in. Are you tired of stubborn stains on your kitchen counters? Frustrated with grimy bathroom tiles? Or maybe you’re just looking for a more eco-friendly way to tackle everyday messes? This simple DIY solution is your answer. I’ll show you how to harness the incredible cleaning potential of these two common household items to tackle a variety of cleaning challenges, saving you time, money, and a trip to the store. Get ready to be amazed by the results!
DIY Super Cleaner: Unleash the Power of Salt and Detergent!
Hey everyone! I’m so excited to share this amazing DIY cleaning hack with you. I’ve been using it for months now, and it’s seriously revolutionized my cleaning routine. Forget those expensive, chemical-laden cleaners – this simple solution, made with just salt and detergent, is incredibly effective, budget-friendly, and surprisingly versatile. I’m talking sparkling sinks, gleaming bathtubs, and grime-free stovetops!
This isn’t just about saving money; it’s about creating a cleaner, healthier home environment. You know exactly what’s going into your cleaner, avoiding harsh chemicals that can irritate skin and lungs. Plus, it’s super easy to whip up a batch whenever you need it.
So, are you ready to ditch the store-bought stuff and embrace the cleaning power of salt and detergent? Let’s get started!
What Makes This Cleaner So Effective?
Before we dive into the how-to, let’s quickly understand why this combination works so well.
* Salt (Sodium Chloride): Salt acts as a mild abrasive, helping to scrub away stubborn dirt and grime without scratching surfaces. It’s also a natural disinfectant and deodorizer. Think of it as your gentle but effective scrubbing partner.
* Detergent: Detergent, whether it’s dish soap or laundry detergent (we’ll talk about the best choices later), is a surfactant. This means it reduces the surface tension of water, allowing it to penetrate dirt and grease more easily. It also emulsifies grease, breaking it down so it can be washed away. Basically, it’s the grease-busting superhero of our cleaning duo.
Choosing Your Ingredients: Not All Salts and Detergents Are Created Equal
Okay, let’s talk ingredients. While the basic recipe is simple, choosing the right salt and detergent can make a big difference in the final result.
* Salt: I recommend using either table salt or fine sea salt. Coarse salt can be too abrasive for delicate surfaces. Avoid using Epsom salts, as they have different chemical properties and won’t work the same way.
* Detergent: This is where you have some options!
* Dish Soap: This is my go-to for general cleaning. Choose a grease-cutting dish soap for best results. I personally love using a natural dish soap, as it’s gentler on my hands and the environment.
* Laundry Detergent: Powdered laundry detergent works great for tougher cleaning jobs, like scrubbing grout or cleaning heavily soiled surfaces. Just be sure to dissolve it completely in water before using it to avoid scratching. Liquid laundry detergent can also be used, but I find powdered detergent to be more effective for scrubbing.
* Important Note: Avoid using detergents that contain bleach or ammonia, as these can react with other cleaning products and create harmful fumes. Always read the label carefully!
The Basic Recipe: Your Foundation for Cleaning Success
This is the base recipe that you can adjust to suit your specific cleaning needs.
Ingredients:
* 1/2 cup salt (table salt or fine sea salt)
* 1/4 cup detergent (dish soap or powdered laundry detergent)
* 1 gallon of warm water
Equipment:
* Bucket or large bowl
* Spoon or whisk for mixing
* Spray bottle (optional, for applying the cleaner)
* Cleaning cloths or sponges
Step-by-Step Instructions: Mixing Your Super Cleaner
Now for the fun part! Let’s mix up our super cleaner.
1. Gather Your Supplies: Make sure you have all your ingredients and equipment ready to go. This will make the process much smoother.
2. Heat the Water: Heat the water until it’s warm, but not too hot. Warm water helps the salt and detergent dissolve more easily.
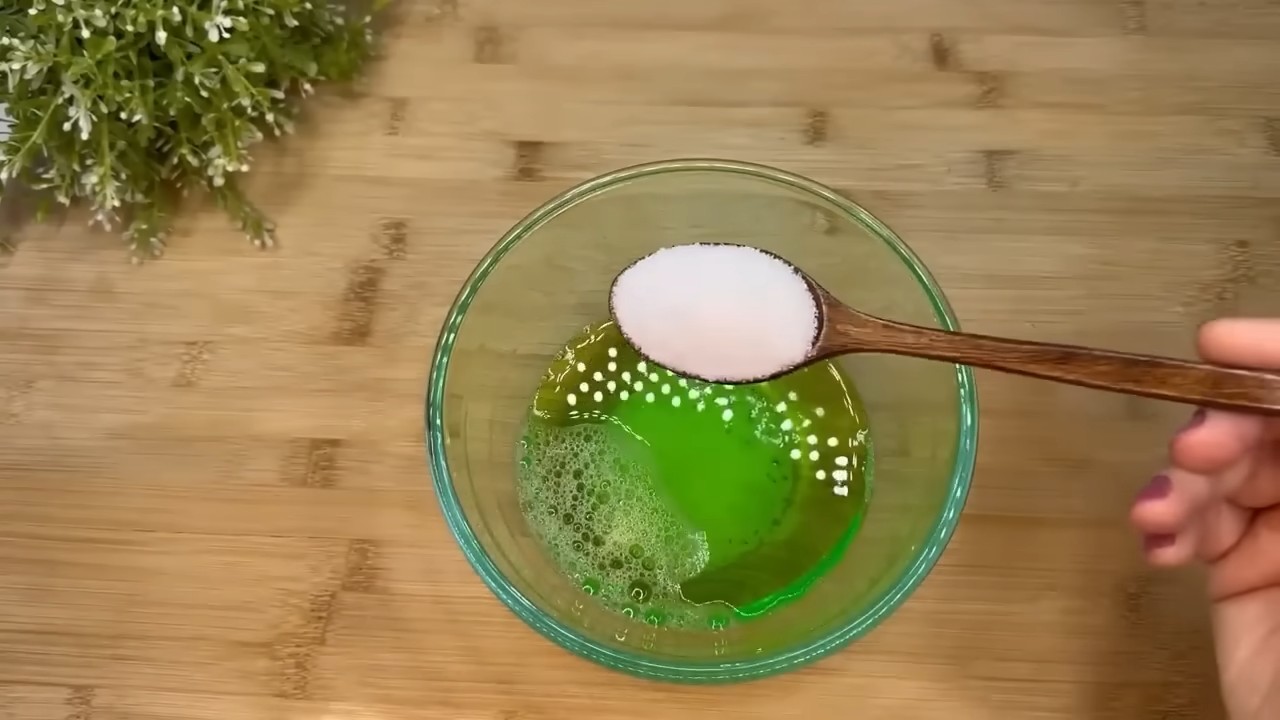
3. Add the Salt: Pour the salt into the bucket or bowl of warm water.
4. Stir Well: Use a spoon or whisk to stir the salt until it’s completely dissolved. You don’t want any gritty residue left behind.
5. Add the Detergent: Pour the detergent into the salt water.
6. Mix Gently: Gently stir the mixture until the detergent is evenly distributed. Avoid creating too many bubbles, especially if you’re using dish soap.
7. Transfer to a Spray Bottle (Optional): If you prefer to use a spray bottle for cleaning, carefully pour the mixture into a clean spray bottle. This makes it easy to apply the cleaner to surfaces.
Cleaning Applications: Where to Use Your Super Cleaner
Okay, now that you have your super cleaner ready, let’s talk about where you can use it! This stuff is seriously versatile.
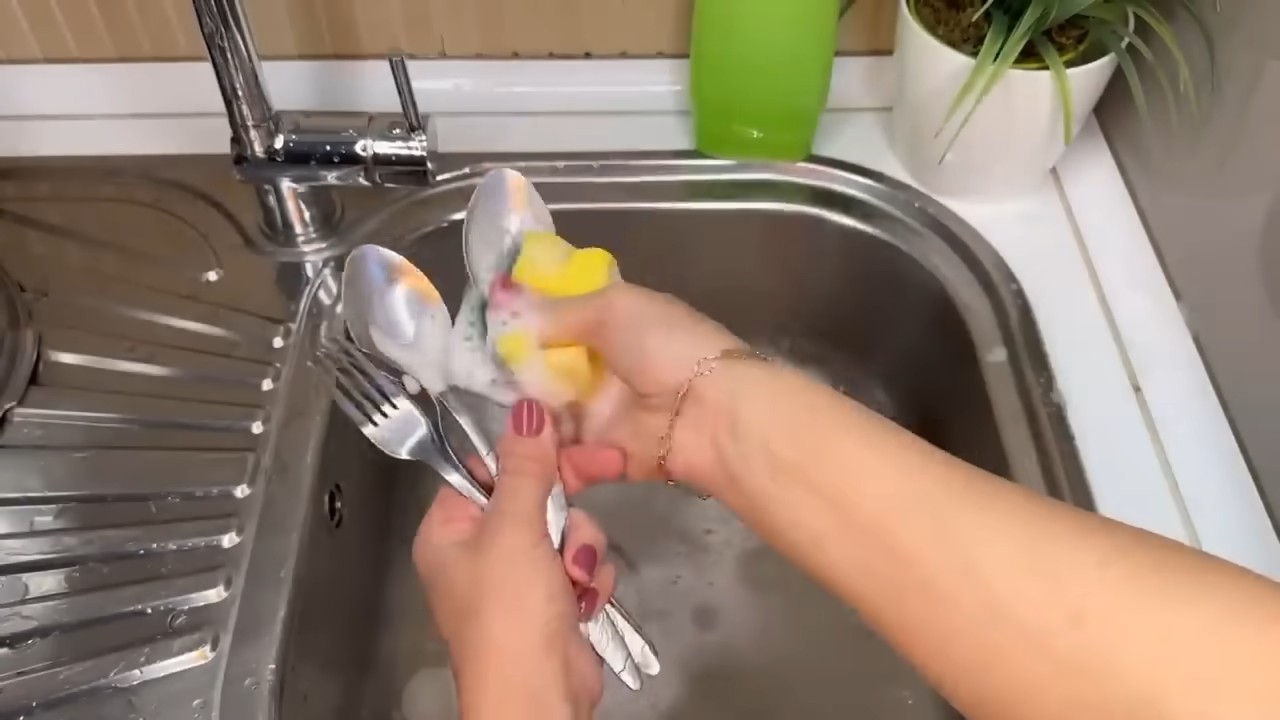
* Sinks and Bathtubs: Sprinkle a little extra salt directly onto the surface and use a sponge or cloth to scrub away soap scum and grime. Rinse thoroughly with water.
* Stovetops: Apply the cleaner to the stovetop and let it sit for a few minutes to loosen grease and food splatters. Then, scrub with a sponge or cloth and rinse with water. For stubborn stains, you can use a paste made from salt and detergent.
* Grout: This cleaner is fantastic for cleaning grout! Apply the cleaner to the grout lines and let it sit for a few minutes. Then, scrub with a grout brush or old toothbrush and rinse with water.
* Toilets: Pour a cup of the cleaner into the toilet bowl and let it sit for a few minutes. Then, scrub with a toilet brush and flush.
* Floors: Add the cleaner to a bucket of warm water and use it to mop your floors. Be sure to wring out the mop well to avoid leaving streaks. This works great on tile, linoleum, and vinyl floors.
* Outdoor Furniture: Use the cleaner to scrub away dirt and mildew from your outdoor furniture. Rinse thoroughly with water.
* Garbage Cans: Clean and deodorize your garbage cans by spraying them with the cleaner and scrubbing them with a brush. Rinse thoroughly with water.
Tackling Tough Stains: Level Up Your Cleaning Game
Sometimes, you need a little extra oomph to tackle those really stubborn stains. Here are a few tips for boosting the cleaning power of your salt and detergent solution:
* For Extra Grime: Make a paste of salt and detergent and apply it directly to the stain. Let it sit for a few minutes before scrubbing.
* For Burnt-On Food: Sprinkle salt directly onto the burnt-on food and add a little water to create a paste. Let it sit for several hours or overnight before scrubbing.
* For Mildew: Mix the cleaner with a little white vinegar for extra mildew-fighting power. Be sure to test this mixture in an inconspicuous area first to make sure it doesn’t damage the surface.
* For Hard Water Stains: Add a little lemon juice to the cleaner to help dissolve hard water stains.
Safety Precautions: A Few Things to Keep in Mind
While this cleaner is generally safe, it’s always a good idea to take a few precautions:
* Test in an Inconspicuous Area: Before using the cleaner on a large surface, test it in an inconspicuous area to make sure it doesn’t damage the finish.
* Wear Gloves: If you have sensitive skin, wear gloves to protect your hands from irritation.
* Avoid Contact with Eyes: Avoid getting the cleaner in your eyes. If contact occurs, rinse thoroughly with water.
* Keep Out of Reach of Children and Pets: As with all cleaning products, keep this cleaner out of reach of children and pets.
* Don’t Mix with Bleach or Ammonia: Never mix this cleaner with bleach or ammonia, as this can create harmful fumes.
Troubleshooting: Common Issues and How to Fix Them
Even with the best instructions, sometimes things don’t go exactly as planned. Here are a few common issues you might encounter and how to fix them:
* Cleaner is Too Abrasive: If you find that the cleaner is too abrasive, reduce the amount of salt you’re using. You can also switch to a finer salt, like table salt.
* Cleaner is Not Cleaning Effectively: If the cleaner isn’t cleaning effectively, try using a stronger detergent or adding a little white vinegar or lemon juice to the mixture.
* Cleaner Leaves a Residue: If the cleaner leaves a residue, make sure you’re rinsing the surface thoroughly with water. You can also try using less detergent in the mixture.
* Cleaner Smells Bad: If the cleaner smells bad, try adding a few drops of essential oil to the mixture. Lemon, lavender, and tea tree oil are all great options.
Storage: Keeping Your Super Cleaner Fresh
You can store your super cleaner in a sealed container for up to a month. I usually keep mine in a spray bottle under the sink for easy access. Just be sure to label the container clearly so you don’t accidentally mistake it for
Conclusion
So, there you have it! This simple yet surprisingly effective DIY cleaning solution using salt and detergent is a game-changer for anyone looking to tackle stubborn stains and grime without resorting to harsh chemicals. We’ve explored how the abrasive power of salt, combined with the degreasing action of detergent, creates a potent cleaning force that can revitalize everything from your kitchen sink to your bathroom tiles.
But why is this DIY trick a must-try? Firstly, it’s incredibly cost-effective. You likely already have both ingredients in your home, eliminating the need to purchase expensive specialty cleaners. Secondly, it’s a more environmentally friendly option compared to many commercial products laden with harsh chemicals. You’re reducing your exposure to potentially harmful substances and minimizing your contribution to environmental pollution. Thirdly, it’s remarkably versatile. As we’ve discussed, this solution can be adapted for various cleaning tasks around the house, making it a true all-purpose cleaner.
The real magic lies in its simplicity and effectiveness. You’re not dealing with complicated formulas or lengthy preparation times. Just a quick mix of salt and detergent, and you’re ready to go. And the results speak for themselves. From removing stubborn grease stains to restoring the shine to your stainless steel, this DIY cleaner delivers impressive results.
Looking for variations? Consider adding a few drops of essential oil, like lemon or tea tree, for an extra boost of cleaning power and a pleasant scent. For tougher stains, you can create a paste by using less water and applying it directly to the affected area. Let it sit for a few minutes before scrubbing and rinsing. You can also experiment with different types of salt, such as coarse sea salt for more abrasive cleaning or Epsom salt for its added mineral benefits. Remember to always test the solution on an inconspicuous area first, especially on delicate surfaces.
We’re confident that once you try this DIY cleaning solution, you’ll be amazed by its effectiveness and simplicity. It’s a practical, budget-friendly, and environmentally conscious way to keep your home sparkling clean.
Now, we want to hear from you! Give this DIY trick a try and share your experience with us. What surfaces did you clean? What stains did you tackle? What variations did you experiment with? Let us know in the comments below! Your feedback will not only help us improve this guide but also inspire others to embrace the power of simple, homemade cleaning solutions. Embrace the cleaning power of salt and detergent and transform your cleaning routine today!
Frequently Asked Questions (FAQ)
1. What type of salt and detergent should I use?
For salt, common table salt works perfectly well for most cleaning tasks. However, you can also use coarse sea salt for more abrasive cleaning, which is great for tackling stubborn grime on surfaces like stovetops or oven interiors. Epsom salt can also be used, particularly for its potential to help loosen mineral deposits and provide a slight disinfecting effect. As for detergent, a standard dish soap is generally recommended. Choose a detergent that is effective at cutting through grease and grime. Avoid using detergents with added bleach or harsh chemicals, especially if you are concerned about damaging surfaces or creating harmful fumes. A clear, unscented detergent is often the safest bet, especially if you plan to add essential oils for fragrance.
2. Can I use this solution on all surfaces?
While this DIY cleaning solution is versatile, it’s not suitable for all surfaces. Avoid using it on delicate or porous materials like marble, granite, or unfinished wood, as the abrasive nature of salt can scratch or damage these surfaces. Always test the solution on an inconspicuous area first to ensure it doesn’t cause any discoloration or damage. It’s generally safe to use on stainless steel, ceramic tiles, porcelain, glass, and plastic. However, exercise caution and use a gentle touch when cleaning painted surfaces, as the salt could potentially dull the paint over time.
3. How do I make a paste for tougher stains?
To create a paste for tackling tougher stains, simply reduce the amount of water you use in the mixture. Instead of a watery solution, aim for a thick, spreadable consistency. Start by mixing the salt and detergent together, then gradually add a small amount of water until you achieve the desired paste-like texture. Apply the paste directly to the stained area and let it sit for a few minutes to allow the salt and detergent to penetrate the stain. Then, scrub gently with a non-abrasive sponge or cloth and rinse thoroughly with water.
4. Can I add other ingredients to this cleaning solution?
Yes, you can definitely add other ingredients to enhance the cleaning power or scent of this DIY solution. As mentioned earlier, a few drops of essential oils like lemon, tea tree, or lavender can add a pleasant fragrance and provide additional antibacterial or antifungal benefits. White vinegar can also be added for its acidic properties, which can help dissolve mineral deposits and cut through grease. However, be cautious when mixing vinegar with detergent, as it can sometimes create a chemical reaction that reduces the effectiveness of both ingredients. Always test any new additions on an inconspicuous area first to ensure they don’t cause any damage or discoloration.
5. How often can I use this cleaning solution?
The frequency of use depends on the surface you’re cleaning and the severity of the grime. For surfaces that require regular cleaning, such as kitchen countertops or bathroom sinks, you can use this solution daily or as needed. However, for more delicate surfaces or those that don’t require frequent cleaning, it’s best to limit the use to once or twice a week to avoid potential damage. Always rinse the surface thoroughly with water after cleaning to remove any residue from the salt and detergent.
6. Is this cleaning solution safe for children and pets?
While this DIY cleaning solution is generally considered safer than many commercial cleaners, it’s still important to exercise caution when using it around children and pets. Keep the solution out of reach of children and pets to prevent accidental ingestion. Avoid spraying the solution directly onto surfaces that children or pets may come into contact with, such as toys or food bowls. Always rinse the cleaned surfaces thoroughly with water to remove any residue. If you have concerns about allergies or sensitivities, consider using a hypoallergenic detergent and avoiding essential oils.
7. How should I store the leftover cleaning solution?
Store any leftover cleaning solution in a tightly sealed container, such as a spray bottle or jar, in a cool, dry place away from direct sunlight. Label the container clearly to avoid confusion with other liquids. It’s best to use the solution within a few weeks, as the ingredients may separate or lose their effectiveness over time. If the solution becomes cloudy or develops an unusual odor, discard it and make a fresh batch.
8. What are the benefits of using a DIY cleaning solution over commercial cleaners?
There are several benefits to using a DIY cleaning solution like this one. Firstly, it’s more cost-effective, as you likely already have the ingredients in your home. Secondly, it’s more environmentally friendly, as you’re reducing your reliance on harsh chemicals and plastic packaging. Thirdly, it’s often safer for your health, as you can control the ingredients and avoid potentially harmful substances. Finally, it’s a fun and empowering way to take control of your cleaning routine and create a customized solution that meets your specific needs. The combination of salt and detergent is a powerful, natural alternative to many store-bought options.


Leave a Comment