
Pumpkin garden transformation – sounds like something out of a fairy tale, doesn’t it? Well, get ready to sprinkle a little magic on your own backyard because I’m about to share some incredible DIY tricks that will turn your pumpkin patch dreams into a reality! For centuries, pumpkins have been more than just a fall decoration; they’re a symbol of harvest, abundance, and community. Think of the ancient harvest festivals, the heartwarming tradition of carving jack-o’-lanterns, and the delicious pies that grace our tables during Thanksgiving.
But let’s be honest, growing pumpkins can sometimes feel like a daunting task. From battling pests to ensuring proper pollination, there are plenty of challenges along the way. That’s where these DIY hacks come in! I’m going to show you simple, cost-effective ways to boost your pumpkin yield, protect your precious gourds from unwanted critters, and create a thriving pumpkin garden that will be the envy of the neighborhood.
Whether you’re a seasoned gardener or just starting out, these tips will empower you to achieve a stunning pumpkin garden transformation. Imagine the satisfaction of harvesting your own plump, vibrant pumpkins, ready for carving, baking, or simply adding a touch of autumnal charm to your home. So, grab your gardening gloves, and let’s get started on this exciting journey together!
Transform Your Backyard into a Pumpkin Paradise!
Okay, pumpkin lovers, gather ’round! I’m about to share my secrets for turning your ordinary backyard into a pumpkin patch worthy of Instagram fame. This isn’t just about scattering a few seeds and hoping for the best. We’re talking about a full-blown pumpkin garden transformation, complete with healthy vines, bountiful harvests, and maybe even a prize-winning giant! So, grab your gardening gloves, and let’s get started!
Planning Your Pumpkin Patch
Before we even think about seeds, we need a plan. Pumpkins are space hogs, so careful planning is crucial.
* Sunlight is Key: Pumpkins need at least 6-8 hours of direct sunlight per day. Scout your yard and identify the sunniest spot.
* Space Requirements: Each pumpkin vine can spread 10-20 feet, depending on the variety. Consider this when choosing your planting location. Smaller varieties like Jack Be Little or Baby Boo need less space. Giant pumpkins need a LOT of space.
* Soil Preparation: Pumpkins are heavy feeders and need rich, well-drained soil. We’ll get into the nitty-gritty of soil prep in the next section.
* Variety Selection: Think about what you want to do with your pumpkins. Carving? Baking? Decorating? Different varieties are better suited for different purposes.
* Water Source: Easy access to water is essential. Consider proximity to a hose or irrigation system.
Preparing the Soil: The Foundation of Success
This is arguably the most important step. Pumpkins need a nutrient-rich environment to thrive.
1. Clear the Area: Remove any existing grass, weeds, rocks, or debris from your chosen planting area. A good, clean slate is essential. I like to use a garden fork to loosen the soil and make it easier to clear.
2. Soil Testing (Optional but Recommended): A soil test will tell you the pH level and nutrient content of your soil. You can purchase a soil testing kit at most garden centers or send a sample to your local agricultural extension office. This will help you determine what amendments your soil needs.
3. Amend the Soil: This is where the magic happens! Pumpkins love organic matter. I like to add a generous amount of the following:
* Compost: This is the cornerstone of healthy soil. Use well-rotted compost from your compost bin or purchase it from a garden center. Aim for at least 4-6 inches of compost worked into the top 12 inches of soil.
* Aged Manure: Another excellent source of nutrients. Make sure it’s well-aged to avoid burning the plants. Chicken, cow, or horse manure are all good options. Again, work it into the top 12 inches of soil.
* Peat Moss: This helps improve drainage and water retention, especially in sandy soils.
* Fertilizer: Use a balanced fertilizer (e.g., 10-10-10) according to the package directions. I prefer organic fertilizers like bone meal and blood meal, which release nutrients slowly over time.
4. Till or Dig: Use a garden tiller or a shovel to thoroughly mix the amendments into the soil. You want a loose, well-aerated soil structure.
5. Create Mounds or Rows: Pumpkins grow best on slightly raised mounds or rows. This improves drainage and warms the soil. Create mounds about 1-2 feet high and 3-4 feet wide, spaced according to the variety you’re planting. If you prefer rows, create rows about 3-4 feet apart.
Planting Your Pumpkin Seeds
Now for the fun part!
1. Timing is Everything: Pumpkins need a long growing season (90-120 days). Plant your seeds after the last frost in your area. Check your local frost dates to be sure. I usually start my seeds indoors about 2-3 weeks before the last frost to get a head start.
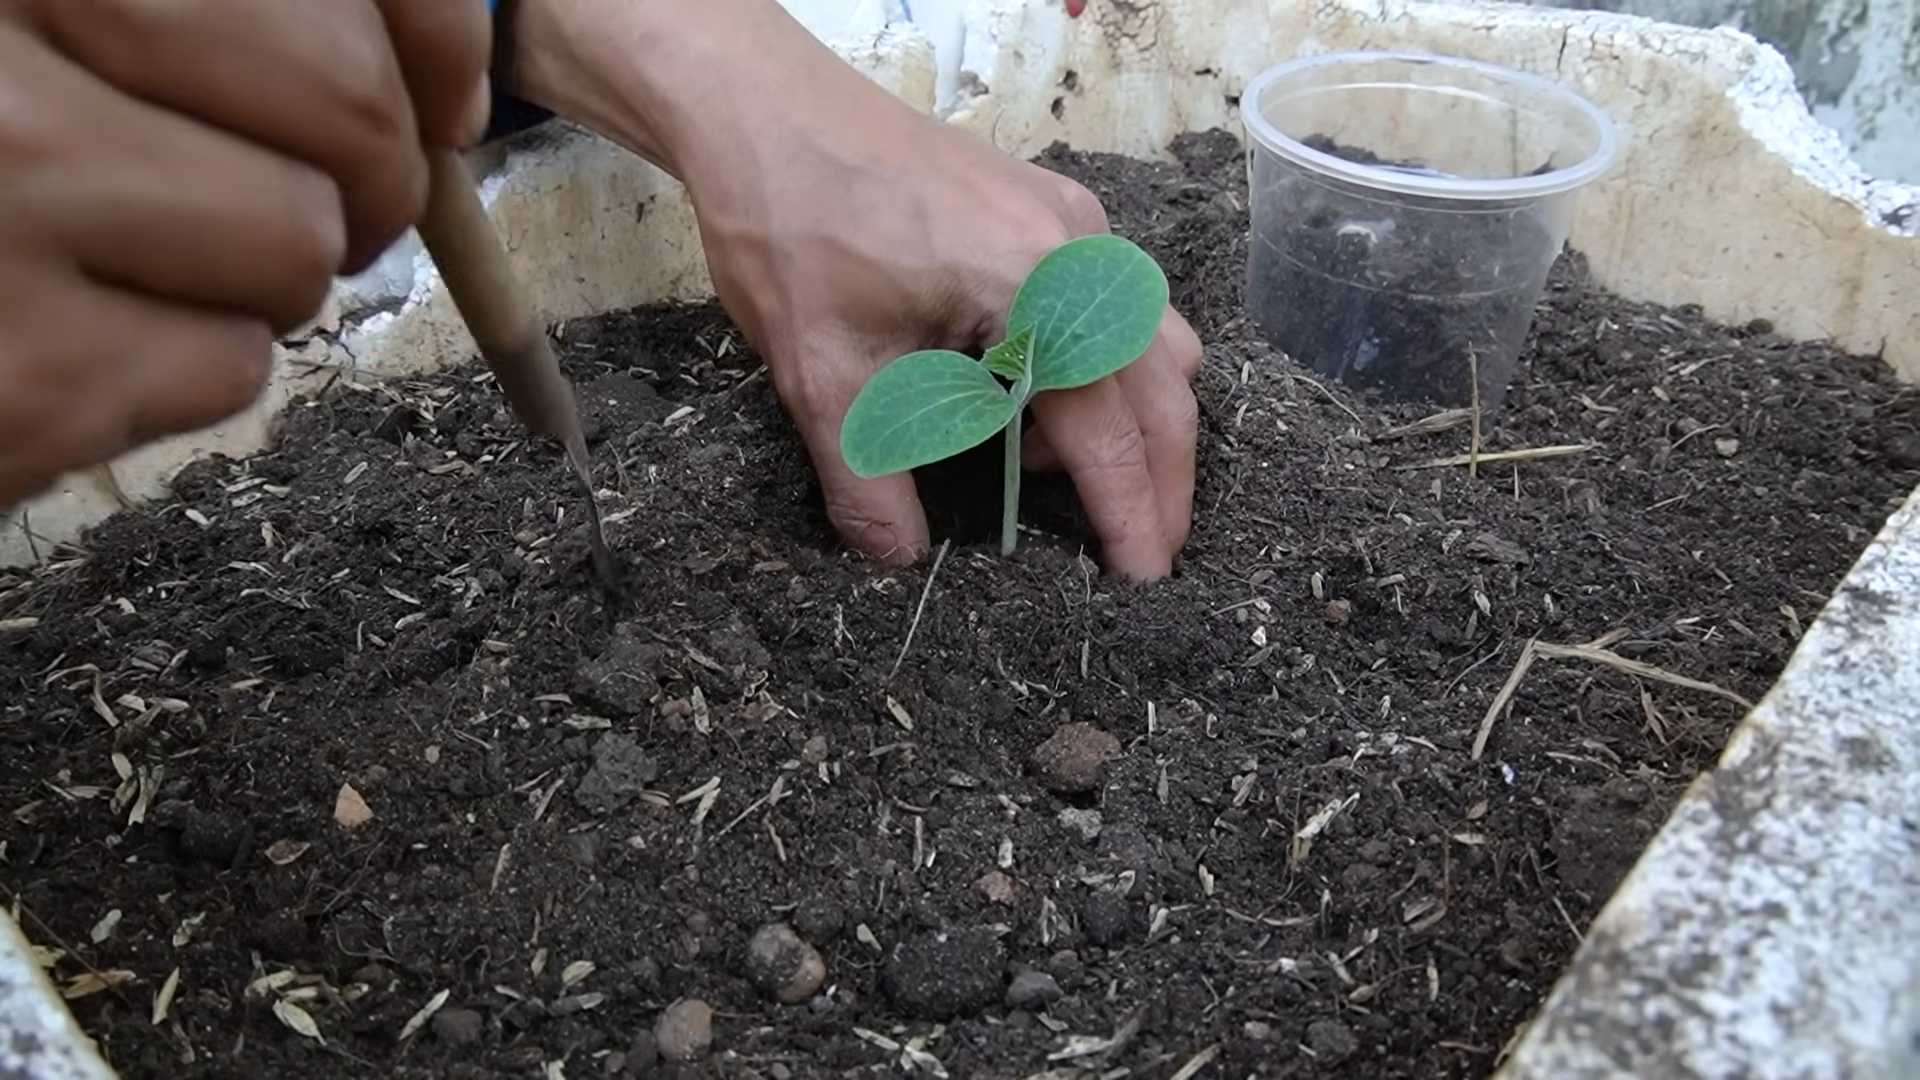
2. Starting Seeds Indoors (Optional): If you’re starting seeds indoors, use peat pots or biodegradable pots to avoid disturbing the roots when transplanting. Plant 2-3 seeds per pot, about 1 inch deep. Keep the soil moist and warm (around 70-80°F). Once the seedlings have a few true leaves, thin them to one plant per pot.
3. Direct Sowing: If you’re planting directly in the garden, sow 3-4 seeds per mound or row, about 1 inch deep. Space the seeds a few inches apart.
4. Water Gently: Water the seeds or seedlings gently after planting. Avoid overwatering, which can cause the seeds to rot.
5. Thinning: Once the seedlings emerge and have a few true leaves, thin them to the strongest plant per mound or row. This ensures that each plant has enough space and resources to thrive.
Okay, pumpkin lovers, gather ’round! I’m about to share my secrets for turning your ordinary backyard into a pumpkin patch worthy of Instagram fame. This isn’t just about scattering a few seeds and hoping for the best. We’re talking about a full-blown pumpkin garden transformation, complete with healthy vines, bountiful harvests, and maybe even a prize-winning giant! So, grab your gardening gloves, and let’s get started!
Planning Your Pumpkin Patch
Before we even think about seeds, we need a plan. Pumpkins are space hogs, so careful planning is crucial.
* Sunlight is Key: Pumpkins need at least 6-8 hours of direct sunlight per day. Scout your yard and identify the sunniest spot.
* Space Requirements: Each pumpkin vine can spread 10-20 feet, depending on the variety. Consider this when choosing your planting location. Smaller varieties like Jack Be Little or Baby Boo need less space. Giant pumpkins need a LOT of space.
* Soil Preparation: Pumpkins are heavy feeders and need rich, well-drained soil. We’ll get into the nitty-gritty of soil prep in the next section.
* Variety Selection: Think about what you want to do with your pumpkins. Carving? Baking? Decorating? Different varieties are better suited for different purposes.
* Water Source: Easy access to water is essential. Consider proximity to a hose or irrigation system.
Preparing the Soil: The Foundation of Success
This is arguably the most important step. Pumpkins need a nutrient-rich environment to thrive.
1. Clear the Area: Remove any existing grass, weeds, rocks, or debris from your chosen planting area. A good, clean slate is essential. I like to use a garden fork to loosen the soil and make it easier to clear.
2. Soil Testing (Optional but Recommended): A soil test will tell you the pH level and nutrient content of your soil. You can purchase a soil testing kit at most garden centers or send a sample to your local agricultural extension office. This will help you determine what amendments your soil needs.
3. Amend the Soil: This is where the magic happens! Pumpkins love organic matter. I like to add a generous amount of the following:
* Compost: This is the cornerstone of healthy soil. Use well-rotted compost from your compost bin or purchase it from a garden center. Aim for at least 4-6 inches of compost worked into the top 12 inches of soil.
* Aged Manure: Another excellent source of nutrients. Make sure it’s well-aged to avoid burning the plants. Chicken, cow, or horse manure are all good options. Again, work it into the top 12 inches of soil.
* Peat Moss: This helps improve drainage and water retention, especially in sandy soils.
* Fertilizer: Use a balanced fertilizer (e.g., 10-10-10) according to the package directions. I prefer organic fertilizers like bone meal and blood meal, which release nutrients slowly over time.
4. Till or Dig: Use a garden tiller or a shovel to thoroughly mix the amendments into the soil. You want a loose, well-aerated soil structure.
5. Create Mounds or Rows: Pumpkins grow best on slightly raised mounds or rows. This improves drainage and warms the soil. Create mounds about 1-2 feet high and 3-4 feet wide, spaced according to the variety you’re planting. If you prefer rows, create rows about 3-4 feet apart.
Planting Your Pumpkin Seeds
Now for the fun part!
1. Timing is Everything: Pumpkins need a long growing season (90-120 days). Plant your seeds after the last frost in your area. Check your local frost dates to be sure. I usually start my seeds indoors about 2-3 weeks before the last frost to get a head start.
2. Starting Seeds Indoors (Optional): If you’re starting seeds indoors, use peat pots or biodegradable pots to avoid disturbing the roots when transplanting. Plant 2-3 seeds per pot, about 1 inch deep. Keep the soil moist and warm (around 70-80°F). Once the seedlings have a few true leaves, thin them to one plant per pot.
3. Direct Sowing: If you’re planting directly in the garden, sow 3-4 seeds per mound or row, about 1 inch deep. Space the seeds a few inches apart.
4. Water Gently: Water the seeds or seedlings gently after planting. Avoid overwatering, which can cause the seeds to rot.
5. Thinning: Once the seedlings emerge and have a few true leaves, thin them to the strongest plant per mound or row. This ensures that each plant has enough space and resources to thrive.
Caring for Your Pumpkin Patch
Consistent care is essential for a successful pumpkin harvest.
1. Watering: Pumpkins need consistent moisture, especially during hot, dry weather. Water deeply and regularly, aiming for about 1 inch of water per week. Avoid watering the foliage, as this can promote fungal diseases. Drip irrigation or soaker hoses are ideal.
2. Weeding: Keep your pumpkin patch free of weeds, which compete with the pumpkins for nutrients and water. Hand-pull weeds regularly or use a hoe to cultivate the soil. Be careful not to damage the pumpkin vines.
3. Fertilizing: Pumpkins are heavy feeders and benefit from regular fertilization. Use a balanced fertilizer (e.g., 10-10-10) every 2-3 weeks, according to the package directions. You can also side-dress the plants with compost or aged manure.
4. Pollination: Pumpkins have separate male and female flowers. Bees are essential for pollination. If you’re not seeing many bees in your garden, you may need to hand-pollinate the flowers. To do this, use a small paintbrush to transfer pollen from the male flower to the female flower. The female flowers have a small, immature pumpkin at the base.
5. Pest and Disease Control: Keep an eye out for common pumpkin pests and diseases, such as squash bugs, squash vine borers, and powdery mildew. Use organic pest control methods whenever possible. Insecticidal soap, neem oil, and Bacillus thuringiensis (Bt) are effective against many pests. For powdery mildew, improve air circulation and apply a fungicide if necessary.
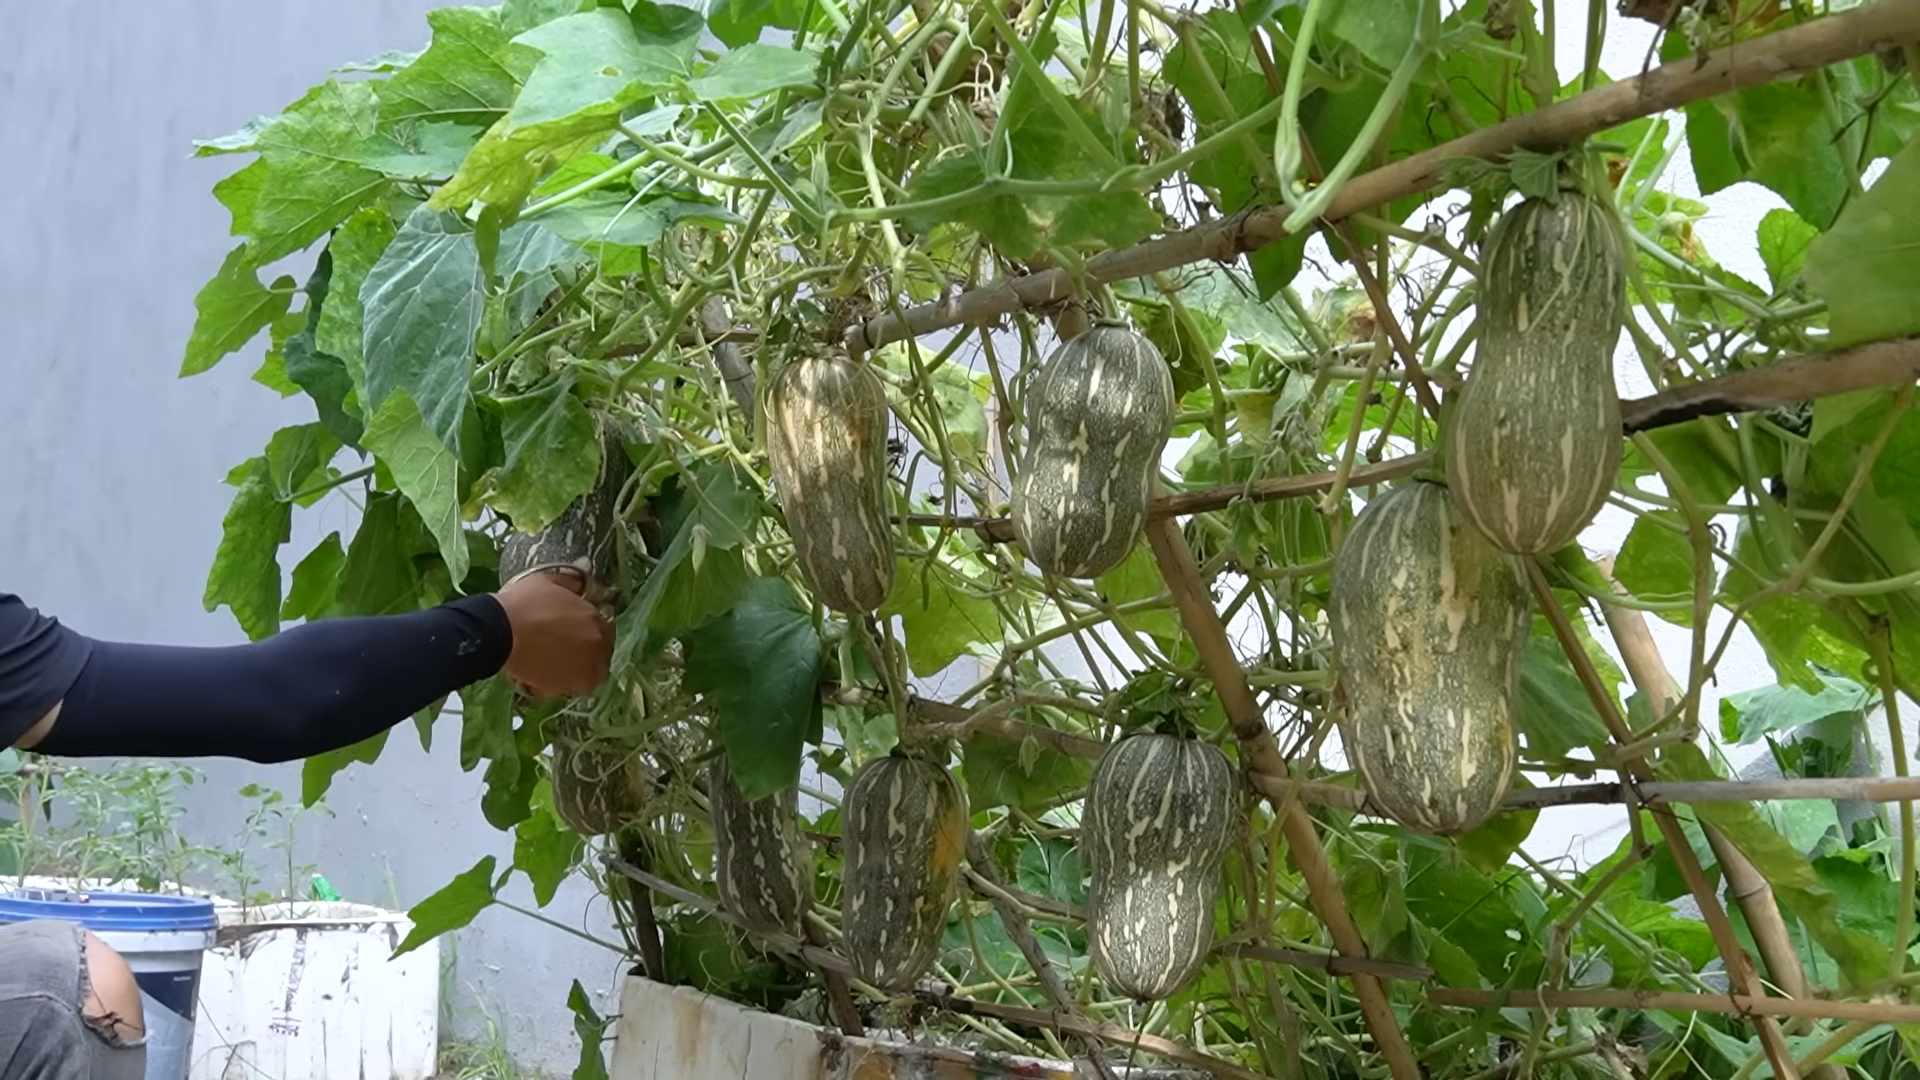
6. Vine Training (Optional): If you’re growing pumpkins in a small space, you can train the vines to grow in a specific direction. Use stakes or trellises to support the vines. Be careful not to damage the vines when training them.
7. Protecting the Pumpkins: As the pumpkins grow, place a piece of cardboard or straw underneath them to prevent them from rotting. This also helps to keep them clean.
Harvesting Your Pumpkins
The moment we’ve all been waiting for!
1. Timing: Pumpkins are typically ready to harvest in the fall, when the vines start to die back and the pumpkins have reached their mature color. The skin should be hard and resistant to scratching.
2. Harvesting: Use a sharp knife or pruning shears to cut the pumpkin from the vine, leaving about 3-4 inches of stem attached. This helps to prevent rot.
3. Curing: Cure the pumpkins in a warm, dry place for about 1-2 weeks. This helps to harden the skin and prolong their storage life.
4. Storage: Store cured pumpkins in a cool, dry place with good ventilation. They can last for several months if stored properly.
Troubleshooting Common Pumpkin Problems
Even with the best planning, you might encounter some challenges. Here are a few common problems and how to address them:
* Poor Germination: If your seeds aren’t germinating, make sure the soil is warm enough and moist but not waterlogged. You can also try scarifying the seeds (lightly scratching the surface) before planting to improve germination.
* Lack of Flowers: If your plants are growing but not producing flowers, they may not be getting enough sunlight or nutrients. Make sure they’re getting at least 6-8 hours of direct sunlight per day and fertilize them regularly.
* Fruit Rot: Fruit rot can be caused by fungal diseases or pests. Improve air circulation, avoid watering the foliage, and use organic pest control methods.
* Small Pumpkins: If your pumpkins are small, they may not be getting enough water or nutrients. Water deeply and regularly and fertilize them every 2-3 weeks. You can also try thinning the number of pumpkins on each vine to allow the remaining pumpkins to grow larger.
Choosing the Right Pumpkin Variety
This is where you can really personalize your pumpkin patch! Here are a few popular varieties to consider:
* Jack O’ Lantern: The classic carving pumpkin.
Conclusion
So, there you have it! Transforming your garden into a pumpkin paradise is not only achievable but incredibly rewarding. This DIY trick, focusing on creating the ideal environment for your pumpkin vines, is a game-changer for anyone serious about growing impressive, healthy pumpkins. Forget struggling with stunted growth, blossom end rot, or disappointing yields. By implementing these simple yet effective techniques, you’re setting yourself up for a bountiful harvest and a truly stunning autumnal display.
This isn’t just about growing pumpkins; it’s about creating an experience. Imagine the joy of watching your tiny seedlings explode into sprawling vines, the anticipation as the first fruits begin to swell, and the pride of harvesting pumpkins that are the envy of the neighborhood. This DIY pumpkin garden transformation is an investment in beauty, satisfaction, and maybe even a little friendly competition!
But don’t just take our word for it. The real magic happens when you put these tips into practice. And the best part? There’s plenty of room for customization.
Consider these variations to tailor the process to your specific needs and preferences:
* **Companion Planting Power:** Experiment with companion plants like marigolds, nasturtiums, or basil to deter pests and attract beneficial insects. These not only protect your pumpkins but also add vibrant color and fragrance to your garden.
* **Vertical Gardening for Small Spaces:** If you’re short on space, train your pumpkin vines to grow vertically on a sturdy trellis or fence. This maximizes your growing area and creates a dramatic visual effect. Just be sure to provide extra support for the developing pumpkins as they get heavier.
* **Soil Amendments for Specific Needs:** While we’ve covered the basics of soil preparation, consider adding specific amendments based on your soil type. For clay soil, incorporate more organic matter like compost or aged manure to improve drainage. For sandy soil, add peat moss or coconut coir to help retain moisture.
* **Heirloom Variety Exploration:** Don’t limit yourself to the standard orange pumpkins. Explore the fascinating world of heirloom varieties, each with its unique shape, color, and flavor. From the ghostly white ‘Lumina’ to the deeply ribbed ‘Rouge Vif d’Etampes,’ there’s a pumpkin out there to suit every taste.
* **Watering System Optimization:** Consider using a soaker hose or drip irrigation system to deliver water directly to the roots of your pumpkin plants. This minimizes water waste and ensures that your plants receive consistent moisture.
We are confident that this DIY pumpkin garden transformation will revolutionize your pumpkin growing experience. So, grab your gardening gloves, gather your supplies, and get ready to create a pumpkin patch that will be the talk of the town.
We can’t wait to hear about your successes (and even your challenges!). Share your photos, tips, and stories with us in the comments below. Let’s build a community of passionate pumpkin growers and inspire each other to create even more amazing gardens. Happy growing!
Frequently Asked Questions (FAQ)
Q: How much space do I really need for a pumpkin garden?
A: That’s a great question! Pumpkin vines are notorious for their sprawling nature. As a general rule, give each plant at least 50 to 100 square feet of space. Smaller varieties like pie pumpkins can get away with less, perhaps 30-40 square feet. Giant pumpkins, on the other hand, need even more – think 200 square feet or more per plant. Consider vertical gardening if space is truly limited, but remember to support the heavy fruits.
Q: What’s the best time to start my pumpkin seeds?
A: Timing is crucial for a successful harvest. Pumpkins need a long growing season, typically 90-120 days. In most regions, you’ll want to start your seeds indoors about 2-3 weeks before the last expected frost. If you live in a warmer climate with a longer growing season, you can direct sow the seeds after the danger of frost has passed. Check your local frost dates to determine the optimal planting time for your area.
Q: My pumpkin plants are producing flowers, but no pumpkins are forming. What’s going on?
A: This is a common issue, and it’s usually related to pollination. Pumpkins have both male and female flowers. The male flowers appear first and are responsible for producing pollen. The female flowers have a small, immature pumpkin at the base of the flower. For pumpkins to form, the female flowers need to be pollinated by the male flowers. Bees are the primary pollinators, but if you’re not seeing much bee activity, you can hand-pollinate the flowers yourself. Simply use a small brush to transfer pollen from the male flower to the female flower.
Q: How often should I water my pumpkin plants?
A: Pumpkins need consistent moisture, especially during fruit development. Water deeply and regularly, aiming for about 1-2 inches of water per week. Avoid overhead watering, as this can lead to fungal diseases. Instead, water at the base of the plants, using a soaker hose or drip irrigation system if possible. Check the soil moisture regularly and adjust your watering schedule accordingly.
Q: What are some common pests and diseases that affect pumpkin plants, and how can I prevent them?
A: Pumpkins are susceptible to several pests and diseases, including squash bugs, squash vine borers, powdery mildew, and downy mildew. To prevent these problems, practice good garden hygiene. Remove any dead or diseased leaves and debris from around the plants. Rotate your crops each year to prevent soilborne diseases from building up. Use row covers to protect young plants from pests. If you do encounter pests or diseases, treat them promptly with appropriate organic or chemical controls.
Q: How do I know when my pumpkins are ripe and ready to harvest?
A: Several signs indicate that your pumpkins are ripe. The skin should be hard and resistant to scratching. The stem should be dry and brown. The color should be deep and uniform. When you tap the pumpkin, it should sound hollow. Leave about 3-4 inches of stem attached when you harvest the pumpkin.
Q: Can I grow pumpkins in containers?
A: While it’s possible to grow pumpkins in containers, it’s more challenging than growing them in the ground. You’ll need a very large container (at least 20 gallons) and a well-draining potting mix. Choose a smaller variety of pumpkin, such as a pie pumpkin or a miniature pumpkin. Water and fertilize regularly, and provide support for the vines.
Q: What kind of fertilizer should I use for my pumpkin plants?
A: Pumpkins are heavy feeders and benefit from regular fertilization. Use a balanced fertilizer (e.g., 10-10-10) at planting time. Once the plants start to flower, switch to a fertilizer that is higher in phosphorus and potassium (e.g., 5-15-15) to promote fruit development. You can also supplement with compost tea or other organic fertilizers.
Q: How can I encourage larger pumpkin growth?
A: If you’re aiming for giant pumpkins, there are a few things you can do to encourage larger growth. First, choose a variety that is known for producing large pumpkins, such as the ‘Atlantic Giant.’ Second, provide the plants with plenty of space, sunlight, water, and nutrients. Third, prune the vines to focus the plant’s energy on developing a single pumpkin. Finally, protect the developing pumpkin from pests and diseases.
Q: What can I do with my pumpkins after I harvest them?
A: The possibilities are endless! You can use them for cooking, baking, carving, decorating, or even making pumpkin puree. Pumpkin seeds can be roasted and eaten as a snack. Pumpkin flesh can be used to make pies, soups, breads, and other delicious dishes. And of course, pumpkins are a classic decoration for Halloween and Thanksgiving. Don’t forget to compost any leftover pumpkin scraps to enrich your garden soil!

Leave a Comment