
Propagate Mogra Jasmine Cuttings: Ever dreamt of filling your garden with the intoxicating fragrance of Mogra Jasmine, without breaking the bank? I know I have! There’s something truly magical about these delicate white blossoms, their scent instantly transporting you to a serene, sun-drenched paradise. But what if I told you that you could easily multiply your Mogra Jasmine plants with a simple DIY trick?
The Mogra Jasmine, also known as Arabian Jasmine, isn’t just a beautiful flower; it’s steeped in history and cultural significance. For centuries, it has been cherished in India and Southeast Asia, used in religious ceremonies, traditional medicine, and of course, perfumery. Its captivating aroma has made it a symbol of love, purity, and good fortune.
Now, you might be thinking, “Propagating plants sounds complicated!” But trust me, it doesn’t have to be. This DIY guide will walk you through the process of propagate Mogra Jasmine cuttings step-by-step, making it accessible even for beginners. Why spend a fortune buying new plants when you can create your own from existing ones? Not only is it cost-effective, but it’s also incredibly rewarding to nurture new life from a simple cutting. Plus, you’ll have the satisfaction of knowing you did it yourself! So, grab your gardening gloves, and let’s get started on this exciting journey of propagating Mogra Jasmine cuttings!
Mogra Jasmin Stecklinge ziehen: Dein DIY-Leitfaden für duftende Blüten
Hallo Pflanzenfreunde! Ich liebe den betörenden Duft von Mogra Jasmin (Arabischer Jasmin) und wollte schon immer mehr davon in meinem Garten haben. Anstatt neue Pflanzen zu kaufen, habe ich mich entschieden, Stecklinge zu ziehen. Es ist nicht nur kostengünstiger, sondern auch unglaublich befriedigend, zu sehen, wie aus einem kleinen Zweig eine neue Pflanze entsteht. In diesem Artikel zeige ich dir Schritt für Schritt, wie du das auch schaffen kannst!
Was du brauchst: Deine Werkzeugkiste für den Erfolg
Bevor wir loslegen, hier eine Liste der Dinge, die du benötigst:
* Gesunde Mogra Jasmin Pflanze: Das ist natürlich die Basis! Wähle eine Mutterpflanze, die kräftig wächst und keine Anzeichen von Krankheiten oder Schädlingen aufweist.
* Scharfe und saubere Gartenschere oder Messer: Hygiene ist wichtig, um Infektionen zu vermeiden. Desinfiziere deine Werkzeuge vor der Verwendung mit Alkohol.
* Bewurzelungshormon (optional, aber empfohlen): Hilft den Stecklingen, schneller und zuverlässiger Wurzeln zu bilden. Ich verwende gerne ein Pulver, aber es gibt auch flüssige Varianten.
* Anzuchterde: Eine leichte, gut durchlässige Erde ist ideal für die Bewurzelung. Du kannst spezielle Anzuchterde kaufen oder eine Mischung aus Torfmoos, Perlit und Vermiculit selbst herstellen.
* Kleine Töpfe oder Anzuchtplatten: Wähle die Größe entsprechend der Anzahl der Stecklinge, die du ziehen möchtest.
* Plastiktüten oder Mini-Gewächshaus: Um die Luftfeuchtigkeit hoch zu halten, was für die Bewurzelung entscheidend ist.
* Sprühflasche mit Wasser: Zum Befeuchten der Stecklinge und der Erde.
* Etiketten und Stift: Um die verschiedenen Stecklinge zu kennzeichnen, falls du verschiedene Sorten hast oder einfach den Überblick behalten möchtest.
* Geduld: Die Bewurzelung kann einige Wochen dauern, also nicht entmutigen lassen!
Die Vorbereitung: Der Schlüssel zum Erfolg
Bevor wir mit dem Schneiden beginnen, ist es wichtig, die Mutterpflanze gut zu wässern. Das hilft, den Stress für die Pflanze zu minimieren.
Stecklinge schneiden: Der richtige Schnitt macht den Unterschied
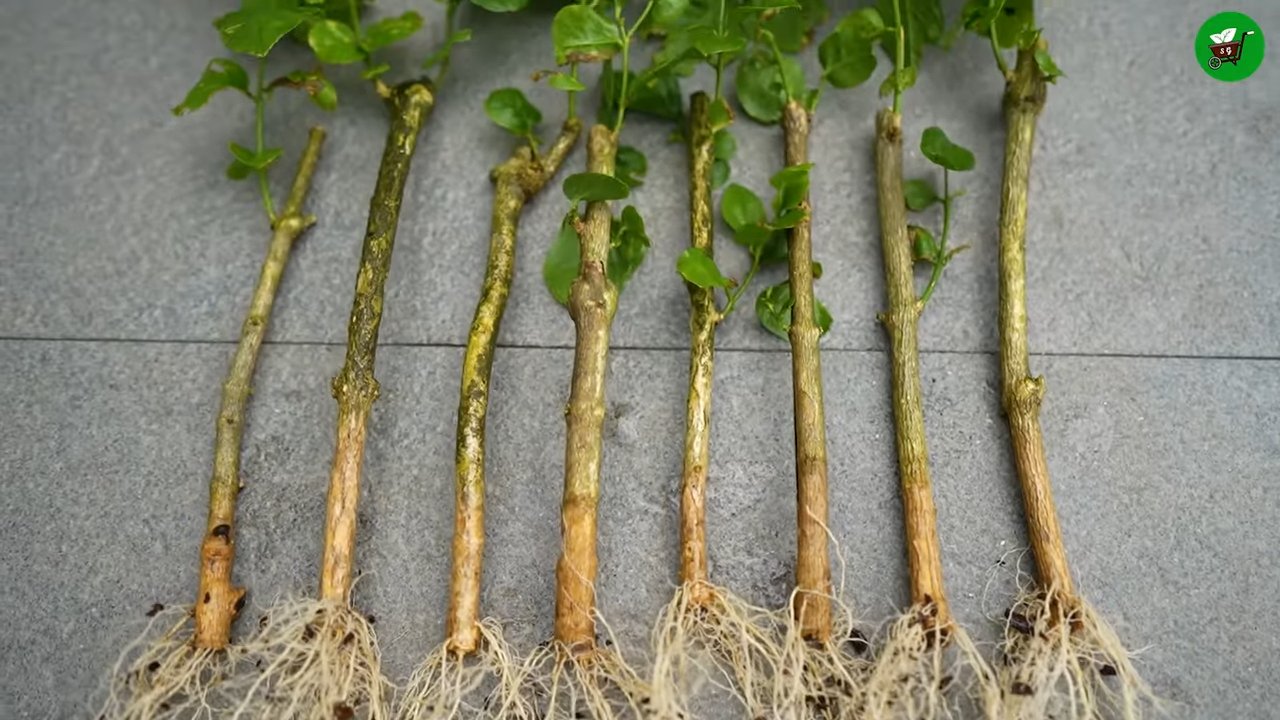
1. Wähle die richtigen Triebe: Suche nach gesunden, nicht blühenden Trieben. Ideal sind Triebe, die etwa 10-15 cm lang sind und mehrere Blattknoten haben.
2. Schneide den Trieb: Schneide den Trieb mit deiner scharfen Gartenschere oder dem Messer direkt unterhalb eines Blattknotens ab. Dieser Schnittpunkt ist reich an Hormonen, die die Wurzelbildung fördern.
3. Entferne die unteren Blätter: Entferne die Blätter im unteren Drittel des Stecklings. Das verhindert, dass sie im Boden verrotten und reduziert die Verdunstung, was dem Steckling hilft, Energie für die Wurzelbildung zu sparen.
4. Reduziere die verbleibenden Blätter: Schneide die verbleibenden Blätter um die Hälfte zurück. Auch das reduziert die Verdunstung und hilft dem Steckling, sich auf die Wurzelbildung zu konzentrieren.
Bewurzelungshormon anwenden: Ein kleiner Helfer für große Ergebnisse
1. Befeuchte das untere Ende des Stecklings: Tauche das untere Ende des Stecklings kurz in Wasser.
2. Tauche den Steckling in das Bewurzelungshormon: Tauche das feuchte Ende des Stecklings in das Bewurzelungshormon. Achte darauf, dass das Hormon gut haftet. Klopfe überschüssiges Hormon vorsichtig ab.
Einpflanzen der Stecklinge: Ein neues Zuhause für junge Pflanzen
1. Fülle die Töpfe mit Anzuchterde: Fülle die Töpfe oder Anzuchtplatten mit der vorbereiteten Anzuchterde.
2. Mache ein Loch in die Erde: Verwende einen Bleistift oder einen Finger, um ein Loch in die Erde zu machen, das tief genug ist, um den Steckling aufzunehmen.
3. Setze den Steckling ein: Setze den Steckling vorsichtig in das Loch ein und drücke die Erde leicht an. Achte darauf, dass die Blattknoten, von denen du die Blätter entfernt hast, unter der Erde liegen.
4. Gieße die Stecklinge: Gieße die Stecklinge vorsichtig mit einer Sprühflasche, um die Erde zu befeuchten. Vermeide Staunässe.
Die richtige Umgebung schaffen: Luftfeuchtigkeit und Licht sind entscheidend
1. Erhöhe die Luftfeuchtigkeit: Um die Luftfeuchtigkeit hoch zu halten, stelle die Töpfe mit den Stecklingen in Plastiktüten oder ein Mini-Gewächshaus. Du kannst auch eine durchsichtige Plastikflasche über jeden Topf stülpen.
2. Platziere die Stecklinge an einem hellen, indirekten Ort: Stelle die Stecklinge an einen Ort, der hell, aber nicht direkt der Sonne ausgesetzt ist. Direkte Sonneneinstrahlung kann die Stecklinge verbrennen.
3. Lüfte regelmäßig: Lüfte die Stecklinge täglich, indem du die Plastiktüten oder das Mini-Gewächshaus kurz öffnest. Das verhindert die Bildung von Schimmel.
4. Befeuchte die Stecklinge regelmäßig: Befeuchte die Stecklinge regelmäßig mit einer Sprühflasche, um die Luftfeuchtigkeit hoch zu halten und die Erde feucht zu halten.
Geduld und Pflege: Die Belohnung kommt mit der Zeit
1. Beobachte die Stecklinge: Überprüfe die Stecklinge regelmäßig auf Anzeichen von Wurzelbildung. Nach einigen Wochen solltest du neue Triebe oder Wurzeln sehen.
2. Gieße sparsam: Gieße die Stecklinge sparsam, um Staunässe zu vermeiden. Die Erde sollte feucht, aber nicht nass sein.
3. Dünge nicht: Dünge die Stecklinge während der Bewurzelungsphase nicht. Sie benötigen die Nährstoffe aus der Erde nicht, da sie sich auf die Wurzelbildung konzentrieren.
4. Härte die Stecklinge ab: Sobald die Stecklinge Wurzeln gebildet haben, beginne, sie langsam an die Außenbedingungen zu gewöhnen. Öffne die Plastiktüten oder das Mini-Gewächshaus für längere Zeiträume, bevor du sie ganz entfernst.
Umtopfen: Ein neues Kapitel für deine Mogra Jasmin Pflanzen
1. Wähle einen größeren Topf: Wähle einen Topf, der etwas größer ist als der vorherige.
2. Verwende eine gute Blumenerde: Verwende eine gute Blumenerde, die gut durchlässig ist.
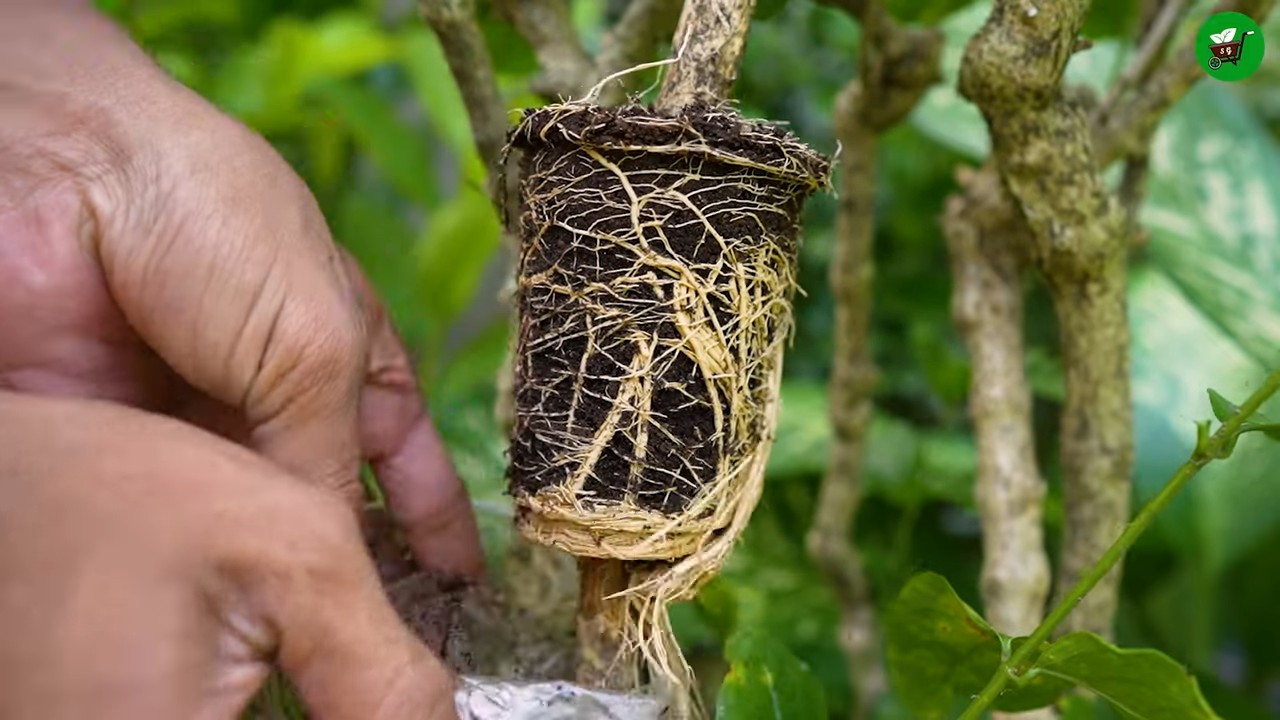
3. Topfe die Stecklinge um: Topfe die Stecklinge vorsichtig um und achte darauf, die Wurzeln nicht zu beschädigen.
4. Gieße die Pflanzen: Gieße die Pflanzen nach dem Umtopfen gründlich.
Die Pflege danach: Damit deine Mogra Jasmin Pflanzen prächtig gedeihen
* Standort: Mogra Jasmin liebt die Sonne! Stelle deine Pflanzen an einen sonnigen Standort, der mindestens 6 Stunden Sonnenlicht pro Tag erhält.
* Gießen: Gieße regelmäßig, besonders während der Wachstumsperiode. Achte darauf, dass die Erde zwischen den Wassergaben leicht antrocknet.
* Düngen: Dünge deine Mogra Jasmin Pflanzen regelmäßig mit einem ausgewogenen Dünger.
* Beschneiden: Beschneide deine Pflanzen regelmäßig, um sie in Form zu halten und die Blütenbildung zu fördern.
* Überwintern: In kälteren Regionen musst du deine Mogra Jasmin Pflanzen im Winter ins Haus holen. Stelle sie an einen hellen, kühlen Ort und gieße sie sparsam.
Häufige Probleme und Lösungen: Keine Angst vor Herausforderungen
* Stecklinge verrotten: Das kann passieren, wenn die Luftfeuchtigkeit zu hoch ist oder die Erde zu nass ist. Lüfte die Stecklinge regelmäßig und gieße sparsamer.
* Stecklinge bilden keine Wurzeln: Das kann verschiedene Ursachen haben, z. B. zu wenig Licht, zu niedrige Luftfeuchtigkeit oder die Verwendung von ungeeigneten Stecklingen. Überprüfe die Bedingungen und passe sie gegebenenfalls an.
* Schädlinge: Mogra Jasmin kann von Sch
Conclusion
So, there you have it! Mastering the art of propagating Mogra Jasmine cuttings is not only achievable but also incredibly rewarding. We’ve walked you through the process, from selecting the perfect cutting to nurturing it into a thriving new plant. Why is this DIY trick a must-try? Because it empowers you to expand your fragrant Mogra Jasmine collection without spending a fortune. Imagine filling your garden or balcony with the intoxicating scent of these beautiful blooms, all thanks to your own green thumb.
Beyond the cost savings, propagating your own Mogra Jasmine cuttings offers a unique connection to your plants. You’re actively participating in their life cycle, fostering a deeper appreciation for their beauty and resilience. Plus, it’s a fantastic way to share the joy of gardening with friends and family – imagine gifting a newly rooted Mogra Jasmine plant, knowing you nurtured it from a simple cutting!
But the possibilities don’t stop there. Feel free to experiment with different rooting mediums. While we recommended a well-draining potting mix, you could also try using perlite, vermiculite, or even a combination of these. Some gardeners have success with water propagation, although this method can sometimes lead to weaker root systems. If you’re feeling adventurous, try using a rooting hormone powder or gel to further enhance root development. Just be sure to follow the instructions on the product label carefully.
Another variation to consider is the type of container you use for rooting. While small pots are ideal, you can also use seedling trays or even repurposed plastic containers. Just make sure the container has drainage holes to prevent waterlogging. You can also experiment with different sizes of cuttings. While we recommended cuttings that are 4-6 inches long, you can try using shorter or longer cuttings to see what works best for you. Keep in mind that shorter cuttings may be more prone to drying out, while longer cuttings may take longer to root.
The key to success with propagating Mogra Jasmine cuttings is patience and observation. Don’t be discouraged if your first attempt isn’t successful. Gardening is a learning process, and every failure is an opportunity to learn and improve. Keep an eye on your cuttings, ensuring they receive adequate moisture and light. Be patient and wait for the roots to develop.
We are confident that with a little effort and attention, you can successfully propagate your own Mogra Jasmine cuttings and enjoy the beauty and fragrance of these wonderful plants for years to come.
So, what are you waiting for? Grab your pruning shears, select a healthy Mogra Jasmine plant, and get started! We encourage you to try this DIY trick and share your experience with us. Let us know in the comments below how your propagation efforts are going. Share your tips, tricks, and any challenges you encounter along the way. We’re all in this together, learning and growing as gardeners. We can’t wait to hear your success stories and see your beautiful new Mogra Jasmine plants! Happy propagating!
Frequently Asked Questions (FAQ)
How long does it take for Mogra Jasmine cuttings to root?
Rooting time can vary depending on several factors, including the health of the cutting, the rooting medium, the temperature, and the humidity. Generally, you can expect to see roots developing within 4-8 weeks. Be patient and avoid disturbing the cuttings too much during this time. Gently tug on the cutting after a few weeks; if you feel resistance, it means roots have started to form.
What is the best time of year to propagate Mogra Jasmine cuttings?
The best time to propagate Mogra Jasmine cuttings is during the spring or early summer, when the plant is actively growing. This is when the cuttings will have the best chance of rooting successfully. Avoid propagating during the dormant season (winter) as the cuttings will be less likely to root.
What kind of soil should I use for rooting Mogra Jasmine cuttings?
A well-draining potting mix is essential for rooting Mogra Jasmine cuttings. You can use a commercially available potting mix or create your own by mixing equal parts of peat moss, perlite, and vermiculite. Avoid using garden soil, as it can be too heavy and may contain pathogens that can harm the cuttings.
How much light do Mogra Jasmine cuttings need?
Mogra Jasmine cuttings need bright, indirect light to root successfully. Avoid placing them in direct sunlight, as this can scorch the leaves. A location near an east-facing window is ideal. If you don’t have access to natural light, you can use a grow light.
How often should I water Mogra Jasmine cuttings?
Keep the rooting medium consistently moist, but not soggy. Water the cuttings when the top inch of soil feels dry to the touch. Avoid overwatering, as this can lead to root rot. You can also increase humidity by misting the cuttings regularly or placing them in a humidity dome.
My Mogra Jasmine cuttings are turning yellow. What should I do?
Yellowing leaves can be a sign of several problems, including overwatering, underwatering, or nutrient deficiency. Check the moisture level of the rooting medium and adjust your watering accordingly. If the cuttings are getting too much direct sunlight, move them to a shadier location. You can also try fertilizing the cuttings with a diluted liquid fertilizer.
Can I propagate Mogra Jasmine cuttings in water?
Yes, you can propagate Mogra Jasmine cuttings in water, but it’s not always the most successful method. Water-rooted cuttings can sometimes develop weaker root systems that are less able to adapt to soil. If you choose to propagate in water, change the water every few days to prevent the growth of algae and bacteria. Once the roots are about an inch long, carefully transplant the cuttings into a well-draining potting mix.
What is rooting hormone and do I need to use it?
Rooting hormone is a substance that promotes root development in plant cuttings. It contains auxins, which are plant hormones that stimulate root growth. While not essential, using rooting hormone can significantly increase the success rate of propagating Mogra Jasmine cuttings. It helps to speed up the rooting process and encourages the development of stronger, healthier roots. You can find rooting hormone in powder or gel form at most garden centers.
How do I know when my Mogra Jasmine cuttings are ready to be transplanted?
Your Mogra Jasmine cuttings are ready to be transplanted when they have developed a strong root system. This typically takes 4-8 weeks. You should see several roots that are at least an inch long. Gently remove the cuttings from the rooting medium and carefully inspect the roots. If the roots are well-developed and healthy, you can transplant the cuttings into individual pots filled with a well-draining potting mix.
What kind of pot should I use for transplanting my Mogra Jasmine cuttings?
Choose a pot that is slightly larger than the root ball of the cutting. A 4-inch pot is usually a good size for transplanting Mogra Jasmine cuttings. Make sure the pot has drainage holes to prevent waterlogging. You can use a plastic or terracotta pot, depending on your preference.
How do I care for my newly transplanted Mogra Jasmine plants?
After transplanting your Mogra Jasmine plants, water them thoroughly and place them in a location with bright, indirect light. Keep the soil consistently moist, but not soggy. Fertilize the plants regularly with a balanced liquid fertilizer. As the plants grow, you can gradually increase the amount of sunlight they receive. Prune the plants regularly to encourage bushier growth and more blooms.
My propagated Mogra Jasmine cutting is not flowering. What can I do?
Several factors can contribute to a lack of flowering in Mogra Jasmine. Ensure the plant is receiving enough sunlight (at least 6 hours of direct sunlight per day). Fertilize regularly with a fertilizer formulated for flowering plants, paying attention to phosphorus levels. Prune the plant after flowering to encourage new growth and more blooms in the following season. Also, ensure the plant is not stressed by overwatering or underwatering. Patience is key; sometimes it takes a young plant a year or two to mature enough to flower profusely.

Leave a Comment