
Potato Grow Bags: Unlock the secrets to bountiful harvests right on your patio! Have you ever dreamed of digging up your own fresh, homegrown potatoes, but thought you didn’t have the space? Well, dream no more! This DIY guide will show you how to cultivate a thriving potato patch, even if you only have a small balcony or a sunny corner in your yard.
The concept of container gardening, including using grow bags, has been around for centuries. From the hanging gardens of Babylon to the resourceful gardeners of the Victorian era, people have always found innovative ways to grow food in limited spaces. Potatoes, in particular, have a rich history, originating in the Andes Mountains and becoming a staple food around the world. Now, you can participate in this tradition, bringing the joy of potato cultivation to your own home.
Why Potato Grow Bags? Because they’re a game-changer! Traditional in-ground gardening can be labor-intensive and requires a significant amount of space. Grow bags offer a convenient, portable, and space-saving solution. They also provide excellent drainage and aeration, which are crucial for healthy potato growth. Plus, the best part? Harvesting is a breeze! No more digging around in the dirt – simply unzip the side of the bag and collect your delicious potatoes. I’m excited to share these simple yet effective techniques that will transform your gardening experience and bring the taste of homegrown goodness to your table. Let’s get growing!
DIY Potato Grow Bags: Bountiful Harvests in Small Spaces!
Hey there, fellow gardening enthusiasts! I’m so excited to share my favorite way to grow potatoes, especially if you’re short on space: potato grow bags! Forget digging up your entire garden to find those hidden treasures; with these bags, harvesting is a breeze. Plus, it’s a super rewarding DIY project. Let’s get started!
What You’ll Need
Before we dive in, let’s gather our supplies. This is what I use, but feel free to adapt based on what you have available:
* Heavy-duty Woven Polypropylene Bags: These are the key! Look for bags that are at least 10-15 gallons in size. You can often find them at feed stores, garden centers, or online. Burlap sacks can also work, but they might not last as long.
* Potting Mix: A good quality potting mix is crucial. Avoid using garden soil directly, as it can compact and hinder drainage. I prefer a mix that’s light and airy, with good water retention.
* Seed Potatoes: These aren’t seeds, but rather small potatoes specifically grown for planting. You can find them at your local garden center in the spring. Choose a variety you love to eat!
* Sharp Knife or Pruning Shears: For cutting the seed potatoes (if needed).
* Watering Can or Hose: For keeping your potatoes hydrated.
* Fertilizer (Optional): A balanced, slow-release fertilizer can give your potatoes an extra boost.
* Gloves: To keep your hands clean.
* Measuring Cup or Small Shovel: To measure and add the potting mix.
Preparing Your Seed Potatoes
This step is important for maximizing your yield. You can skip it if your seed potatoes are already small (egg-sized or smaller).
1. Chitting (Optional but Recommended): Chitting encourages your seed potatoes to sprout before planting. This gives them a head start and can result in an earlier harvest. To chit, place your seed potatoes in a cool, bright location (but not direct sunlight) for a few weeks. You’ll see small green sprouts emerging from the “eyes” of the potato.
2. Cutting (If Necessary): If your seed potatoes are large (larger than an egg), you’ll want to cut them into smaller pieces. Each piece should have at least 2-3 “eyes” or sprouts.
3. Curing the Cuts: After cutting, let the pieces sit for a day or two to allow the cut surfaces to dry and callous over. This helps prevent rot when you plant them.
Creating Your Potato Grow Bags
Now for the fun part! Let’s assemble our grow bags.
1. Prepare the Bags: If your bags are new, give them a good shake to remove any debris. You might also want to turn them inside out to remove any loose fibers.
2. Add the Initial Layer of Potting Mix: Pour about 4-6 inches of potting mix into the bottom of each bag. This will provide a base for your seed potatoes to grow.
3. Plant the Seed Potatoes: Place 2-3 seed potato pieces (or whole small seed potatoes) on top of the potting mix, spacing them evenly. Make sure the sprouts are facing upwards.
4. Cover the Seed Potatoes: Add another 4-6 inches of potting mix to completely cover the seed potatoes.
5. Water Thoroughly: Water the bags well until the water drains out of the bottom. This will help settle the potting mix and encourage root growth.
Caring for Your Potato Plants
Now that your potatoes are planted, it’s time to nurture them!
1. Location, Location, Location: Place your grow bags in a sunny location that receives at least 6-8 hours of direct sunlight per day.
2. Watering: Keep the potting mix consistently moist, but not soggy. Water when the top inch of soil feels dry to the touch. The frequency of watering will depend on the weather and the drainage of your potting mix.
3. Fertilizing (Optional): If you choose to fertilize, apply a balanced, slow-release fertilizer according to the package directions. You can also use a liquid fertilizer every few weeks.
4. “Hilling” or Adding More Soil: This is the key to a big harvest! As your potato plants grow, you’ll need to add more potting mix to the bags. When the stems are about 6-8 inches tall, add enough potting mix to cover all but the top few leaves. Repeat this process every few weeks as the plants continue to grow. This encourages the plants to produce more potatoes along the buried stems.
5. Pest and Disease Control: Keep an eye out for common potato pests like aphids, potato beetles, and flea beetles. You can handpick them off the plants or use an organic insecticide if necessary. Also, watch for signs of diseases like blight. Good air circulation and proper watering can help prevent these problems.
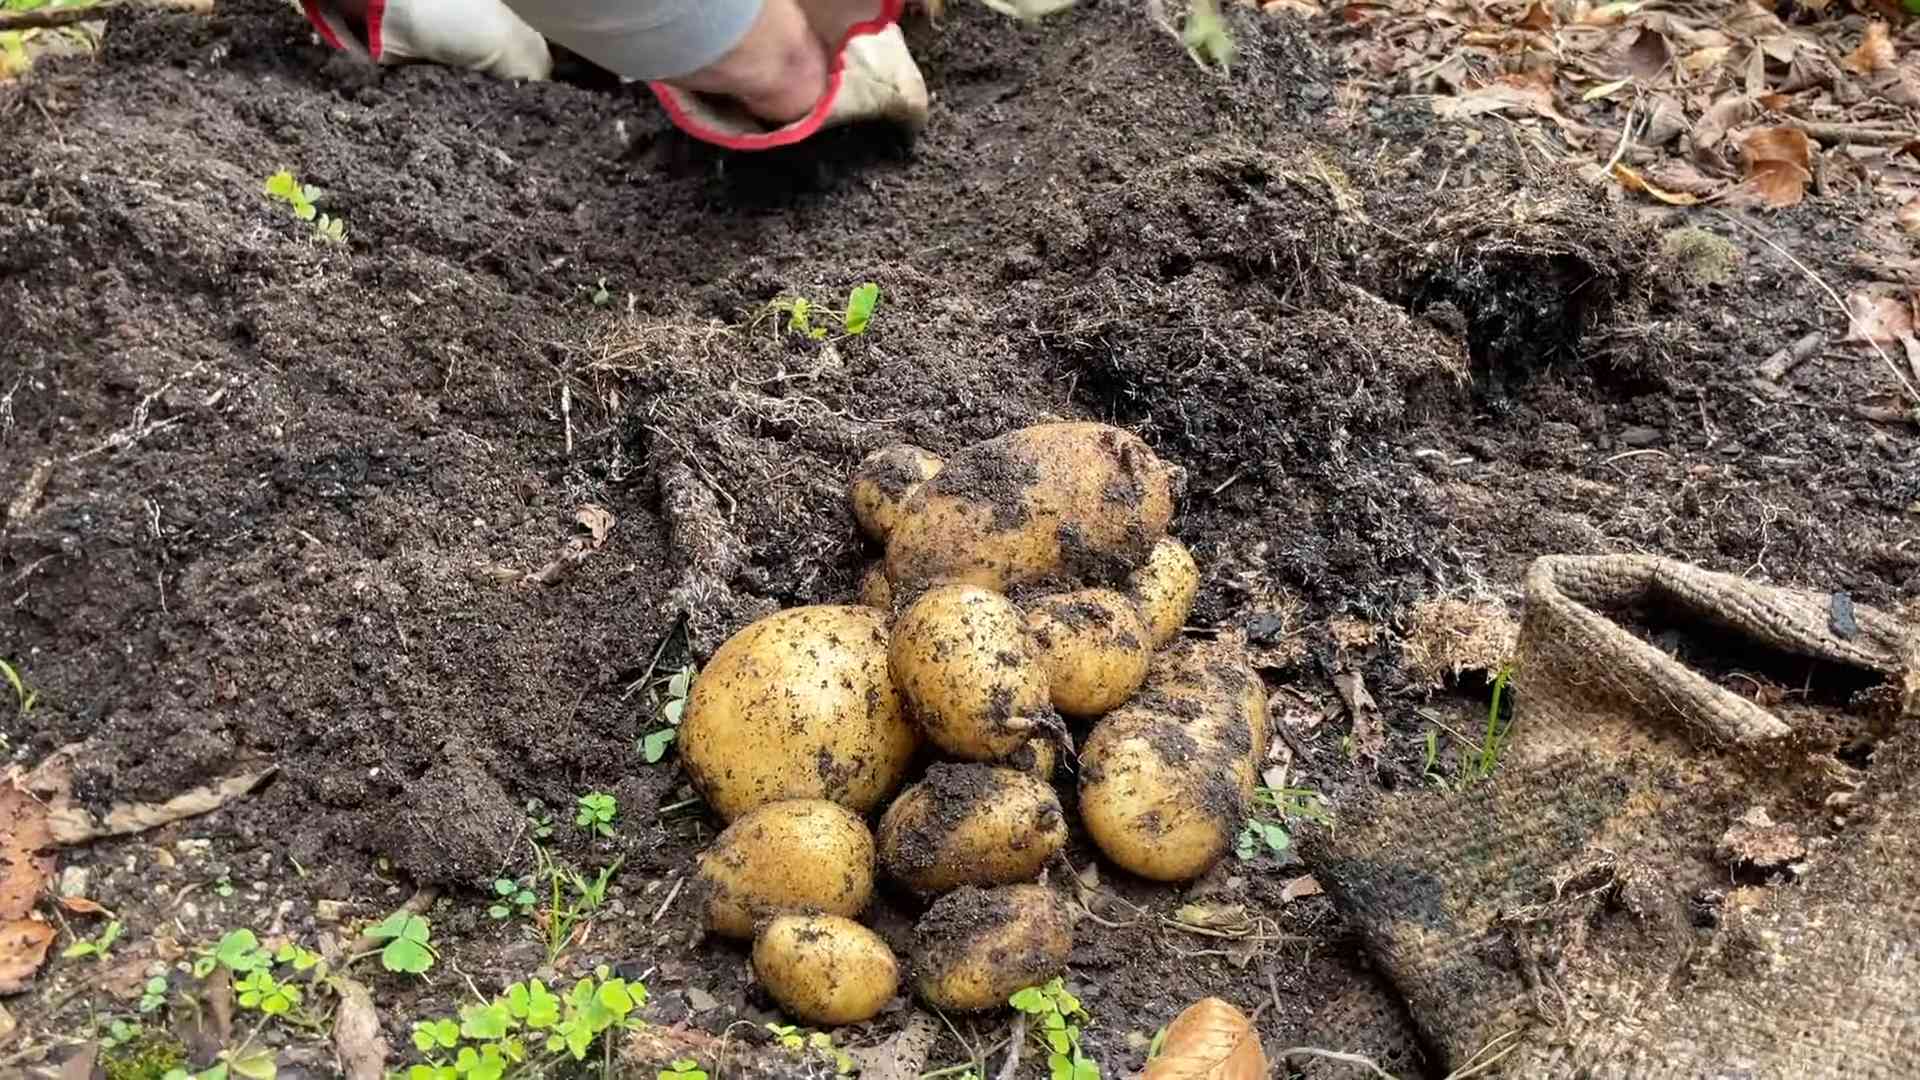
Harvesting Your Potatoes
The moment we’ve all been waiting for! Harvesting is the best part.
1. When to Harvest: You can harvest “new potatoes” (small, tender potatoes) about 2-3 weeks after the plants flower. For larger, more mature potatoes, wait until the foliage starts to die back and turn yellow or brown. This usually takes about 80-100 days from planting.
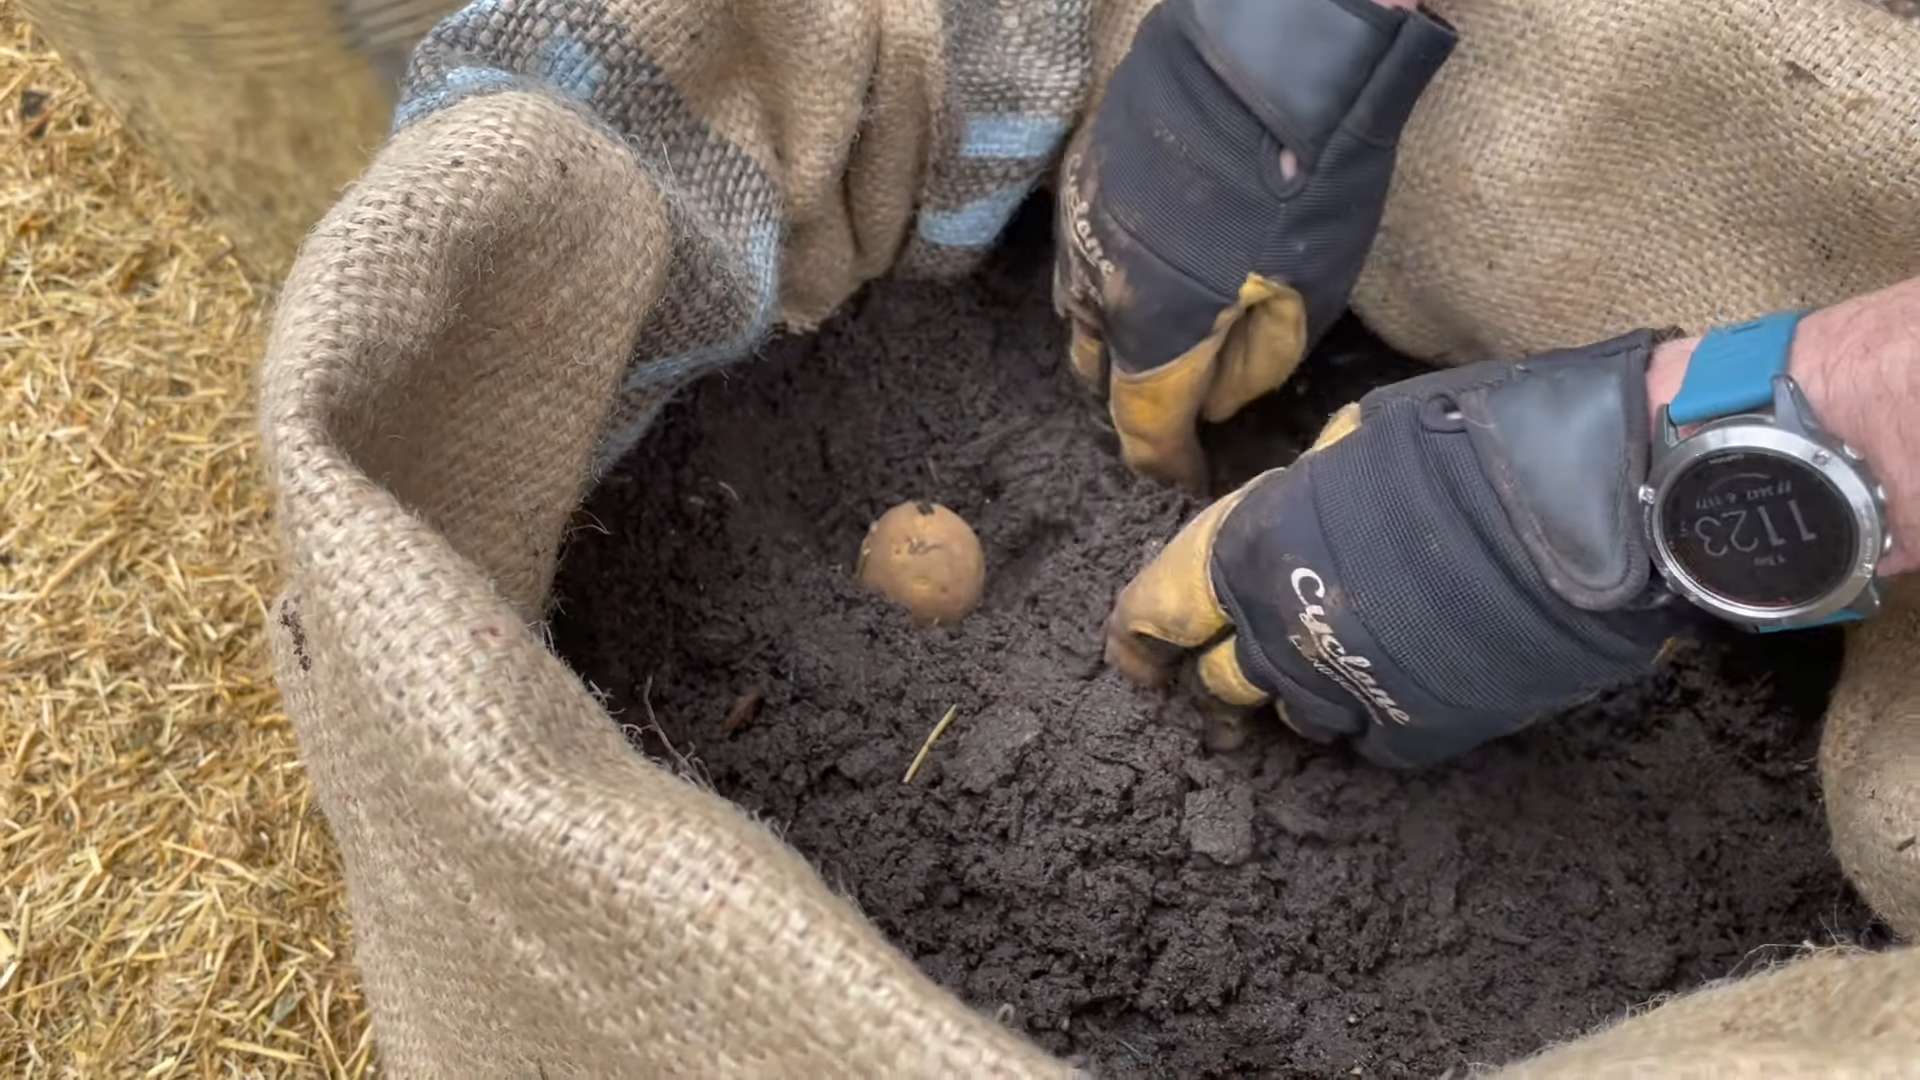
2. Harvesting New Potatoes: To harvest new potatoes, simply reach into the bag and gently pull out a few potatoes. Be careful not to disturb the rest of the plant.
3. Harvesting Mature Potatoes: When the foliage has died back, it’s time to harvest the entire crop. Simply tip the bag over and dump out the contents. You’ll be amazed at how many potatoes you find!
4. Curing Your Potatoes: After harvesting, let your potatoes cure in a cool, dark, and well-ventilated place for about a week. This will help them develop a thicker skin and improve their storage life.
5. Storing Your Potatoes: Store your cured potatoes in a cool, dark, and dry place, such as a root cellar or a cool basement. Avoid storing them in the refrigerator, as this can cause them to develop a sweet taste.
Troubleshooting
Sometimes things don’t go exactly as planned. Here are a few common issues and how to address them:
* Yellowing Leaves: This could be a sign of overwatering, underwatering, nutrient deficiency, or disease. Check the soil moisture, fertilize if necessary, and look for signs of pests or diseases.
* Small Potatoes: This could be due to insufficient sunlight, lack of nutrients, or overcrowding. Make sure your plants are getting enough sunlight, fertilize regularly, and don’t plant too many seed potatoes in each bag.
* Rotting Potatoes: This is usually caused by overwatering or poor drainage. Make sure your potting mix is well-draining and avoid overwatering.
Tips for Success
Here are a few extra tips to help you grow the best potatoes ever:
* Choose the Right Variety: Different potato varieties have different growing requirements and maturity times. Choose a variety that is well-suited to your climate and growing conditions.
* Use High-Quality Potting Mix: Don’t skimp on the potting mix! A good quality mix will provide the nutrients and drainage your potatoes need to thrive.
* Water Regularly: Potatoes need consistent moisture, especially during hot weather.
* Hill Regularly: Don’t forget to add more potting mix as the plants grow! This is the key to a big harvest.
* Don’t Be Afraid to Experiment: Gardening is all about learning and experimenting. Try different varieties, fertilizers, and watering techniques to see what works best for you.
I hope this guide has inspired you to try growing potatoes in grow bags. It’s a fun, easy, and rewarding way to enjoy fresh, homegrown potatoes, even if you don’t have a lot of space. Happy gardening!
Conclusion
So, there you have it! Transforming humble burlap sacks into thriving potato grow bags is not just a cost-effective alternative to store-bought containers; it’s a rewarding experience that connects you directly to the source of your food. We’ve walked you through the simple steps, highlighting the benefits of breathability, drainage, and the sheer joy of watching your potato plants flourish in these rustic, homemade havens.
But why is this DIY trick a must-try? Beyond the obvious financial savings, consider the environmental impact. Reusing burlap sacks reduces waste and promotes a more sustainable gardening practice. Plus, the natural material allows for excellent air circulation around the roots, preventing rot and encouraging healthier, more robust potato growth. You’ll be amazed at the difference it makes!
And the best part? You can customize your potato grow bags to suit your specific needs and preferences. Feel free to experiment with different sizes depending on the variety of potatoes you’re growing. For smaller, early-maturing varieties, a smaller bag will suffice. For larger, late-season potatoes, opt for a more substantial bag to accommodate their extensive root systems.
Consider adding a layer of landscape fabric inside the burlap to further improve drainage and prevent soil from escaping. You can also reinforce the seams with heavy-duty thread for added durability, especially if you plan on reusing the bags for multiple seasons.
Another variation to explore is the addition of handles. Simply attach sturdy rope or webbing to the sides of the bags to make them easier to move around your garden or patio. This is particularly useful if you live in an area with unpredictable weather and need to relocate your potato plants quickly.
Don’t be afraid to get creative with your burlap potato grow bags! You can even decorate them with paint or stencils to add a personal touch to your garden. Imagine rows of burlap bags adorned with whimsical potato-themed designs – a truly unique and eye-catching display!
The beauty of this DIY project lies in its simplicity and adaptability. It’s a perfect activity for gardeners of all skill levels, from seasoned pros to complete beginners. And the satisfaction of harvesting your own homegrown potatoes from these handmade containers is simply unparalleled.
We wholeheartedly encourage you to give this DIY potato grow bag trick a try. It’s a fun, affordable, and environmentally friendly way to grow your own delicious potatoes. Once you’ve experienced the joy of harvesting your own homegrown potatoes from your DIY burlap bags, you’ll never go back to store-bought containers!
So, grab some burlap sacks, gather your supplies, and get ready to embark on a rewarding gardening adventure. And most importantly, don’t forget to share your experiences with us! We’d love to see photos of your DIY potato grow bags and hear about your potato-growing successes. Share your tips, tricks, and variations in the comments below – let’s create a community of burlap bag potato growers! Happy gardening!
Frequently Asked Questions (FAQ)
What kind of burlap sacks should I use for my potato grow bags?
Ideally, you should use food-grade burlap sacks that haven’t been treated with any harmful chemicals. These are often available from coffee roasters, feed stores, or online retailers. Avoid using sacks that have contained pesticides or other toxic substances. If you’re unsure about the history of a particular sack, it’s best to err on the side of caution and choose a different one. New burlap sacks are also readily available and are a safe and reliable option.
How big should my potato grow bags be?
The size of your potato grow bags will depend on the variety of potatoes you’re growing and the amount of space you have available. A good starting point is a bag that’s approximately 18-24 inches in diameter and 24-36 inches tall. This size will provide ample room for the potato plants to develop a healthy root system and produce a good yield. For smaller, early-maturing varieties, you can use smaller bags. Remember that larger bags will require more soil and may be heavier to move.
What kind of soil should I use in my potato grow bags?
Potatoes thrive in well-draining, nutrient-rich soil. A good mix would be equal parts of compost, potting soil, and perlite or vermiculite. The compost provides essential nutrients, the potting soil provides structure, and the perlite or vermiculite improves drainage and aeration. Avoid using heavy clay soil, as it can become waterlogged and lead to root rot. You can also amend your soil with a slow-release fertilizer specifically formulated for potatoes.
How often should I water my potato grow bags?
The watering frequency will depend on the weather conditions and the type of soil you’re using. Generally, you should water your potato grow bags when the top inch of soil feels dry to the touch. Avoid overwatering, as this can lead to root rot. During hot, dry weather, you may need to water your potato plants daily. Check the moisture level regularly and adjust your watering schedule accordingly.
How do I “hill” my potatoes in a grow bag?
“Hilling” is the process of adding more soil to the base of the potato plants as they grow. This encourages the development of more potatoes along the stem. When your potato plants are about 6-8 inches tall, add a few inches of soil to the grow bag, covering the lower part of the stems. Repeat this process every few weeks as the plants continue to grow, until the bag is almost full.
How do I know when my potatoes are ready to harvest from the grow bags?
The timing of your potato harvest will depend on the variety of potatoes you’re growing. Generally, early-maturing potatoes can be harvested about 70-80 days after planting, while late-season potatoes may take 100-120 days. A good indicator that your potatoes are ready to harvest is when the foliage starts to turn yellow and die back. You can also gently dig around the base of the plant to check the size of the potatoes.
Can I reuse my burlap potato grow bags?
Yes, you can reuse your burlap potato grow bags for multiple seasons, provided they are properly cleaned and stored. After harvesting your potatoes, empty the bags and remove any remaining soil and plant debris. Wash the bags thoroughly with soap and water, and allow them to dry completely in the sun. Store the bags in a dry, well-ventilated area until you’re ready to use them again. You may need to reinforce the seams or add a new layer of landscape fabric if the bags have become worn.
What are some common problems I might encounter when growing potatoes in burlap bags?
Some common problems include pests like potato beetles and aphids, diseases like blight, and nutrient deficiencies. Regularly inspect your potato plants for signs of pests or diseases, and take appropriate action if necessary. Ensure that your potato plants are receiving adequate sunlight, water, and nutrients. You can also use organic pest control methods, such as neem oil or insecticidal soap, to protect your plants.
Can I grow other vegetables in burlap bags besides potatoes?
Absolutely! Burlap bags can be used to grow a variety of other vegetables, including tomatoes, peppers, eggplants, and herbs. The breathable fabric and excellent drainage make them ideal for plants that prefer well-drained soil. Just be sure to choose the appropriate size bag for the specific vegetable you’re growing.
Where can I find burlap sacks if I don’t have any?
If you don’t have any burlap sacks readily available, you can often find them at coffee roasters, feed stores, garden centers, or online retailers. You can also check with local businesses that may use burlap sacks for shipping or storage. When sourcing burlap sacks, be sure to choose food-grade sacks that haven’t been treated with any harmful chemicals.
Leave a Comment