
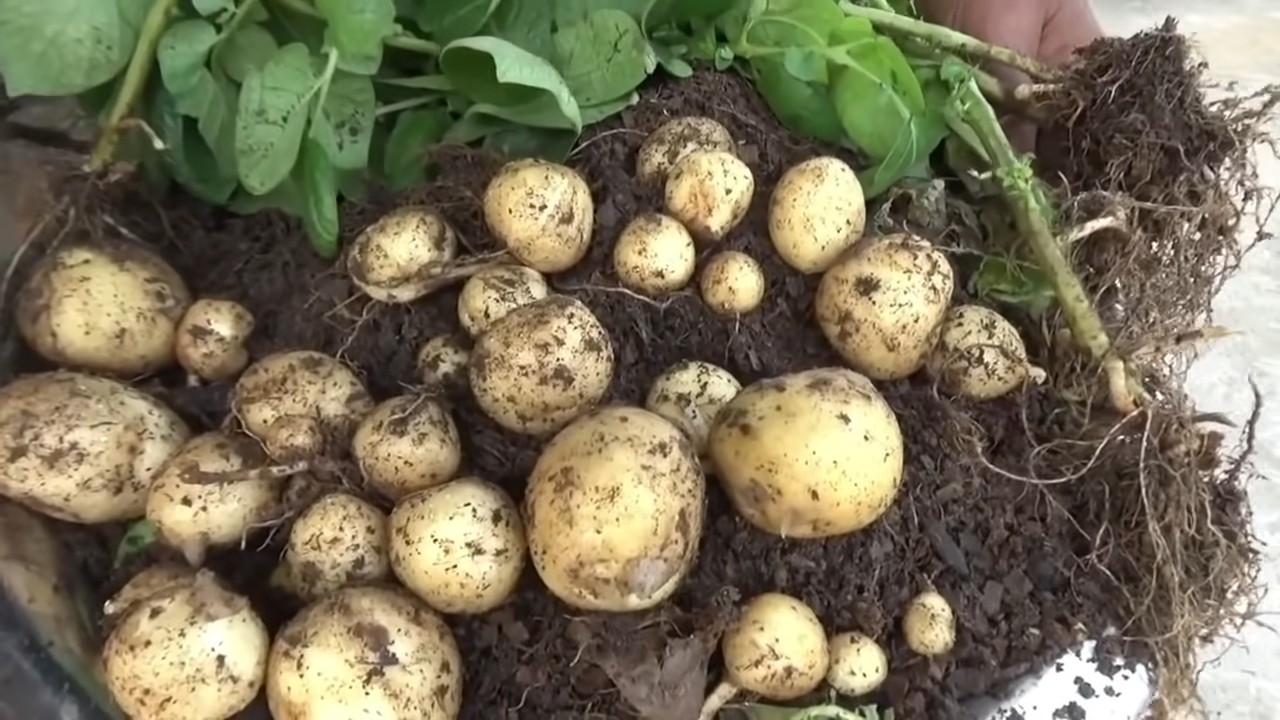
Potato gardening easy trick – ever dreamt of harvesting a mountain of potatoes from your own backyard, without breaking the bank or spending hours toiling away? I know I have! For centuries, potatoes have been a staple food, nourishing communities across the globe. From the Inca civilization in the Andes, where they were first cultivated, to the humble family gardens of today, potatoes hold a special place in our hearts (and stomachs!).
But let’s be honest, traditional potato gardening can seem daunting. All that digging, hilling, and worrying about pests… it’s enough to make anyone reach for a bag of chips instead! That’s where this potato gardening easy trick comes in. I’m going to share a simple, effective, and surprisingly fun method that will have you growing potatoes like a pro, even if you’re a complete beginner.
Why do you need this DIY hack? Because everyone deserves fresh, homegrown potatoes! Imagine the satisfaction of serving up a delicious potato salad made with ingredients you nurtured yourself. Plus, this method is perfect for small spaces, uses minimal resources, and is incredibly rewarding. So, ditch the store-bought spuds and get ready to embark on a potato-growing adventure with me!
Grow Potatoes in a Bag: An Easy DIY Gardening Hack!
Hey there, fellow gardening enthusiasts! I’m so excited to share one of my favorite gardening hacks with you: growing potatoes in a bag! It’s a fantastic way to grow a substantial potato crop, even if you have limited space, like a balcony or small patio. Plus, it’s super easy and rewarding. Trust me, once you try this, you’ll be hooked!
Why Grow Potatoes in a Bag?
Before we dive into the how-to, let’s talk about why this method is so awesome:
* Space-Saving: Perfect for small gardens, balconies, or patios. You don’t need a huge plot of land.
* Easy Harvesting: No more digging around in the dirt! Just tip the bag over when you’re ready to harvest.
* Control Over Soil: You have complete control over the soil composition, ensuring optimal growing conditions.
* Mobility: You can easily move the bag to follow the sun or protect it from harsh weather.
* Fun and Educational: It’s a great project for kids and adults alike, teaching about plant growth and where our food comes from.
What You’ll Need
Okay, let’s gather our supplies. Here’s what you’ll need to get started:
* A Large Bag: I recommend using a sturdy burlap bag, a heavy-duty plastic garbage bag (dark-colored is best), or a specialized grow bag. The bag should be at least 2 feet wide and 2 feet tall. The bigger, the better, as it allows for more potato growth.
* Seed Potatoes: These are potatoes specifically grown for planting. You can find them at your local garden center or online. Choose certified disease-free seed potatoes for the best results. You can use regular potatoes from the grocery store, but they may not sprout as reliably and could carry diseases.
* Potting Mix: Use a high-quality potting mix that’s well-draining. Avoid using garden soil, as it can be too heavy and compact. A mix of compost, peat moss, and perlite works well.
* Water: Essential for keeping your potatoes hydrated.
* Sunlight: Potatoes need at least 6-8 hours of sunlight per day.
* Fertilizer (Optional): A balanced fertilizer can help boost potato growth. I like to use an organic fertilizer.
* Scissors or a Knife: For cutting the seed potatoes (if necessary).
Preparing Your Seed Potatoes
This step is crucial for getting a head start on your potato crop.
1. Chitting (Sprouting): About 2-3 weeks before planting, place your seed potatoes in a cool, bright location (but not direct sunlight). This encourages them to sprout “eyes.” You can use an egg carton or a tray to hold them.
2. Cutting (Optional): If your seed potatoes are large (bigger than an egg), you can cut them into smaller pieces. Make sure each piece has at least 2-3 “eyes.” Let the cut pieces dry for a day or two to callous over. This helps prevent rotting. I usually don’t cut mine unless they are really big.
Planting Your Potatoes
Now for the fun part! Let’s get those potatoes in the bag.
1. Prepare the Bag: If you’re using a plastic bag, poke some drainage holes in the bottom. This is super important to prevent waterlogging.
2. Add Soil: Fill the bag with about 4-6 inches of potting mix.
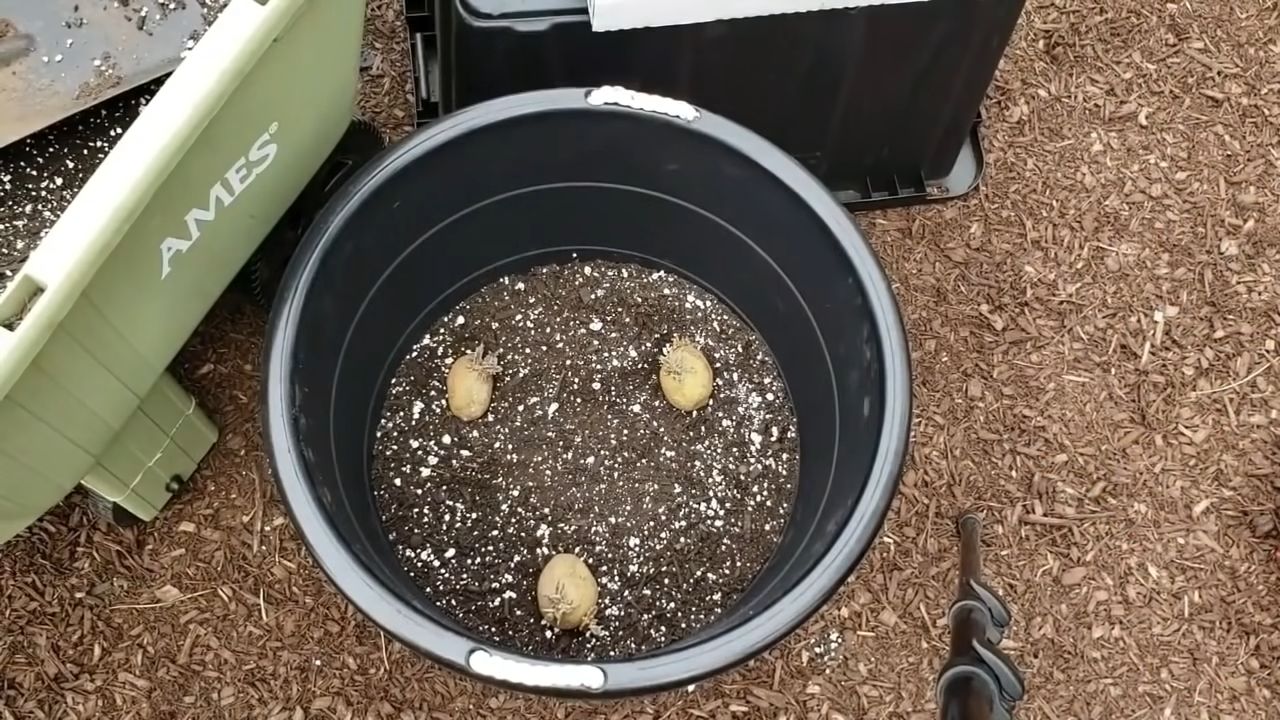
3. Plant the Seed Potatoes: Place the seed potatoes on top of the soil, with the “eyes” facing up. Space them about 8-10 inches apart. If you’re only planting one or two seed potatoes, place them in the center of the bag.
4. Cover with Soil: Cover the seed potatoes with another 4-6 inches of potting mix.
5. Water Thoroughly: Water the soil until it’s moist but not soggy.
“Hilling” Your Potatoes
This is the key to getting a big harvest! “Hilling” encourages the potato plants to produce more potatoes along the stem.
1. Wait for Growth: As the potato plants grow, they’ll start to emerge from the soil.
2. Add More Soil: When the plants are about 6-8 inches tall, add more potting mix to the bag, covering the stems up to the bottom leaves. Leave the top leaves exposed.
3. Repeat: Continue this process every few weeks as the plants grow, until the bag is almost full. This encourages the plant to produce more potatoes along the buried stem. I usually do this 3-4 times throughout the growing season.
4. Water Regularly: Keep the soil consistently moist, but not waterlogged. Check the soil moisture regularly and water when the top inch feels dry.
Caring for Your Potato Plants
A little TLC goes a long way!
1. Sunlight: Make sure your potato bag gets at least 6-8 hours of sunlight per day. If you don’t have enough sunlight, consider using grow lights.
2. Watering: Water regularly, especially during hot, dry weather. Potatoes need consistent moisture to thrive.
3. Fertilizing (Optional): If you want to give your potatoes a boost, you can fertilize them every few weeks with a balanced fertilizer. Follow the instructions on the fertilizer package.
4. Pest Control: Keep an eye out for pests like aphids, potato beetles, and flea beetles. If you spot any pests, you can try using insecticidal soap or neem oil. I prefer organic pest control methods whenever possible.
5. Disease Prevention: To prevent diseases, make sure your potato plants have good air circulation and avoid overwatering.
Harvesting Your Potatoes
The moment we’ve all been waiting for!
1. When to Harvest: You can start harvesting “new potatoes” (small, tender potatoes) about 2-3 weeks after the plants flower. For larger, mature potatoes, wait until the plants start to die back and the foliage turns yellow or brown. This usually takes about 80-100 days from planting.
2. Harvesting: The easiest way to harvest is to simply tip the bag over and sift through the soil to find your potatoes! You can also reach into the bag and carefully pull out the potatoes.
3. Curing (Optional): If you’re planning to store your potatoes for a longer period, you can cure them for a week or two. To cure potatoes, spread them out in a cool, dark, and well-ventilated place. This helps the skins to harden and prevents rotting.
Troubleshooting
Sometimes things don’t go exactly as planned. Here are a few common problems and how to fix them:
* Yellowing Leaves: This could be a sign of overwatering, underwatering, nutrient deficiency, or disease. Check the soil moisture and adjust your watering accordingly. You may also need to fertilize your plants.
* No Potatoes: This could be due to insufficient sunlight, poor soil, or not “hilling” the potatoes properly. Make sure your plants are getting enough sunlight and that you’re using a good-quality potting mix. Remember to “hill” the potatoes regularly as they grow.
* Rotting Potatoes: This is usually caused by overwatering or poor drainage. Make sure your bag has drainage holes and avoid overwatering.
Enjoy Your Homegrown Potatoes!
There you have it! Growing potatoes in a bag is a simple and rewarding way to enjoy fresh, homegrown potatoes, even if you don’t have a lot of space. I hope you found this guide helpful. Happy gardening! I know I’ll be enjoying some delicious, homegrown potatoes soon, and I hope you will too!
Conclusion
So, there you have it! This surprisingly simple potato gardening easy trick is a game-changer for anyone looking to maximize their yield, minimize their space, and enjoy the unparalleled satisfaction of harvesting their own homegrown potatoes. Forget back-breaking digging and endless weeding; this method is all about working smarter, not harder.
Why is this a must-try? Because it addresses the most common challenges faced by potato gardeners. Limited space? No problem! This technique thrives in containers, making it perfect for balconies, patios, or even small backyards. Tired of battling pests and diseases? The contained environment offers better control and reduces the risk of soil-borne issues. And let’s not forget the sheer joy of watching your potato plant flourish and knowing that a bountiful harvest awaits.
But the beauty of this method lies in its adaptability. Feel free to experiment with different potato varieties. Russets, Yukon Golds, fingerlings – each will bring its unique flavor and texture to your table. You can also adjust the container size to suit your needs and available space. Want to add a companion plant? Consider interplanting with herbs like basil or thyme to deter pests and enhance the flavor of your potatoes.
Don’t be afraid to get creative with your container choices, either. While a traditional grow bag works perfectly, you can also repurpose old trash cans, buckets, or even large storage totes. Just make sure they have adequate drainage holes to prevent waterlogging.
This potato gardening easy trick isn’t just about growing potatoes; it’s about connecting with nature, learning new skills, and enjoying the fruits (or rather, tubers!) of your labor. It’s a rewarding experience that will bring you closer to your food and give you a newfound appreciation for the simple act of growing.
We wholeheartedly encourage you to give this method a try. It’s easy, affordable, and incredibly satisfying. And once you’ve experienced the joy of harvesting your own homegrown potatoes, you’ll never look at store-bought spuds the same way again.
So, grab your seed potatoes, gather your supplies, and get ready to embark on a potato-growing adventure. We’re confident that you’ll be amazed by the results. And most importantly, don’t forget to share your experience with us! We’d love to hear about your successes, your challenges, and any variations you’ve tried. Share your photos, tips, and stories in the comments below. Let’s build a community of potato-growing enthusiasts and inspire others to discover the magic of homegrown potatoes. Happy gardening!
Frequently Asked Questions (FAQ)
What kind of potatoes are best for container gardening using this method?
Almost any potato variety can be grown in containers, but some tend to perform better than others. Determinate varieties, which produce potatoes in one layer, are generally recommended for beginners. These include Yukon Gold, Red Pontiac, and Irish Cobbler. Indeterminate varieties, which produce potatoes along the stem, can also be grown, but they require more hilling and a larger container. Popular indeterminate varieties include Russet Burbank and fingerling potatoes. Experiment to see what works best in your climate and with your preferences.
How much sunlight do my potato plants need?
Potato plants need at least six to eight hours of direct sunlight per day to thrive. Choose a location that receives ample sunlight throughout the day. If you’re growing your potatoes indoors, you may need to supplement with grow lights. Insufficient sunlight can lead to leggy growth and reduced potato production.
What type of soil should I use for container potato gardening?
Use a well-draining potting mix that is rich in organic matter. Avoid using garden soil, as it can become compacted in containers and hinder drainage. A good potting mix will provide the necessary nutrients and aeration for healthy potato growth. You can also amend your potting mix with compost or other organic materials to further improve its fertility.
How often should I water my potato plants in containers?
Water your potato plants regularly, especially during hot and dry weather. The soil should be consistently moist but not waterlogged. Check the soil moisture by sticking your finger about an inch into the soil. If it feels dry, it’s time to water. Overwatering can lead to root rot, so be sure to provide adequate drainage.
How do I “hill” my potato plants in a container?
Hilling is the process of adding more soil around the stems of the potato plants as they grow. This encourages the formation of more potatoes along the buried stem. As your potato plants grow, gradually add more soil to the container, leaving only the top few inches of the plant exposed. Repeat this process every few weeks until the container is nearly full.
When is the right time to harvest my potatoes?
The timing of your potato harvest will depend on the variety you’re growing and your personal preferences. Generally, you can start harvesting “new potatoes” (small, immature potatoes) a few weeks after flowering. For mature potatoes, wait until the foliage begins to yellow and die back. This indicates that the potatoes have reached their full size and are ready to be harvested.
How do I harvest potatoes from a container?
Harvesting potatoes from a container is much easier than digging them up from the ground. Simply tip the container over and gently remove the soil, being careful not to damage the potatoes. You can also reach into the container and carefully pull out the potatoes by hand.
What are some common pests and diseases that affect potato plants?
Common pests that can affect potato plants include aphids, potato beetles, and flea beetles. Diseases include early blight, late blight, and potato scab. Monitor your plants regularly for signs of pests or diseases and take appropriate action if necessary. Organic pest control methods, such as insecticidal soap or neem oil, can be effective for controlling many pests.
Can I reuse the soil from my potato container for other plants?
Yes, you can reuse the soil from your potato container, but it’s important to amend it with fresh compost or other organic matter to replenish the nutrients. You should also avoid planting other members of the nightshade family (tomatoes, peppers, eggplants) in the same soil, as they are susceptible to similar diseases.
How do I store my harvested potatoes?
Store your harvested potatoes in a cool, dark, and well-ventilated place. Avoid storing them in direct sunlight or near ethylene-producing fruits, such as apples and bananas, as this can cause them to sprout prematurely. Properly stored potatoes can last for several months.

Leave a Comment