
Microwave Hacks and Uses: Unleash the Hidden Potential of Your Kitchen’s Powerhouse!
Let’s be honest, most of us see the microwave as just a quick way to reheat leftovers or pop some popcorn. But what if I told you that your microwave is capable of so much more? For decades, this appliance has been a staple in homes, evolving from a bulky, experimental device to the sleek, convenient kitchen companion we know and love. Its impact on our lives is undeniable, saving us precious time and effort in the kitchen.
But beyond the basics, there’s a whole world of microwave hacks and uses waiting to be discovered! Are you tired of scrubbing burnt food off your microwave walls? Do you want to steam vegetables in minutes without dirtying a bunch of pots? Or maybe you’re just looking for a clever way to revive stale bread? This article is your ultimate guide to unlocking the full potential of your microwave. We’ll explore surprising and practical tips that will not only save you time and effort but also help you get the most out of this often-underestimated appliance. Get ready to transform your microwave from a simple reheating tool into a versatile kitchen assistant!
Growing Zucchini Like a Pro: My Foolproof Guide
Okay, zucchini lovers, let’s get down to business! I’m going to share everything I know about growing zucchini, from seed to harvest. Trust me, with a little know-how, you’ll be swimming in zucchini before you know it. We’re talking zucchini bread, zucchini noodles, grilled zucchini – the possibilities are endless!
Choosing the Right Zucchini Variety
First things first, let’s talk varieties. There are tons of different zucchini types out there, and choosing the right one can make a big difference in your success. Here are a few of my favorites:
* Black Beauty: This is a classic, reliable variety that produces dark green, almost black, zucchini. It’s a heavy producer and disease-resistant, making it a great choice for beginners.
* Costata Romanesco: If you’re looking for something a little more unique, try Costata Romanesco. It has beautiful ribbed fruit with a nutty flavor.
* Golden Zucchini: For a pop of color, go for a golden zucchini variety. These are just as easy to grow as green zucchini and have a slightly sweeter flavor.
* Round Zucchini (Eight Ball, One Ball): These are fun to grow and perfect for stuffing! They’re also great for smaller gardens since they tend to be more compact.
Getting Started: Planting Your Zucchini
Zucchini is a warm-weather crop, so you’ll want to wait until the danger of frost has passed before planting. Here’s how I get my zucchini plants off to a good start:
1. Starting Seeds Indoors (Optional): You can start zucchini seeds indoors about 3-4 weeks before the last expected frost. This gives you a head start on the growing season. I usually skip this step and direct sow, but if you live in a colder climate, starting indoors is a good idea.
* Use seed starting trays or small pots filled with seed starting mix.
* Plant the seeds about 1 inch deep.
* Keep the soil moist but not soggy.
* Provide plenty of light (a grow light works great).
* Harden off the seedlings by gradually exposing them to outdoor conditions for a week before transplanting.
2. Direct Sowing: This is my preferred method because it’s so easy!
* Choose a sunny spot in your garden with well-drained soil. Zucchini needs at least 6-8 hours of sunlight per day.
* Amend the soil with compost or well-rotted manure. Zucchini are heavy feeders and need nutrient-rich soil.
* Sow the seeds directly into the ground about 1 inch deep and 2-3 feet apart. Zucchini plants get big!
* Water the soil well after planting.
* Keep the soil moist until the seeds germinate, which usually takes about 7-10 days.
Caring for Your Zucchini Plants
Once your zucchini plants are established, here’s how to keep them happy and healthy:
1. Watering: Zucchini needs consistent moisture, especially during hot weather. Water deeply at the base of the plant, avoiding getting the leaves wet. I usually water every other day, or more often if the soil feels dry.
2. Fertilizing: As I mentioned, zucchini are heavy feeders. I like to fertilize them every 2-3 weeks with a balanced fertilizer. You can also side-dress them with compost or manure.
3. Weeding: Keep the area around your zucchini plants free of weeds. Weeds compete with the plants for nutrients and water.
4. Mulching: Apply a layer of mulch around your zucchini plants. Mulch helps to retain moisture, suppress weeds, and regulate soil temperature. I use straw or wood chips.
5. Pest Control: Keep an eye out for pests like squash bugs, squash vine borers, and aphids.
* Squash Bugs: These nasty little bugs can suck the sap out of your zucchini plants. Handpick them off the plants or use insecticidal soap.
* Squash Vine Borers: These pests bore into the stems of zucchini plants and can kill them. To prevent squash vine borers, wrap the base of the stems with aluminum foil or netting. You can also inject Bacillus thuringiensis (Bt) into the stems to kill the borers.
* Aphids: These tiny insects can cluster on the leaves and stems of zucchini plants. Spray them off with a strong stream of water or use insecticidal soap.
6. Pollination: Zucchini plants have separate male and female flowers. The female flowers need to be pollinated in order to produce fruit. If you’re not seeing any zucchini forming, you may need to hand-pollinate the flowers.
* To hand-pollinate, use a small paintbrush to transfer pollen from the male flower to the female flower. The male flower has a long, thin stem, while the female flower has a small zucchini-like fruit at the base.
Harvesting Your Zucchini
Now for the fun part – harvesting! Zucchini grows quickly, so you’ll need to check your plants regularly.
1. When to Harvest: Harvest zucchini when they are young and tender, usually about 6-8 inches long. Overgrown zucchini can be tough and seedy.
2. How to Harvest: Use a sharp knife or pruning shears to cut the zucchini from the plant. Be careful not to damage the plant.
3. Frequency of Harvest: Harvest zucchini frequently to encourage the plant to produce more fruit. The more you pick, the more you get!
Dealing with Common Zucchini Problems
Even with the best care, you may encounter some problems when growing zucchini. Here are a few common issues and how to deal with them:
* Powdery Mildew: This fungal disease can cause a white, powdery coating on the leaves of zucchini plants. To prevent powdery mildew, provide good air circulation and avoid getting the leaves wet when watering. If you see powdery mildew, spray the plants with a fungicide.
* Blossom End Rot: This condition causes the ends of zucchini to rot. It’s usually caused by a calcium deficiency or inconsistent watering. To prevent blossom end rot, amend the soil with calcium and water regularly.
* Lack of Fruit Production: If your zucchini plants are not producing fruit, it could be due to a lack of pollination, poor soil, or pests. Make sure your plants are getting enough sunlight, water, and nutrients. Hand-pollinate the flowers if necessary.
Recipes and Ideas for Using Your Zucchini Harvest
Okay, you’ve got a mountain of zucchini – now what? Here are a few of my favorite ways to use up my zucchini harvest:
* Zucchini Bread: This is a classic for a reason! Zucchini bread is moist, delicious, and easy to make.
* Zucchini Noodles (Zoodles): Use a spiralizer to turn zucchini into noodles. They’re a healthy and low-carb alternative to pasta.
* Grilled Zucchini: Slice zucchini lengthwise and grill it until tender. Season with salt, pepper, and your favorite herbs.
* Stuffed Zucchini: Hollow out zucchini and fill them with a mixture of ground meat, rice, and vegetables.
* Zucchini Fritters: Grate zucchini and mix it with flour, eggs, and cheese. Fry the fritters until golden brown.
* Zucchini Soup: Puree zucchini with broth and herbs for a creamy and delicious soup.
* Zucchini Relish: Preserve your zucchini harvest by making relish. It’s great on sandwiches, burgers, and hot dogs.
* Freezing Zucchini: Grate or slice zucchini and freeze it for later use. It’s perfect for adding to soups, stews, and baked goods.
Extra Tips for Zucchini Success
Here are a few extra tips that have helped me grow amazing zucchini over the years:
* Plant in succession: Plant new zucchini seeds every few weeks to extend your harvest season.
* Choose disease-resistant varieties: This can help prevent problems like powdery mildew.
* Rotate your crops: Don’t plant zucchini in the same spot every year. This can help prevent soilborne diseases.
* Don’t be afraid to prune: If your zucchini plants are getting too crowded, you can prune some of the leaves to improve air circulation.
* Enjoy the process! Growing zucchini is a rewarding experience. Don’t be afraid to experiment and have fun.
So there you have it – my complete guide to growing zucchini! I hope these tips help you have a bountiful harvest. Happy gardening!
Conclusion
So, there you have it! These microwave hacks and uses are more than just clever tricks; they’re game-changers for anyone looking to streamline their kitchen routine, save time, and even rescue culinary mishaps. From reviving stale bread to sanitizing sponges and creating perfectly steamed vegetables in minutes, the microwave’s potential extends far beyond simply reheating leftovers.
The beauty of these DIY microwave tricks lies in their simplicity and accessibility. You don’t need fancy equipment or specialized skills to unlock the full potential of this ubiquitous kitchen appliance. It’s about understanding the science behind how microwaves work and applying that knowledge to everyday cooking and cleaning tasks.
Why is this a must-try? Because time is precious, and efficiency is key. Imagine reclaiming those extra minutes you used to spend scrubbing a stubborn sponge or waiting for bread to thaw. Think about the convenience of whipping up a quick and healthy meal without dirtying a dozen pots and pans. These microwave hacks offer a tangible improvement to your daily life, making cooking and cleaning less of a chore and more of a joy.
But don’t just take our word for it. We encourage you to experiment with these techniques and discover the magic of microwave mastery for yourself. Start with the basics, like softening brown sugar or peeling garlic, and then gradually move on to more advanced applications, such as poaching eggs or making mug cakes.
Variations and Suggestions:
The possibilities are truly endless. Consider these variations to personalize your microwave experience:
* **Infused Oils:** Use the microwave to quickly infuse oils with herbs and spices. Simply combine your favorite oil with ingredients like garlic, rosemary, or chili flakes, microwave for short intervals, and let it steep for a flavorful addition to your dishes.
* **Homemade Potpourri:** Dry citrus peels and herbs in the microwave to create a fragrant homemade potpourri. This is a great way to repurpose food scraps and freshen up your home naturally.
* **DIY Heating Pads:** Fill a clean sock with rice or flax seeds, microwave for a minute or two, and you have a soothing heating pad for aches and pains. Add a few drops of essential oil for aromatherapy benefits.
* **Speedy Nut Roasting:** Toast nuts in the microwave for a quick and easy snack. Spread them in a single layer on a microwave-safe plate and microwave in short bursts, stirring frequently, until they are lightly browned and fragrant.
* **Reviving Herbs:** Slightly wilted herbs can be revived by wrapping them in a damp paper towel and microwaving for a few seconds. The moisture will help them regain their crispness.
Remember to always use microwave-safe containers and follow safety precautions when working with hot liquids or steam. Start with short intervals and monitor the progress closely to avoid overheating or burning.
We are confident that these microwave hacks will revolutionize your kitchen routine. So, go ahead, give them a try! And most importantly, share your experiences with us. Let us know which hacks worked best for you, what variations you discovered, and any other tips or tricks you’ve learned along the way. Your feedback will help us continue to refine and improve these techniques for the benefit of the entire community. Embrace the power of the microwave and unlock its hidden potential today! Let’s make cooking and cleaning easier, faster, and more enjoyable for everyone.
Frequently Asked Questions (FAQ)
Is it safe to use the microwave for all of these hacks?
Yes, when done correctly and with the proper precautions. Always use microwave-safe containers and follow the instructions carefully. Avoid using metal containers or utensils in the microwave, as they can cause sparks and damage the appliance. Be mindful of overheating liquids, which can cause them to explode or splatter. When in doubt, err on the side of caution and start with shorter intervals.
What types of containers are microwave-safe?
Look for containers that are specifically labeled as “microwave-safe.” These are typically made of glass, ceramic, or certain types of plastic. Avoid using containers made of metal, aluminum foil, or melamine, as they can be dangerous in the microwave. If you’re unsure whether a container is microwave-safe, it’s best to err on the side of caution and use a different one.
How do I prevent food from exploding in the microwave?
To prevent food from exploding in the microwave, pierce the skin of foods like potatoes, sweet potatoes, and eggs before cooking. This allows steam to escape and prevents pressure from building up inside. When heating liquids, use a microwave-safe container with a wide opening and stir the liquid occasionally to distribute heat evenly. You can also place a microwave-safe utensil in the liquid to help prevent superheating.
Can I really sanitize sponges in the microwave?
Yes, microwaving a damp sponge can effectively kill bacteria and germs. Wet the sponge thoroughly and microwave it on high for 1-2 minutes. Be careful when removing the sponge from the microwave, as it will be very hot. Allow it to cool slightly before handling. This is a great way to keep your sponges clean and fresh between uses.
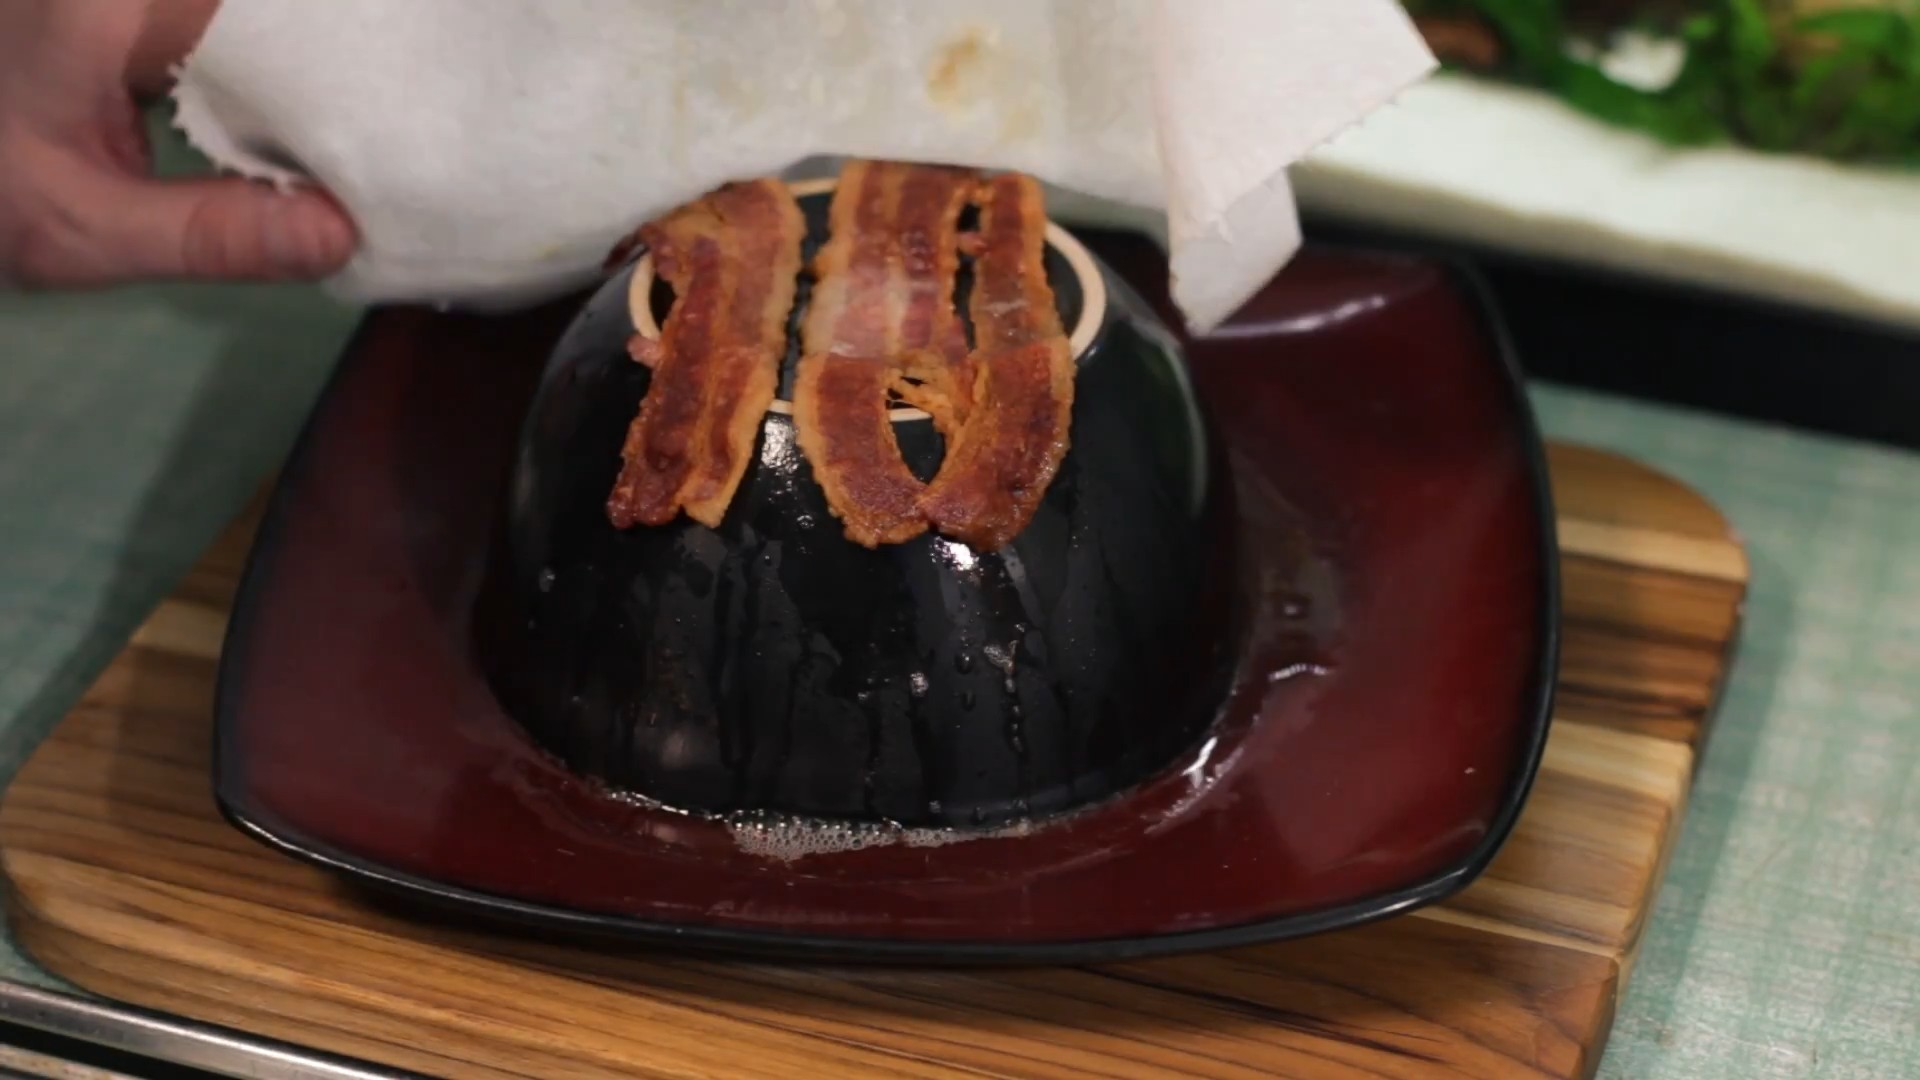
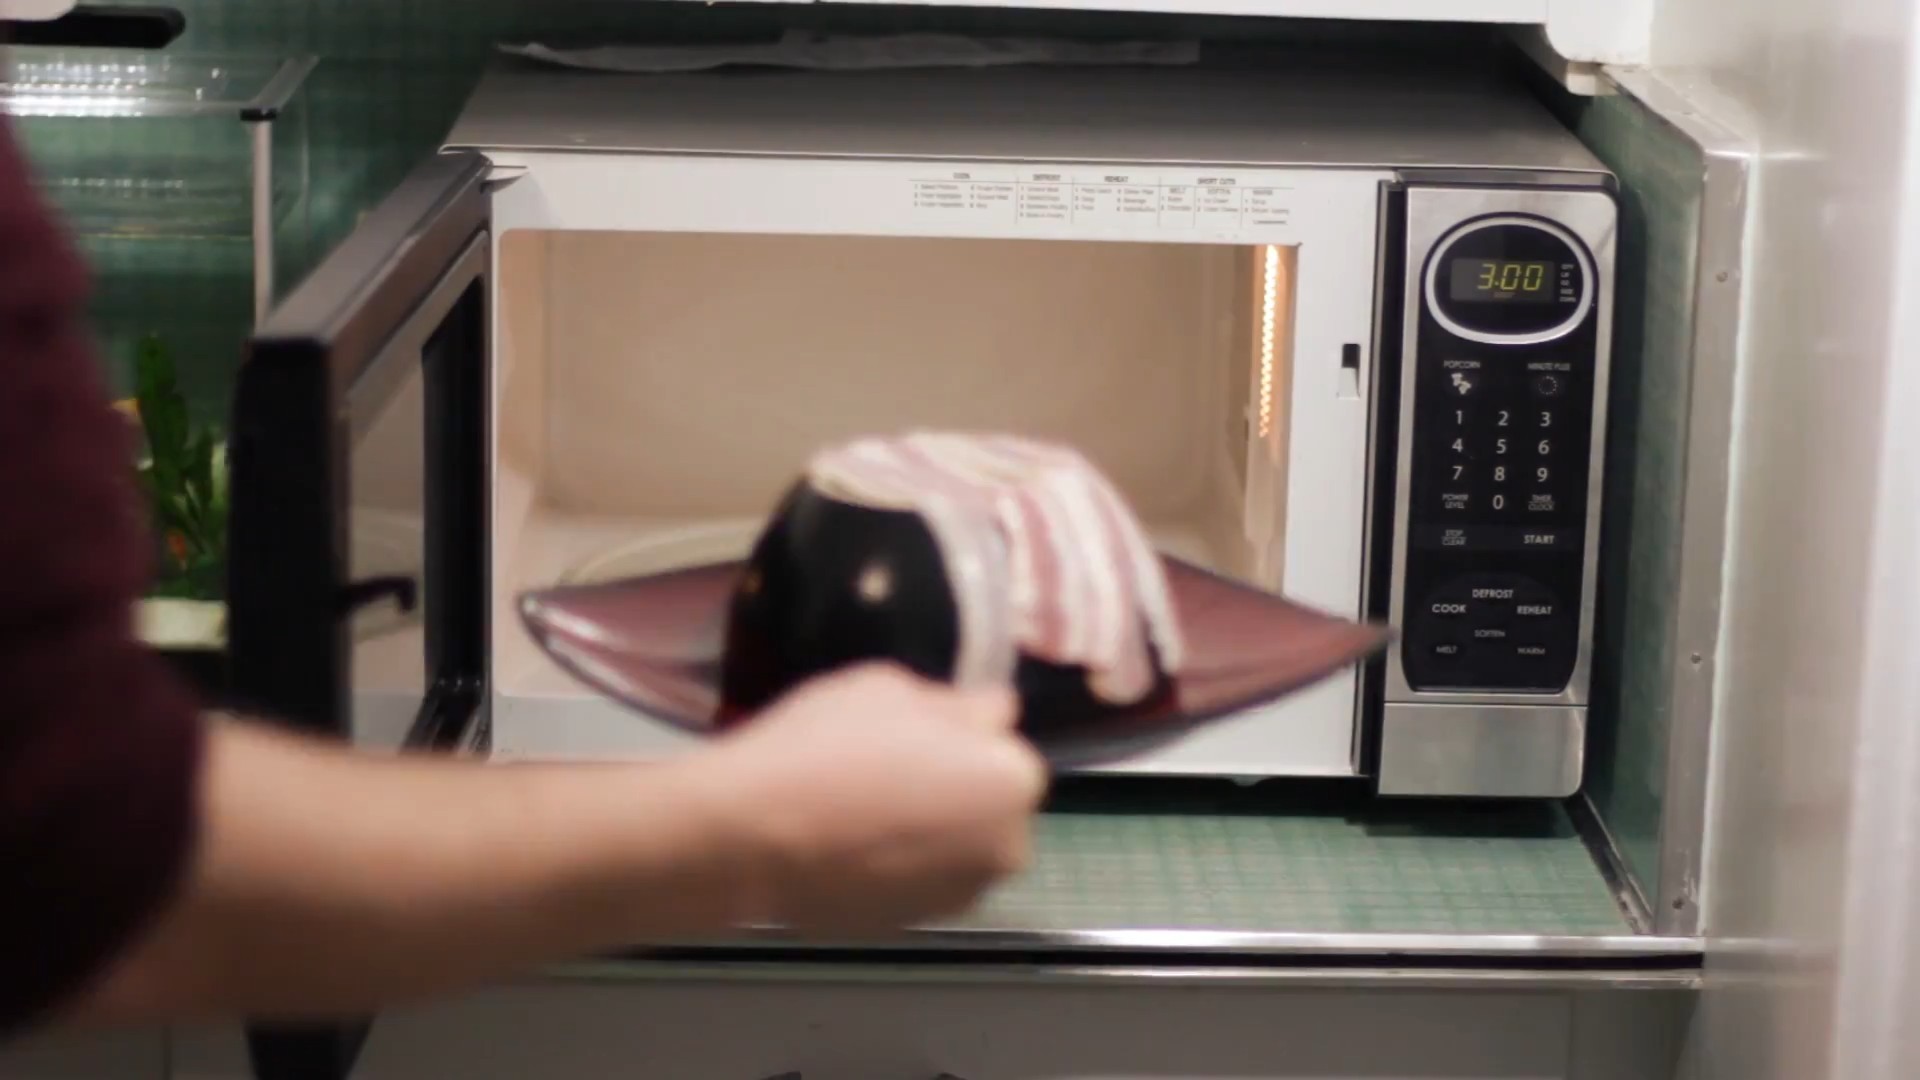
How do I revive stale bread in the microwave?
To revive stale bread in the microwave, wrap it in a damp paper towel and microwave it for 10-20 seconds. The moisture from the paper towel will help to rehydrate the bread and make it soft again. Be careful not to microwave it for too long, as it can become tough and rubbery.
What’s the best way to steam vegetables in the microwave?
To steam vegetables in the microwave, place them in a microwave-safe dish with a small amount of water (about 1-2 tablespoons). Cover the dish with a microwave-safe lid or plastic wrap, leaving a small vent for steam to escape. Microwave on high for 2-5 minutes, depending on the type and quantity of vegetables. Check for doneness and adjust the cooking time as needed.
Can I cook eggs in the microwave?
Yes, you can cook eggs in the microwave, but it requires some caution. To poach an egg, crack it into a microwave-safe cup or bowl with a small amount of water. Pierce the yolk with a toothpick to prevent it from exploding. Microwave on medium power for 1-2 minutes, or until the egg is cooked to your liking. Be careful not to overcook the egg, as it can become rubbery. Scrambled eggs can also be cooked in the microwave by whisking them with a little milk or cream and microwaving in short intervals, stirring frequently.
How can I prevent my microwave from getting splattered with food?
To prevent your microwave from getting splattered with food, cover dishes with a microwave-safe lid or plastic wrap. You can also use a microwave splatter cover, which is a reusable plastic dome that fits over your dishes. When heating liquids, use a container with a wide opening and stir the liquid occasionally to distribute heat evenly. Clean up any spills or splatters immediately to prevent them from hardening and becoming difficult to remove.
What are some other unexpected uses for the microwave?
Besides the hacks mentioned in the article, the microwave can also be used to:
* Soften ice cream for easier scooping.
* Warm up beauty products like face masks or hair treatments.
* Dry herbs quickly.
* Make single-serving desserts like mug cakes or brownies.
* Warm up massage oils or lotions.
How do I clean my microwave effectively?
To clean your microwave effectively, place a microwave-safe bowl filled with water and a few slices of lemon or lime inside. Microwave on high for 3-5 minutes, or until the water boils and the microwave is filled with steam. Let the steam sit for a few minutes to loosen any food particles. Then, carefully remove the bowl and wipe down the interior of the microwave with a clean cloth or sponge. The steam and citrus will help to dissolve grease and grime, making it easier to clean.

Leave a Comment