
Indoor Mushroom Bucket Growing: Sounds like something out of a sci-fi movie, right? But trust me, it’s a surprisingly simple and incredibly rewarding DIY project that can bring the magic of the forest floor right into your home! For centuries, mushrooms have been revered across cultures, from ancient Egyptians who considered them a delicacy reserved for royalty to traditional Chinese medicine practitioners who valued their healing properties. Now, you can cultivate your own delicious and nutritious fungi without needing acres of land or a degree in mycology.
Let’s face it, grocery store mushrooms can be bland and expensive. Plus, who knows how long they’ve been sitting on the shelf? With this DIY indoor mushroom bucket growing method, you’ll have a constant supply of fresh, flavorful mushrooms at your fingertips. Imagine adding them to your omelets, stir-fries, or pasta dishes – all grown with your own two hands! This isn’t just about saving money; it’s about connecting with nature, learning a new skill, and enjoying the satisfaction of growing your own food. So, grab your bucket, some substrate, and let’s get started on this exciting fungal adventure!
DIY Indoor Mushroom Bucket Growing: A Beginner’s Guide
Hey there, fellow fungi enthusiasts! Ever dreamt of harvesting your own delicious mushrooms right in your home? Well, dream no more! This guide will walk you through the surprisingly simple process of growing mushrooms in a bucket. It’s a fun, rewarding, and relatively low-maintenance project that will have you enjoying fresh, homegrown mushrooms in no time. Let’s get started!
What You’ll Need
Before we dive in, let’s gather our supplies. Don’t worry, you probably have a lot of this stuff lying around already!
* A 5-gallon bucket with a lid: Clean and food-grade is best. You can find these at most hardware stores or even reuse an old one.
* Mushroom spawn: This is the “seed” of your mushrooms. Oyster mushrooms are a great choice for beginners because they’re relatively easy to grow and tolerate a wider range of conditions. You can purchase spawn online or from a local mushroom supplier.
* Substrate: This is the food source for your mushrooms. Straw is a popular and readily available option. You can also use hardwood sawdust, but straw is generally easier for beginners.
* Lime: This helps to pasteurize the straw and prevent contamination. Hydrated lime (also known as builder’s lime) is what you need.
* Large pot or container: Big enough to submerge your straw.
* Drill with a 1/4-inch drill bit: For creating drainage and fruiting holes in the bucket.
* Spray bottle: For misting the mushrooms.
* Gloves: To keep things sanitary.
* Optional: A thermometer to monitor the temperature of the pasteurization process.
Preparing the Substrate: Pasteurization is Key!
This is arguably the most important step. Pasteurization kills off competing organisms that could prevent your mushrooms from growing. We’re not sterilizing (which is much more intense), just giving our mushrooms a head start.
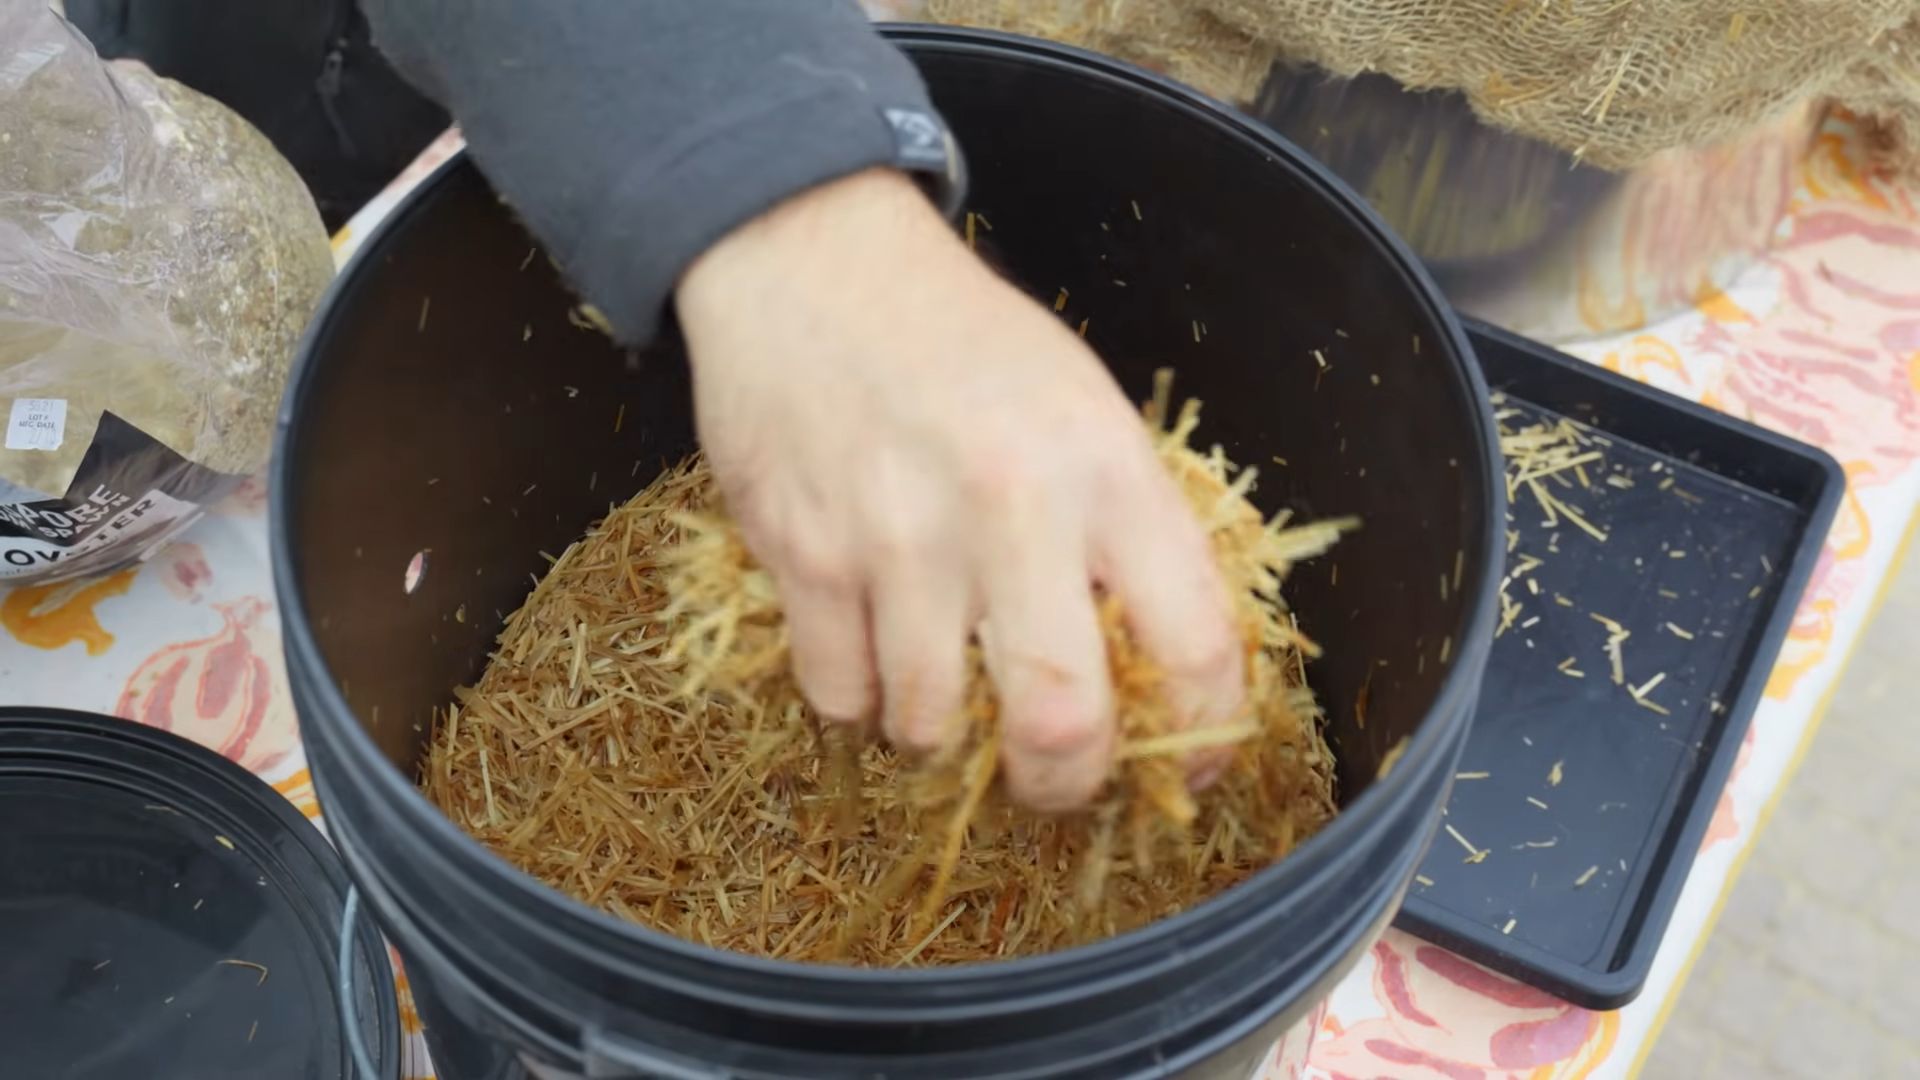
1. Chop the Straw: If you’re using long strands of straw, chop it into smaller pieces, about 2-4 inches long. This makes it easier to pack into the bucket and allows the mushroom mycelium to colonize it more effectively. I like to use garden shears for this.
2. Lime Bath: Fill your large pot or container with water. Add the hydrated lime. The general rule of thumb is about 1 tablespoon of lime per gallon of water. Stir well to dissolve the lime. The water will become cloudy.
3. Submerge the Straw: Add the chopped straw to the lime water. Make sure all the straw is completely submerged. You might need to weigh it down with a brick or a heavy plate to keep it from floating.
4. Pasteurize: Let the straw soak in the lime water for at least 12-18 hours. This allows the lime to raise the pH of the straw, killing off unwanted microorganisms.
5. Drain and Cool: After the soaking period, drain the straw thoroughly. You want it to be moist but not dripping wet. I usually let it sit in a colander or on a clean surface for a few hours to drain. The straw should be cool to the touch before you move on to the next step.
Preparing the Bucket: Drainage and Fruiting
Now, let’s get our bucket ready for its mushroom-growing duties!
1. Drill Drainage Holes: Using your drill and the 1/4-inch drill bit, drill drainage holes in the bottom of the bucket. Space them about 2-3 inches apart. These holes will prevent the substrate from becoming waterlogged.
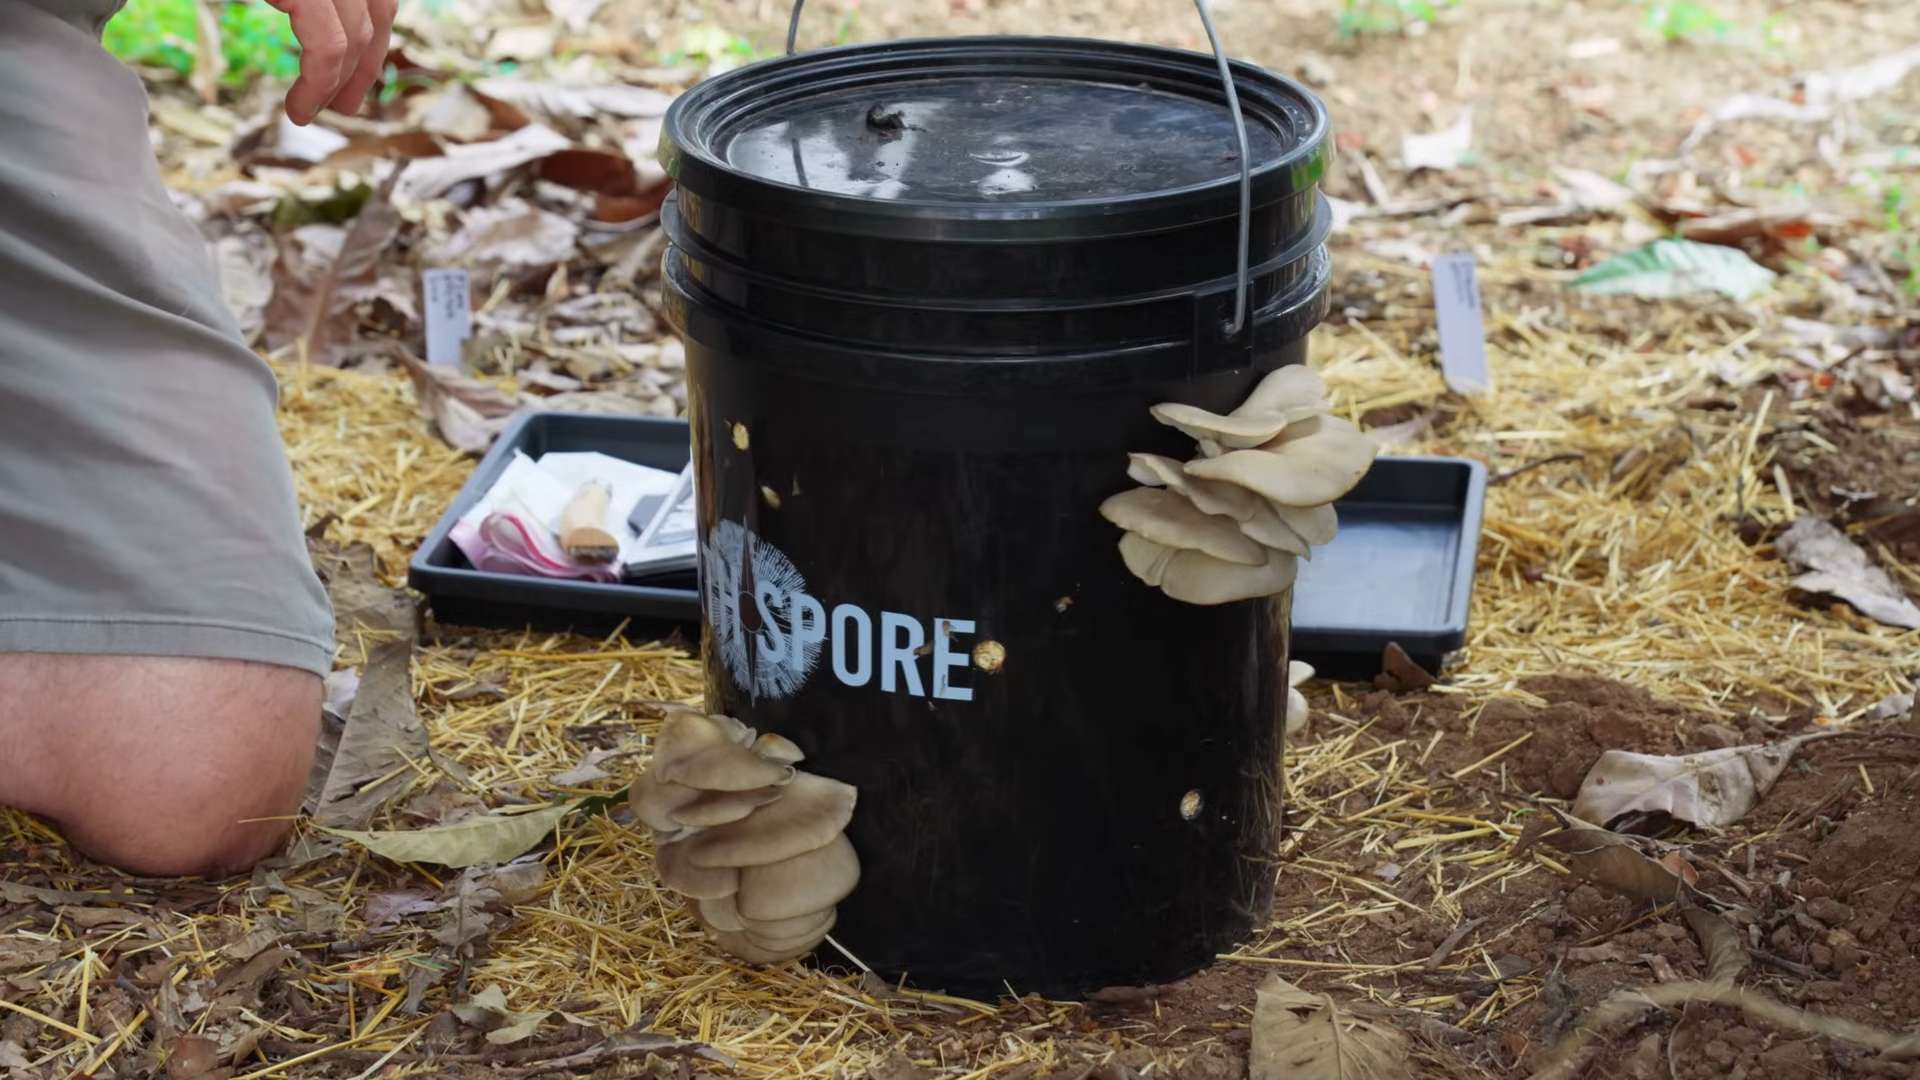
2. Drill Fruiting Holes: Drill fruiting holes around the sides of the bucket. These are where the mushrooms will eventually emerge. Space them about 4-6 inches apart, in a staggered pattern. I usually drill about 10-15 holes per bucket.
Layering the Bucket: Spawn and Substrate Sandwich
This is where the magic happens! We’re going to create a layered “sandwich” of spawn and substrate that will allow the mushroom mycelium to colonize the straw.
1. First Layer of Substrate: Start by placing a 2-3 inch layer of the pasteurized straw at the bottom of the bucket. Gently pack it down.
2. First Layer of Spawn: Sprinkle a generous layer of mushroom spawn over the straw. Use about 1/4 of your total spawn for this layer.
3. Second Layer of Substrate: Add another 2-3 inch layer of straw on top of the spawn. Pack it down gently.
4. Second Layer of Spawn: Sprinkle another layer of spawn over the straw. Use about 1/4 of your total spawn again.
5. Repeat: Continue layering straw and spawn until you reach the top of the bucket, leaving about 2-3 inches of space at the top. Make sure the final layer is a layer of straw.
6. Final Layer of Spawn: Sprinkle the remaining spawn on top of the final straw layer.
7. Close the Lid: Place the lid on the bucket. This will help to retain moisture and create a humid environment for the mycelium to grow.
Incubation: The Waiting Game
Now comes the hardest part: waiting! During this phase, the mushroom mycelium will colonize the straw.
1. Find a Suitable Location: Place the bucket in a dark, humid, and well-ventilated location. A basement, closet, or spare room works well. The ideal temperature for oyster mushroom colonization is between 65-75°F (18-24°C).
2. Monitor the Temperature: If possible, monitor the temperature of the room. Avoid temperatures above 80°F (27°C), as this can inhibit mycelial growth.
3. Patience is Key: The colonization process can take anywhere from 2-4 weeks, depending on the temperature and humidity. You’ll know the mycelium is colonizing when you see white, fuzzy growth spreading throughout the straw.
Fruiting: Time to Harvest!
Once the mycelium has fully colonized the substrate (the entire surface should be covered in white fuzz), it’s time to initiate fruiting.
1. Increase Ventilation: Remove the lid from the bucket. This will allow fresh air to circulate and trigger the formation of mushrooms.
2. Increase Humidity: Mushrooms need high humidity to fruit properly. Mist the inside of the bucket and the surrounding area with water several times a day. You can also place a humidity dome over the bucket to help retain moisture.
3. Provide Light: While mushrooms don’t need direct sunlight, they do need some light to fruit properly. Place the bucket in a location that receives indirect light. A fluorescent light or LED grow light can also be used.
4. Monitor for Pinning: After a few days, you should start to see small mushroom “pins” forming around the fruiting holes. These are the baby mushrooms!
5. Harvesting: Once the mushrooms have reached a desirable size (usually within a week of pinning), it’s time to harvest! Gently twist or cut the mushrooms off the substrate. Try to harvest the entire cluster at once.
Post-Harvest: Second Flush and Beyond
After harvesting your first flush of mushrooms, don’t throw away the bucket just yet! You can often get several more flushes from the same substrate.
1. Soaking: After harvesting, soak the substrate in water for 12-24 hours. This will rehydrate the mycelium and encourage another flush of mushrooms. You can do this by filling the bucket with water or submerging it in a larger container.
2. Drain and Repeat: After soaking, drain the bucket and repeat the fruiting process. You may need to mist the mushrooms more frequently during subsequent flushes.
3. Decline: Eventually, the substrate will become depleted of nutrients and the mushroom production will decline. At this point, you can compost the spent substrate and start a new bucket.
Troubleshooting: Common Issues and Solutions
Even with the best intentions, things can sometimes go wrong. Here are some common issues you might encounter and how to fix them:
* Contamination: If you see green, black, or other colored molds growing in your bucket, it’s likely contaminated. Unfortunately, there’s not much you can do at this point except discard the substrate. To prevent contamination, make sure to properly pasteurize the straw and work in a clean environment.
* Slow Colonization: If the mycelium is taking a long time to colonize the substrate, it could be due to low temperatures, low humidity, or poor spawn quality. Make sure the temperature is within the ideal range (65-75°F), increase humidity by misting, and purchase spawn from a reputable supplier.
* No Pinning: If the mycelium has fully colonized the substrate but you’re not seeing
Conclusion
So, there you have it! Transforming a simple bucket into a thriving indoor mushroom farm is not only surprisingly easy, but also incredibly rewarding. Forget expensive kits and complicated setups. This DIY indoor mushroom bucket growing method empowers you to cultivate fresh, delicious mushrooms right in the comfort of your own home, regardless of your gardening experience.
Why is this a must-try? Because it offers a sustainable, cost-effective, and deeply satisfying way to enjoy gourmet mushrooms. Imagine the pride of serving dishes featuring mushrooms you nurtured from spawn to plate. Think of the money you’ll save by bypassing the grocery store’s often-inflated prices. And consider the environmental impact of reducing your reliance on commercially grown mushrooms, often shipped long distances. This isn’t just about growing food; it’s about connecting with the natural world and taking control of your food source.
Beyond the basic method, there’s ample room for experimentation. Try different mushroom varieties! Oyster mushrooms are a fantastic starting point, known for their rapid growth and adaptability. But don’t stop there. Explore shiitake, lion’s mane, or even wine cap mushrooms, each offering unique flavors and textures. You can also experiment with different substrates. While straw and coffee grounds are popular choices, consider supplementing with hardwood sawdust, cardboard, or even shredded paper for a richer, more diverse growing medium. Remember to always pasteurize your substrate properly to eliminate competing organisms.
Another variation to consider is the bucket size. While a standard 5-gallon bucket works well, you can scale up or down depending on your space and desired yield. Smaller buckets are great for beginners or those with limited space, while larger buckets can produce a more substantial harvest. Just be sure to adjust the amount of spawn and substrate accordingly.
Don’t be intimidated by the process. The beauty of this DIY approach lies in its simplicity and adaptability. Even if you encounter challenges along the way, the learning experience is invaluable. And the reward – a bounty of fresh, homegrown mushrooms – is well worth the effort.
We wholeheartedly encourage you to give this indoor mushroom bucket growing method a try. It’s a fun, educational, and delicious project that will transform the way you think about food. Once you’ve harvested your first flush, we’d love to hear about your experience! Share your photos, tips, and challenges in the comments below. Let’s build a community of indoor mushroom growers and inspire others to embrace the magic of mycology. What are you waiting for? Grab a bucket, some spawn, and get growing!
Frequently Asked Questions (FAQ)
What type of mushrooms are best for bucket growing?
Oyster mushrooms (Pleurotus spp.) are generally considered the easiest and most forgiving for beginners. They are fast-growing, tolerate a wider range of conditions, and produce abundant yields. Other suitable options include shiitake (Lentinula edodes), lion’s mane (Hericium erinaceus), and wine cap (Stropharia rugosoannulata) mushrooms, although these may require more specific substrate and environmental conditions. Research the specific needs of each mushroom variety before starting.
How do I pasteurize the substrate?
Pasteurization is crucial to eliminate competing molds and bacteria that can hinder mushroom growth. There are several methods:
* Hot Water Pasteurization: Submerge the substrate in hot water (around 160-180°F or 71-82°C) for 60-90 minutes. This is a common and effective method for straw and coffee grounds. Use a large pot or container and monitor the temperature with a thermometer.
* Steam Pasteurization: Place the substrate in a container with holes and steam it for 60-90 minutes. This method is suitable for larger quantities of substrate.
* Lime Pasteurization: Soak the substrate in a lime water solution (calcium hydroxide) for 12-24 hours. This method is often used for straw and helps to increase the pH, making it more favorable for mushroom growth. Use caution when handling lime, as it can be caustic.
After pasteurization, allow the substrate to cool completely before mixing it with the mushroom spawn.
Where can I buy mushroom spawn?
Mushroom spawn can be purchased from various sources, including:
* Online retailers: Many online vendors specialize in mushroom growing supplies and offer a wide selection of spawn varieties.
* Local nurseries and garden centers: Some nurseries and garden centers may carry mushroom spawn, especially in areas with a strong interest in gardening and sustainable living.
* Mushroom farms: If you live near a mushroom farm, they may sell spawn directly to consumers.
When purchasing spawn, ensure it is from a reputable source and that it is fresh and free from contamination.
How long does it take for mushrooms to grow?
The time it takes for mushrooms to grow depends on several factors, including the mushroom variety, the substrate, the environmental conditions, and the quality of the spawn. Generally, oyster mushrooms can start fruiting within 2-3 weeks of inoculation, while other varieties may take longer. Maintain optimal humidity and temperature levels to encourage faster growth.
What are the ideal environmental conditions for mushroom growth?
Different mushroom varieties have different environmental requirements, but some general guidelines apply:
* Humidity: Mushrooms need high humidity levels (80-90%) to thrive. You can maintain humidity by misting the bucket regularly, placing it in a humid environment (like a bathroom), or using a humidity tent.
* Temperature: The ideal temperature range varies depending on the mushroom variety. Oyster mushrooms generally prefer temperatures between 60-75°F (15-24°C).
* Light: Mushrooms don’t need a lot of light, but they do need some light to fruit properly. Indirect sunlight or artificial light is sufficient.
* Airflow: Good airflow is essential to prevent the buildup of carbon dioxide and promote healthy mushroom growth. Ensure the bucket has adequate ventilation.
How do I know when the mushrooms are ready to harvest?
Mushrooms are typically ready to harvest when the caps have fully expanded and the edges are still slightly curled downwards. The exact timing depends on the mushroom variety. For oyster mushrooms, harvest them before the caps start to flatten out or release spores.
How do I harvest the mushrooms?
To harvest the mushrooms, gently twist and pull them from the substrate. Avoid cutting them, as this can leave behind a stump that can rot and contaminate the substrate. After harvesting, clean the area around the harvest point to prevent contamination.
Can I get multiple flushes of mushrooms from the same bucket?
Yes, you can typically get multiple flushes of mushrooms from the same bucket. After harvesting the first flush, maintain the humidity and temperature levels, and the mushrooms should start to regrow within a few weeks. You may need to soak the substrate in water for a few hours to rehydrate it and stimulate new growth. The subsequent flushes may be smaller than the first.
What do I do with the spent substrate after harvesting?
The spent substrate is a valuable resource that can be used in several ways:
* Composting: The spent substrate is rich in nutrients and makes an excellent addition to your compost pile.
* Soil amendment: You can mix the spent substrate into your garden soil to improve its fertility and water retention.
* Animal feed: Some animals, such as chickens and pigs, can eat the spent substrate.
What if my mushroom bucket gets contaminated?
Contamination can occur if the substrate is not properly pasteurized or if the growing environment is not clean. Common contaminants include molds and bacteria. If you notice signs of contamination, such as green, black, or orange mold, remove the affected area immediately. If the contamination is widespread, it may be necessary to discard the entire bucket. To prevent contamination, always use sterile techniques when handling the spawn and substrate, and maintain a clean growing environment.
Leave a Comment