
Indoor Basil Planting: Imagine stepping into your kitchen, not to a barren countertop, but to a vibrant, fragrant oasis where fresh basil awaits, ready to elevate your next culinary masterpiece. Forget those sad, wilted bunches from the grocery store! This isn’t just about growing herbs; it’s about bringing a touch of the Mediterranean sunshine right into your home, all year round.
Basil, revered for centuries, holds a special place in cultures worldwide. From its use in ancient medicinal practices to its symbolic representation of love and good fortune in Italian folklore, basil has always been more than just a simple herb. Now, you can tap into that rich history and bring its vibrant energy into your own space.
But why should you bother with indoor basil planting? Well, for starters, think of the convenience! No more last-minute dashes to the store or settling for subpar quality. Plus, growing your own basil is incredibly rewarding. You get to nurture a living thing, watch it thrive, and then savor the delicious fruits (or rather, leaves!) of your labor. In this article, I’m going to share some simple, yet effective DIY tricks and hacks that will transform even the most novice gardener into an indoor basil-growing pro. Get ready to unleash your inner green thumb and enjoy the fresh, aromatic flavors of homegrown basil, no matter the season!
Grow Your Own Delicious Basil Indoors: A Beginner’s Guide
Hey there, fellow plant enthusiasts! Are you craving fresh, fragrant basil all year round? Well, you’re in luck! Growing basil indoors is surprisingly easy and rewarding. I’m going to walk you through everything you need to know to cultivate your own thriving basil plant right in your home. Let’s get started!
Choosing the Right Basil Variety
First things first, let’s talk basil varieties. While most basil types will grow indoors, some are better suited than others.
* Genovese Basil: This is the classic Italian basil, perfect for pesto and tomato sauces. It’s a reliable choice for indoor growing.
* Sweet Basil: Similar to Genovese, sweet basil has a slightly milder flavor and is also a great option.
* Dwarf Basil: If you’re short on space, dwarf basil varieties like ‘Spicy Globe’ are excellent choices. They stay compact and bushy.
* Lemon Basil: For a citrusy twist, try lemon basil. It adds a unique flavor to salads and teas.
* Thai Basil: With its anise-like flavor, Thai basil is perfect for Asian-inspired dishes.
I personally love growing Genovese basil because it’s so versatile, but feel free to experiment and find your favorite!
Gathering Your Supplies
Before we dive into the planting process, let’s make sure you have everything you need. Here’s a checklist:
* Basil Seeds or Seedlings: You can start from seeds or purchase small basil seedlings from a local nursery.
* Pot: Choose a pot that’s at least 6 inches in diameter with drainage holes. Terra cotta pots are great because they allow the soil to breathe.
* Potting Mix: Use a high-quality potting mix that’s well-draining. Avoid using garden soil, as it can compact and hinder drainage.
* Watering Can or Spray Bottle: For gentle watering.
* Grow Lights (Optional): If you don’t have a sunny windowsill, grow lights can provide the necessary light for your basil.
* Fertilizer (Optional): A balanced liquid fertilizer can help your basil thrive.
* Small Shovel or Trowel: For planting.
Planting Your Basil
Now for the fun part! Let’s get those basil seeds or seedlings into their new home.
Starting from Seeds
1. Prepare the Pot: Fill your pot with potting mix, leaving about an inch of space at the top. Gently pat down the soil.
2. Sow the Seeds: Sprinkle the basil seeds evenly over the surface of the soil. Don’t overcrowd them.
3. Cover the Seeds: Lightly cover the seeds with a thin layer of potting mix (about 1/4 inch).
4. Water Gently: Use a spray bottle to mist the soil thoroughly. You want to moisten the soil without disturbing the seeds.
5. Create a Humid Environment: Cover the pot with plastic wrap or a clear plastic bag to create a humid environment. This will help the seeds germinate.
6. Place in a Warm Location: Place the pot in a warm location (around 70-75°F) with indirect sunlight.
7. Monitor and Water: Check the soil daily and mist it as needed to keep it moist.
8. Remove the Cover: Once the seedlings emerge (usually within 5-10 days), remove the plastic wrap or bag.
9. Thin the Seedlings: Once the seedlings have a few sets of true leaves, thin them out, leaving the strongest seedlings spaced about 2-3 inches apart.
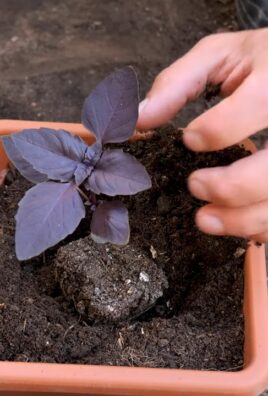
Planting Seedlings
1. Prepare the Pot: Fill your pot with potting mix, leaving about an inch of space at the top.
2. Create a Hole: Dig a hole in the center of the pot that’s large enough to accommodate the root ball of the seedling.
3. Remove the Seedling: Gently remove the seedling from its container. If the roots are tightly bound, gently loosen them with your fingers.
4. Place the Seedling: Place the seedling in the hole, making sure the top of the root ball is level with the surrounding soil.
5. Fill with Soil: Fill in the hole with potting mix and gently pat down the soil.
6. Water Thoroughly: Water the seedling thoroughly until water drains out of the bottom of the pot.
Caring for Your Indoor Basil Plant
Once your basil is planted, it’s time to provide it with the care it needs to thrive.
Light
Basil needs at least 6-8 hours of sunlight per day. A sunny south-facing windowsill is ideal. If you don’t have enough natural light, use grow lights to supplement. I’ve found that LED grow lights work really well and don’t generate too much heat.
Watering
Water your basil when the top inch of soil feels dry to the touch. Avoid overwatering, as this can lead to root rot. Water thoroughly until water drains out of the bottom of the pot. Make sure your pot has good drainage!
Temperature
Basil prefers temperatures between 65-80°F. Avoid placing your basil plant near drafts or extreme temperatures.
Fertilizing
Basil is a heavy feeder, so fertilizing regularly will help it grow strong and healthy. Use a balanced liquid fertilizer diluted to half strength every 2-4 weeks. I like to use an organic fertilizer to keep things natural.
Pruning and Harvesting
Pruning is essential for keeping your basil plant bushy and productive.
* Pinch Off Flower Buds: As soon as you see flower buds forming, pinch them off. This will encourage the plant to produce more leaves.
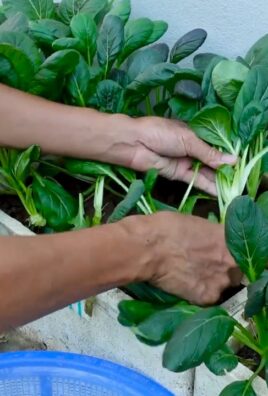
* Harvest Regularly: Harvest basil leaves regularly by pinching or cutting them off just above a leaf node (where leaves grow from the stem). This will encourage new growth.
* Don’t Remove Too Much: Avoid removing more than one-third of the plant at a time.
Troubleshooting Common Problems
Even with the best care, you might encounter some problems with your indoor basil plant. Here are some common issues and how to address them:
* Yellowing Leaves: This can be caused by overwatering, underwatering, or nutrient deficiencies. Check the soil moisture and adjust your watering accordingly. If the problem persists, try fertilizing with a balanced fertilizer.
* Leggy Growth: This is usually caused by insufficient light. Move your basil plant to a sunnier location or use grow lights.
* Pests: Aphids, spider mites, and whiteflies can sometimes infest basil plants. Inspect your plant regularly and treat any infestations with insecticidal soap or neem oil. I prefer neem oil because it’s a natural and effective solution.
* Root Rot: This is caused by overwatering and poor drainage. Make sure your pot has drainage holes and that you’re not overwatering. If root rot is severe, you may need to repot your basil plant in fresh potting mix.
Enjoying Your Fresh Basil
Now that you’ve successfully grown your own basil indoors, it’s time to enjoy the fruits (or rather, leaves) of your labor! Fresh basil is incredibly versatile and can be used in a variety of dishes.
* Pesto: Make a classic pesto sauce with fresh basil, pine nuts, garlic, Parmesan cheese, and olive oil.
* Tomato Sauce: Add fresh basil to your favorite tomato sauce for a burst of flavor.
* Salads: Sprinkle fresh basil leaves over salads for a refreshing touch.
* Pizza: Top your homemade pizza with fresh basil after baking.
* Teas: Brew a soothing basil tea by steeping fresh basil leaves in hot water.
* Garnish: Use fresh basil as a garnish for soups, stews, and other dishes.
I hope this guide has inspired you to grow your own delicious basil indoors. With a little care and attention, you can enjoy fresh, fragrant basil all year round. Happy gardening!
Conclusion
So, there you have it! Mastering indoor basil planting is not only achievable but also incredibly rewarding. Imagine fresh, fragrant basil readily available at your fingertips, regardless of the season. No more last-minute grocery store runs or settling for wilted, lackluster herbs. This DIY trick empowers you to cultivate your own thriving basil garden right in your kitchen, bringing a touch of summer sunshine into your home year-round.
The benefits extend beyond mere convenience. Growing your own basil allows you to control the quality of your herbs, ensuring they are free from harmful pesticides and bursting with flavor. Plus, the act of nurturing a plant from seed to harvest is incredibly therapeutic and satisfying. It’s a small but meaningful connection to nature that can brighten your day and enhance your culinary creations.
But the best part? This method is incredibly adaptable. Feel free to experiment with different varieties of basil. Genovese basil is a classic choice for pesto, while Thai basil adds a unique anise-like flavor to Asian dishes. Lemon basil offers a citrusy twist, and purple basil brings a beautiful visual element to your indoor garden. You can even try growing multiple varieties in separate containers to create a diverse and flavorful herb collection.
Consider using different types of containers as well. While terracotta pots are aesthetically pleasing and allow for good drainage, plastic pots are lightweight and retain moisture more effectively. Self-watering planters can be a great option for busy individuals who may forget to water their plants regularly. Vertical planters are perfect for small spaces, allowing you to maximize your growing area.
For those looking to take their indoor basil planting to the next level, consider investing in a grow light. While a sunny windowsill is ideal, supplemental lighting can ensure your basil plants receive the optimal amount of light, especially during the darker winter months. LED grow lights are energy-efficient and provide the full spectrum of light that plants need to thrive.
Don’t be afraid to experiment with different soil mixes as well. While a standard potting mix will work fine, you can create a custom blend by adding perlite or vermiculite to improve drainage and aeration. Adding compost or worm castings can provide your basil plants with essential nutrients.
Ultimately, the key to successful indoor basil planting is observation and adaptation. Pay attention to your plants’ needs and adjust your watering, lighting, and fertilization accordingly. Don’t be discouraged if you encounter a few challenges along the way. Gardening is a learning process, and every mistake is an opportunity to improve your skills.
We wholeheartedly encourage you to give this DIY trick a try. It’s a simple, affordable, and rewarding way to enjoy fresh basil year-round. Once you’ve experienced the joy of harvesting your own homegrown basil, you’ll never want to go back to store-bought herbs again.
And most importantly, we want to hear about your experience! Share your photos, tips, and challenges in the comments below. Let’s create a community of indoor basil enthusiasts and learn from each other. What varieties of basil are you growing? What tips have you found most helpful? What challenges have you overcome? Your insights can help others succeed in their indoor basil planting endeavors. So, get your hands dirty, embrace the process, and enjoy the delicious rewards of your own homegrown basil!
Frequently Asked Questions (FAQ)
What is the best location for my indoor basil plant?
The ideal location for your indoor basil plant is a sunny windowsill that receives at least 6-8 hours of direct sunlight per day. A south-facing window is typically the best option, but east- or west-facing windows can also work. If you don’t have access to a sunny windowsill, you can supplement with a grow light. Place the grow light about 6-12 inches above the plant and keep it on for 12-16 hours per day.
How often should I water my indoor basil plant?
Water your basil plant when the top inch of soil feels dry to the touch. Avoid overwatering, as this can lead to root rot. When you water, water thoroughly until water drains out of the bottom of the pot. Be sure to empty the saucer underneath the pot to prevent the plant from sitting in water. The frequency of watering will depend on factors such as the size of the pot, the type of soil, and the temperature and humidity of your home.
What type of soil should I use for indoor basil planting?
Use a well-draining potting mix that is specifically formulated for herbs or vegetables. Avoid using garden soil, as it can be too heavy and compact, which can lead to poor drainage. You can also amend your potting mix with perlite or vermiculite to improve drainage and aeration. Adding compost or worm castings can provide your basil plants with essential nutrients.
How often should I fertilize my indoor basil plant?
Fertilize your basil plant every 2-4 weeks during the growing season (spring and summer) with a balanced liquid fertilizer. Follow the instructions on the fertilizer label for proper dilution. Avoid over-fertilizing, as this can burn the roots of the plant. You can also use a slow-release fertilizer at the time of planting.
How do I harvest basil from my indoor plant?
Harvest basil leaves by pinching or cutting them off just above a leaf node (the point where leaves grow from the stem). This will encourage the plant to branch out and produce more leaves. Avoid harvesting more than one-third of the plant at a time. You can harvest basil leaves throughout the growing season.
Why are the leaves on my basil plant turning yellow?
Yellowing leaves can be caused by a number of factors, including overwatering, underwatering, nutrient deficiencies, and pests. Check the soil moisture to determine if you are watering too much or too little. If the soil is consistently wet, reduce your watering frequency. If the soil is dry, water more often. You can also fertilize your plant to address any nutrient deficiencies. Inspect the leaves for pests, such as aphids or spider mites. If you find pests, treat your plant with an insecticidal soap or neem oil.
How do I prevent pests from attacking my indoor basil plant?
To prevent pests from attacking your indoor basil plant, inspect your plant regularly for signs of infestation. Keep your plant clean by removing any dead or yellowing leaves. Provide good air circulation around your plant. You can also use insecticidal soap or neem oil as a preventative measure.
Can I grow basil from seed indoors?
Yes, you can grow basil from seed indoors. Start seeds indoors 6-8 weeks before the last expected frost. Sow seeds in a seed-starting mix and keep them moist. Provide warmth and light. Once the seedlings have developed a few sets of true leaves, transplant them into individual pots.
My basil plant is flowering. Should I remove the flowers?
Yes, you should remove the flowers from your basil plant. Flowering signals the end of the plant’s vegetative growth cycle and can cause the leaves to become bitter. Pinch off the flower buds as soon as you see them to encourage the plant to continue producing leaves.
How long will my indoor basil plant last?
With proper care, your indoor basil plant can last for several months. However, basil is an annual plant, which means it will eventually die. To prolong the life of your plant, provide it with plenty of sunlight, water, and fertilizer. You can also propagate new plants from cuttings.
Leave a Comment