
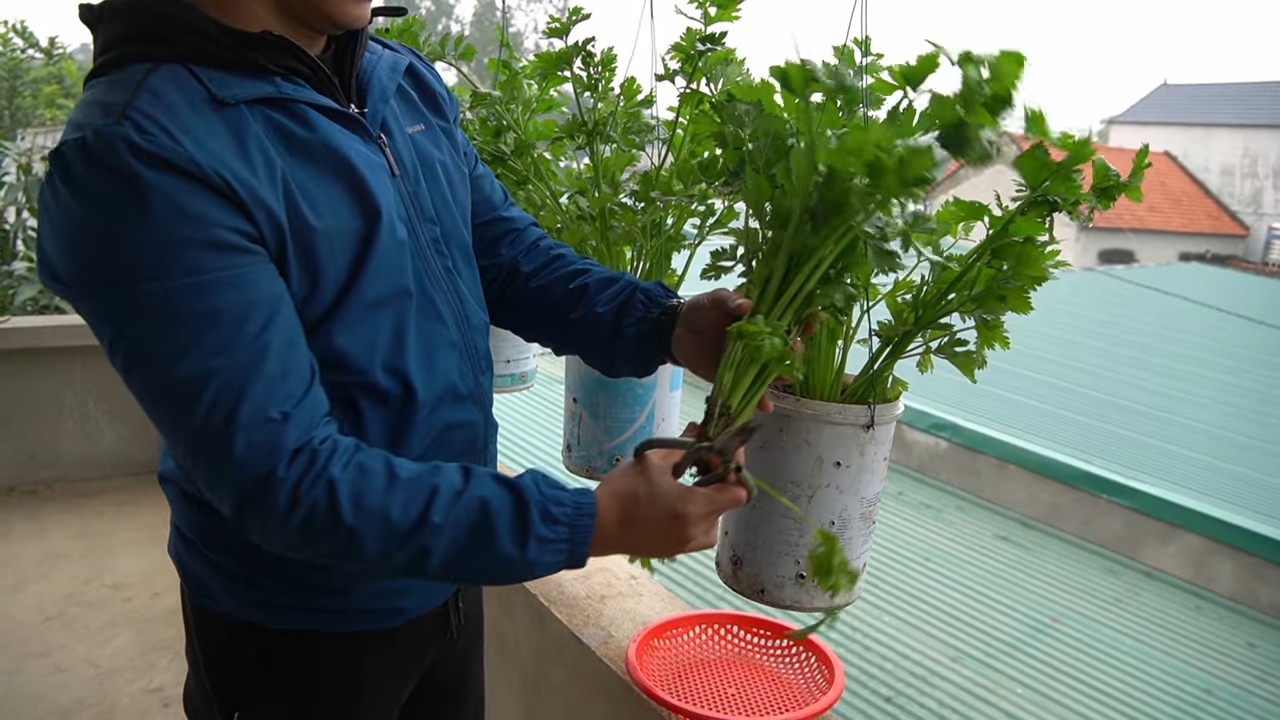
Harvest Celery Backyard: Imagine stepping into your backyard, not just to relax, but to gather fresh, crisp celery for your next meal. Sounds idyllic, right? Well, it’s more achievable than you think! For centuries, home gardens have provided sustenance and a connection to nature. From the hanging gardens of Babylon to the victory gardens of World War II, growing your own food has always been a rewarding endeavor.
But let’s be honest, sometimes gardening feels more like a chore than a joy. That’s where clever DIY tricks and hacks come in! I’m here to share some simple, effective methods to help you successfully harvest celery backyard, even if you’re a complete beginner.
Why is this important? Because store-bought celery can be expensive and often lacks the vibrant flavor of homegrown produce. Plus, knowing exactly where your food comes from and how it was grown gives you peace of mind. So, ditch the grocery store celery and get ready to enjoy the satisfaction of harvesting your own delicious, crunchy stalks. Let’s dive into some easy-to-follow DIY tips that will transform your backyard into a celery-growing haven!
Sellerie aus dem eigenen Garten ernten: Eine Schritt-für-Schritt-Anleitung
Hallo liebe Gartenfreunde! Ich freue mich riesig, euch heute zu zeigen, wie ihr euren eigenen Sellerie im Garten ernten könnt. Es ist wirklich ein tolles Gefühl, Gemüse anzubauen und dann frisch auf den Tisch zu bringen. Sellerie ist nicht nur superlecker, sondern auch reich an Vitaminen und Mineralstoffen. Also, lasst uns loslegen!
Wann ist der richtige Zeitpunkt für die Sellerieernte?
Der Zeitpunkt der Ernte ist entscheidend für den Geschmack und die Qualität eures Selleries. Hier sind ein paar Anhaltspunkte, die euch helfen, den optimalen Zeitpunkt zu bestimmen:
* Größe der Knolle: Die Sellerieknolle sollte einen Durchmesser von etwa 10-15 cm haben. Das ist ein guter Indikator dafür, dass sie reif ist.
* Festigkeit: Drückt leicht auf die Knolle. Sie sollte fest und prall sein. Wenn sie sich weich anfühlt, ist sie wahrscheinlich überreif.
* Blätter: Die äußeren Blätter können gelblich werden, aber das ist kein Problem. Achtet darauf, dass die inneren Blätter noch grün und frisch aussehen.
* Zeitpunkt im Jahr: Sellerie wird in der Regel im Herbst geerntet, bevor der erste Frost kommt. In den meisten Regionen ist das zwischen September und November der Fall.
Benötigtes Werkzeug und Material
Bevor wir mit der Ernte beginnen, solltet ihr sicherstellen, dass ihr alles Notwendige zur Hand habt. Hier ist eine Liste der Werkzeuge und Materialien, die ihr benötigt:
* Spaten oder Grabegabel: Zum Ausgraben der Sellerieknolle.
* Gartenhandschuhe: Zum Schutz eurer Hände.
* Messer oder Gartenschere: Zum Abschneiden der Blätter und Wurzeln.
* Eimer oder Korb: Zum Sammeln der geernteten Sellerieknollen.
* Gartenschlauch oder Wasserbehälter: Zum Reinigen der Knollen.
Schritt-für-Schritt-Anleitung zur Sellerieernte
Jetzt geht es ans Eingemachte! Folgt diesen Schritten, um euren Sellerie erfolgreich zu ernten:
1. Vorbereitung: Zieht eure Gartenhandschuhe an und nehmt den Spaten oder die Grabegabel zur Hand. Stellt sicher, dass ihr genügend Platz um die Selleriepflanze habt, um bequem arbeiten zu können.
2. Ausgraben der Knolle: Stecht mit dem Spaten oder der Grabegabel vorsichtig um die Selleriepflanze herum in den Boden. Achtet darauf, die Knolle nicht zu beschädigen. Beginnt etwa 15-20 cm von der Pflanze entfernt und arbeitet euch langsam vor.
3. Anheben der Pflanze: Hebelt die Pflanze vorsichtig mit dem Spaten oder der Grabegabel aus dem Boden. Versucht, die Knolle so wenig wie möglich zu belasten. Wenn der Boden sehr fest ist, müsst ihr möglicherweise etwas mehr Kraft aufwenden.
4. Entfernen der Erde: Schüttelt die Erde vorsichtig von der Knolle ab. Ihr könnt auch eure Hände benutzen, um die Erde zu entfernen. Achtet darauf, die Knolle nicht zu beschädigen.
5. Abschneiden der Blätter: Nehmt das Messer oder die Gartenschere und schneidet die Blätter etwa 2-3 cm über der Knolle ab. Lasst einen kleinen Stiel stehen, um die Knolle vor dem Austrocknen zu schützen.
6. Abschneiden der Wurzeln: Schneidet die Wurzeln so nah wie möglich an der Knolle ab. Auch hier könnt ihr das Messer oder die Gartenschere verwenden.
7. Reinigen der Knolle: Spült die Knolle mit dem Gartenschlauch oder in einem Wasserbehälter ab, um restliche Erde zu entfernen. Achtet darauf, alle Rillen und Vertiefungen gründlich zu reinigen.
8. Kontrolle: Überprüft die Knolle auf Beschädigungen oder Krankheiten. Wenn ihr etwas Ungewöhnliches feststellt, solltet ihr die Knolle nicht lagern, sondern sofort verarbeiten.
9. Lagerung: Lagert die geernteten Sellerieknollen an einem kühlen, dunklen und trockenen Ort. Ideal ist ein Keller oder eine Speisekammer. Ihr könnt die Knollen auch in feuchten Sand einschlagen, um sie länger frisch zu halten.
Zusätzliche Tipps und Tricks für eine erfolgreiche Sellerieernte
Hier sind noch ein paar zusätzliche Tipps, die euch helfen können, eure Sellerieernte zu optimieren:
* Bewässerung: Gießt den Sellerie regelmäßig, besonders in trockenen Perioden. Eine ausreichende Bewässerung sorgt für eine gute Entwicklung der Knolle.
* Düngung: Düngt den Sellerie während der Wachstumsphase regelmäßig mit einem organischen Dünger. Das fördert das Wachstum und die Gesundheit der Pflanze.
* Schutz vor Schädlingen: Achtet auf Schädlinge wie Schnecken oder Blattläuse. Bekämpft sie bei Bedarf mit natürlichen Mitteln.
* Fruchtfolge: Baut Sellerie nicht jedes Jahr am selben Standort an. Eine Fruchtfolge hilft, Krankheiten und Schädlinge zu vermeiden.
* Verwendung der Blätter: Werft die abgeschnittenen Blätter nicht weg! Ihr könnt sie zum Würzen von Suppen und Eintöpfen verwenden oder sie trocknen und als Kräuter verwenden.
Was tun, wenn der Sellerie nicht so wächst, wie er soll?
Manchmal läuft es nicht so, wie geplant. Hier sind ein paar häufige Probleme und mögliche Lösungen:
* Kleine Knollen: Wenn die Knollen klein bleiben, kann das an einem Nährstoffmangel liegen. Düngt den Sellerie mit einem stickstoffreichen Dünger.
* Weiche Knollen: Weiche Knollen können ein Zeichen für Überreife sein. Erntet den Sellerie sofort.
* Krankheiten: Sellerie kann von verschiedenen Krankheiten befallen werden. Achtet auf Anzeichen wie Flecken auf den Blättern oder Fäulnis an der Knolle. Bekämpft Krankheiten mit geeigneten Mitteln.
* Schädlinge: Schädlinge können das Wachstum des Selleries beeinträchtigen. Kontrolliert die Pflanzen regelmäßig und bekämpft Schädlinge bei Bedarf.
Verwendung des geernteten Selleries
Nach der Ernte könnt ihr euren Sellerie vielseitig verwenden. Hier sind ein paar Ideen:
* Roh: Sellerie kann roh als Snack gegessen werden. Er passt gut zu Dips wie Hummus oder Guacamole.
* Gekocht: Sellerie kann gekocht, gedünstet oder gebraten werden. Er ist eine tolle Zutat für Suppen, Eintöpfe und Gemüsepfannen.
* Saft: Selleriesaft ist ein gesunder und erfrischender Drink. Er kann pur getrunken oder mit anderen Gemüsesäften gemischt werden.
* Suppenbasis: Sellerie ist eine wichtige Zutat für viele Suppenbasen. Er verleiht der Suppe einen würzigen Geschmack.
Sellerie richtig lagern
Die richtige Lagerung ist entscheidend, um die Frische und den Geschmack des Selleries zu erhalten. Hier sind ein paar Tipps:
* Kühlschrank: Sellerie kann im Kühlschrank bis zu zwei Wochen gelagert werden. Wickelt die Knolle in ein feuchtes Tuch oder legt sie in einen Plastikbeutel.
* Keller: Ein kühler, dunkler Keller ist ein idealer Ort zur Lagerung von Sellerie. Lagert die Knollen in feuchtem Sand, um sie länger frisch zu halten.
* Einfrieren: Sellerie kann auch eingefroren werden. Schneidet die Knolle in Würfel und blanchiert sie kurz in kochendem Wasser. Friert die Würfel dann in einem Gefrierbeutel ein.
Ich hoffe, diese Anleitung hat euch geholfen, euren eigenen Sellerie erfolgreich zu ernten. Viel Spaß beim Gärtnern und guten Appetit!

Conclusion
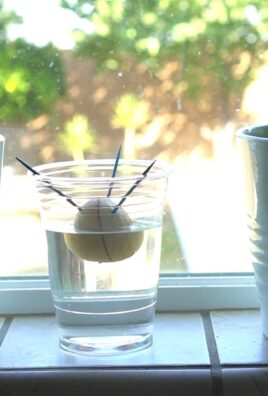
So, there you have it! Mastering the art of regrowing celery from scraps is not just a fun experiment; it’s a sustainable way to reduce food waste, save money, and enjoy fresh, homegrown celery right from your kitchen. This simple DIY trick transforms what would otherwise be discarded into a vibrant source of crisp, flavorful stalks. Forget those wilted, expensive bunches at the grocery store – imagine the satisfaction of harvesting your own celery, knowing you nurtured it from a humble leftover.
This method is a must-try for several reasons. First, it’s incredibly easy. Even if you don’t have a green thumb, you can succeed with this project. The steps are straightforward, and the required materials are minimal. Second, it’s eco-friendly. By regrowing celery, you’re reducing your carbon footprint and contributing to a more sustainable lifestyle. Third, it’s cost-effective. Celery can be surprisingly expensive, especially if you use it frequently in your cooking. Regrowing your own significantly cuts down on grocery bills. Finally, it’s a rewarding experience. Watching your celery sprout and grow is a tangible reminder of your connection to nature and the power of resourcefulness.
But don’t stop there! Once you’ve mastered the basic technique, feel free to experiment with variations. Try different types of celery, such as Pascal or Utah varieties, to see which grows best in your environment. You can also experiment with different growing mediums, such as hydroponics or aquaponics, for a more advanced approach. Consider adding fertilizer to the water or soil to boost growth and yield. You can even try growing your regrown celery in a larger container or directly in your garden for a more substantial harvest.
Don’t be afraid to get creative and personalize your celery-growing journey.
We encourage you to try this DIY trick and discover the joy of regrowing celery from scraps. It’s a simple, sustainable, and satisfying way to add fresh flavor to your meals and reduce food waste. Share your experiences with us! We’d love to hear about your successes, challenges, and any tips you’ve discovered along the way. Post photos of your regrown celery on social media using #RegrowCelery and #BackyardHarvest, and let’s inspire others to embrace this eco-friendly practice.
Ready to start your celery-growing adventure? Grab that celery base, follow the steps outlined, and watch the magic happen. Happy growing!
Frequently Asked Questions (FAQ)
How long does it take to regrow celery from a base?
The time it takes to regrow celery from a base can vary depending on several factors, including the variety of celery, the growing conditions (temperature, light, humidity), and the care you provide. Generally, you can expect to see new growth within a few days to a week after placing the celery base in water. Small leaves will start to emerge from the center of the base. After about a week or two in water, you should see significant root development. Once the roots are well-established, you can transplant the celery into soil. From transplanting to harvesting a usable stalk, it can take anywhere from 2-3 months. Remember, regrown celery might not be as large or robust as store-bought celery, but it will still provide a delicious and fresh flavor.
What kind of water should I use to regrow celery?
Using the right kind of water is crucial for successful celery regrowth. Tap water is generally acceptable, but it’s best to let it sit out for 24 hours to allow chlorine and other chemicals to dissipate. These chemicals can sometimes inhibit root growth. Filtered water or rainwater is even better, as they are free of these additives. Avoid using distilled water, as it lacks the minerals that plants need to thrive. Change the water every 1-2 days to prevent bacterial growth and keep the celery base healthy.
How much sunlight does regrown celery need?
Celery needs plenty of sunlight to thrive. Aim for at least 6 hours of direct sunlight per day. If you’re growing your celery indoors, place it near a sunny window, preferably one that faces south or west. If you don’t have access to enough natural light, you can supplement with a grow light. A fluorescent or LED grow light can provide the necessary light spectrum for healthy growth. Position the light a few inches above the celery plant and keep it on for 12-16 hours per day.
What kind of soil is best for regrowing celery?
Celery prefers rich, well-draining soil. A good potting mix that contains compost, peat moss, and perlite or vermiculite is ideal. This type of mix provides the necessary nutrients and allows for good drainage, preventing the roots from becoming waterlogged. You can also amend your garden soil with compost or well-rotted manure to improve its fertility and drainage. The soil pH should be slightly acidic to neutral, around 6.0 to 7.0.
Can I grow celery indoors permanently?
Yes, you can grow celery indoors permanently, but it requires some extra care and attention. Ensure your celery receives adequate sunlight or supplemental grow lights. Maintain consistent moisture in the soil, but avoid overwatering. Fertilize regularly with a balanced liquid fertilizer diluted to half strength. Provide good air circulation to prevent fungal diseases. Keep an eye out for pests, such as aphids or spider mites, and treat them promptly. While indoor-grown celery may not reach the same size as outdoor-grown celery, it can still provide a continuous supply of fresh stalks for your culinary needs.
How often should I fertilize my regrown celery?
Fertilizing your regrown celery is important for promoting healthy growth and a good harvest. Start fertilizing about two weeks after transplanting the celery base into soil. Use a balanced liquid fertilizer, such as a 10-10-10 or 20-20-20 formula, diluted to half strength. Apply the fertilizer every two to three weeks during the growing season. Avoid over-fertilizing, as this can lead to excessive foliage growth and reduced stalk development. You can also supplement with organic fertilizers, such as compost tea or fish emulsion, to provide additional nutrients and beneficial microbes to the soil.
What are some common problems when regrowing celery and how can I fix them?
Several common problems can arise when regrowing celery. One common issue is yellowing leaves, which can be caused by nutrient deficiencies, overwatering, or underwatering. Ensure your celery is receiving adequate nutrients by fertilizing regularly. Check the soil moisture and adjust your watering schedule accordingly. Another problem is pest infestations, such as aphids or spider mites. Treat these pests with insecticidal soap or neem oil. Fungal diseases, such as celery blight, can also be a problem. Prevent these diseases by providing good air circulation and avoiding overhead watering. If you notice any signs of disease, remove the affected leaves and treat the plant with a fungicide.
Can I harvest seeds from my regrown celery?
While it’s possible to harvest seeds from regrown celery, it’s a more advanced process that requires patience and specific conditions. Celery is a biennial plant, meaning it typically takes two years to produce seeds. In the first year, the plant focuses on vegetative growth, producing stalks and leaves. In the second year, it will bolt (send up a flower stalk) and produce seeds. To harvest seeds, you’ll need to overwinter your celery plant and allow it to flower in the spring. Once the flowers have dried and the seed heads have turned brown, you can harvest the seeds. Keep in mind that the seeds from regrown celery may not be true to type, meaning they may not produce plants that are identical to the original celery.

Leave a Comment