
Harvest bean sprouts like a pro with these simple, yet effective DIY tricks! Have you ever wondered how those crunchy, delicious bean sprouts end up in your stir-fries and salads? It’s easier than you think to grow your own, and I’m here to guide you through the process. For centuries, sprouting has been a staple in various cultures, particularly in Asian cuisine, where they’re valued for their nutritional benefits and fresh taste. Think of it as a miniature garden right in your kitchen!
But why should you bother learning how to harvest bean sprouts yourself? Well, for starters, it’s incredibly rewarding to nurture something from seed to sprout. Plus, store-bought sprouts can sometimes be a bit pricey, and let’s be honest, they don’t always have that vibrant, fresh flavor. With my DIY methods, you’ll not only save money but also enjoy the satisfaction of knowing exactly where your food comes from. Imagine adding a handful of freshly harvested bean sprouts to your next meal, knowing you grew them yourself – it’s a game-changer! So, let’s dive in and unlock the secrets to successful bean sprout harvesting!
Sprossen selbst ziehen: Eine einfache Anleitung für zu Hause
Hallo liebe DIY-Freunde! Ich liebe frische Sprossen. Sie sind knackig, gesund und peppen jedes Gericht auf. Und das Beste: Man kann sie super einfach selbst ziehen! In diesem Artikel zeige ich euch, wie ihr zu Hause eure eigenen Sprossen ernten könnt. Es ist einfacher als ihr denkt und macht richtig Spaß!
Was du brauchst:
* Sprossengläser oder ein Keimgerät: Ich persönlich mag Sprossengläser am liebsten, weil sie einfach zu reinigen sind und wenig Platz wegnehmen. Es gibt aber auch tolle Keimgeräte mit mehreren Etagen, wenn du gleich größere Mengen ziehen möchtest.
* Sprossensamen: Achte darauf, dass du spezielle Sprossensamen kaufst. Diese sind unbehandelt und für den Verzehr geeignet. Du findest sie in Bioläden, Reformhäusern oder online. Beliebte Sorten sind Alfalfa, Radieschen, Brokkoli, Mungbohnen und Linsen.
* Sauberes Wasser: Am besten gefiltertes Wasser oder abgekochtes, abgekühltes Wasser verwenden.
* Ein feines Sieb oder ein Tuch: Zum Abspülen der Sprossen.
* Ein dunkler, kühler Ort: Sprossen keimen am besten im Dunkeln.
* Geduld: Sprossen brauchen ein paar Tage, um zu wachsen.
Sprossen ziehen im Sprossenglas: Schritt für Schritt
1. Samen vorbereiten: Gib einen Esslöffel Sprossensamen in dein Sprossenglas. Die Menge hängt von der Sorte und der Größe deines Glases ab. Weniger ist mehr, da die Samen beim Keimen aufquellen.
2. Einweichen: Fülle das Glas mit reichlich Wasser und lasse die Samen für 4-12 Stunden einweichen. Die genaue Einweichzeit hängt von der Sorte ab. Informiere dich am besten auf der Packung deiner Samen.
3. Wasser abgießen: Gieße das Einweichwasser durch ein feines Sieb oder ein Tuch ab. Achte darauf, dass alle Samen im Glas bleiben.
4. Spülen: Spüle die Samen gründlich mit frischem Wasser ab. Das ist wichtig, um Schimmelbildung zu vermeiden.
5. Glas positionieren: Stelle das Sprossenglas schräg auf, sodass überschüssiges Wasser ablaufen kann. Am besten stellst du es in eine Schüssel oder auf ein Abtropfgitter.
6. Dunkler Ort: Stelle das Glas an einen dunklen, kühlen Ort. Eine Speisekammer oder ein Küchenschrank sind ideal.
7. Regelmäßig spülen: Spüle die Sprossen 2-3 Mal täglich mit frischem Wasser. Das ist das A und O für eine erfolgreiche Sprossenzucht. Achte darauf, dass das Wasser gut abläuft, damit die Sprossen nicht im Wasser stehen.
8. Warten und beobachten: Nach ein paar Tagen beginnen die Samen zu keimen. Du wirst kleine Wurzeln und Blättchen sehen.
9. Licht: Sobald die Sprossen gekeimt sind, kannst du sie für ein paar Stunden am Tag ans Licht stellen. Das fördert die Chlorophyllbildung und macht sie grüner. Aber Vorsicht: Zu viel direktes Sonnenlicht kann sie austrocknen.
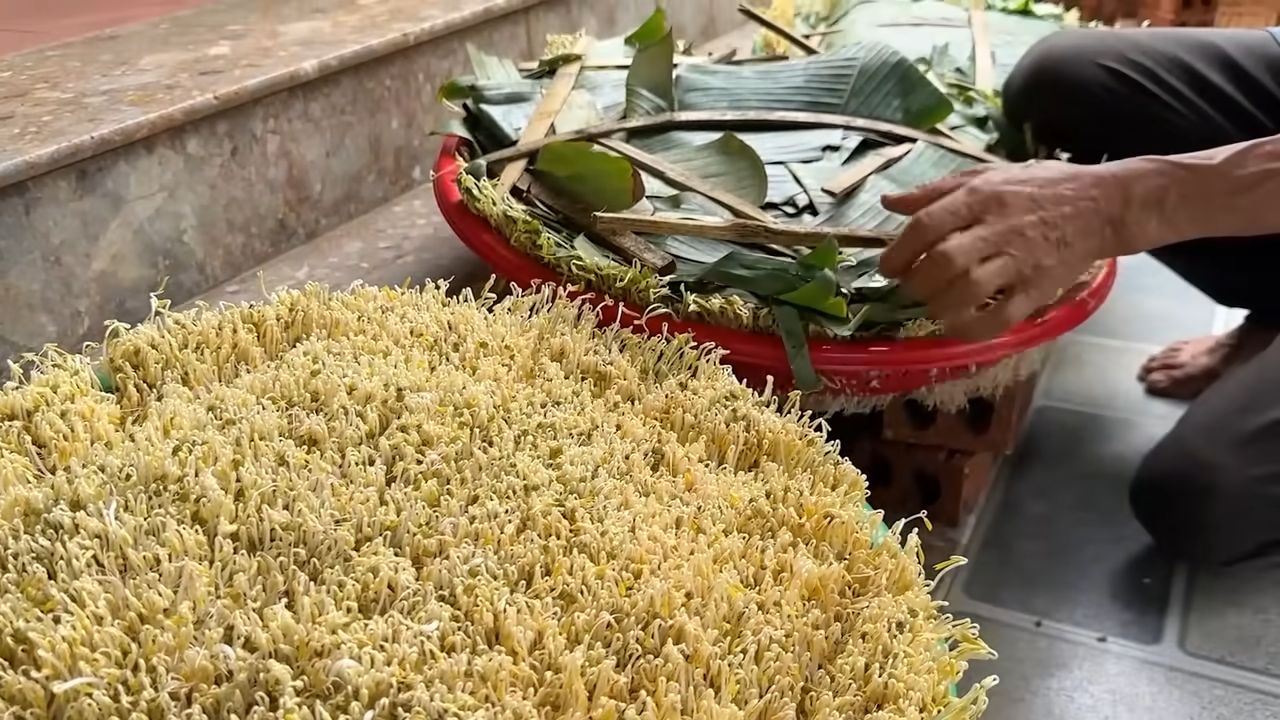
10. Ernten: Nach 3-7 Tagen (je nach Sorte) sind deine Sprossen erntereif. Sie sollten knackig und frisch aussehen.
Sprossen ernten: So geht’s richtig
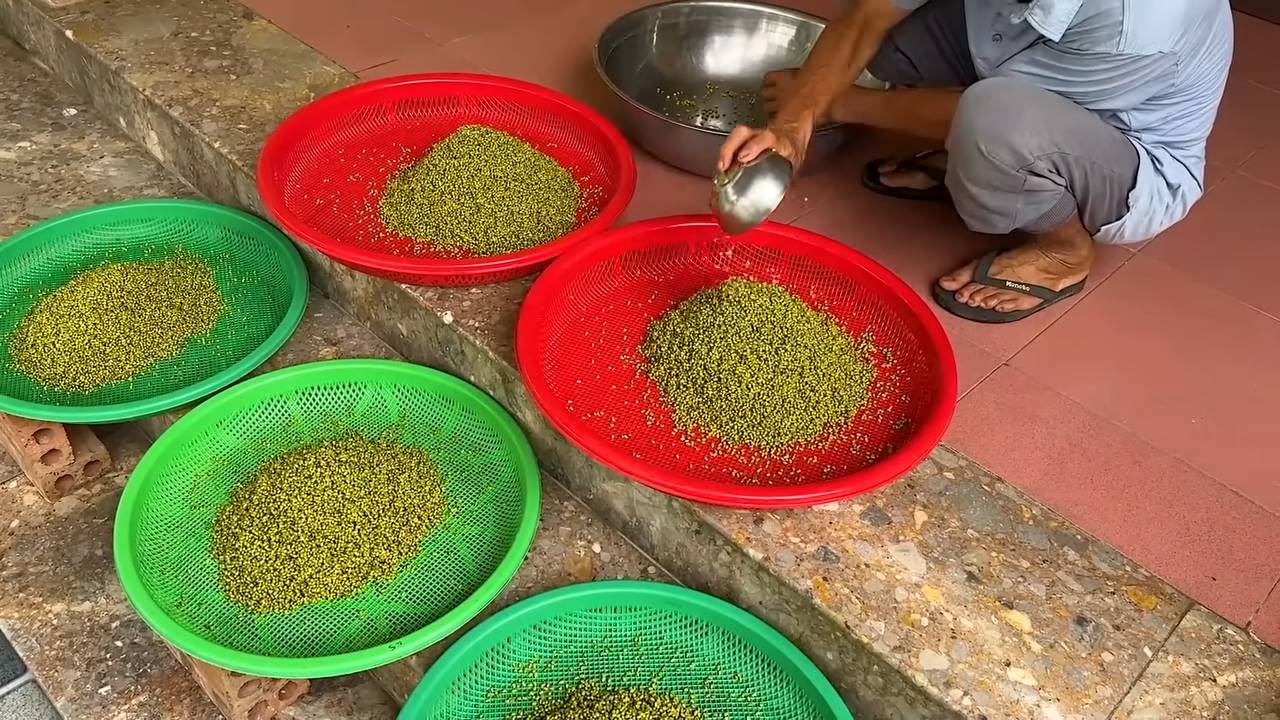
1. Gründlich spülen: Spüle die Sprossen vor der Ernte noch einmal gründlich mit kaltem Wasser ab.
2. Schalen entfernen (optional): Einige Leute entfernen die Samenschalen vor dem Verzehr. Das ist aber Geschmackssache. Du kannst sie einfach mitessen. Wenn du sie entfernen möchtest, kannst du die Sprossen in eine Schüssel mit Wasser geben und die Schalen abschöpfen.
3. Abtropfen lassen: Lasse die Sprossen gut abtropfen, bevor du sie verwendest.
4. Lagern: Bewahre die geernteten Sprossen im Kühlschrank auf. Sie halten sich dort 2-3 Tage. Am besten lagerst du sie in einem sauberen Behälter mit einem feuchten Tuch abgedeckt.
Häufige Probleme und Lösungen
* Schimmelbildung: Schimmelbildung ist das häufigste Problem beim Sprossen ziehen. Die Ursache ist meist mangelnde Hygiene oder zu wenig Belüftung. Achte darauf, dass du deine Sprossengläser und Samen gründlich reinigst und die Sprossen regelmäßig spülst. Sorge für eine gute Belüftung, indem du das Glas nicht zu voll machst und es schräg positionierst. Wenn du Schimmel entdeckst, solltest du die betroffenen Sprossen entsorgen.
* Faule Sprossen: Faule Sprossen riechen unangenehm und sind schleimig. Die Ursache ist meist zu viel Feuchtigkeit. Achte darauf, dass das Wasser nach dem Spülen gut abläuft.
* Keine Keimung: Wenn deine Samen nicht keimen, kann das verschiedene Ursachen haben. Vielleicht sind die Samen zu alt, von schlechter Qualität oder wurden falsch gelagert. Achte darauf, dass du frische, hochwertige Sprossensamen verwendest und sie kühl und trocken lagerst. Es kann auch sein, dass die Einweichzeit zu kurz war.
Welche Sprossen sind für Anfänger geeignet?
Für Anfänger empfehle ich Alfalfa, Radieschen oder Mungbohnen. Diese Sorten sind relativ einfach zu ziehen und keimen schnell.
Sprossen in der Küche: Vielseitige Verwendungsmöglichkeiten
Sprossen sind unglaublich vielseitig und können in vielen Gerichten verwendet werden.
* Salate: Sprossen peppen jeden Salat auf und verleihen ihm eine knackige Textur.
* Sandwiches und Wraps: Sprossen sind eine tolle Ergänzung für Sandwiches und Wraps.
* Suppen und Eintöpfe: Sprossen können kurz vor dem Servieren in Suppen und Eintöpfe gegeben werden.
* Wok-Gerichte: Sprossen sind eine beliebte Zutat in Wok-Gerichten.
* Smoothies: Sprossen können auch in Smoothies gemixt werden.
* Als Garnitur: Sprossen eignen sich hervorragend als Garnitur für verschiedene Gerichte.
Warum Sprossen so gesund sind
Sprossen sind wahre Nährstoffbomben. Sie enthalten viele Vitamine, Mineralstoffe, Enzyme und Ballaststoffe. Außerdem sind sie leicht verdaulich und liefern wertvolle Energie.
* Vitamine: Sprossen enthalten viele Vitamine, darunter Vitamin C, Vitamin K und B-Vitamine.
* Mineralstoffe: Sprossen sind reich an Mineralstoffen wie Eisen, Kalzium und Magnesium.
* Enzyme: Sprossen enthalten viele Enzyme, die die Verdauung fördern.
* Ballaststoffe: Sprossen sind reich an Ballaststoffen, die die Darmgesundheit unterstützen.
* Antioxidantien: Sprossen enthalten Antioxidantien, die die Zellen vor Schäden schützen.
Weitere Tipps und Tricks
* Verschiedene Sorten mischen: Du kannst verschiedene Sprossensorten mischen, um einen abwechslungsreichen Geschmack zu erzielen.
* Sprossen im Garten ziehen: Du kannst Sprossen auch im Garten ziehen. Dafür benötigst du ein Keimbeet oder eine Keimbox.
* Sprossen als Tierfutter: Sprossen sind auch ein gesundes Futter für Haustiere wie Vögel und Nagetiere.
* Sprossen selbst trocknen: Du kannst Sprossen auch selbst trocknen und als Zutat für Suppen und Eintöpfe verwenden.
Fazit
Sprossen selbst zu ziehen ist eine einfache und lohnende Möglichkeit, frische und gesunde Lebensmittel zu Hause zu produzieren. Mit ein wenig Geduld und den richtigen Tipps und Tricks gelingt es jedem! Probiert es aus und lasst euch von der Vielfalt und dem Geschmack der Sprossen begeistern! Ich wünsche euch viel Erfolg beim Sprossen ziehen!
Conclusion
So, there you have it! Harvesting bean sprouts at home is not only surprisingly simple, but it’s also incredibly rewarding. Forget those limp, flavorless sprouts from the grocery store. With this easy DIY trick, you can cultivate a vibrant, crunchy, and intensely flavorful batch of bean sprouts right in your own kitchen. The difference in taste and texture is truly remarkable, and once you experience the freshness of homegrown sprouts, you’ll never want to go back to store-bought again.
This method is a must-try for anyone looking to add a healthy and delicious boost to their meals. Think about the possibilities! Toss them into stir-fries for added crunch and nutrients, layer them onto sandwiches and wraps for a refreshing bite, or sprinkle them over salads for a burst of flavor. The versatility of fresh bean sprouts is truly endless.
Beyond the superior taste and texture, growing your own bean sprouts is also a fantastic way to save money and reduce your environmental impact. You’ll be cutting down on plastic packaging and transportation costs, all while enjoying a sustainable and healthy food source. It’s a win-win situation!
Ready to take your bean sprout game to the next level? Consider experimenting with different types of beans. Mung beans are the most common choice, but you can also try adzuki beans, lentils, or even chickpeas for a unique flavor profile. Each type of bean will yield sprouts with slightly different textures and tastes, allowing you to customize your harvest to your liking.
Another variation to explore is the growing environment. While a simple jar or sprouting container works perfectly well, you can also experiment with different levels of light exposure. Some people prefer to grow their sprouts in complete darkness for a milder flavor, while others prefer to expose them to indirect sunlight for a slightly sweeter taste.
Don’t be afraid to get creative and experiment with different techniques to find what works best for you. The beauty of this DIY trick is that it’s incredibly forgiving and adaptable. Even if you’re a complete beginner, you’re almost guaranteed to have success.
We wholeheartedly encourage you to give this DIY trick a try. It’s a simple, affordable, and incredibly satisfying way to enjoy fresh, healthy, and delicious bean sprouts at home. Once you’ve experienced the joy of harvesting your own sprouts, we’re confident that you’ll be hooked!
And most importantly, we want to hear about your experience! Share your tips, tricks, and photos with us in the comments below. Let us know what type of beans you used, what variations you tried, and how you’re enjoying your homegrown bean sprouts. We’re excited to learn from your experiences and build a community of fellow sprout enthusiasts. Happy sprouting!
Frequently Asked Questions (FAQ)
What types of beans are best for sprouting?
The most common and readily available bean for sprouting is the mung bean. Mung beans sprout quickly and reliably, producing crisp and flavorful sprouts. However, you can also experiment with other types of beans, such as adzuki beans, lentils, chickpeas, and even soybeans. Each type of bean will yield sprouts with a slightly different flavor and texture. For example, adzuki beans have a slightly sweeter taste, while lentils tend to be more earthy. When choosing beans for sprouting, make sure they are whole, un-split, and specifically intended for sprouting or culinary use. Avoid using beans that are labeled as “treated” or “intended for planting,” as these may contain chemicals that are not safe for consumption.
How long does it take to harvest bean sprouts?
The entire process, from soaking the beans to harvesting the sprouts, typically takes between 3 to 7 days, depending on the type of bean, the temperature, and the humidity. Mung beans usually sprout within 3 to 5 days, while other types of beans may take a bit longer. You’ll know your sprouts are ready to harvest when they have reached your desired length and have developed small, leafy green shoots. It’s important to monitor your sprouts closely and harvest them before they become too long or bitter.
What is the best way to store harvested bean sprouts?
Once you’ve harvested your bean sprouts, it’s important to store them properly to maintain their freshness and prevent spoilage. The best way to store bean sprouts is in the refrigerator, in a sealed container lined with a paper towel. The paper towel will help absorb excess moisture and keep the sprouts from becoming soggy. You can also rinse the sprouts with cold water before storing them to remove any remaining hulls or debris. Properly stored bean sprouts will typically last for up to a week in the refrigerator.
How do I prevent mold growth during the sprouting process?
Mold growth is a common concern when sprouting beans, but it can be easily prevented with proper hygiene and ventilation. The most important thing is to rinse your beans thoroughly at least twice a day with fresh, clean water. This will help remove any bacteria or mold spores that may be present. It’s also important to ensure that your sprouting container has adequate ventilation to prevent moisture buildup. Avoid overcrowding the container with too many beans, as this can also contribute to mold growth. If you notice any signs of mold, such as a fuzzy white or gray growth, discard the entire batch of sprouts immediately.
Are there any health benefits to eating bean sprouts?
Yes, bean sprouts are a nutritional powerhouse! They are a good source of vitamins, minerals, and antioxidants. They are particularly rich in vitamin C, vitamin K, folate, and fiber. Bean sprouts are also low in calories and fat, making them a healthy addition to any diet. The sprouting process actually increases the bioavailability of certain nutrients, making them easier for your body to absorb. Eating bean sprouts can help boost your immune system, improve digestion, and protect against chronic diseases.
Can I eat the bean hulls or should I remove them?
Whether or not to eat the bean hulls is a matter of personal preference. Some people find them to be slightly bitter or tough, while others don’t mind them at all. If you prefer to remove the hulls, you can do so by gently rubbing the sprouts under cold water. The hulls will usually float to the surface and can be easily skimmed off. However, removing the hulls is not necessary, and they are perfectly safe to eat. They actually contain a good amount of fiber, which can be beneficial for digestion.
What if my bean sprouts don’t sprout?
If your bean sprouts aren’t sprouting, there are a few possible reasons. First, make sure that your beans are fresh and viable. Old or damaged beans may not sprout properly. Second, ensure that you are soaking the beans for the correct amount of time. Over-soaking or under-soaking can both inhibit sprouting. Third, check the temperature of your sprouting environment. Bean sprouts prefer a warm, humid environment, but not too hot. If the temperature is too cold, the sprouts may not germinate. Finally, make sure that you are rinsing the beans regularly with fresh water. Lack of moisture can also prevent sprouting. If you’ve tried all of these tips and your beans still aren’t sprouting, it’s possible that they are simply not viable and you’ll need to try a different batch.

Leave a Comment