
Growing Tomatoes from Grocery Store: Imagine biting into a juicy, sun-ripened tomato that you grew yourself, all from a simple tomato you bought at the grocery store! Sounds too good to be true? Well, get ready to roll up your sleeves because this DIY guide will show you exactly how to transform those everyday supermarket tomatoes into a thriving home garden. For centuries, cultivating tomatoes has been a cherished tradition, dating back to the Aztecs and Incas who first domesticated these vibrant fruits. From humble beginnings in South America, tomatoes have journeyed across continents, becoming a staple in cuisines worldwide.
But let’s face it, buying fresh, flavorful tomatoes can sometimes be a hit or miss. Store-bought tomatoes often lack the intense taste and aroma of homegrown varieties. That’s where this DIY trick comes in! I’m going to show you how to bypass the seed packets and directly propagate new tomato plants from the tomatoes you already have. Not only is it incredibly satisfying to nurture a plant from something you’d normally discard, but it’s also a fantastic way to save money and ensure a constant supply of delicious, homegrown tomatoes. Plus, it’s a fun and educational project for the whole family! So, are you ready to learn the secrets of growing tomatoes from grocery store finds? Let’s get started!

Growing Tomatoes from Grocery Store Tomatoes: A DIY Adventure!
Okay, let’s be honest, who hasn’t looked at a perfectly ripe, juicy tomato in the grocery store and thought, “I wonder if I could grow that?” Well, I’m here to tell you, you absolutely can! It’s a fun, slightly experimental, and surprisingly rewarding DIY project. It’s not guaranteed to work every single time, but the potential for homegrown goodness makes it totally worth the effort.
Choosing Your Tomato & Gathering Supplies
Before we dive into the nitty-gritty, let’s talk about picking the right tomato and getting our supplies in order. This is crucial for success!
* Tomato Selection:
* Organic is Best: Opt for organic tomatoes whenever possible. Non-organic tomatoes are sometimes treated to prevent sprouting, which will obviously hinder our efforts.
* Heirloom Varieties: Heirloom tomatoes are your best bet. They’re known for their delicious flavor and, more importantly, they’re more likely to be true-to-seed, meaning the seeds will produce plants that resemble the parent tomato.
* Ripe and Healthy: Choose a tomato that is ripe, firm, and free from blemishes or bruises. The healthier the tomato, the better the chances of viable seeds.
* Avoid Hybrids: Hybrid tomatoes (often labeled as “F1”) are bred for specific traits and their seeds may not produce plants that are true to type. You *can* try, but don’t be surprised if the resulting tomatoes are different from the original.
* Essential Supplies:
* A Sharp Knife: For carefully slicing the tomato.
* A Small Bowl or Jar: To collect the seeds and pulp.
* Water: For rinsing and fermenting the seeds.
* Paper Towels: For drying the seeds.
* Seed Starting Tray or Small Pots: To plant the seeds.
* Seed Starting Mix: A light, well-draining soil mix specifically designed for starting seeds. Regular potting soil can be too heavy.
* Spray Bottle: For misting the soil.
* Warm, Sunny Location: A spot that gets at least 6-8 hours of sunlight per day.
* Optional: Heat Mat: To speed up germination.
* Optional: Grow Light: If you don’t have enough natural sunlight.
Extracting and Fermenting the Seeds
This is where the magic happens! Fermenting the seeds helps remove a germination-inhibiting gel coating and increases your chances of success. Don’t skip this step!
1. Slice the Tomato: Carefully slice the tomato in half horizontally. This will expose the seed cavities.
2. Scoop Out the Seeds and Pulp: Use a spoon or your fingers to scoop out the seeds and surrounding pulp into your bowl or jar. Don’t worry about separating the seeds from the pulp at this stage.
3. Add Water: Add about twice as much water as you have seed and pulp mixture.
4. Ferment the Mixture: Cover the bowl or jar loosely with plastic wrap or a lid. Leave it in a warm place (around 70-75°F or 21-24°C) for 3-4 days. You’ll notice a layer of mold forming on top – don’t panic! This is a good sign that the fermentation process is working. It’s breaking down the gel coating. Stir the mixture gently once or twice a day.
5. Check for Viable Seeds: After 3-4 days, the mixture should smell a bit sour. Add more water to the bowl or jar. Gently stir the mixture and let it settle for a few minutes. Viable seeds will sink to the bottom, while non-viable seeds and pulp will float to the top.
6. Rinse the Seeds: Carefully pour off the moldy water and floating debris. Add fresh water and repeat the process until the water is clear and you’re left with clean, viable seeds at the bottom.
7. Dry the Seeds: Spread the seeds out in a single layer on a paper towel. Make sure they’re not clumped together. Let them dry completely in a cool, dry place for about a week. This is crucial to prevent mold growth.
8. Store the Seeds: Once the seeds are completely dry, store them in an airtight container (like a small envelope or a jar) in a cool, dark, and dry place. Properly stored tomato seeds can remain viable for several years. Label the container with the tomato variety and the date.
Planting the Seeds
Now for the exciting part – planting our little seeds and watching them sprout!
1. Prepare Your Seed Starting Tray or Pots: Fill your seed starting tray or small pots with seed starting mix. Moisten the soil thoroughly, but don’t let it become waterlogged.
2. Sow the Seeds: Make a small indentation (about ¼ inch deep) in the soil. Place 2-3 seeds in each indentation. This increases your chances of at least one seed germinating.
3. Cover the Seeds: Gently cover the seeds with a thin layer of seed starting mix.
4. Water Gently: Use a spray bottle to mist the soil surface. Avoid pouring water directly onto the soil, as this can dislodge the seeds.
5. Provide Warmth and Light: Place the seed starting tray or pots in a warm, sunny location. If you’re using a heat mat, place it underneath the tray. If you don’t have enough natural sunlight, use a grow light. Keep the light a few inches above the soil surface.
6. Maintain Moisture: Keep the soil consistently moist, but not soggy. Mist the soil regularly with a spray bottle.
7. Wait for Germination: Tomato seeds typically germinate in 5-10 days, but it can take longer depending on the variety and environmental conditions. Be patient!
Caring for Seedlings
Once your seedlings emerge, it’s time to provide them with the care they need to grow strong and healthy.
1. Thin the Seedlings: Once the seedlings have their first true leaves (the second set of leaves that appear after the initial seed leaves), thin them out by snipping off the weaker seedlings at the soil line with scissors. Leave only the strongest seedling in each pot or cell.
2. Provide Adequate Light: Ensure your seedlings are getting plenty of light. If you’re using a grow light, adjust the height as the seedlings grow.
3. Water Regularly: Water the seedlings when the soil surface feels dry to the touch. Avoid overwatering, as this can lead to root rot.
4. Fertilize Lightly: Once the seedlings have a few sets of true leaves, you can start fertilizing them with a diluted liquid fertilizer specifically formulated for seedlings. Follow the instructions on the fertilizer label.
5. Harden Off the Seedlings: Before transplanting your seedlings outdoors, you need to “harden them off.” This process gradually acclimates them to outdoor conditions. Start by placing the seedlings outdoors in a sheltered location for a few hours each day, gradually increasing the amount of time they spend outdoors over a period of 1-2 weeks. Protect them from direct sunlight and strong winds during this process.
Transplanting Outdoors
The final step is transplanting your seedlings into their permanent home in your garden or in containers.
1. Choose a Sunny Location: Tomatoes need at least 6-8 hours of sunlight per day. Choose a location in your garden that receives plenty of sun.
2. Prepare the Soil: Amend the soil with compost or other organic matter to improve drainage and fertility.
3. Dig a Hole: Dig a hole that is slightly larger than the root ball of the seedling.
4. Transplant the Seedling: Gently remove the seedling from its pot or cell. Loosen the roots slightly and place the seedling in the hole.
5. Bury the Stem: This is a trick I learned that really helps! Bury the stem of the tomato plant up to the first set of leaves. Tomatoes can grow roots along their stems, which will result in a stronger, healthier plant.
6. Fill the Hole: Fill the hole with soil and gently firm it around the base of the plant.
7. Water Thoroughly: Water the seedling thoroughly after transplanting.
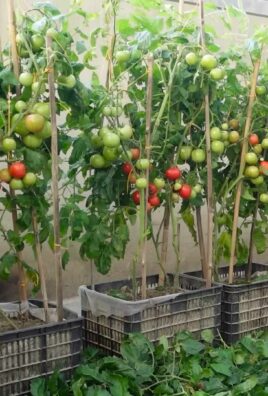
8. Provide Support: Tomatoes need support to prevent them from falling over as they grow. Use stakes, cages, or trellises to support your plants.
9. Mulch: Apply a layer of mulch around the base of the plants to help retain moisture, suppress weeds, and regulate soil temperature.
Ongoing Care
Once your tomato plants are established, continue to provide them with the care they need to thrive.
* Water Regularly: Water deeply and regularly, especially during hot, dry weather.

Conclusion
So, there you have it! Growing tomatoes from grocery store tomatoes isn’t just a fun experiment; it’s a surprisingly effective way to cultivate your own delicious, homegrown produce. It’s a testament to the resilience of nature and a fantastic opportunity to connect with the food you eat on a deeper level. Forget the seed packets for a moment and embrace the thrill of transforming a simple grocery store purchase into a thriving tomato plant.
Why is this DIY trick a must-try? Because it’s accessible, affordable, and incredibly rewarding. You’re essentially recycling food waste, reducing your carbon footprint, and gaining a bountiful harvest of fresh tomatoes – all from something you were likely going to discard anyway. Plus, it’s a fantastic learning experience for both adults and children, teaching valuable lessons about plant life cycles, sustainability, and the joy of gardening.
But the adventure doesn’t stop there! Feel free to experiment with different varieties of tomatoes. Cherry tomatoes, Roma tomatoes, beefsteak tomatoes – each will offer a unique flavor profile and growth habit. You can also explore different growing mediums, from traditional potting soil to hydroponic systems. Consider adding companion plants like basil or marigolds to your tomato garden to deter pests and enhance flavor.
Don’t be afraid to get your hands dirty and personalize your tomato-growing journey.
And remember, success with this method often depends on the quality of the tomato you start with. Opt for organic, ripe tomatoes that are free from blemishes or signs of decay. The riper the tomato, the more viable the seeds are likely to be.
We encourage you to give this DIY trick a try. It’s a simple yet profound way to experience the magic of gardening and enjoy the unparalleled taste of homegrown tomatoes. Imagine the satisfaction of serving a salad made entirely from ingredients you nurtured from seed (or, in this case, from a grocery store tomato!).
Once you’ve embarked on your tomato-growing adventure, we’d love to hear about your experience! Share your tips, tricks, and triumphs in the comments below. Let’s create a community of tomato enthusiasts who are passionate about sustainable gardening and the deliciousness of homegrown produce. Let us know what kind of growing tomatoes from grocery store you were able to grow.
Frequently Asked Questions (FAQ)
Q: What types of tomatoes are best for growing from grocery store tomatoes?
A: While you can technically try growing any type of tomato from a grocery store tomato, some varieties are more likely to be successful than others. Heirloom tomatoes, particularly organic varieties, tend to have higher germination rates because they haven’t been hybridized as much. Avoid hybrid tomatoes, as their seeds may not produce plants that are true to the parent variety. Cherry tomatoes, Roma tomatoes, and beefsteak tomatoes are all good options to experiment with. The key is to choose ripe, healthy-looking tomatoes that are free from blemishes or signs of decay.
Q: How long does it take to grow tomatoes from grocery store tomatoes?
A: The time it takes to grow tomatoes from grocery store tomatoes can vary depending on several factors, including the variety of tomato, the growing conditions, and the climate. Generally, it takes about 7-14 days for the seeds to germinate. After germination, it takes approximately 60-85 days for the plants to mature and produce ripe tomatoes. Keep in mind that these are just estimates, and your results may vary. Providing optimal growing conditions, such as plenty of sunlight, well-drained soil, and regular watering, will help to speed up the process.
Q: What kind of soil is best for growing tomatoes?
A: Tomatoes thrive in well-drained, fertile soil that is rich in organic matter. A slightly acidic soil pH of around 6.0 to 6.8 is ideal. You can use a commercially available potting mix specifically formulated for vegetables, or you can create your own mix by combining equal parts of garden soil, compost, and peat moss. Adding some perlite or vermiculite to the mix will improve drainage and aeration. Before planting, amend the soil with compost or other organic matter to provide essential nutrients and improve soil structure.
Q: How much sunlight do tomatoes need?
A: Tomatoes need at least 6-8 hours of direct sunlight per day to thrive. Choose a sunny location in your garden or on your patio where your tomato plants will receive plenty of sunlight throughout the day. If you live in a hot climate, providing some afternoon shade can help to prevent the plants from overheating. If you are growing tomatoes indoors, you may need to supplement with artificial lighting, such as grow lights, to ensure that the plants receive enough light.
Q: How often should I water my tomato plants?
A: Tomatoes need consistent watering to thrive, but it’s important to avoid overwatering, which can lead to root rot. Water your tomato plants deeply whenever the top inch of soil feels dry to the touch. The frequency of watering will depend on the weather conditions, the type of soil, and the size of the plants. During hot, dry weather, you may need to water your plants daily. In cooler, wetter weather, you may only need to water them every few days. Use a soaker hose or drip irrigation system to water the plants at the base, avoiding wetting the foliage, which can increase the risk of disease.
Q: Do I need to fertilize my tomato plants?
A: Yes, tomatoes are heavy feeders and benefit from regular fertilization. Start fertilizing your tomato plants about two weeks after transplanting them into the garden. Use a balanced fertilizer that is specifically formulated for tomatoes, following the instructions on the label. You can also use organic fertilizers, such as compost tea or fish emulsion. Fertilize your tomato plants every 2-3 weeks throughout the growing season to provide them with the nutrients they need to produce abundant fruit.
Q: How do I prevent pests and diseases from affecting my tomato plants?
A: There are several things you can do to prevent pests and diseases from affecting your tomato plants. Choose disease-resistant varieties of tomatoes. Practice crop rotation to prevent soilborne diseases from building up. Provide good air circulation around your plants by spacing them properly and pruning them regularly. Water your plants at the base to avoid wetting the foliage. Inspect your plants regularly for signs of pests or diseases, and take action promptly if you spot any problems. Use organic pest control methods, such as insecticidal soap or neem oil, to control pests. Remove any diseased leaves or plants to prevent the spread of disease.
Q: Can I grow tomatoes in containers?
A: Yes, you can definitely grow tomatoes in containers. Choose a large container that is at least 12 inches in diameter and 12 inches deep. Use a well-drained potting mix and provide plenty of sunlight and water. Container-grown tomatoes may need to be fertilized more frequently than tomatoes grown in the ground. Choose determinate varieties of tomatoes, which are more compact and better suited for container growing.
Q: What do I do if my tomato plants are not producing fruit?
A: There are several reasons why your tomato plants may not be producing fruit. Make sure your plants are getting enough sunlight, water, and nutrients. Check the soil pH to make sure it is within the optimal range. Pollination problems can also prevent fruit set. If you are growing tomatoes indoors or in a greenhouse, you may need to hand-pollinate the flowers. Extreme temperatures can also affect fruit set. If the temperature is too hot or too cold, the flowers may not be able to pollinate properly.
Leave a Comment