
Growing Purple Basil in Containers: Unlock the secrets to cultivating vibrant, aromatic purple basil right on your patio or balcony! Have you ever dreamt of adding a touch of culinary elegance and visual splendor to your home-cooked meals? Imagine snipping fresh, deep-purple basil leaves just moments before adding them to your pasta sauce, salads, or even a refreshing summer cocktail. This isn’t just a dream; it’s an achievable reality with a little know-how and the right container gardening techniques.
Basil, with its rich history dating back to ancient India, has been revered for centuries for its medicinal properties and culinary versatility. Different varieties of basil have been used in traditional medicine and religious ceremonies. While the familiar green basil is a kitchen staple, purple basil offers a unique twist, both in flavor and aesthetics. Its striking color makes it a beautiful ornamental plant as well.
But why should you consider growing purple basil in containers? Well, for starters, it’s incredibly convenient! Whether you have a sprawling garden or a tiny apartment balcony, container gardening allows you to enjoy fresh herbs regardless of your space constraints. Plus, it gives you greater control over the growing environment, protecting your precious basil from pests and diseases. I’m going to show you some simple DIY tricks and hacks that will have you harvesting a bountiful crop of purple basil in no time. Get ready to transform your outdoor space into a fragrant, flavorful oasis!
Lila Basilikum im Topf ziehen: Ein umfassender DIY-Leitfaden
Hallo liebe Gartenfreunde! Ich liebe es, meinen eigenen Kräutergarten zu haben, und lila Basilikum ist eines meiner absoluten Lieblingskräuter. Es ist nicht nur wunderschön anzusehen, sondern auch unglaublich vielseitig in der Küche. In diesem Artikel zeige ich euch, wie ihr ganz einfach lila Basilikum in Töpfen ziehen könnt. Keine Sorge, es ist einfacher als ihr denkt!
Was du brauchst:
* Samen oder Jungpflanzen: Du kannst entweder lila Basilikumsamen kaufen oder bereits vorgezogene Jungpflanzen. Ich persönlich finde, dass Jungpflanzen den Start etwas erleichtern.
* Töpfe: Wähle Töpfe mit einem Durchmesser von mindestens 15 cm. Achte darauf, dass sie Drainagelöcher haben, damit das Wasser gut ablaufen kann.
* Hochwertige Blumenerde: Verwende eine gut durchlässige Blumenerde, die reich an Nährstoffen ist. Du kannst auch etwas Kompost untermischen.
* Gießkanne oder Sprühflasche: Zum Bewässern deiner Basilikumpflanzen.
* Dünger (optional): Ein organischer Flüssigdünger kann das Wachstum fördern.
* Sonniger Standort: Lila Basilikum liebt die Sonne!
* Geduld und Liebe: Das Wichtigste überhaupt!
Schritt-für-Schritt-Anleitung:
1. Die Vorbereitung:
1. Töpfe vorbereiten: Fülle die Töpfe mit der Blumenerde. Lasse etwa 2-3 cm Platz bis zum Rand.
2. Erde anfeuchten: Befeuchte die Erde leicht mit einer Sprühflasche oder Gießkanne. Sie sollte feucht, aber nicht nass sein.
2. Aussaat (wenn du Samen verwendest):
1. Samen aussäen: Verteile die Samen gleichmäßig auf der Oberfläche der Erde. Drücke sie leicht an.
2. Mit Erde bedecken: Bedecke die Samen mit einer dünnen Schicht Erde (ca. 0,5 cm).
3. Bewässern: Befeuchte die Erde vorsichtig mit einer Sprühflasche.
4. Warm halten: Stelle die Töpfe an einen warmen, hellen Ort. Die ideale Keimtemperatur liegt zwischen 20 und 25 Grad Celsius.
5. Geduld haben: Die Keimung kann 1-2 Wochen dauern. Halte die Erde währenddessen feucht.
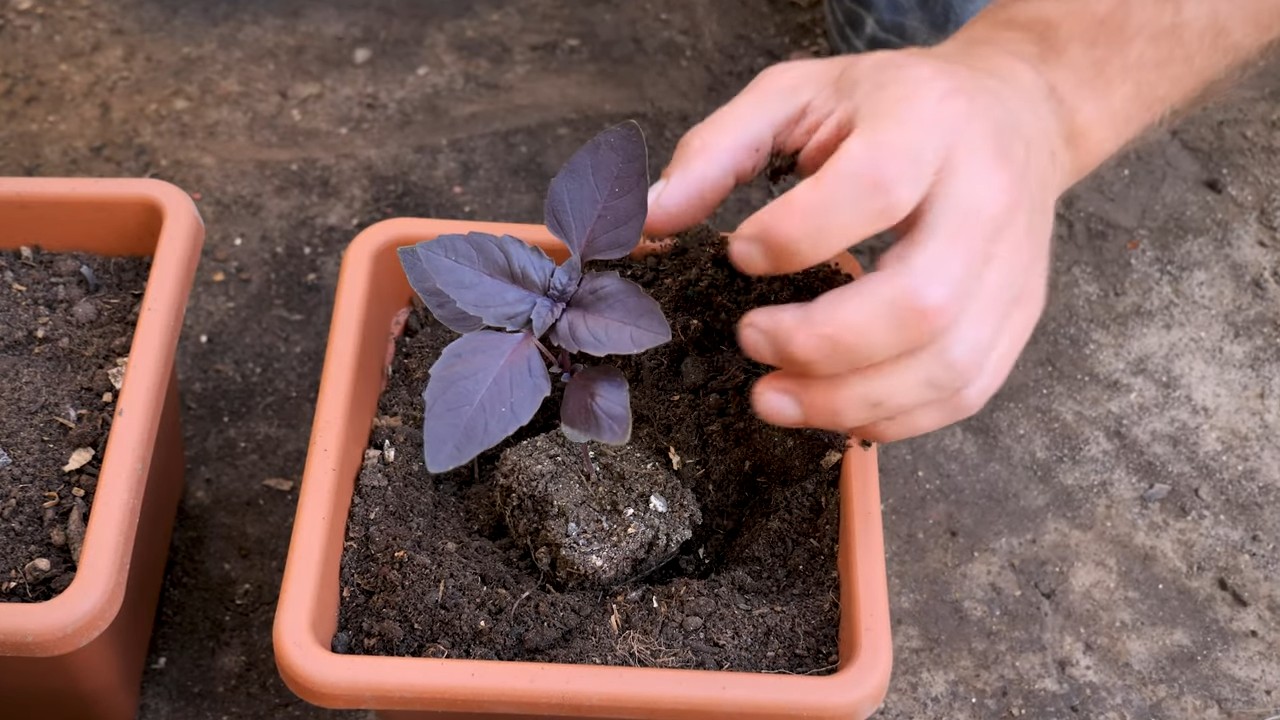
3. Einpflanzen (wenn du Jungpflanzen verwendest):
1. Pflanzen vorbereiten: Nimm die Jungpflanzen vorsichtig aus ihren Anzuchttöpfen. Lockere die Wurzeln etwas auf.
2. Pflanzlöcher graben: Grabe in den Töpfen kleine Löcher, die groß genug sind, um die Wurzelballen der Jungpflanzen aufzunehmen.
3. Einsetzen: Setze die Jungpflanzen in die Löcher ein. Achte darauf, dass die Oberseite des Wurzelballens mit der Oberfläche der Erde abschließt.
4. Mit Erde auffüllen: Fülle die Löcher mit Erde auf und drücke sie leicht an.
5. Bewässern: Gieße die Pflanzen gründlich an.
4. Die Pflege:
1. Standort: Stelle die Töpfe an einen sonnigen Standort. Lila Basilikum braucht mindestens 6 Stunden Sonne pro Tag.
2. Bewässerung: Gieße die Pflanzen regelmäßig, aber vermeide Staunässe. Die Erde sollte immer leicht feucht sein. Am besten gießt du, wenn die oberste Erdschicht trocken ist.
3. Düngen (optional): Dünge die Pflanzen alle 2-3 Wochen mit einem organischen Flüssigdünger. Befolge dabei die Anweisungen auf der Verpackung.
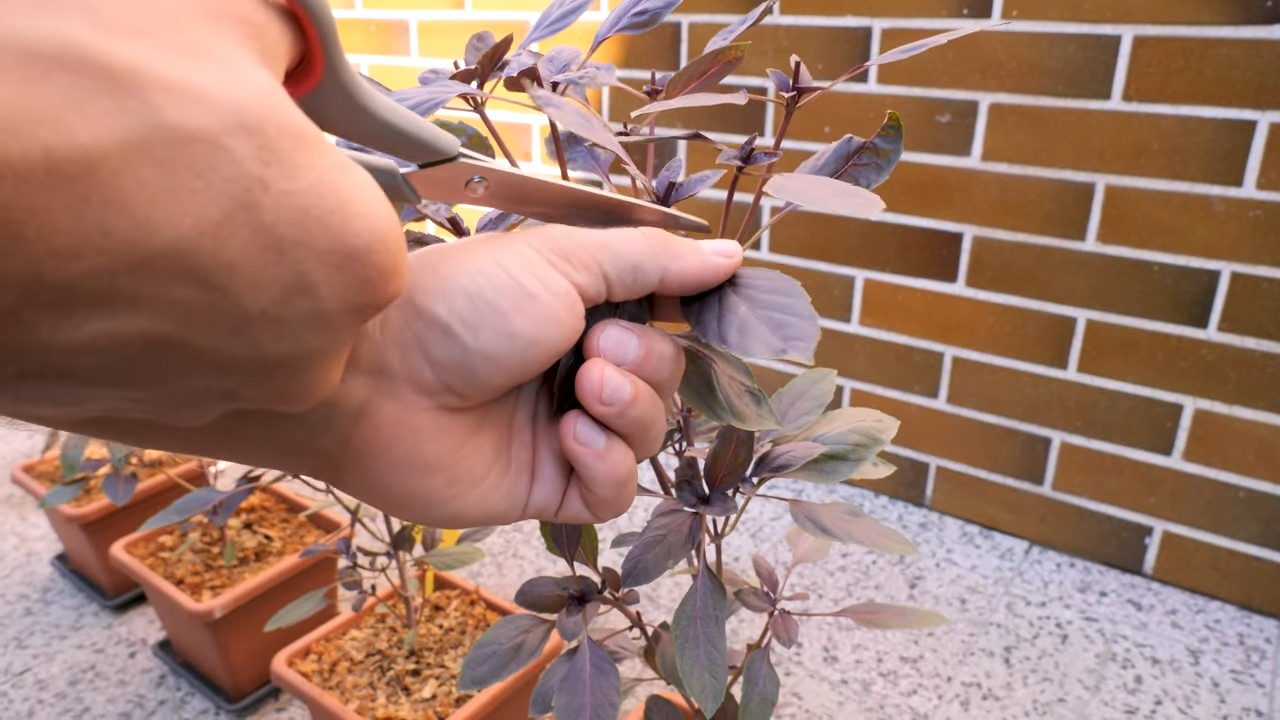
4. Ausgeizen: Entferne regelmäßig die Blütenstände, um das Wachstum der Blätter zu fördern. Wenn du die Blütenstände entfernst, konzentriert sich die Pflanze auf die Produktion von Blättern, was zu einer buschigeren und ertragreicheren Pflanze führt.
5. Schädlinge und Krankheiten: Achte auf Schädlinge wie Blattläuse oder Schnecken. Bei Bedarf kannst du biologische Schädlingsbekämpfungsmittel einsetzen. Achte auch auf Anzeichen von Pilzkrankheiten, wie z.B. Mehltau. Sorge für eine gute Belüftung und vermeide es, die Blätter beim Gießen zu benetzen.
Zusätzliche Tipps für prächtiges lila Basilikum:
* Die richtige Erde ist entscheidend: Lila Basilikum gedeiht am besten in gut durchlässiger, nährstoffreicher Erde. Ich mische oft etwas Kompost oder organischen Dünger unter die Blumenerde, um sicherzustellen, dass meine Pflanzen alles bekommen, was sie brauchen.
* Sonne, Sonne, Sonne: Wie bereits erwähnt, liebt lila Basilikum die Sonne. Je mehr Sonne, desto intensiver wird die Farbe der Blätter. Wenn du keinen vollsonnigen Standort hast, versuche, so viel Licht wie möglich zu bieten.
* Regelmäßiges Ernten: Scheue dich nicht, die Blätter regelmäßig zu ernten. Das fördert nicht nur das Wachstum, sondern sorgt auch dafür, dass die Pflanze buschiger wird. Schneide die Stängel knapp über einem Blattknoten ab, um neues Wachstum anzuregen.
* Überwinterung (in kälteren Regionen): Lila Basilikum ist nicht winterhart. Wenn du in einer Region mit kalten Wintern lebst, kannst du versuchen, deine Pflanze im Haus zu überwintern. Stelle sie an einen hellen Standort und reduziere die Bewässerung. Es ist jedoch wichtig zu wissen, dass die Pflanze im Winter möglicherweise nicht so gut wächst wie im Sommer.
* Verschiedene Sorten ausprobieren: Es gibt verschiedene Sorten von lila Basilikum, wie z.B. ‘Dark Opal’, ‘Purple Ruffles’ oder ‘Red Rubin’. Probiere verschiedene Sorten aus, um herauszufinden, welche dir am besten gefällt.
* Kombination mit anderen Kräutern: Lila Basilikum lässt sich gut mit anderen Kräutern wie Rosmarin, Thymian oder Oregano kombinieren. Achte jedoch darauf, dass die Kräuter ähnliche Ansprüche an Standort und Bewässerung haben.
* Verwendung in der Küche: Lila Basilikum ist nicht nur schön anzusehen, sondern auch unglaublich vielseitig in der Küche. Verwende es in Salaten, Saucen, Pesto oder als Garnitur für deine Gerichte. Der Geschmack ist etwas würziger als der von grünem Basilikum.
Häufige Probleme und Lösungen:
* Gelbe Blätter: Gelbe Blätter können ein Zeichen für Überwässerung oder Nährstoffmangel sein. Überprüfe die Bewässerung und dünge die Pflanze gegebenenfalls.
* Blattläuse: Blattläuse können mit einem Wasserstrahl oder mit biologischen Schädlingsbekämpfungsmitteln bekämpft werden.
* Pilzkrankheiten: Pilzkrankheiten können durch eine gute Belüftung und das Vermeiden von Staunässe vorgebeugt werden. Bei Bedarf kannst du ein Fungizid einsetzen.
* Schnecken: Schnecken können mit Schneckenkorn oder durch das Aufstellen von Schneckenfallen bekämpft werden.
Erntezeit!
Du kannst dein lila Basilikum ernten, sobald die Pflanze ausreichend Blätter gebildet hat. Am besten erntest du am Morgen, wenn die ätherischen Öle am konzentriertesten sind. Schneide die Stängel knapp über einem Blattknoten ab, um neues Wachstum anzuregen.
Ich hoffe, dieser Leitfaden hat dir geholfen, dein eigenes lila Basilikum im Topf zu ziehen. Es ist wirklich ein lohnendes Projekt, das dir nicht nur Freude bereitet, sondern auch frische Kräuter für deine Küche liefert. Viel Spaß beim Gärtnern!
Conclusion
So, there you have it! Growing purple basil in containers is not only achievable, but it’s also a rewarding and visually stunning addition to any garden, balcony, or even a sunny windowsill. We’ve walked through the essential steps, from selecting the right container and soil to providing the optimal environment for your purple basil to thrive.
But why is this DIY trick a must-try? Beyond the sheer beauty of those deep, vibrant purple leaves, growing your own purple basil offers a multitude of benefits. First and foremost, you have complete control over the growing process. You can ensure that your basil is free from harmful pesticides and herbicides, resulting in a healthier and more flavorful herb. Imagine the satisfaction of snipping fresh leaves for your pesto, salads, or cocktails, knowing exactly where they came from and how they were grown.
Furthermore, growing purple basil in containers allows for flexibility and convenience. You can easily move your container to follow the sun, protect it from harsh weather, or even bring it indoors during the colder months to extend the growing season. This is particularly beneficial for those with limited garden space or those who live in climates with short summers.
Don’t be afraid to experiment with variations! Try different container sizes and materials to see what works best for your space and aesthetic. Consider companion planting with other herbs or flowers that complement purple basil, such as rosemary, thyme, or marigolds. You can also explore different varieties of purple basil, each with its own unique flavor and appearance. ‘Dark Opal’ and ‘Purple Ruffles’ are two popular choices, but there are many others to discover.
Growing purple basil in containers is more than just a gardening project; it’s an opportunity to connect with nature, enhance your culinary creations, and add a touch of beauty to your surroundings. It’s a relatively low-maintenance activity that yields high rewards, both in terms of flavor and visual appeal.
We wholeheartedly encourage you to give this DIY trick a try. Start small, be patient, and don’t be afraid to learn from your mistakes. Gardening is a journey, and every plant you grow is a lesson learned.
And most importantly, we want to hear about your experiences! Share your photos, tips, and challenges in the comments below. Let’s create a community of purple basil enthusiasts and learn from each other. What container did you use? What variety of purple basil did you choose? What are your favorite ways to use your homegrown basil? We can’t wait to see what you create!
Frequently Asked Questions (FAQ)
What is the best size container for growing purple basil?
The ideal container size for growing purple basil is at least 12 inches in diameter and 12 inches deep. This provides ample space for the roots to grow and allows the plant to reach its full potential. However, you can start with a smaller container (around 6-8 inches) if you’re starting from seedlings or cuttings, and then transplant to a larger container as the plant grows. Remember that larger containers retain moisture better, which can be beneficial in hot climates.
What type of soil should I use for purple basil in containers?
Purple basil thrives in well-draining soil that is rich in organic matter. A good potting mix specifically formulated for containers is ideal. You can also amend regular potting soil with compost, aged manure, or other organic materials to improve its fertility and drainage. Avoid using garden soil in containers, as it tends to compact and doesn’t drain well. The pH level should be slightly acidic to neutral, around 6.0 to 7.0.
How much sunlight does purple basil need?
Purple basil requires at least 6-8 hours of direct sunlight per day to thrive. If you’re growing it indoors, place it near a sunny window or supplement with grow lights. Insufficient sunlight can result in leggy growth and reduced flavor. If you live in a particularly hot climate, some afternoon shade may be beneficial to prevent the leaves from scorching.
How often should I water my purple basil in containers?
Water your purple basil regularly, especially during hot and dry weather. The soil should be kept consistently moist, but not waterlogged. Check the soil moisture by sticking your finger about an inch deep. If it feels dry, it’s time to water. Avoid overhead watering, as this can promote fungal diseases. Instead, water at the base of the plant.
How do I fertilize purple basil in containers?
Purple basil benefits from regular fertilization, especially when grown in containers. Use a balanced liquid fertilizer diluted to half strength every 2-3 weeks during the growing season. You can also use a slow-release fertilizer at the time of planting. Avoid over-fertilizing, as this can lead to excessive foliage growth at the expense of flavor.
How do I harvest purple basil?
Harvest purple basil regularly to encourage bushier growth. Pinch off the top leaves and stems, just above a leaf node. This will encourage the plant to produce more side shoots. You can also harvest entire stems as needed. Avoid harvesting more than one-third of the plant at a time.
What are some common pests and diseases that affect purple basil?
Common pests that can affect purple basil include aphids, spider mites, and whiteflies. These can be controlled with insecticidal soap or neem oil. Fungal diseases, such as powdery mildew and downy mildew, can also be a problem, especially in humid conditions. Ensure good air circulation and avoid overhead watering to prevent these diseases. If necessary, use a fungicide specifically labeled for use on herbs.
Can I grow purple basil indoors?
Yes, you can successfully grow purple basil indoors, provided you give it enough sunlight or supplement with grow lights. Place the container near a sunny window that receives at least 6 hours of direct sunlight per day. You may also need to adjust your watering schedule, as indoor plants tend to dry out more slowly than outdoor plants.
How can I propagate purple basil?
Purple basil can be easily propagated from stem cuttings. Take a 4-6 inch cutting from a healthy plant, remove the lower leaves, and place the cutting in a glass of water. Roots should develop within a week or two. Once the roots are about an inch long, you can transplant the cutting into a pot filled with potting mix.
What are some culinary uses for purple basil?
Purple basil has a slightly different flavor profile than sweet basil, with hints of clove and anise. It can be used in a variety of culinary applications, including pesto, salads, sauces, soups, and cocktails. It also makes a beautiful garnish. The purple color adds a unique visual appeal to any dish. Experiment and find your favorite ways to use this versatile herb!

Leave a Comment