
Growing pumpkins in soil bags might sound unconventional, but trust me, it’s a game-changer for any gardener, especially if you’re short on space or dealing with less-than-ideal soil conditions! Have you ever dreamt of carving your own homegrown jack-o’-lantern but thought you didn’t have the room? Well, dream no more! This simple DIY trick opens up the possibility of pumpkin patches to even the smallest balconies and patios.
Pumpkins, symbols of autumn and harvest festivals, have a rich history dating back thousands of years to Central America. They were a staple food source for many indigenous cultures and later became a beloved part of Thanksgiving traditions in North America. Now, you can connect with that history and bring the joy of growing your own pumpkins, no matter where you live.
Let’s face it, not everyone has a sprawling garden with perfectly fertile soil. That’s where this growing pumpkins in soil bags hack comes in! It’s a fantastic way to bypass poor soil quality, control drainage, and even move your pumpkin plants around to chase the sun. Plus, it’s incredibly budget-friendly and easy to set up. I’m excited to share this simple yet effective method that will have you harvesting your own beautiful pumpkins in no time. Get ready to impress your neighbors and enjoy the satisfaction of growing your own fall decorations!
Kürbisse im Pflanzsack ziehen: Eine einfache DIY-Anleitung
Hallo Kürbisfreunde! Habt ihr wenig Platz im Garten, aber trotzdem Lust auf selbstgezogene Kürbisse? Dann ist das Ziehen von Kürbissen im Pflanzsack genau das Richtige für euch! Ich zeige euch, wie ihr mit einfachen Mitteln und etwas Geduld prächtige Kürbisse ernten könnt. Keine Sorge, es ist einfacher als ihr denkt!
Warum Kürbisse im Pflanzsack?
* Platzsparend: Ideal für Balkone, Terrassen oder kleine Gärten.
* Flexibel: Ihr könnt die Säcke leicht umstellen, um die optimale Sonneneinstrahlung zu gewährleisten.
* Kontrollierte Bedingungen: Ihr habt die volle Kontrolle über die Bodenqualität und Bewässerung.
* Frühere Ernte: Durch die schnellere Erwärmung des Bodens im Sack können die Kürbisse früher reifen.
Was ihr braucht:
* Pflanzsäcke: Am besten stabile, gewebte Säcke mit einem Volumen von mindestens 75 Litern (je größer, desto besser!). Ihr könnt auch alte Jutesäcke oder stabile Müllsäcke verwenden (diese aber unbedingt mit Löchern versehen!).
* Kürbissamen: Wählt eure Lieblingssorte! Achtet auf die Angaben zur Größe der Pflanze und der Früchte. Beliebte Sorten für den Anbau im Sack sind z.B. ‘Baby Boo’, ‘Jack Be Little’ (Zierkürbisse), ‘Hokkaido’ oder ‘Butternut’.
* Erde: Eine hochwertige, nährstoffreiche Pflanzerde ist entscheidend. Ich empfehle eine Mischung aus Gartenerde, Kompost und etwas Sand oder Perlite für eine gute Drainage.
* Kompost oder organischer Dünger: Für eine optimale Nährstoffversorgung.
* Gießkanne oder Schlauch: Zum regelmäßigen Bewässern.
* Mulchmaterial: Stroh, Holzhackschnitzel oder Rasenschnitt, um die Feuchtigkeit im Boden zu halten und Unkraut zu unterdrücken.
* Pflanzstäbe oder Rankhilfe: Je nach Kürbissorte, um die Triebe zu stützen.
* Schere oder Messer: Zum Zuschneiden der Säcke (falls nötig).
* Handschuhe: Zum Schutz eurer Hände.
Schritt-für-Schritt-Anleitung:
1. Vorbereitung der Pflanzsäcke
1. Säcke vorbereiten: Falls ihr Müllsäcke verwendet, schneidet oder stecht mehrere Löcher in den Boden der Säcke, um Staunässe zu vermeiden. Bei gekauften Pflanzsäcken ist dies meist nicht nötig.
2. Säcke befüllen: Füllt die Säcke zu etwa zwei Dritteln mit der vorbereiteten Erdmischung. Achtet darauf, dass die Erde locker ist und nicht zu stark verdichtet.
3. Dünger hinzufügen: Mischt Kompost oder organischen Dünger unter die oberste Erdschicht. Die Menge richtet sich nach den Angaben auf der Verpackung des Düngers.
2. Aussaat oder Pflanzung
1. Aussaat: Wenn ihr die Kürbisse direkt in die Säcke aussäen wollt, legt 2-3 Samen pro Sack in die Erde, etwa 2-3 cm tief. Bedeckt die Samen mit Erde und gießt sie vorsichtig an.
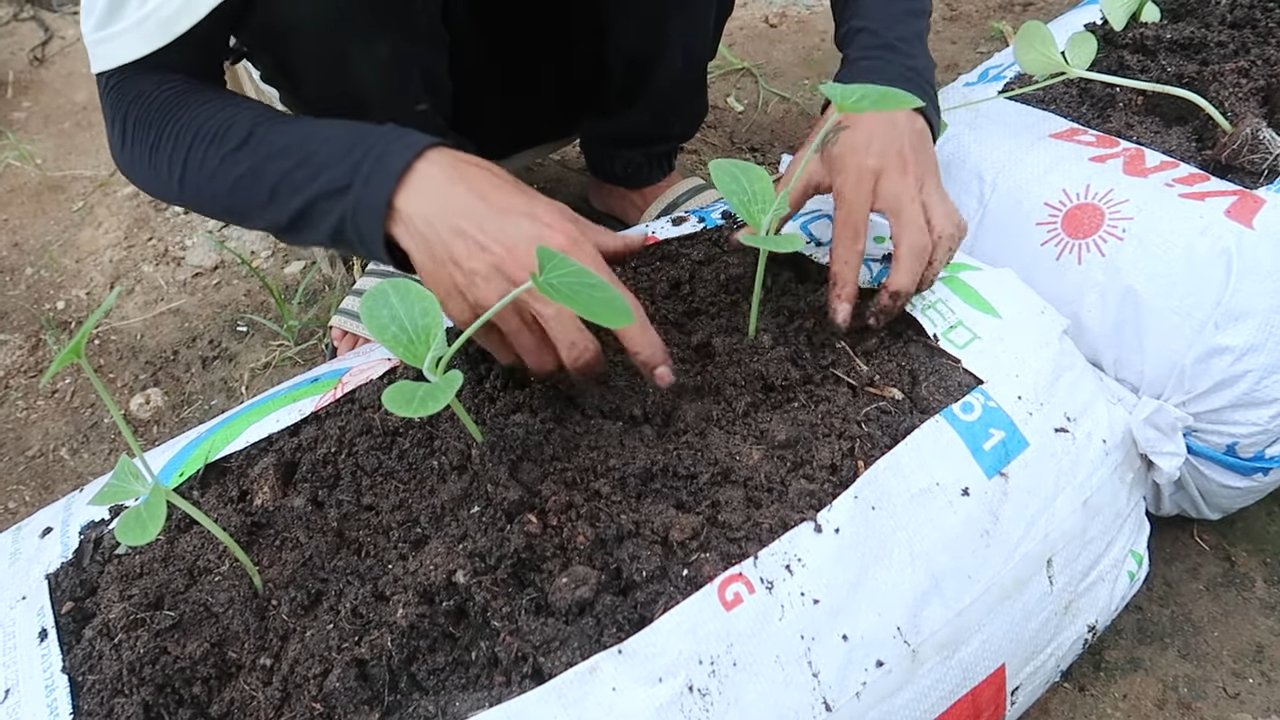
2. Vorziehen (empfohlen): Ich empfehle, die Kürbisse in kleinen Töpfen vorzuziehen. Das gibt ihnen einen Vorsprung und schützt sie vor Schnecken und anderen Schädlingen. Füllt kleine Töpfe mit Anzuchterde und legt einen Samen pro Topf hinein. Gießt die Erde an und stellt die Töpfe an einen hellen, warmen Ort.
3. Pflanzung: Sobald die vorgezogenen Kürbispflanzen kräftig genug sind (etwa 2-3 Wochen nach der Aussaat), könnt ihr sie in die Pflanzsäcke umpflanzen. Macht eine kleine Mulde in die Erde und setzt die Pflanze vorsichtig hinein. Füllt die Mulde mit Erde auf und drückt sie leicht an. Gießt die Pflanze gut an.
3. Pflege der Kürbispflanzen
1. Bewässerung: Kürbisse brauchen viel Wasser, besonders während der Blütezeit und Fruchtbildung. Gießt die Pflanzen regelmäßig, am besten morgens oder abends, damit das Wasser nicht so schnell verdunstet. Achtet darauf, dass die Erde immer feucht, aber nicht nass ist. Vermeidet Staunässe!
2. Düngung: Düngt die Kürbispflanzen regelmäßig, etwa alle 2-3 Wochen, mit einem organischen Dünger oder Komposttee. Das sorgt für eine gute Nährstoffversorgung und fördert das Wachstum und die Fruchtbildung.
3. Rankhilfe: Je nach Kürbissorte benötigen die Pflanzen eine Rankhilfe, um sich daran festzuhalten. Ihr könnt Pflanzstäbe, ein Rankgitter oder ein Seil verwenden. Bindet die Triebe vorsichtig an die Rankhilfe, damit sie nicht abbrechen.
4. Mulchen: Bedeckt die Erde um die Kürbispflanzen mit Mulchmaterial. Das hält die Feuchtigkeit im Boden, unterdrückt Unkraut und schützt die Früchte vor direktem Bodenkontakt.
5. Schneckenkontrolle: Kürbisse sind leider auch bei Schnecken sehr beliebt. Kontrolliert die Pflanzen regelmäßig und entfernt Schnecken, falls ihr welche findet. Ihr könnt auch Schneckenkorn oder andere natürliche Mittel zur Schneckenbekämpfung einsetzen.
6. Bestäubung: Kürbisse sind auf die Bestäubung durch Bienen und andere Insekten angewiesen. Wenn ihr wenig Insekten in eurem Garten habt, könnt ihr die Blüten auch von Hand bestäuben. Nehmt dazu einen Pinsel und übertragt den Pollen von den männlichen Blüten (dünner Stiel) auf die weiblichen Blüten (dicker Stiel mit Fruchtansatz).
4. Ernte
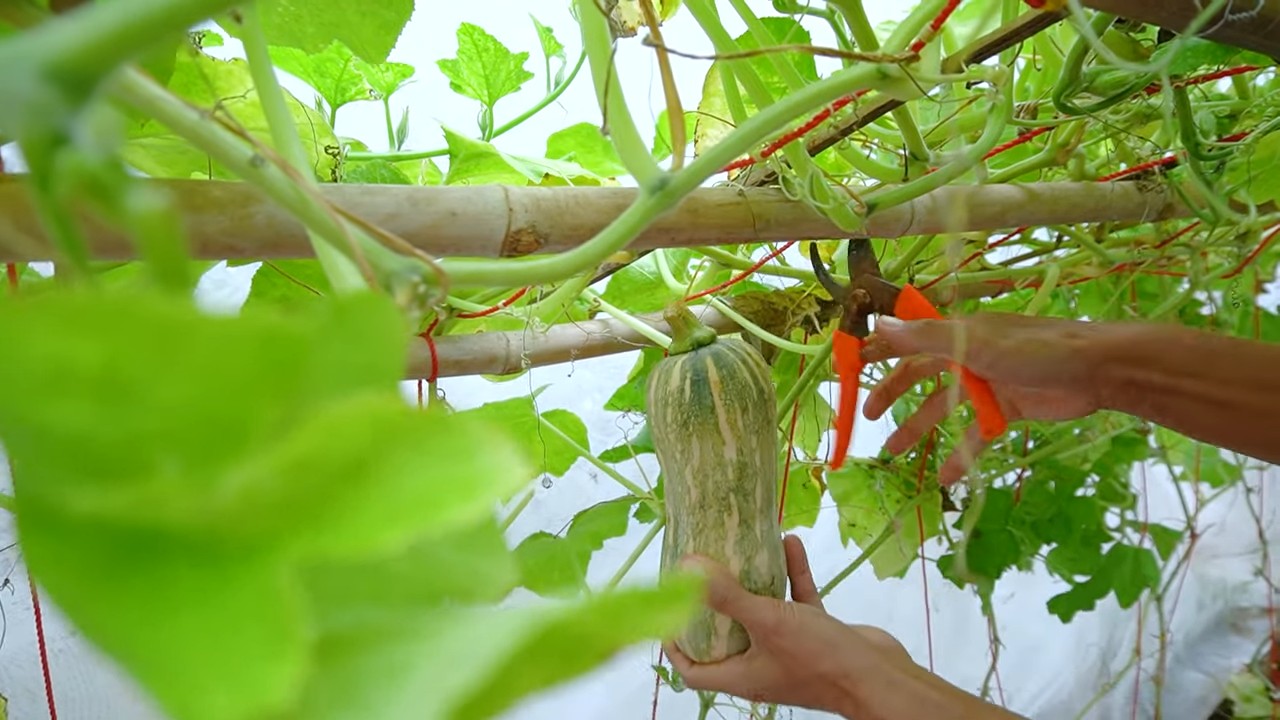
1. Reife erkennen: Die Reife der Kürbisse erkennt ihr an der Farbe, der Härte der Schale und dem Klang. Die Farbe sollte intensiv sein und die Schale hart. Wenn ihr auf den Kürbis klopft, sollte er hohl klingen.
2. Ernten: Schneidet die Kürbisse mit einem scharfen Messer oder einer Gartenschere vom Stiel ab. Lasst dabei einen Stielansatz von etwa 5-10 cm stehen. Das verlängert die Haltbarkeit der Kürbisse.
3. Lagerung: Lagert die Kürbisse an einem kühlen, trockenen und gut belüfteten Ort. Vermeidet direkte Sonneneinstrahlung. Unter optimalen Bedingungen können Kürbisse mehrere Monate gelagert werden.
Zusätzliche Tipps und Tricks:
* Sortenwahl: Achtet bei der Sortenwahl auf die Größe der Kürbisse. Kleine Sorten wie ‘Baby Boo’ oder ‘Jack Be Little’ eignen sich besser für den Anbau im Sack als große Sorten wie ‘Atlantic Giant’.
* Bodenverbesserung: Mischt dem Boden etwas Hornspäne oder Steinmehl bei, um die Nährstoffversorgung zu verbessern.
* Sonnenschutz: An sehr heißen Tagen kann es sinnvoll sein, die Säcke mit einem Sonnensegel oder einem Schattiernetz zu schützen, um die Pflanzen vor Verbrennungen zu bewahren.
* Krankheiten und Schädlinge: Achtet auf Anzeichen von Krankheiten oder Schädlingsbefall und behandelt die Pflanzen gegebenenfalls mit geeigneten Mitteln.
* Kürbisblüten essen: Die Blüten der Kürbispflanzen sind essbar und eine Delikatesse! Ihr könnt sie frittieren, füllen oder in Salaten verwenden.
Ich hoffe, diese Anleitung hilft euch dabei, eure eigenen Kürbisse im Pflanzsack zu ziehen. Viel Spaß beim Gärtnern und eine reiche Ernte! Lasst es mich wissen, wenn ihr Fragen habt oder eure Erfahrungen teilen möchtet!
Conclusion
So, there you have it! Growing pumpkins in soil bags is not just a viable alternative to traditional gardening; it’s a game-changer for those with limited space, poor soil conditions, or simply a desire for a more controlled and manageable growing environment. We’ve explored the ins and outs of this method, from choosing the right soil bag and pumpkin variety to nurturing your plants for optimal growth and yield.
But why is this DIY trick a must-try? The answer is multifaceted. First and foremost, it democratizes pumpkin growing. No longer is a sprawling garden a prerequisite for harvesting your own Halloween decorations or pie fillings. Soil bags offer a contained, portable ecosystem, allowing you to grow pumpkins on patios, balconies, or even driveways. This accessibility opens up the joy of gardening to a wider audience.
Secondly, growing pumpkins in soil bags offers unparalleled control over the growing environment. You can tailor the soil composition to meet the specific needs of your chosen pumpkin variety, ensuring optimal nutrient availability and drainage. This level of control translates to healthier plants, fewer pest and disease problems, and ultimately, larger and more abundant pumpkins.
Thirdly, it’s incredibly rewarding! There’s something deeply satisfying about nurturing a tiny seed into a massive, vibrant pumpkin. The process is educational, engaging, and provides a tangible connection to the natural world. Plus, imagine the bragging rights when you showcase your homegrown pumpkins to friends and family!
Now, let’s talk about variations. While we’ve focused on the standard soil bag method, there are plenty of ways to customize it to suit your preferences and resources. Consider experimenting with different types of soil mixes, such as adding compost, aged manure, or perlite to improve drainage and fertility. You could also try using different sizes of soil bags, depending on the size of the pumpkin variety you’re growing. For smaller pumpkins, a smaller bag will suffice, while giant pumpkins will require a much larger volume of soil.
Another exciting variation is vertical pumpkin growing. By constructing a sturdy trellis or support system, you can train your pumpkin vines to grow upwards, saving even more space and creating a visually stunning display. This method is particularly well-suited for smaller pumpkin varieties like Jack Be Little or Baby Boo.
Don’t be afraid to get creative with your soil bag setup. You can decorate the bags with paint or fabric to add a personal touch to your garden. You can also group multiple bags together to create a more cohesive and visually appealing display.
Ultimately, the key to success with growing pumpkins in soil bags is experimentation and observation. Pay close attention to your plants’ needs, adjust your watering and fertilizing schedule as necessary, and don’t be afraid to try new things.
We wholeheartedly encourage you to give this DIY trick a try. It’s a fun, rewarding, and accessible way to grow your own pumpkins, regardless of your gardening experience or space limitations. And most importantly, share your experience with us! We’d love to hear about your successes, challenges, and any tips or tricks you’ve discovered along the way. Post photos of your pumpkins on social media using #SoilBagPumpkins and let’s create a community of soil bag pumpkin growers! Let’s see those amazing pumpkins you can grow!
Frequently Asked Questions (FAQ)
What size soil bag is best for growing pumpkins?
The ideal soil bag size depends on the pumpkin variety you plan to grow. For smaller pumpkins like Jack Be Little or Baby Boo, a 20-30 gallon bag should be sufficient. For medium-sized pumpkins like Sugar Pie or Cinderella, a 40-50 gallon bag is recommended. And for giant pumpkins, you’ll need a bag that’s at least 100 gallons or larger. Remember, the larger the pumpkin, the more soil it will need to support its growth. Ensure the bag is sturdy enough to hold the weight of the soil and the mature pumpkin.
What type of soil should I use in my soil bag?
A well-draining, nutrient-rich soil mix is essential for growing healthy pumpkins. A good starting point is a mix of equal parts garden soil, compost, and peat moss or coco coir. You can also add perlite or vermiculite to improve drainage. Avoid using heavy clay soil, as it can become waterlogged and suffocate the roots. Consider amending the soil with slow-release fertilizer or organic amendments like bone meal and blood meal to provide essential nutrients throughout the growing season. A soil pH between 6.0 and 7.0 is ideal for pumpkin growth.
How often should I water my pumpkins in soil bags?
Watering frequency depends on several factors, including the weather, the size of the pumpkin plant, and the type of soil you’re using. Generally, you should water your pumpkins deeply whenever the top inch of soil feels dry to the touch. Avoid
So, there you have it! Growing pumpkins in soil bags is not just a viable alternative to traditional gardening; it’s a game-changer for those with limited space, poor soil conditions, or simply a desire for a more controlled and manageable growing environment. We’ve explored the ins and outs of this method, from choosing the right soil bag and pumpkin variety to nurturing your plants for optimal growth and yield.
But why is this DIY trick a must-try? The answer is multifaceted. First and foremost, it democratizes pumpkin growing. No longer is a sprawling garden a prerequisite for harvesting your own Halloween decorations or pie fillings. Soil bags offer a contained, portable ecosystem, allowing you to grow pumpkins on patios, balconies, or even driveways. This accessibility opens up the joy of gardening to a wider audience.
Secondly, growing pumpkins in soil bags offers unparalleled control over the growing environment. You can tailor the soil composition to meet the specific needs of your chosen pumpkin variety, ensuring optimal nutrient availability and drainage. This level of control translates to healthier plants, fewer pest and disease problems, and ultimately, larger and more abundant pumpkins.
Thirdly, it’s incredibly rewarding! There’s something deeply satisfying about nurturing a tiny seed into a massive, vibrant pumpkin. The process is educational, engaging, and provides a tangible connection to the natural world. Plus, imagine the bragging rights when you showcase your homegrown pumpkins to friends and family!
Now, let’s talk about variations. While we’ve focused on the standard soil bag method, there are plenty of ways to customize it to suit your preferences and resources. Consider experimenting with different types of soil mixes, such as adding compost, aged manure, or perlite to improve drainage and fertility. You could also try using different sizes of soil bags, depending on the size of the pumpkin variety you’re growing. For smaller pumpkins, a smaller bag will suffice, while giant pumpkins will require a much larger volume of soil.
Another exciting variation is vertical pumpkin growing. By constructing a sturdy trellis or support system, you can train your pumpkin vines to grow upwards, saving even more space and creating a visually stunning display. This method is particularly well-suited for smaller pumpkin varieties like Jack Be Little or Baby Boo.
Don’t be afraid to get creative with your soil bag setup. You can decorate the bags with paint or fabric to add a personal touch to your garden. You can also group multiple bags together to create a more cohesive and visually appealing display.
Ultimately, the key to success with growing pumpkins in soil bags is experimentation and observation. Pay close attention to your plants’ needs, adjust your watering and fertilizing schedule as necessary, and don’t be afraid to try new things.
We wholeheartedly encourage you to give this DIY trick a try. It’s a fun, rewarding, and accessible way to grow your own pumpkins, regardless of your gardening experience or space limitations. And most importantly, share your experience with us! We’d love to hear about your successes, challenges, and any tips or tricks you’ve discovered along the way. Post photos of your pumpkins on social media using #SoilBagPumpkins and let’s create a community of soil bag pumpkin growers! Let’s see those amazing pumpkins you can grow!
Frequently Asked Questions (FAQ)
What size soil bag is best for growing pumpkins?
The ideal soil bag size depends on the pumpkin variety you plan to grow. For smaller pumpkins like Jack Be Little or Baby Boo, a 20-30 gallon bag should be sufficient. For medium-sized pumpkins like Sugar Pie or Cinderella, a 40-50 gallon bag is recommended. And for giant pumpkins, you’ll need a bag that’s at least 100 gallons or larger. Remember, the larger the pumpkin, the more soil it will need to support its growth. Ensure the bag is sturdy enough to hold the weight of the soil and the mature pumpkin.
What type of soil should I use in my soil bag?
A well-draining, nutrient-rich soil mix is essential for growing healthy pumpkins. A good starting point is a mix of equal parts garden soil, compost, and peat moss or coco coir. You can also add perlite or vermiculite to improve drainage. Avoid using heavy clay soil, as it can become waterlogged and suffocate the roots. Consider amending the soil with slow-release fertilizer or organic amendments like bone meal and blood meal to provide essential nutrients throughout the growing season. A soil pH between 6.0 and 7.0 is ideal for pumpkin growth.
How often should I water my pumpkins in soil bags?
Watering frequency depends on several factors, including the weather, the size of the pumpkin plant, and the type of soil you’re using. Generally, you should water your pumpkins deeply whenever the top inch of soil feels dry to the touch. Avoid overwatering, as this can lead to root rot. During hot, dry weather, you may need to water daily. Use a soaker hose or drip irrigation to deliver water directly to the roots, minimizing water loss through evaporation. Check the soil moisture regularly and adjust your watering schedule accordingly.
How much sunlight do pumpkins need when grown in soil bags?
Pumpkins need at least 6-8 hours of direct sunlight per day to thrive. Choose a location for your soil bags that receives plenty of sunlight throughout the growing season. If you live in a particularly hot climate, you may need to provide some afternoon shade to prevent the leaves from scorching. Insufficient sunlight can result in stunted growth, reduced fruit production, and smaller pumpkins. Monitor your plants closely and adjust their location if necessary to ensure they receive adequate sunlight.
How do I fertilize pumpkins grown in soil bags?
Pumpkins are heavy feeders and require regular fertilization to support their rapid growth. Start by incorporating a slow-release fertilizer into the soil mix at planting time. Then, supplement with liquid fertilizer every 2-3 weeks throughout the growing season. Use a fertilizer that’s high in phosphorus and potassium to promote fruit development. Avoid over-fertilizing, as this can lead to excessive vine growth at the expense of fruit production. Follow the instructions on the fertilizer label carefully. You can also use organic fertilizers like compost tea or fish emulsion.
How do I prevent pests and diseases when growing pumpkins in soil bags?
Prevention is key when it comes to pests and diseases. Start by choosing disease-resistant pumpkin varieties. Inspect your plants regularly for signs of pests or diseases. Common pumpkin pests include squash bugs, squash vine borers, and aphids. Common diseases include powdery mildew and downy mildew. Use organic pest control methods like insecticidal soap or neem oil to control pests. Improve air circulation around your plants by spacing them properly and pruning excess foliage. Water at the base of the plants to avoid wetting the leaves, which can promote fungal diseases. Remove any infected leaves or fruit promptly to prevent the spread of disease.
Can I grow giant pumpkins in soil bags?
Yes, you can grow giant pumpkins in soil bags, but it requires careful planning and execution. You’ll need a very large soil bag (at least 100 gallons), a strong support system, and a lot of patience. Choose a giant pumpkin variety like Atlantic Giant. Start with healthy seedlings and provide them with optimal growing conditions, including plenty of sunlight, water, and fertilizer. Prune the vines to encourage the growth of a single, dominant pumpkin. Hand-pollinate the female flowers to ensure successful fruit set. Monitor the pumpkin’s growth closely and provide support as needed. Growing giant pumpkins is a challenging but rewarding experience.
What do I do if my pumpkin plant outgrows the soil bag?
If your pumpkin plant outgrows the soil bag, you have a few options. You can transplant it into a larger bag or directly into the ground. If transplanting, be careful not to damage the roots. Alternatively, you can prune the vines to control the plant’s size. Regular pruning can help to redirect the plant’s energy into fruit production. You can also add more soil to the bag to provide additional support for the roots. Monitor the plant’s growth closely and adjust your management practices as needed.
Leave a Comment