
Growing Potatoes Easy DIY – ever dreamt of harvesting a bounty of delicious, homegrown potatoes right from your own backyard? I know I have! There’s something incredibly satisfying about digging into the earth and unearthing those earthy treasures. Forget the grocery store spuds; we’re talking about fresh, flavorful potatoes bursting with goodness, and you can achieve this with some easy DIY magic!
Potatoes have been a staple food for centuries, with a rich history dating back to the Inca civilization in South America. They’ve nourished populations and fueled cultures, and now, you can tap into that legacy by cultivating your own potato patch. But let’s be honest, the thought of growing potatoes can seem daunting to some. That’s where these easy DIY tricks come in.
Many people struggle with traditional potato growing methods, facing issues like limited space, pest infestations, or simply not knowing where to start. That’s why I’m so excited to share these simple, effective, and space-saving growing potatoes easy DIY hacks. Imagine enjoying the taste of freshly dug potatoes in your favorite recipes, knowing you grew them yourself. It’s not just about the food; it’s about connecting with nature, learning a new skill, and enjoying the fruits (or rather, vegetables!) of your labor. So, grab your gardening gloves, and let’s get started on this exciting potato-growing adventure!
Kartoffeln Anbauen: Dein Einfacher DIY-Leitfaden für eine Reiche Ernte
Hallo Gartenfreunde! Habt ihr jemals davon geträumt, eure eigenen Kartoffeln anzubauen? Es ist einfacher als ihr denkt und unglaublich befriedigend, wenn ihr eure selbst geernteten Kartoffeln auf dem Teller habt. In diesem Artikel zeige ich euch, wie ihr mit einfachen Mitteln und ohne viel Aufwand eure eigenen Kartoffeln anbauen könnt. Los geht’s!
Was du brauchst: Die Vorbereitung
Bevor wir loslegen, brauchen wir natürlich die richtigen Materialien und Werkzeuge. Hier eine Liste, damit du alles parat hast:
* Saatkartoffeln: Das sind spezielle Kartoffeln, die für den Anbau gezüchtet wurden. Du bekommst sie im Gartencenter oder online. Achte darauf, dass sie gesund aussehen und keine Anzeichen von Krankheiten haben.
* Ein sonniger Standort: Kartoffeln lieben die Sonne! Wähle einen Platz in deinem Garten, der mindestens sechs Stunden Sonne am Tag bekommt.
* Gut durchlässiger Boden: Kartoffeln mögen keinen nassen Füße. Der Boden sollte locker und gut durchlässig sein. Wenn dein Boden sehr lehmig ist, kannst du ihn mit Kompost oder Sand verbessern.
* Kompost oder organischer Dünger: Kartoffeln sind hungrig! Kompost oder organischer Dünger versorgen sie mit den nötigen Nährstoffen.
* Eine Schaufel oder Spaten: Zum Umgraben und Pflanzen.
* Eine Gießkanne oder ein Schlauch: Zum Bewässern.
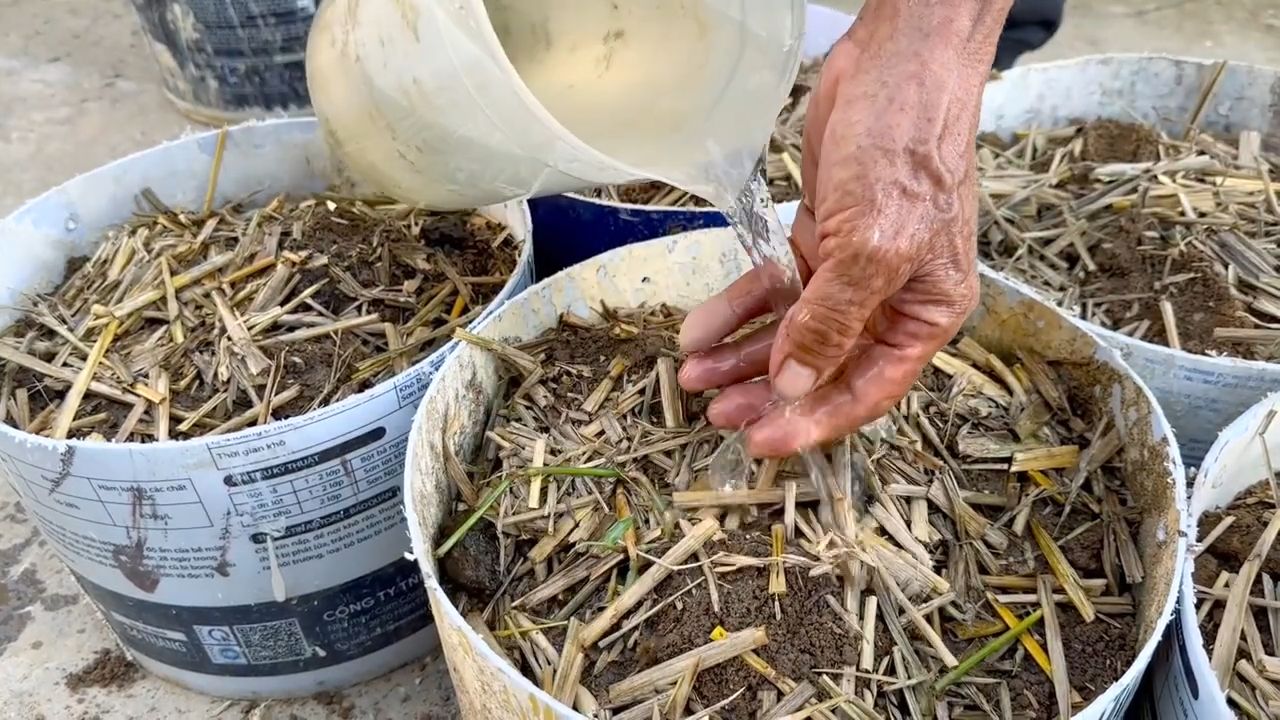
* Mulch (optional): Stroh, Heu oder Grasschnitt helfen, die Feuchtigkeit im Boden zu halten und Unkraut zu unterdrücken.
* Ein großer Behälter (optional): Wenn du keinen Garten hast, kannst du Kartoffeln auch in einem großen Topf oder Sack anbauen.
Schritt-für-Schritt-Anleitung: Kartoffeln Pflanzen
Jetzt geht es ans Eingemachte! Hier ist eine detaillierte Anleitung, wie du deine Kartoffeln pflanzt:
1. Saatkartoffeln vorbereiten:
* Einige Wochen vor dem Pflanzen solltest du die Saatkartoffeln vorkeimen lassen. Lege sie an einen hellen, kühlen Ort (ca. 10-15°C).
* Du wirst sehen, dass sich kleine, grüne Triebe bilden. Das ist gut so! Diese Triebe werden später zu den Stängeln der Kartoffelpflanze.
* Wenn die Saatkartoffeln sehr groß sind, kannst du sie in Stücke schneiden. Achte darauf, dass jedes Stück mindestens einen Trieb hat. Lass die Schnittflächen vor dem Pflanzen ein paar Tage trocknen, um Fäulnis zu vermeiden.
2. Den Boden vorbereiten:
* Grabe den Boden an dem gewählten Standort um. Entferne Steine und Unkraut.
* Arbeite Kompost oder organischen Dünger in den Boden ein. Das verbessert die Bodenstruktur und versorgt die Kartoffeln mit Nährstoffen.
* Der Boden sollte locker und krümelig sein.
3. Kartoffeln pflanzen:
* Hebe Pflanzlöcher aus, die etwa 10-15 cm tief sind. Der Abstand zwischen den Löchern sollte etwa 30-40 cm betragen, und der Abstand zwischen den Reihen etwa 60-70 cm.
* Lege die Saatkartoffeln mit den Trieben nach oben in die Löcher.
* Bedecke die Kartoffeln mit Erde.
* Gieße die Erde leicht an.
4. Mulchen (optional):
* Bedecke die Erde um die Kartoffelpflanzen mit einer Schicht Mulch. Das hilft, die Feuchtigkeit im Boden zu halten, Unkraut zu unterdrücken und den Boden kühl zu halten.
Die Pflege: Kartoffeln Verwöhnen
Nach dem Pflanzen ist vor der Pflege! Hier sind ein paar Tipps, wie du deine Kartoffeln verwöhnst, damit sie prächtig gedeihen:
1. Bewässerung:
* Kartoffeln brauchen regelmäßig Wasser, besonders während der Blütezeit und der Knollenbildung.
* Gieße die Pflanzen, wenn die oberste Erdschicht trocken ist. Vermeide Staunässe, da dies zu Fäulnis führen kann.
2. Anhäufeln:
* Wenn die Kartoffelpflanzen etwa 20-30 cm hoch sind, solltest du sie anhäufeln. Das bedeutet, dass du Erde um die Stängel herum anhäufst.
* Das Anhäufeln fördert die Knollenbildung und schützt die Kartoffeln vor Sonnenlicht, das sie grün werden lässt. Grüne Kartoffeln enthalten Solanin, das giftig ist.
* Wiederhole das Anhäufeln alle paar Wochen, bis die Pflanzen etwa 50-60 cm hoch sind.
3. Düngung:
* Kartoffeln sind hungrig! Dünge sie während der Wachstumsphase regelmäßig mit einem organischen Dünger oder Komposttee.
* Achte darauf, dass der Dünger reich an Kalium ist, da Kalium die Knollenbildung fördert.
4. Schutz vor Schädlingen und Krankheiten:
* Kartoffeln können von verschiedenen Schädlingen und Krankheiten befallen werden. Achte auf Anzeichen von Befall und ergreife gegebenenfalls Maßnahmen.
* Kartoffelkäfer sind häufige Schädlinge. Du kannst sie von Hand absammeln oder ein biologisches Insektizid verwenden.
* Kraut- und Braunfäule ist eine häufige Krankheit. Achte auf braune Flecken auf den Blättern und entferne befallene Blätter.
* Eine gute Belüftung und ein sonniger Standort helfen, Krankheiten vorzubeugen.
Der Erntezeitpunkt: Wann sind die Kartoffeln reif?
Die Ernte ist der Höhepunkt der Kartoffelzucht! Aber wann sind die Kartoffeln reif?
* Frühkartoffeln: Sie können geerntet werden, wenn die Pflanzen blühen. Die Knollen sind dann noch klein und haben eine dünne Schale.
* Spätkartoffeln: Sie werden geerntet, wenn die Blätter der Pflanzen gelb werden und absterben. Die Knollen sind dann größer und haben eine dickere Schale.
* Testen: Um sicherzugehen, kannst du eine Pflanze ausgraben und die Größe der Kartoffeln überprüfen.
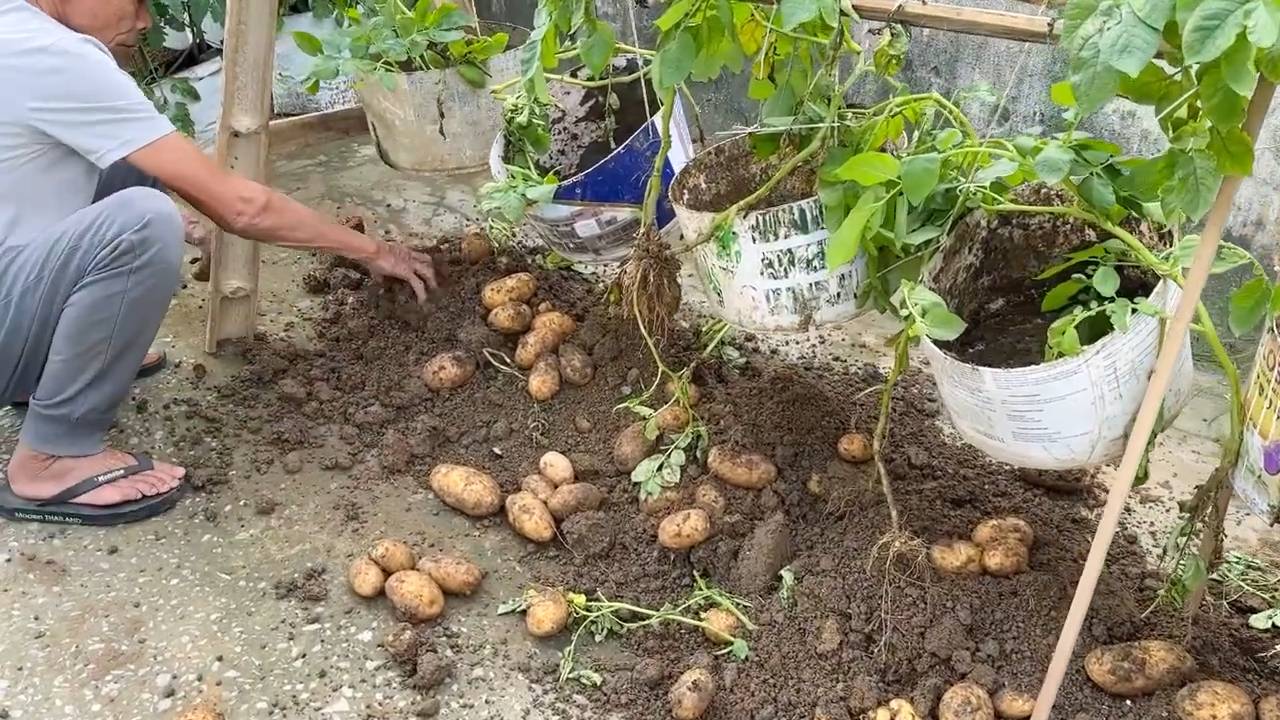
Die Ernte: Endlich Kartoffeln!
Jetzt ist es soweit! Die Ernte kann beginnen:
1. Vorbereitung:
* Wähle einen trockenen Tag für die Ernte.
* Besorge dir eine Grabegabel oder eine Schaufel.
* Lege einen Korb oder eine Schubkarre bereit, um die Kartoffeln zu transportieren.
2. Ernten:
* Grabe die Kartoffelpflanzen vorsichtig aus.
* Hebe die Knollen aus der Erde.
* Schüttle die Erde von den Kartoffeln ab.
3. Sortieren:
* Sortiere die Kartoffeln nach Größe und Zustand.
* Beschädigte oder kranke Kartoffeln solltest du aussortieren und nicht lagern.
4. Trocknen:
* Lasse die Kartoffeln ein paar Stunden oder Tage an einem trockenen, luftigen Ort trocknen. Das härtet die Schale und verlängert die Lagerfähigkeit.
Die Lagerung: Kartoffeln Haltbar Machen
Damit du lange Freude an deiner Ernte hast, solltest du die Kartoffeln richtig lagern:
* Der richtige Ort:
* Lagere die Kartoffeln an einem kühlen, dunklen und trockenen Ort. Ein Keller oder eine Speisekammer sind ideal.
* Die Temperatur sollte zwischen 4 und 10°C liegen.
* Die richtige Verpackung:
* Lagere die Kartoffeln in einem Korb, einer Holzkiste oder einem Jutesack.
* Vermeide Plastiktüten, da sie die Belüftung behindern und zu Fäulnis führen können.
* Regelmäßige Kontrolle:
* Kontrolliere die Kartoffeln regelmäßig auf Anzeichen von Fäulnis oder Schimmel.
* Entferne befallene Kartoffeln sofort, um die Ausbreitung zu verhindern.
Kartoff
Conclusion
So, there you have it! Growing potatoes using this easy DIY method is not just a fun project; it’s a rewarding experience that puts fresh, flavorful potatoes right at your fingertips. Forget the store-bought spuds that have traveled miles and lost their vibrancy. Imagine the satisfaction of harvesting your own crop, knowing exactly where they came from and how they were grown. This method simplifies the process, making it accessible even for those with limited space or gardening experience.
Why is this DIY potato growing trick a must-try? Because it’s efficient, cost-effective, and incredibly satisfying. You’re not just growing food; you’re connecting with nature and learning a valuable skill. Plus, the taste of homegrown potatoes is simply unmatched. They’re sweeter, earthier, and bursting with flavor that you just can’t find in commercially grown varieties.
Looking for variations? Absolutely! Experiment with different potato varieties to discover your favorites. Russets are great for baking and frying, Yukon Golds are perfect for creamy mashed potatoes, and red potatoes hold their shape well in salads. You can also adjust the size of your growing container to suit your space. A larger container will generally yield more potatoes, but even a smaller bucket can produce a surprisingly bountiful harvest. Consider adding companion plants like marigolds or basil around your potato plants to deter pests and attract beneficial insects. Another variation is to try different soil mixes. While a basic potting mix works well, you can enrich it with compost, aged manure, or other organic matter to boost nutrient levels and improve drainage.
Don’t be afraid to get creative and personalize your potato-growing journey. The beauty of this DIY method is its adaptability. It’s all about learning, experimenting, and enjoying the process.
We wholeheartedly encourage you to give this easy DIY potato growing method a try. It’s a fantastic way to get your hands dirty, learn about gardening, and enjoy the delicious rewards of your labor. And most importantly, we want to hear about your experience! Share your photos, tips, and stories with us in the comments below. Let’s build a community of potato-growing enthusiasts and inspire others to embrace the joy of homegrown goodness. What variety did you choose? What challenges did you face? What successes did you celebrate? Your feedback is invaluable and will help us refine and improve this guide for future generations of potato growers. So, grab your seed potatoes, gather your supplies, and get ready to embark on a rewarding gardening adventure. Happy growing!
Frequently Asked Questions (FAQ)
What kind of potatoes can I grow using this DIY method?
You can grow virtually any type of potato using this method! The key is to start with seed potatoes, which are potatoes specifically grown for planting. You can purchase seed potatoes from garden centers or online retailers. Popular varieties include Russet Burbank (great for baking and fries), Yukon Gold (creamy and versatile), Red Pontiac (good for boiling and salads), and fingerling potatoes (unique shape and flavor). Experiment with different varieties to find your favorites! Just make sure the potatoes you use are certified seed potatoes to avoid diseases.
How much sunlight do my potato plants need?
Potatoes thrive in full sun, which means they need at least 6-8 hours of direct sunlight per day. Choose a location for your container that receives ample sunlight throughout the day. If you don’t have a spot with full sun, you can supplement with grow lights, especially during the early stages of growth. Insufficient sunlight can lead to leggy plants and reduced potato production.
How often should I water my potato plants?
Watering frequency depends on the weather and the type of soil you’re using. Generally, you should water your potato plants deeply whenever the top inch of soil feels dry to the touch. Avoid overwatering, as this can lead to root rot. During hot, dry weather, you may need to water daily. In cooler, wetter weather, you may only need to water every few days. Check the soil moisture regularly to ensure your plants are getting the right amount of water.
How do I know when my potatoes are ready to harvest?
The timing of harvest depends on the potato variety and your personal preference. Generally, potatoes are ready to harvest when the foliage starts to turn yellow and die back. This usually occurs about 80-100 days after planting. You can also gently dig around the base of the plant to check the size of the potatoes. If they’re the size you want, you can harvest them. For “new potatoes,” you can harvest them earlier when they’re smaller and more tender.
What do I do if I see pests on my potato plants?
Potato plants can be susceptible to various pests, such as aphids, potato beetles, and flea beetles. Regularly inspect your plants for signs of infestation. If you find pests, you can try hand-picking them off the plants or using insecticidal soap or neem oil. Companion planting with marigolds or basil can also help deter pests. For more severe infestations, you may need to use a stronger insecticide, but always follow the instructions carefully and choose a product that is safe for use on edible plants.
Can I grow potatoes in a container indoors?
While it’s possible to grow potatoes indoors, it can be challenging to provide them with the necessary sunlight and space. If you want to try growing potatoes indoors, choose a large container and place it in a location that receives at least 6-8 hours of direct sunlight per day. You may also need to supplement with grow lights. Be sure to monitor the soil moisture and provide adequate ventilation to prevent fungal diseases.
What kind of soil should I use for growing potatoes in containers?
Use a well-draining potting mix that is rich in organic matter. You can also amend the potting mix with compost, aged manure, or other organic materials to improve its fertility and drainage. Avoid using garden soil, as it can be too heavy and compact for container gardening. A good potting mix will provide the necessary nutrients and drainage for healthy potato growth.
How do I store my harvested potatoes?
Store your harvested potatoes in a cool, dark, and dry place. A root cellar is ideal, but a basement or garage can also work. Avoid storing potatoes in the refrigerator, as this can cause them to develop a sweet taste. Properly stored potatoes can last for several months. Check them periodically for signs of spoilage and discard any that are soft or have sprouts.
Can I reuse the soil from my potato container for other plants?
Yes, you can reuse the soil from your potato container for other plants, but it’s a good idea to amend it with fresh compost or other organic matter to replenish the nutrients. Potatoes are heavy feeders, so they can deplete the soil of nutrients. Adding compost will help restore the soil’s fertility and improve its structure. You may also want to test the soil pH and adjust it as needed for the plants you plan to grow.
Is it really that easy to grow potatoes using this DIY method?
Yes! This DIY method is designed to be simple and accessible for gardeners of all skill levels. While there are always challenges involved in gardening, this method minimizes the complexity and maximizes the chances of success. With a little bit of care and attention, you can enjoy a bountiful harvest of homegrown potatoes. The key is to follow the instructions carefully, provide your plants with the right conditions, and be patient. The rewards are well worth the effort!
Leave a Comment