
Growing Onions Successfully can feel like a real victory in the home garden! Have you ever dreamt of pulling up plump, flavorful onions straight from your backyard, ready to transform your culinary creations? I know I have! But let’s be honest, sometimes the reality falls short, leaving us with spindly greens and bulbs that never quite reach their full potential. That’s where these DIY tricks and hacks come in – your secret weapon to onion-growing success.
Onions have a rich history, dating back thousands of years. They were revered in ancient Egypt, even used as offerings to the gods! Throughout history, different cultures have valued onions not only for their flavor but also for their medicinal properties. From warding off illness to adding depth to countless dishes, onions have truly earned their place as a culinary staple.
But why bother with the effort of growing your own when you can easily buy them at the store? Well, for starters, homegrown onions taste incredible! The flavor is fresher, more vibrant, and simply unmatched. Plus, you have complete control over what goes into your garden, ensuring you’re growing healthy, organic produce for yourself and your family. And let’s not forget the satisfaction of nurturing a plant from seed to harvest – it’s a truly rewarding experience. So, if you’re ready to unlock the secrets to growing onions successfully and enjoy a bountiful harvest, keep reading! I’m going to share some simple yet effective DIY tricks that will transform your onion-growing game.
Zwiebeln erfolgreich im eigenen Garten anbauen: Eine DIY-Anleitung
Hallo Gartenfreunde! Ich liebe es, frische Zutaten direkt aus meinem Garten zu verwenden, und Zwiebeln sind da keine Ausnahme. Sie sind vielseitig, einfach zu lagern und schmecken einfach besser, wenn man sie selbst gezogen hat. In diesem Artikel zeige ich euch, wie ihr Zwiebeln erfolgreich im eigenen Garten anbauen könnt, von der Vorbereitung bis zur Ernte. Keine Angst, es ist einfacher als ihr denkt!
Die Grundlagen: Was Zwiebeln zum Wachsen brauchen
Bevor wir loslegen, ist es wichtig zu verstehen, was Zwiebeln wirklich brauchen, um zu gedeihen. Hier sind die wichtigsten Punkte:
* Sonne: Zwiebeln lieben die Sonne! Sie brauchen mindestens 6-8 Stunden direktes Sonnenlicht pro Tag. Wählt also einen sonnigen Standort in eurem Garten.
* Boden: Ein gut durchlässiger, lockerer Boden ist entscheidend. Zwiebeln mögen keine Staunässe. Der Boden sollte reich an organischen Stoffen sein.
* Wasser: Regelmäßige Bewässerung ist wichtig, besonders während der Wachstumsphase. Achtet darauf, dass der Boden feucht, aber nicht nass ist.
* Nährstoffe: Zwiebeln sind hungrig! Sie brauchen eine gute Versorgung mit Nährstoffen, besonders Stickstoff, Phosphor und Kalium.
* pH-Wert: Der ideale pH-Wert für Zwiebeln liegt zwischen 6,0 und 7,0.
Vorbereitung ist alles: Den Boden vorbereiten
Die richtige Bodenvorbereitung ist der Schlüssel zum Erfolg. Ich habe festgestellt, dass diese Schritte wirklich einen Unterschied machen:
1. Boden testen: Bevor ihr irgendetwas tut, solltet ihr euren Boden testen, um den pH-Wert und den Nährstoffgehalt zu bestimmen. Boden-Testkits gibt es in jedem Gartencenter.
2. Boden lockern: Lockert den Boden gründlich auf, am besten mit einer Grabegabel oder einem Kultivator. Entfernt Steine, Wurzeln und andere Hindernisse.
3. Organische Substanz hinzufügen: Mischt reichlich Kompost, verrotteten Mist oder andere organische Substanz in den Boden ein. Das verbessert die Drainage, die Belüftung und den Nährstoffgehalt. Ich verwende immer eine ordentliche Schicht Kompost aus meinem eigenen Komposthaufen.
4. Düngen: Wenn euer Bodentest einen Nährstoffmangel aufzeigt, könnt ihr einen organischen Dünger hinzufügen, der speziell für Gemüse geeignet ist. Achtet auf ein ausgewogenes Verhältnis von Stickstoff, Phosphor und Kalium.
5. Eine ebene Fläche schaffen: Harkt den Boden glatt, um eine ebene Fläche zu schaffen. Das erleichtert das Pflanzen und die Bewässerung.
Die Qual der Wahl: Zwiebeln auswählen
Es gibt verschiedene Möglichkeiten, Zwiebeln anzubauen: aus Samen, Steckzwiebeln oder Jungpflanzen. Jede Methode hat ihre Vor- und Nachteile.
* Samen: Der Anbau aus Samen ist die günstigste Option, erfordert aber mehr Zeit und Geduld. Ihr müsst die Samen früh im Jahr (Januar/Februar) im Haus vorziehen.
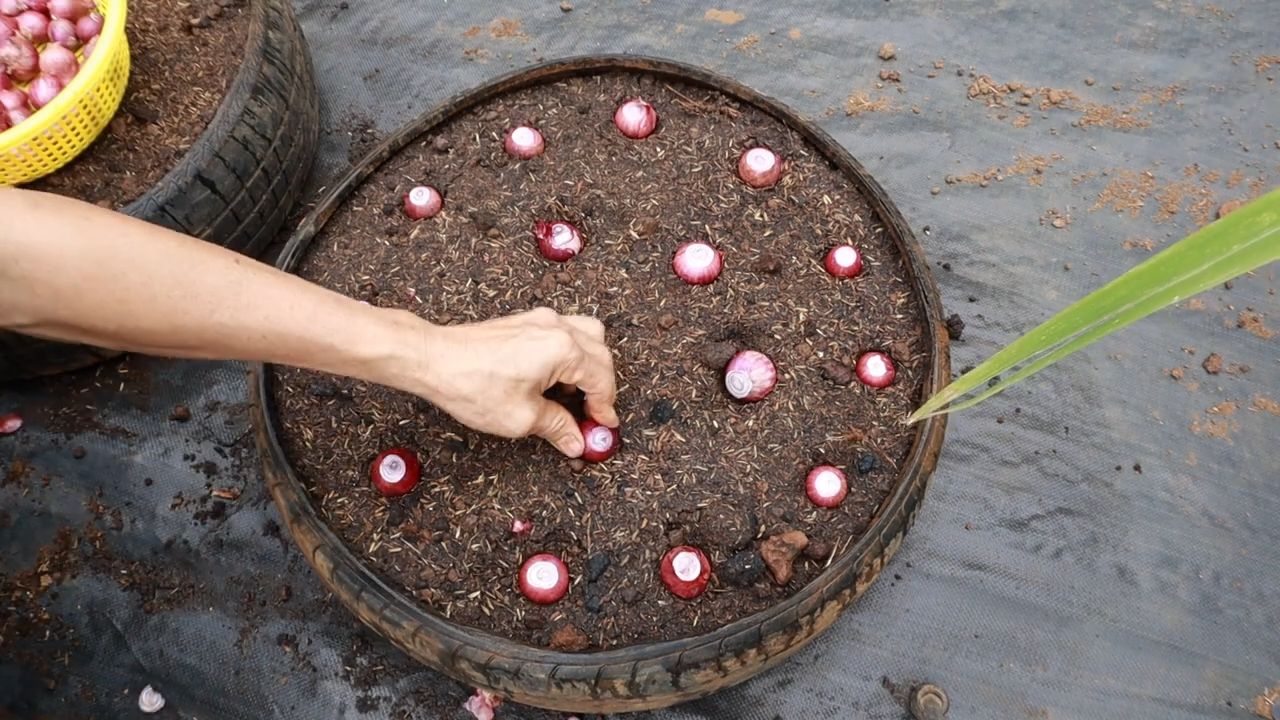
* Steckzwiebeln: Steckzwiebeln sind kleine, getrocknete Zwiebeln, die ihr direkt in den Boden pflanzen könnt. Sie sind einfacher anzubauen als Samen und liefern schneller Ergebnisse. Das ist meine bevorzugte Methode.
* Jungpflanzen: Jungpflanzen sind vorgezogene Zwiebelpflanzen, die ihr im Gartencenter kaufen könnt. Sie sind die teuerste Option, aber auch die einfachste.
Wählt die Zwiebelsorte, die am besten zu eurem Klima und euren Vorlieben passt. Es gibt verschiedene Sorten, die sich in Geschmack, Größe und Lagerfähigkeit unterscheiden. Einige beliebte Sorten sind:
* Gelbe Zwiebeln: Vielseitig und gut lagerfähig.
* Rote Zwiebeln: Mild im Geschmack und ideal für Salate.
* Weiße Zwiebeln: Schärfer im Geschmack und gut für die Küche.
* Gemüsezwiebeln: Sehr groß und mild im Geschmack.
Los geht’s: Zwiebeln pflanzen (mit Steckzwiebeln)
Ich bevorzuge die Verwendung von Steckzwiebeln, da sie einfach zu handhaben sind und schnell Ergebnisse liefern. Hier ist, wie ich vorgehe:
1. Der richtige Zeitpunkt: Pflanzt die Steckzwiebeln im Frühjahr, sobald der Boden aufgetaut ist und die Frostgefahr vorüber ist. In milden Klimazonen könnt ihr sie auch im Herbst pflanzen.
2. Abstand halten: Pflanzt die Steckzwiebeln in Reihen, mit einem Abstand von etwa 10-15 cm zwischen den Zwiebeln und 20-30 cm zwischen den Reihen.
3. Die richtige Tiefe: Drückt die Steckzwiebeln so tief in den Boden, dass nur die Spitze herausschaut.
4. Gießen: Gießt die Steckzwiebeln nach dem Pflanzen gründlich an.
Pflegeleicht: Zwiebeln richtig pflegen
Zwiebeln sind relativ pflegeleicht, aber ein paar Dinge solltet ihr beachten:
1. Bewässerung: Gießt die Zwiebeln regelmäßig, besonders während der Wachstumsphase. Achtet darauf, dass der Boden feucht, aber nicht nass ist. Vermeidet es, die Blätter zu benetzen, um Pilzkrankheiten vorzubeugen.
2. Unkrautbekämpfung: Haltet den Bereich um die Zwiebeln unkrautfrei. Unkraut konkurriert mit den Zwiebeln um Nährstoffe und Wasser. Ihr könnt Unkraut manuell entfernen oder eine Mulchschicht auftragen, um das Unkrautwachstum zu unterdrücken.
3. Düngung: Düngt die Zwiebeln während der Wachstumsphase regelmäßig mit einem organischen Dünger. Ich verwende gerne verdünnte Brennnesseljauche oder Komposttee.
4. Schädlinge und Krankheiten: Achtet auf Schädlinge wie Zwiebelfliegen oder Thripse. Bei Bedarf könnt ihr biologische Schädlingsbekämpfungsmittel einsetzen. Pilzkrankheiten wie Falscher Mehltau können auftreten, wenn die Blätter zu lange feucht bleiben. Sorgt für eine gute Belüftung und vermeidet es, die Blätter zu benetzen.
Erntezeit: Wann sind die Zwiebeln reif?
Die Erntezeit hängt von der Sorte und dem Zeitpunkt der Pflanzung ab. In der Regel sind Zwiebeln erntereif, wenn die Blätter gelb werden und umfallen.
1. Der richtige Zeitpunkt: Wartet, bis etwa die Hälfte der Blätter umgefallen ist.
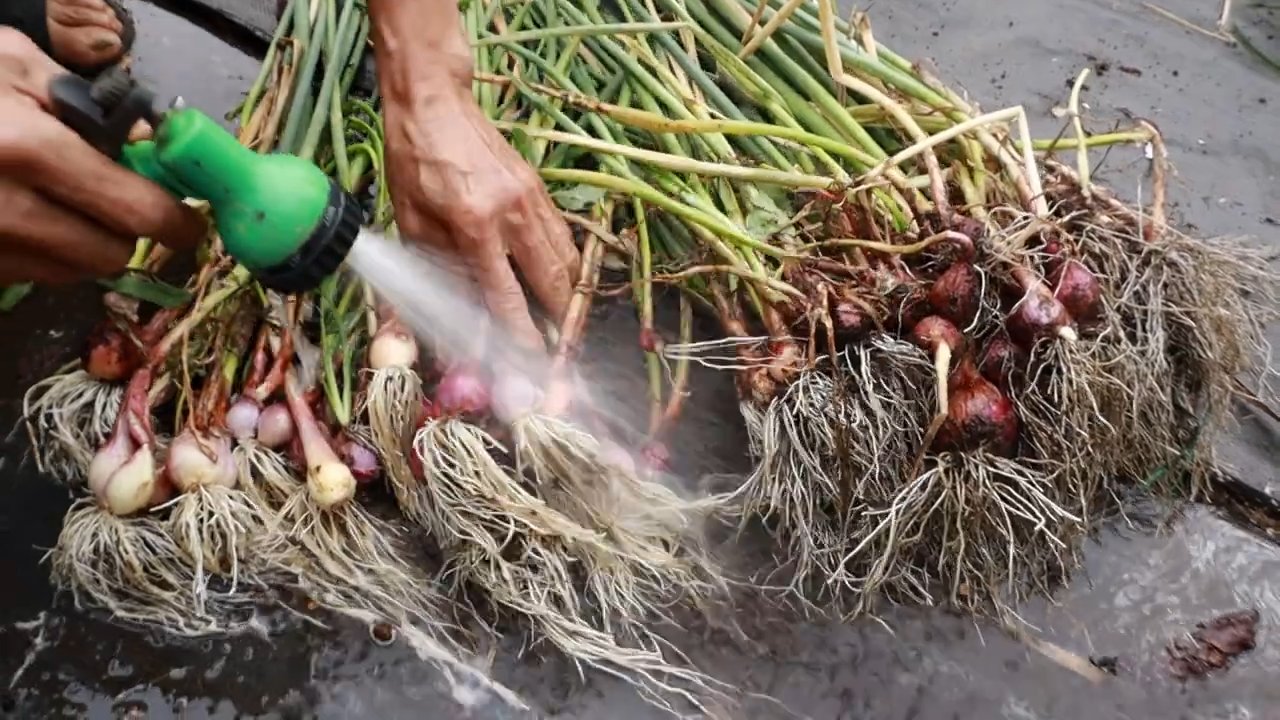
2. Ernten: Zieht die Zwiebeln vorsichtig aus dem Boden.
3. Trocknen: Lasst die Zwiebeln an einem trockenen, luftigen Ort trocknen. Ich lege sie gerne auf ein Gitter oder eine alte Palette. Das Trocknen dauert in der Regel 2-3 Wochen.
4. Lagern: Sobald die Zwiebeln vollständig getrocknet sind, könnt ihr sie an einem kühlen, trockenen und dunklen Ort lagern. Ich hänge sie gerne in Zöpfen auf oder lagere sie in Netzsäcken.
Extra-Tipps für den Zwiebelanbau
Hier sind noch ein paar zusätzliche Tipps, die euch helfen können, eure Zwiebelernte zu maximieren:
* Fruchtfolge: Baut Zwiebeln nicht jedes Jahr am selben Standort an. Wechselt die Anbaufläche, um Krankheiten und Schädlingen vorzubeugen.
* Beetnachbarn: Gute Beetnachbarn für Zwiebeln sind Karotten, Salat, Tomaten und Kamille. Vermeidet es, Zwiebeln neben Bohnen oder Erbsen anzubauen.
* Zwiebelblüten: Wenn eure Zwiebeln Blüten bilden, solltet ihr diese entfernen, um die Energie der Pflanze in die Zwiebelbildung zu lenken.
* Mulchen: Eine Mulchschicht aus Stroh, Heu oder Holzhackschnitzeln hilft, den Boden feucht zu halten, Unkraut zu unterdrücken und den Boden zu düngen.
Häufige Probleme und Lösungen
Auch beim Zwiebelanbau können Probleme auftreten. Hier sind einige häufige Probleme und wie
Conclusion
So, there you have it! Mastering the art of growing onions successfully doesn’t require a green thumb blessed by the gardening gods. It’s about understanding the plant’s needs, providing the right environment, and employing a few clever DIY tricks to give your onions the best possible start. We’ve explored a simple yet effective method to boost your onion-growing game, focusing on creating a nutrient-rich starting mix that will set your seedlings up for robust growth.
Why is this DIY approach a must-try? Because it puts you in control. You know exactly what’s going into your soil, avoiding potentially harmful chemicals and ensuring your onions receive a balanced diet from day one. This translates to stronger, healthier plants that are more resistant to pests and diseases, ultimately leading to a more bountiful harvest. Plus, it’s incredibly satisfying to nurture your onions from tiny seedlings to plump, flavorful bulbs, knowing you played an active role in their success.
But don’t stop there! Experiment with variations to tailor this DIY trick to your specific needs and preferences. Consider adding a handful of bone meal to the mix for an extra boost of phosphorus, which is crucial for root development. If you’re growing onions in containers, you might want to incorporate some perlite or vermiculite to improve drainage and aeration. For those aiming for organic gardening, explore using compost tea as a regular foliar spray to provide additional nutrients and ward off potential problems. You can also try different types of compost, such as worm castings, for a unique nutrient profile.
Remember, gardening is a journey of learning and discovery. Don’t be afraid to experiment and find what works best for you and your local climate. The key is to observe your plants closely and adjust your approach as needed.
We wholeheartedly encourage you to try this DIY trick for growing onions successfully. It’s a simple, cost-effective way to improve your yields and enjoy the satisfaction of harvesting your own homegrown onions. And most importantly, we want to hear about your experiences! Share your successes, your challenges, and any variations you try in the comments below. Let’s build a community of onion-growing enthusiasts and learn from each other’s experiences. Your insights could be invaluable to someone just starting out on their onion-growing journey. Happy gardening!
Frequently Asked Questions (FAQ)
Q: What kind of compost is best for growing onions successfully?
A: While almost any well-rotted compost will benefit your onions, some types are particularly advantageous. Worm castings are an excellent choice, as they are rich in nutrients and beneficial microbes. Well-aged manure, such as cow or horse manure, is also a good option, but be sure it’s fully composted to avoid burning the delicate roots of your seedlings. Leaf mold, made from decomposed leaves, is another great addition, as it improves soil structure and water retention. Avoid using compost that is too acidic, as onions prefer a slightly alkaline to neutral soil pH. Experiment with different types of compost to see what works best in your garden.
Q: How often should I water my onion seedlings after transplanting?
A: Watering frequency depends on several factors, including the weather, soil type, and size of your containers. Generally, you should aim to keep the soil consistently moist but not waterlogged. Check the soil moisture level by sticking your finger about an inch deep into the soil. If it feels dry, it’s time to water. In hot, dry weather, you may need to water daily, while in cooler, wetter conditions, you can water less frequently. Avoid overhead watering, as this can increase the risk of fungal diseases. Instead, water at the base of the plants, using a watering can or a soaker hose.
Q: What are some common pests and diseases that affect onions, and how can I prevent them?
A: Onions are susceptible to several pests and diseases, including onion maggots, thrips, and fungal diseases like downy mildew and onion rot. To prevent these problems, start with healthy, disease-free seedlings. Practice crop rotation to avoid building up pest and disease populations in the soil. Ensure good air circulation around your plants by spacing them properly. Use organic pest control methods, such as neem oil or insecticidal soap, to control pests. To prevent fungal diseases, avoid overhead watering and ensure good drainage. You can also apply a copper-based fungicide as a preventative measure. Regularly inspect your plants for signs of pests or diseases and take action promptly to prevent them from spreading.
Q: Can I grow onions from seed directly in the garden, or is it better to start them indoors?
A: While you can grow onions from seed directly in the garden, starting them indoors is generally recommended, especially in regions with short growing seasons. Starting seeds indoors gives your onions a head start, allowing them to develop into larger, more robust plants before being transplanted into the garden. This is particularly important for long-day onions, which require a long growing season to mature. If you choose to direct sow, be sure to prepare the soil well and sow the seeds thinly. Keep the soil consistently moist until the seedlings emerge.
Q: How do I know when my onions are ready to harvest?
A: Onions are typically ready to harvest when the tops begin to fall over and turn brown. This indicates that the bulbs have stopped growing and are starting to cure. You can gently push over any remaining upright tops to encourage them to dry out. Once the tops are completely dry, you can pull the onions from the ground. Cure the onions by laying them out in a warm, dry, well-ventilated place for several weeks. This allows the outer layers of the bulbs to dry and harden, which helps to prevent rot and extend their storage life.
Q: What are the best companion plants for onions?
A: Onions are excellent companion plants for many vegetables and herbs. They are known to repel certain pests, such as aphids and cabbage moths, making them a valuable addition to any garden. Good companion plants for onions include carrots, tomatoes, lettuce, chamomile, and summer savory. Avoid planting onions near beans or peas, as they can inhibit their growth.
Q: How can I store my harvested onions to keep them fresh for longer?
A: Proper storage is essential for extending the shelf life of your harvested onions. After curing, trim the roots and tops, leaving about an inch of the neck. Store the onions in a cool, dry, well-ventilated place, such as a basement or pantry. You can store them in mesh bags or loosely woven baskets. Avoid storing onions in plastic bags, as this can trap moisture and promote rot. Check your onions regularly and remove any that show signs of spoilage. Properly stored onions can last for several months.
Q: What if my onion seedlings are leggy and weak?
A: Leggy and weak onion seedlings are often a sign of insufficient light. Ensure your seedlings are receiving at least 6-8 hours of direct sunlight per day, or supplement with grow lights. You can also try gently brushing the tops of the seedlings with your hand a few times a day. This helps to strengthen the stems and prevent them from becoming too leggy. When transplanting, bury the seedlings deeper than they were growing in the seed tray, up to the first set of leaves. This will encourage them to develop stronger roots.

Leave a Comment