
Growing onions in plastic bottles might sound a little unconventional, but trust me, it’s a game-changer for any home gardener, especially if you’re tight on space! For centuries, humans have cultivated onions, from the fertile crescent where they were first domesticated to kitchen gardens around the world. Their pungent flavor and incredible versatility have made them a staple in countless cuisines.
But what if you don’t have a sprawling backyard to dedicate to your allium dreams? That’s where this ingenious DIY trick comes in. Imagine harvesting fresh, flavorful onions right from your balcony or windowsill. No more trips to the grocery store for that one missing ingredient! This method is not only space-saving but also incredibly sustainable, giving those plastic bottles a new lease on life.
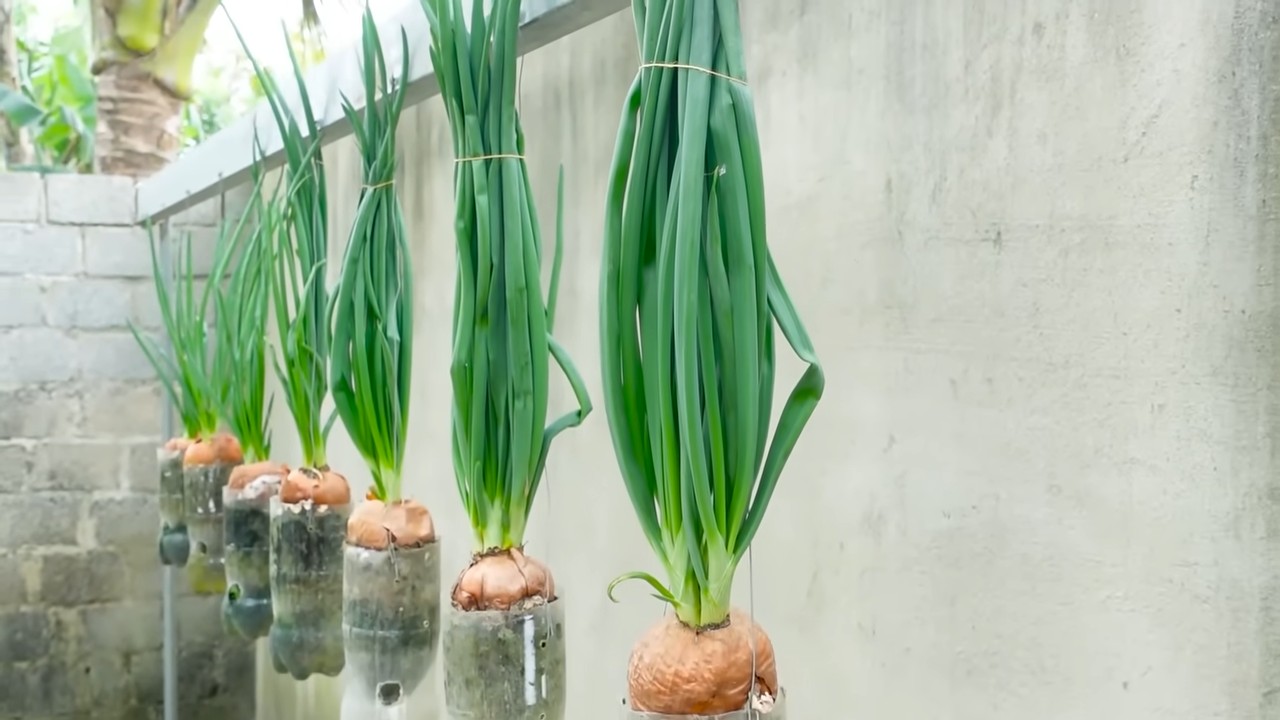
I’m going to show you how to transform discarded plastic bottles into mini onion farms, making growing onions in plastic bottles a fun, rewarding, and eco-friendly project. Get ready to impress your friends and family with your green thumb and enjoy the satisfaction of growing your own delicious onions, no matter how small your living space may be!
Zwiebeln ziehen in Plastikflaschen: Ein DIY-Gartenprojekt für Jedermann!
Hallo liebe Gartenfreunde! Habt ihr auch manchmal das Gefühl, dass der Platz im Garten einfach nicht ausreicht? Oder vielleicht habt ihr gar keinen Garten, sondern nur einen Balkon oder eine Terrasse? Keine Sorge, ich habe da eine super Lösung für euch: Zwiebeln ziehen in Plastikflaschen! Das ist nicht nur platzsparend, sondern auch eine tolle Möglichkeit, Plastikmüll zu recyceln und gleichzeitig frische, leckere Zwiebeln zu ernten. Ich zeige euch, wie es geht!
Was ihr braucht:
* Plastikflaschen: Am besten eignen sich große PET-Flaschen (z.B. von Wasser oder Saft). Je größer die Flasche, desto mehr Platz haben die Zwiebeln zum Wachsen.
* Erde: Normale Blumenerde oder Gartenerde ist perfekt. Ihr könnt auch eine Mischung aus Erde, Kompost und Sand verwenden.
* Zwiebeln: Entweder kleine Steckzwiebeln oder Zwiebeln, die bereits ausgetrieben haben. Letzteres ist eine super Möglichkeit, Zwiebeln zu verwerten, die im Kühlschrank vergessen wurden und angefangen haben zu sprießen.
* Messer oder Schere: Zum Schneiden der Plastikflaschen.
* Bohrmaschine oder Nagel: Um Löcher für die Drainage zu bohren.
* Gießkanne: Zum Bewässern der Zwiebeln.
* Optional: Kies oder Blähton für die Drainage.
Die Vorbereitung:
Bevor wir loslegen, müssen wir die Plastikflaschen vorbereiten. Das ist aber ganz einfach!
1. Flaschen reinigen: Spült die Plastikflaschen gründlich mit Wasser und Spülmittel aus, um alle Rückstände zu entfernen. Lasst sie anschließend gut trocknen.
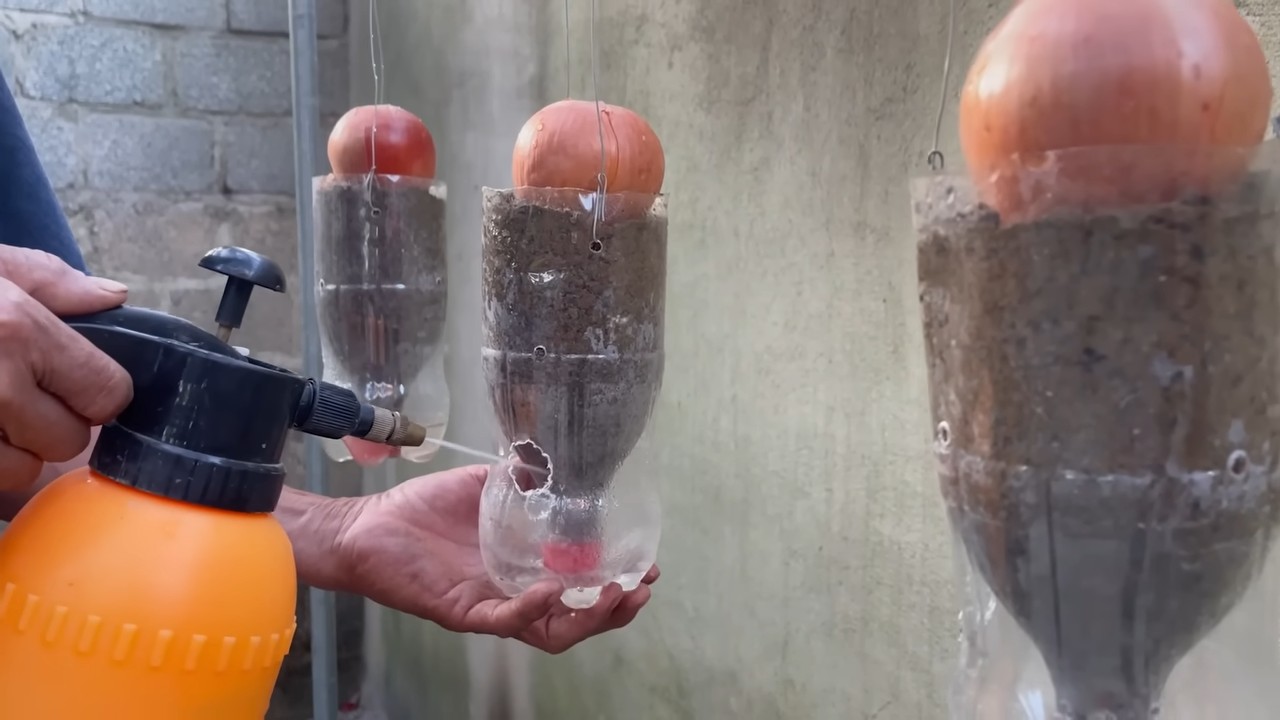
2. Löcher bohren: Bohrt mit einer Bohrmaschine oder einem Nagel mehrere Löcher in den Boden der Flasche. Diese Löcher dienen als Drainage und verhindern, dass sich Staunässe bildet. Achtet darauf, dass die Löcher nicht zu groß sind, damit die Erde nicht herausfällt.
3. Flaschen schneiden: Es gibt verschiedene Möglichkeiten, die Flaschen zu schneiden. Ich zeige euch zwei Varianten:
* Variante 1: Horizontales Schneiden: Schneidet die Flasche horizontal in der Mitte durch. Ihr erhaltet zwei Hälften, die ihr beide bepflanzen könnt. Die obere Hälfte könnt ihr umgedreht in die untere Hälfte stellen, um einen Mini-Gewächshaus-Effekt zu erzielen.
* Variante 2: Vertikales Schneiden: Schneidet die Flasche vertikal auf, aber nicht ganz durch. Lasst am Boden ein paar Zentimeter stehen, damit die Flasche noch zusammenhält. Biegt die beiden Hälften auseinander, um mehr Platz für die Zwiebeln zu schaffen.
Das Bepflanzen:
Jetzt kommt der spaßige Teil: Das Bepflanzen der Flaschen mit den Zwiebeln!
1. Drainage anlegen (optional): Füllt den Boden der Flasche mit einer Schicht Kies oder Blähton. Das verbessert die Drainage und verhindert Staunässe.
2. Erde einfüllen: Füllt die Flasche mit Erde. Lasst oben ein paar Zentimeter frei, damit ihr beim Gießen nicht gleich alles überschwemmt.
3. Zwiebeln setzen: Drückt die Zwiebeln vorsichtig in die Erde. Achtet darauf, dass die Spitze der Zwiebeln noch aus der Erde herausschaut. Der Abstand zwischen den Zwiebeln sollte etwa 5-10 cm betragen, damit sie genügend Platz zum Wachsen haben.
4. Angießen: Gießt die Zwiebeln vorsichtig an. Achtet darauf, dass die Erde gleichmäßig feucht ist, aber nicht zu nass.
Die Pflege:
Damit eure Zwiebeln gut wachsen, brauchen sie natürlich auch die richtige Pflege.
1. Standort: Stellt die bepflanzten Flaschen an einen sonnigen Standort. Zwiebeln lieben die Sonne!
2. Bewässerung: Gießt die Zwiebeln regelmäßig, aber nicht zu viel. Die Erde sollte immer leicht feucht sein. Vermeidet Staunässe, da dies zu Fäulnis führen kann.
3. Düngung (optional): Wenn ihr möchtet, könnt ihr die Zwiebeln während der Wachstumsphase mit einem organischen Dünger düngen. Das fördert das Wachstum und die Ernte.
4. Schutz vor Schädlingen: Achtet auf Schädlinge wie Blattläuse oder Zwiebelfliegen. Bei Bedarf könnt ihr die Zwiebeln mit einem natürlichen Schädlingsbekämpfungsmittel behandeln.
Die Ernte:
Je nach Zwiebelsorte und Standort könnt ihr die Zwiebeln nach etwa 3-4 Monaten ernten.
1. Erntezeitpunkt: Die Zwiebeln sind reif, wenn das Laub gelb wird und umknickt.
2. Ernten: Zieht die Zwiebeln vorsichtig aus der Erde.
3. Trocknen: Lasst die Zwiebeln an einem trockenen und luftigen Ort trocknen. Das verlängert die Haltbarkeit.
Zusätzliche Tipps und Tricks:
* Verschiedene Zwiebelsorten: Probiert verschiedene Zwiebelsorten aus, um herauszufinden, welche euch am besten schmecken und am besten in Plastikflaschen wachsen.
* Kräuter pflanzen: Ihr könnt auch Kräuter wie Schnittlauch oder Petersilie zusammen mit den Zwiebeln in die Flaschen pflanzen. Das spart Platz und sieht toll aus.
* Beschriftung: Beschriftet die Flaschen mit dem Namen der Zwiebelsorte und dem Pflanzdatum. So behaltet ihr den Überblick.
* Upcycling: Verwendet alte Plastikflaschen, um euren Beitrag zum Umweltschutz zu leisten.
* Experimentieren: Seid kreativ und experimentiert mit verschiedenen Anbaumethoden und Materialien.
Häufige Probleme und Lösungen:
* Staunässe: Wenn die Erde zu nass ist, können die Zwiebeln faulen. Achtet auf eine gute Drainage und gießt nicht zu viel.
* Schädlinge: Blattläuse und Zwiebelfliegen können die Zwiebeln befallen. Behandelt die Zwiebeln mit einem natürlichen Schädlingsbekämpfungsmittel.
* Wachstumsstörungen: Wenn die Zwiebeln nicht richtig wachsen, kann das an einem Nährstoffmangel liegen. Düngt die Zwiebeln mit einem organischen Dünger.
Noch ein paar Ideen für die Gestaltung:
* Bemalen: Bemalt die Plastikflaschen mit bunten Farben oder Mustern. Das macht euren kleinen Garten noch fröhlicher.
* Etiketten: Klebt Etiketten mit den Namen der Zwiebelsorten auf die Flaschen.
* Aufhängen: Hängt die Flaschen an einem Geländer oder einer Wand auf. Das spart Platz und sieht toll aus.
* Kombinieren: Kombiniert die Zwiebeln mit anderen Pflanzen wie Kräutern oder Salat.
Warum Zwiebeln in Plastikflaschen ziehen?
* Platzsparend: Ideal für kleine Gärten, Balkone oder Terrassen.
* Recycling: Eine tolle Möglichkeit, Plastikmüll zu recyceln.
* Einfach: Auch für Anfänger geeignet.
* Frische Zwiebeln: Immer frische Zwiebeln zur Hand.
* Dekorativ: Ein Hingucker für jeden Garten oder Balkon.
Ich hoffe, diese Anleitung hat euch gefallen und inspiriert, eure eigenen Zwiebeln in Plastikflaschen zu ziehen. Es ist wirklich ein tolles Projekt, das Spaß macht und gleichzeitig etwas Gutes für die Umwelt tut. Also, worauf wartet ihr noch? Ran an die Flaschen und los geht’s! Viel Erfolg und eine reiche Ernte!
Conclusion
So, there you have it! Growing onions in plastic bottles isn’t just a quirky gardening experiment; it’s a genuinely effective and space-saving method for cultivating fresh, flavorful onions right at home. We’ve walked through the process, highlighting the benefits and addressing potential challenges. Now, it’s time to ditch the store-bought onions (at least some of the time!) and embrace the satisfaction of harvesting your own.
Why is this DIY trick a must-try? Because it empowers you to take control of your food source, even with limited space. Imagine the pride of adding homegrown onions to your favorite dishes, knowing you nurtured them from seedling to bulb. Beyond the practical advantages, it’s a rewarding experience that connects you with nature and promotes sustainable living. Plus, let’s be honest, it’s a fantastic conversation starter!
But don’t stop there! Experiment with different onion varieties to discover your favorites. Try red onions for a vibrant addition to salads, or shallots for a milder, more delicate flavor. You can also explore companion planting by adding herbs like thyme or rosemary to the bottle, creating a miniature ecosystem that benefits your onions. Consider using different types of plastic bottles too – larger bottles can accommodate more onions, while smaller bottles are perfect for starting seedlings.
Remember, gardening is all about learning and adapting. Don’t be discouraged if your first attempt isn’t perfect. Observe your onions, adjust your watering schedule, and fine-tune your technique. The more you experiment, the better you’ll become at this innovative gardening method.
We are confident that this method of growing onions in plastic bottles will not only save you money but also provide you with a constant supply of fresh onions.
Now, we want to hear from you! Have you tried growing onions in plastic bottles? What were your results? What challenges did you face, and how did you overcome them? Share your experiences, tips, and photos in the comments below. Let’s create a community of bottle-gardening enthusiasts and inspire others to give this fantastic DIY trick a try. Your insights could be invaluable to someone just starting out. Let’s cultivate a greener, more sustainable future, one plastic bottle at a time!
Frequently Asked Questions (FAQ)
1. What type of plastic bottle is best for growing onions?
Ideally, you should use food-grade plastic bottles, such as those that previously contained water, juice, or soda. Avoid bottles that held harsh chemicals or cleaning products, as these could contaminate the soil and affect the onions. The size of the bottle depends on how many onions you want to grow in each container. A 2-liter bottle can comfortably accommodate 3-4 onion sets or seedlings. Ensure the bottle is clean and has drainage holes before planting.
2. What kind of soil should I use for growing onions in plastic bottles?
A well-draining potting mix is crucial for successful onion growth. Onions prefer soil that is rich in organic matter and retains moisture without becoming waterlogged. You can use a commercially available potting mix or create your own by combining equal parts of garden soil, compost, and perlite or vermiculite. The compost provides essential nutrients, while the perlite or vermiculite improves drainage and aeration. Avoid using heavy clay soil, as it can compact and hinder root development.
3. How often should I water my onions grown in plastic bottles?
Watering frequency depends on several factors, including the climate, the type of soil, and the size of the bottle. Generally, you should water your onions when the top inch of soil feels dry to the touch. Avoid overwatering, as this can lead to root rot. Water thoroughly until excess water drains out of the drainage holes. During hot, dry weather, you may need to water more frequently. Check the soil moisture regularly and adjust your watering schedule accordingly.
4. How much sunlight do onions need when grown in plastic bottles?
Onions require at least 6-8 hours of direct sunlight per day to thrive. Place your plastic bottle containers in a sunny location, such as a south-facing balcony or windowsill. If you don’t have access to enough natural sunlight, you can supplement with artificial grow lights. Rotate the bottles regularly to ensure that all sides of the onions receive adequate sunlight. Insufficient sunlight can result in weak, leggy growth and smaller bulbs.
5. How do I fertilize onions grown in plastic bottles?
Onions are heavy feeders and benefit from regular fertilization. Start by incorporating compost into the potting mix before planting. During the growing season, fertilize your onions every 2-3 weeks with a balanced liquid fertilizer, such as a 10-10-10 or 20-20-20 formula. Dilute the fertilizer according to the package instructions and apply it to the soil around the base of the onions. Avoid getting fertilizer on the leaves, as this can cause burning. You can also use organic fertilizers, such as fish emulsion or seaweed extract.
6. How do I prevent pests and diseases from affecting my onions?
Growing onions in plastic bottles can help minimize pest and disease problems, but it’s still important to take preventative measures. Inspect your onions regularly for signs of pests, such as aphids, thrips, or onion maggots. If you spot any pests, treat them with insecticidal soap or neem oil. To prevent fungal diseases, ensure good air circulation around the plants and avoid overwatering. You can also apply a fungicide if necessary. Remove any diseased or damaged leaves promptly to prevent the spread of infection.
7. How long does it take to grow onions in plastic bottles?
The time it takes to grow onions in plastic bottles depends on the variety of onion and the growing conditions. Generally, it takes about 90-120 days to grow onions from sets (small, immature bulbs) and 120-150 days to grow onions from seeds. You can harvest green onions (scallions) at any time, as needed. The bulbs are ready to harvest when the tops start to turn yellow and fall over.
8. Can I grow different types of onions in plastic bottles?
Yes, you can grow various types of onions in plastic bottles, including bulb onions, green onions (scallions), and shallots. Bulb onions require more space and time to mature, so choose smaller varieties or plant fewer onions per bottle. Green onions are quick and easy to grow and can be harvested continuously. Shallots are similar to onions but have a milder flavor and can be grown in the same way. Experiment with different varieties to find your favorites.
9. What are some variations I can try when growing onions in plastic bottles?
There are many variations you can try to customize your onion-growing experience. You can experiment with different types of plastic bottles, such as hanging bottles or self-watering bottles. You can also try companion planting by adding herbs or flowers to the bottle, which can attract beneficial insects and deter pests. Another variation is to use different growing mediums, such as hydroponics or aquaponics. Get creative and see what works best for you.
10. What do I do with the plastic bottles after harvesting the onions?
After harvesting your onions, you can reuse the plastic bottles for other gardening projects or recycle them. Clean the bottles thoroughly and remove any remaining soil or debris. You can use them to start new seedlings, grow herbs, or create a vertical garden. If you choose to recycle them, check with your local recycling center for specific guidelines. By reusing or recycling the plastic bottles, you can reduce waste and promote sustainable gardening practices.
Leave a Comment