
Growing Kohlrabi in Small Spaces can feel like a gardening challenge, but trust me, it’s totally achievable and incredibly rewarding! Have you ever dreamt of harvesting fresh, crisp kohlrabi right from your own balcony or patio? Imagine the satisfaction of adding this unique vegetable to your salads and stir-fries, knowing you grew it yourself, even without a sprawling garden. This DIY guide is your key to unlocking that dream!
Kohlrabi, sometimes called a “German turnip,” has a fascinating history. Originating in Europe, it’s been cultivated for centuries, prized for its mild, slightly sweet flavor and crisp texture. It’s a staple in many European cuisines, and now, you can bring a little bit of that culinary heritage to your own home, no matter how limited your space may be.
Why is mastering the art of growing kohlrabi in small spaces so important? Well, in today’s world, many of us live in apartments or homes with limited outdoor areas. But that doesn’t mean we have to miss out on the joy and benefits of gardening! This DIY trick empowers you to cultivate fresh produce, connect with nature, and enjoy delicious, healthy meals, all within the confines of your own small space. Plus, it’s a fantastic way to reduce your carbon footprint and save money on groceries. Let’s dive in and discover the secrets to successful small-space kohlrabi cultivation!
Growing Kohlrabi in Small Spaces: A Beginner’s Guide
Hey there, fellow gardening enthusiasts! So, you’re itching to grow some kohlrabi but think you don’t have the space? Think again! I’m here to tell you that you absolutely can cultivate this quirky and delicious vegetable even if you’re working with a small balcony, patio, or even just a sunny windowsill. Kohlrabi is surprisingly adaptable and thrives in containers, making it perfect for urban gardeners like us. Let’s dive into how you can grow your own kohlrabi bounty in a limited space.
What You’ll Need
Before we get our hands dirty, let’s gather our supplies. Here’s a list of everything you’ll need to successfully grow kohlrabi in containers:
* Kohlrabi Seeds: Choose a variety that suits your taste. ‘Early White Vienna’ and ‘Early Purple Vienna’ are popular choices, but there are many others to explore.
* Containers: Each kohlrabi plant needs at least a 6-inch diameter pot, but an 8-12 inch pot is even better. Make sure your containers have drainage holes!
* Potting Mix: Use a high-quality, well-draining potting mix. Avoid using garden soil, as it can compact in containers and hinder drainage.
* Watering Can or Hose: For consistent and gentle watering.
* Fertilizer: A balanced, water-soluble fertilizer or slow-release fertilizer.
* Sunlight: Kohlrabi needs at least 6 hours of sunlight per day.
* Optional:
* Seed starting tray and dome (if starting seeds indoors).
* Grow lights (if sunlight is limited).
* Mulch (to help retain moisture).
* Plant labels (to keep track of your varieties).
Starting Your Kohlrabi Journey
You have two main options for starting your kohlrabi: direct sowing or starting seeds indoors. I personally prefer starting seeds indoors, especially if you live in an area with a short growing season, but both methods work just fine.
Direct Sowing (The Easy Route)
If you choose to direct sow, wait until the danger of frost has passed and the soil has warmed up to at least 50°F (10°C).
1. Prepare Your Container: Fill your container with potting mix, leaving about an inch of space at the top.
2. Sow the Seeds: Sow the seeds about ½ inch deep and 1 inch apart. You can always thin them later.
3. Water Gently: Water the soil gently until it’s evenly moist.
4. Keep it Moist: Keep the soil consistently moist but not waterlogged.
5. Thin Seedlings: Once the seedlings emerge and have a few true leaves, thin them to one plant per 6-8 inches.
Starting Seeds Indoors (For a Head Start)
Starting seeds indoors gives you a head start on the growing season, especially if you live in a colder climate.
1. Prepare Your Seed Starting Tray: Fill your seed starting tray with seed starting mix.
2. Sow the Seeds: Sow the seeds about ¼ inch deep in each cell.
3. Water Gently: Water the soil gently until it’s evenly moist.
4. Cover with a Dome: Cover the tray with a humidity dome to help retain moisture.
5. Provide Light: Place the tray under grow lights or in a sunny windowsill.
6. Keep it Moist: Keep the soil consistently moist but not waterlogged.
7. Harden Off Seedlings: Once the seedlings have a few true leaves, gradually acclimate them to outdoor conditions over a week or two before transplanting. This process is called “hardening off.” Start by placing them outside for an hour or two each day, gradually increasing the time they spend outdoors.
Transplanting Your Kohlrabi Seedlings
Whether you started your seeds indoors or bought seedlings from a nursery, transplanting is a crucial step.
1. Prepare Your Container: Fill your container with potting mix, leaving about an inch of space at the top.
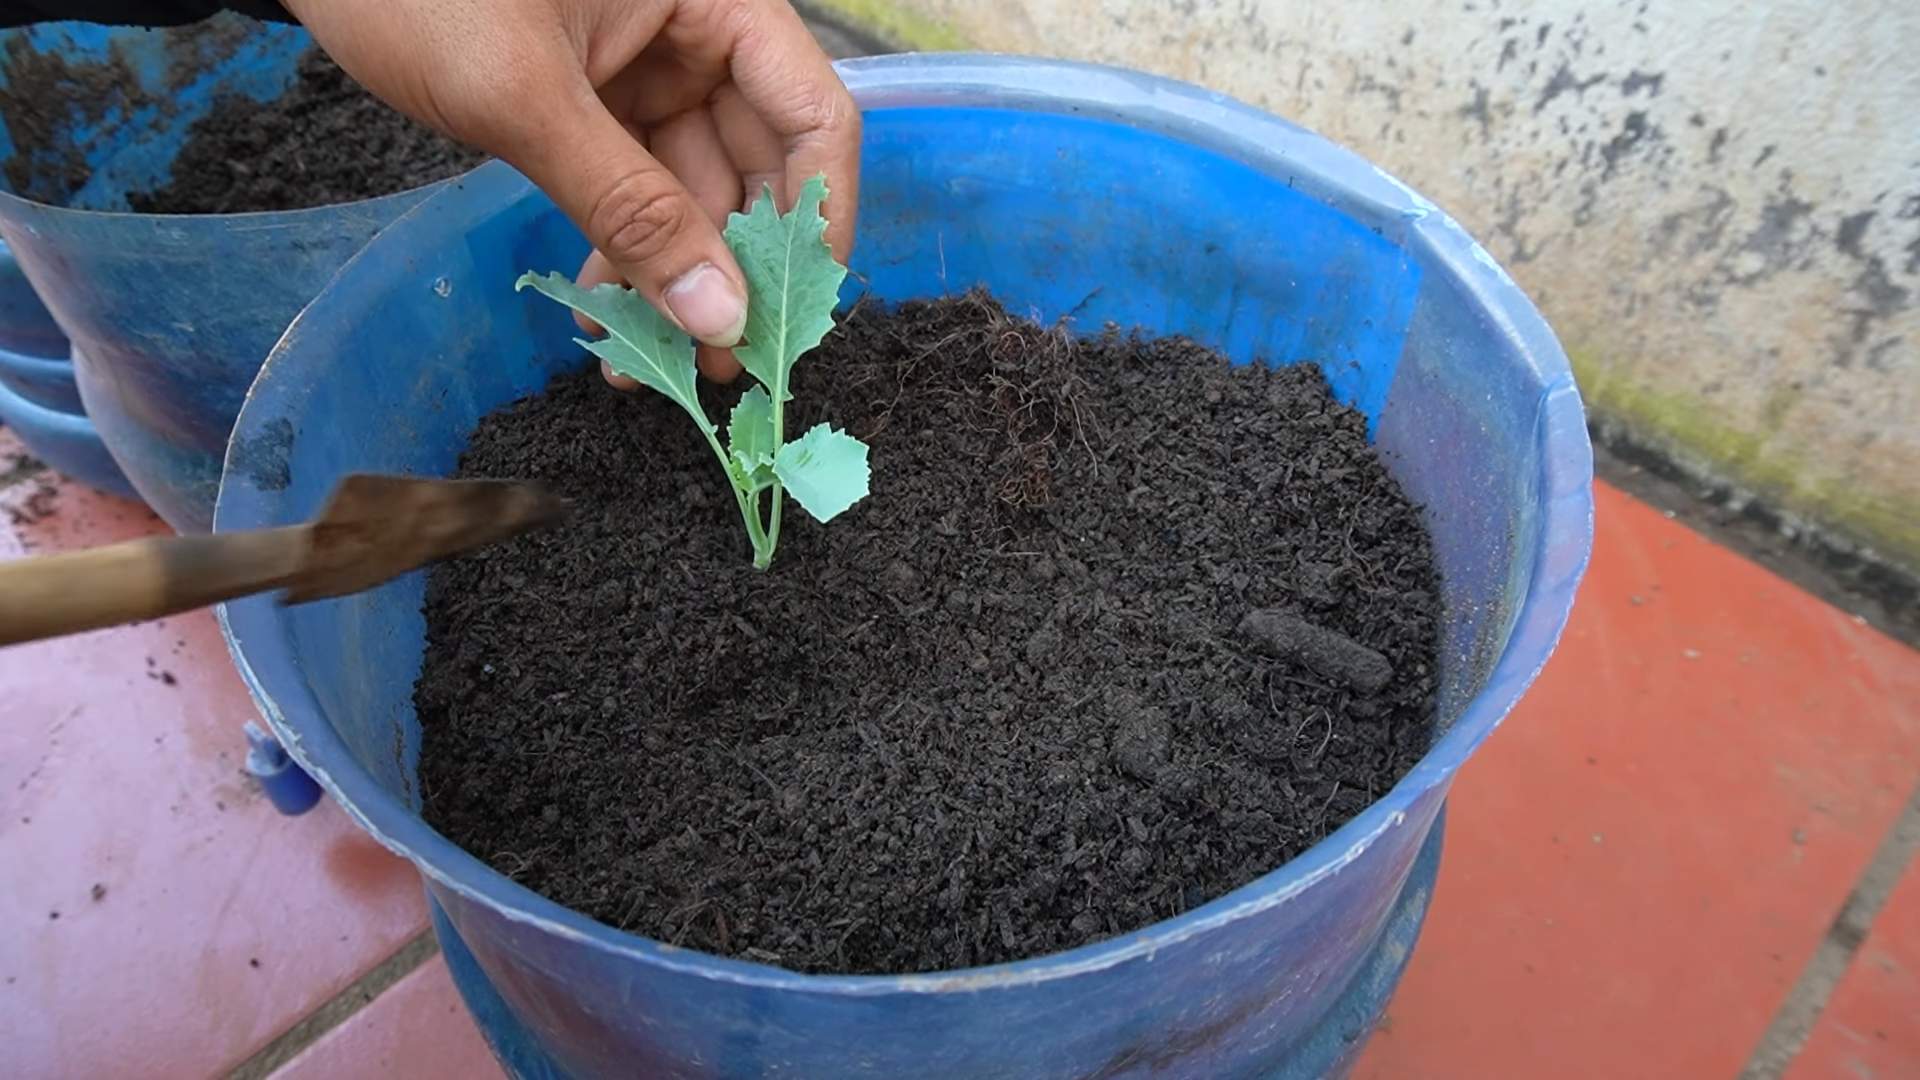
2. Dig a Hole: Dig a hole in the center of the container that’s large enough to accommodate the root ball of the seedling.
3. Gently Remove the Seedling: Gently remove the seedling from its tray or pot, being careful not to damage the roots.
4. Place the Seedling in the Hole: Place the seedling in the hole and backfill with potting mix.
5. Water Thoroughly: Water the soil thoroughly until it’s evenly moist.
6. Mulch (Optional): Add a layer of mulch around the base of the plant to help retain moisture and suppress weeds.
Caring for Your Kohlrabi Plants
Now that your kohlrabi plants are in their containers, it’s time to provide them with the care they need to thrive.
1. Watering: Kohlrabi needs consistent moisture, especially during hot weather. Water deeply whenever the top inch of soil feels dry to the touch. Avoid overwatering, as this can lead to root rot.
2. Fertilizing: Feed your kohlrabi plants every 2-3 weeks with a balanced, water-soluble fertilizer. Alternatively, you can use a slow-release fertilizer at planting time. Follow the instructions on the fertilizer package.
3. Sunlight: Ensure your kohlrabi plants receive at least 6 hours of sunlight per day. If you don’t have enough sunlight, consider using grow lights.
4. Weeding: Keep your containers free of weeds, as they can compete with your kohlrabi plants for nutrients and water.
5. Pest Control: Keep an eye out for pests such as aphids, cabbage worms, and flea beetles. Handpick any pests you find or use an organic insecticide if necessary.
6. Temperature: Kohlrabi prefers cool weather, with temperatures between 60°F and 75°F (15°C and 24°C). If you live in a hot climate, provide shade during the hottest part of the day.
Harvesting Your Kohlrabi
Harvest time is the most exciting part! Kohlrabi is typically ready to harvest about 50-60 days after planting.
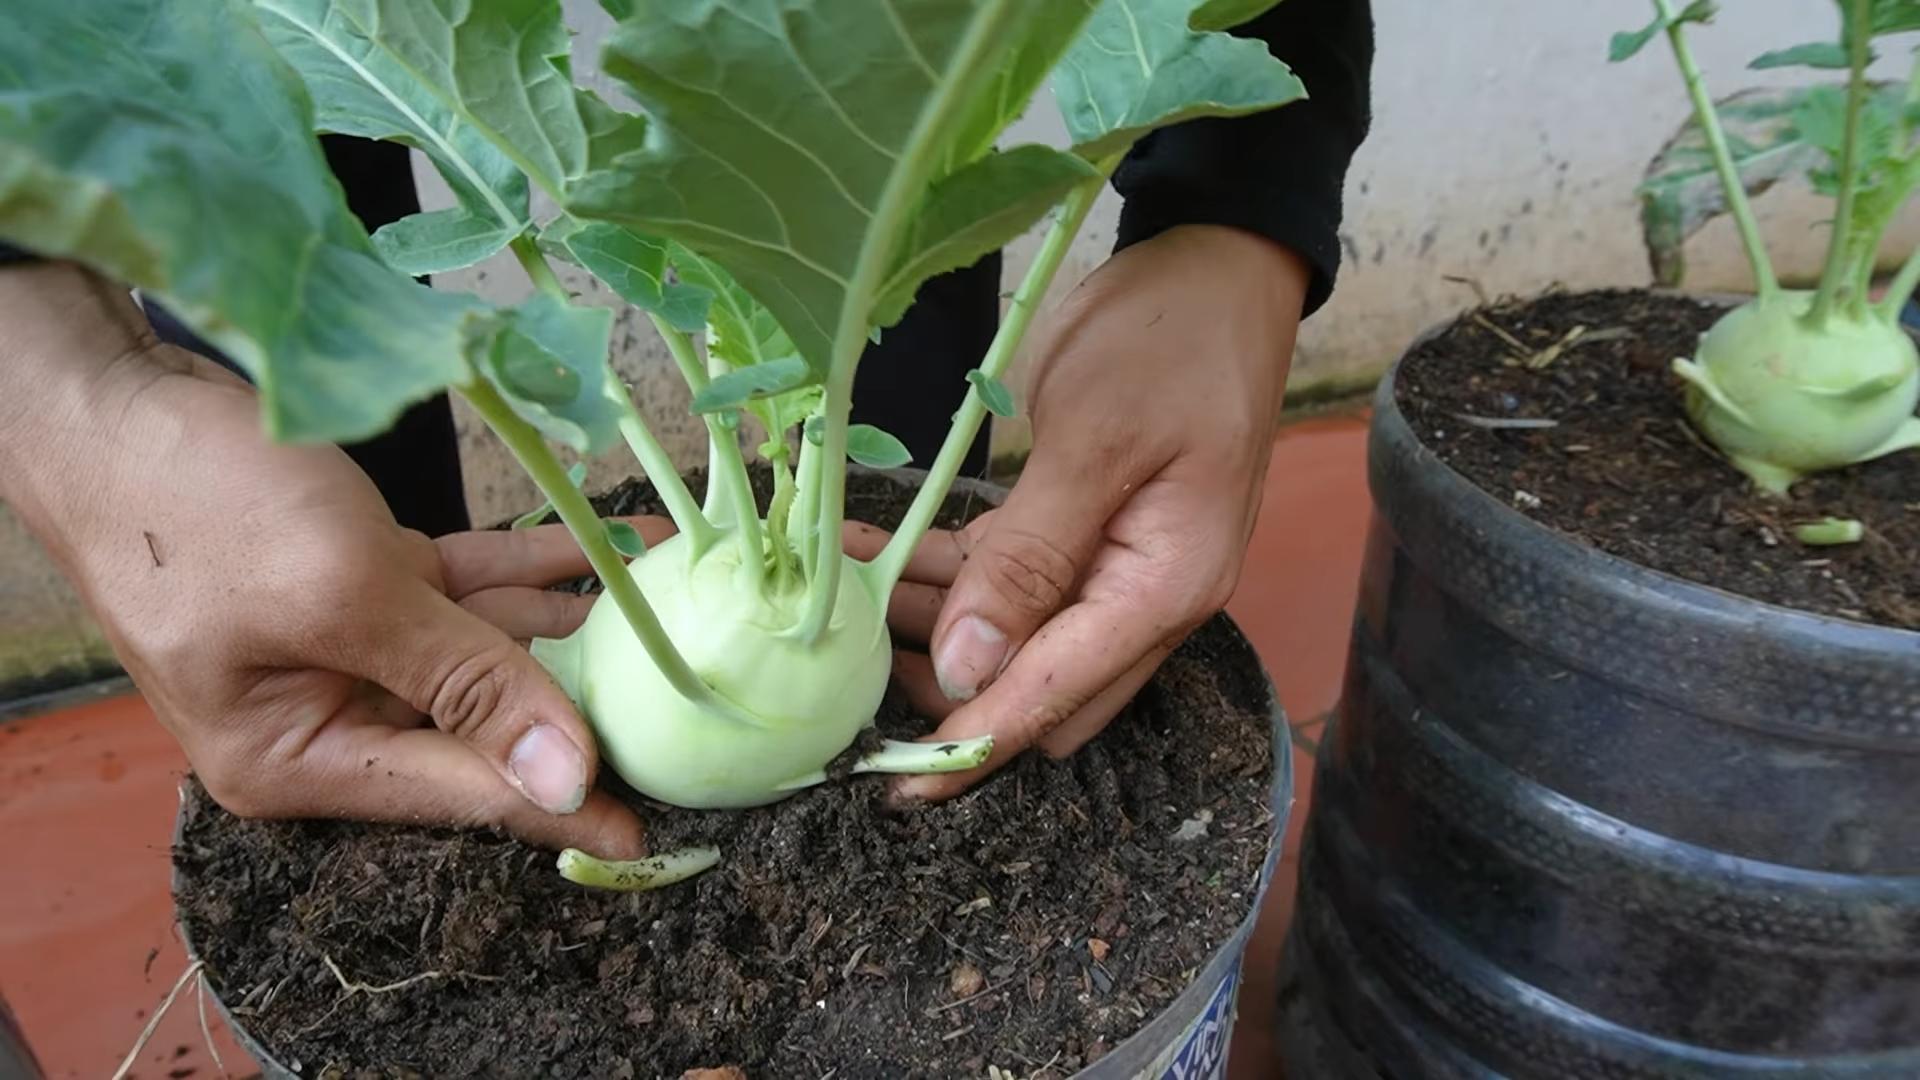
1. Check the Size: Harvest your kohlrabi when the bulb is about 2-3 inches in diameter. Larger bulbs can become tough and woody.
2. Harvesting: Gently pull the entire plant from the soil or use a sharp knife to cut the bulb from the roots just above the soil line.
3. Remove the Leaves: Remove the leaves from the bulb. The leaves are also edible and can be cooked like spinach or kale.
4. Store Your Harvest: Store your kohlrabi bulbs in the refrigerator for up to several weeks.
Troubleshooting
Even with the best care, you might encounter some challenges along the way. Here are a few common problems and how to address them:
* Bolting (Premature Flowering): Bolting can occur if kohlrabi is exposed to prolonged periods of hot weather or stress. To prevent bolting, choose heat-tolerant varieties, provide shade during hot weather, and ensure consistent watering.
* Cracking Bulbs: Cracking can be caused by inconsistent watering. Ensure your kohlrabi plants receive consistent moisture, especially during dry spells.
* Pest Infestations: Regularly inspect your plants for pests and take action promptly. Handpicking pests, using organic insecticides, or introducing beneficial insects can help control infest
Hey there, fellow gardening enthusiasts! So, you’re itching to grow some kohlrabi but think you don’t have the space? Think again! I’m here to tell you that you absolutely can cultivate this quirky and delicious vegetable even if you’re working with a small balcony, patio, or even just a sunny windowsill. Kohlrabi is surprisingly adaptable and thrives in containers, making it perfect for urban gardeners like us. Let’s dive into how you can grow your own kohlrabi bounty in a limited space.
What You’ll Need
Before we get our hands dirty, let’s gather our supplies. Here’s a list of everything you’ll need to successfully grow kohlrabi in containers:
* Kohlrabi Seeds: Choose a variety that suits your taste. ‘Early White Vienna’ and ‘Early Purple Vienna’ are popular choices, but there are many others to explore.
* Containers: Each kohlrabi plant needs at least a 6-inch diameter pot, but an 8-12 inch pot is even better. Make sure your containers have drainage holes!
* Potting Mix: Use a high-quality, well-draining potting mix. Avoid using garden soil, as it can compact in containers and hinder drainage.
* Watering Can or Hose: For consistent and gentle watering.
* Fertilizer: A balanced, water-soluble fertilizer or slow-release fertilizer.
* Sunlight: Kohlrabi needs at least 6 hours of sunlight per day.
* Optional:
* Seed starting tray and dome (if starting seeds indoors).
* Grow lights (if sunlight is limited).
* Mulch (to help retain moisture).
* Plant labels (to keep track of your varieties).
Starting Your Kohlrabi Journey
You have two main options for starting your kohlrabi: direct sowing or starting seeds indoors. I personally prefer starting seeds indoors, especially if you live in an area with a short growing season, but both methods work just fine.
Direct Sowing (The Easy Route)
If you choose to direct sow, wait until the danger of frost has passed and the soil has warmed up to at least 50°F (10°C).
1. Prepare Your Container: Fill your container with potting mix, leaving about an inch of space at the top.
2. Sow the Seeds: Sow the seeds about ½ inch deep and 1 inch apart. You can always thin them later.
3. Water Gently: Water the soil gently until it’s evenly moist.
4. Keep it Moist: Keep the soil consistently moist but not waterlogged.
5. Thin Seedlings: Once the seedlings emerge and have a few true leaves, thin them to one plant per 6-8 inches.
Starting Seeds Indoors (For a Head Start)
Starting seeds indoors gives you a head start on the growing season, especially if you live in a colder climate.
1. Prepare Your Seed Starting Tray: Fill your seed starting tray with seed starting mix.
2. Sow the Seeds: Sow the seeds about ¼ inch deep in each cell.
3. Water Gently: Water the soil gently until it’s evenly moist.
4. Cover with a Dome: Cover the tray with a humidity dome to help retain moisture.
5. Provide Light: Place the tray under grow lights or in a sunny windowsill.
6. Keep it Moist: Keep the soil consistently moist but not waterlogged.
7. Harden Off Seedlings: Once the seedlings have a few true leaves, gradually acclimate them to outdoor conditions over a week or two before transplanting. This process is called “hardening off.” Start by placing them outside for an hour or two each day, gradually increasing the time they spend outdoors.
Transplanting Your Kohlrabi Seedlings
Whether you started your seeds indoors or bought seedlings from a nursery, transplanting is a crucial step.
1. Prepare Your Container: Fill your container with potting mix, leaving about an inch of space at the top.
2. Dig a Hole: Dig a hole in the center of the container that’s large enough to accommodate the root ball of the seedling.
3. Gently Remove the Seedling: Gently remove the seedling from its tray or pot, being careful not to damage the roots.
4. Place the Seedling in the Hole: Place the seedling in the hole and backfill with potting mix.
5. Water Thoroughly: Water the soil thoroughly until it’s evenly moist.
6. Mulch (Optional): Add a layer of mulch around the base of the plant to help retain moisture and suppress weeds.
Caring for Your Kohlrabi Plants
Now that your kohlrabi plants are in their containers, it’s time to provide them with the care they need to thrive.
1. Watering: Kohlrabi needs consistent moisture, especially during hot weather. Water deeply whenever the top inch of soil feels dry to the touch. Avoid overwatering, as this can lead to root rot.
2. Fertilizing: Feed your kohlrabi plants every 2-3 weeks with a balanced, water-soluble fertilizer. Alternatively, you can use a slow-release fertilizer at planting time. Follow the instructions on the fertilizer package.
3. Sunlight: Ensure your kohlrabi plants receive at least 6 hours of sunlight per day. If you don’t have enough sunlight, consider using grow lights.
4. Weeding: Keep your containers free of weeds, as they can compete with your kohlrabi plants for nutrients and water.
5. Pest Control: Keep an eye out for pests such as aphids, cabbage worms, and flea beetles. Handpick any pests you find or use an organic insecticide if necessary.
6. Temperature: Kohlrabi prefers cool weather, with temperatures between 60°F and 75°F (15°C and 24°C). If you live in a hot climate, provide shade during the hottest part of the day.
Harvesting Your Kohlrabi
Harvest time is the most exciting part! Kohlrabi is typically ready to harvest about 50-60 days after planting.
1. Check the Size: Harvest your kohlrabi when the bulb is about 2-3 inches in diameter. Larger bulbs can become tough and woody.
2. Harvesting: Gently pull the entire plant from the soil or use a sharp knife to cut the bulb from the roots just above the soil line.
3. Remove the Leaves: Remove the leaves from the bulb. The leaves are also edible and can be cooked like spinach or kale.
4. Store Your Harvest: Store your kohlrabi bulbs in the refrigerator for up to several weeks.
Troubleshooting
Even with the best care, you might encounter some challenges along the way. Here are a few common problems and how to address them:
* Bolting (Premature Flowering): Bolting can occur if kohlrabi is exposed to prolonged periods of hot weather or stress. To prevent bolting, choose heat-tolerant varieties, provide shade during hot weather, and ensure consistent watering.
* Cracking Bulbs: Cracking can be caused by inconsistent watering. Ensure your kohlrabi plants receive consistent moisture, especially during dry spells.
* Pest Infestations: Regularly inspect your plants for pests and take action promptly. Handpicking pests, using organic insecticides, or introducing beneficial insects can help control infestations.
* Root Rot: Root rot is caused by overwatering and poor drainage. Ensure your containers have drainage holes and avoid overwatering.
Kohlrabi Varieties to Consider
Choosing the right variety can make a big difference in your success. Here are a few popular choices for container gardening:
* Early White Vienna: A classic variety with a mild flavor and crisp texture.
* Early Purple Vienna: Similar to Early White Vienna, but with a beautiful purple skin.
* Grand Duke: A fast-growing variety that’s resistant to bolting.
* Kossak: A large, slow-growing variety that can reach up to 10 pounds. (You might need a bigger container for this one!)
Enjoying Your Homegrown Kohlrabi
Now that you’ve harvested your kohlrabi, it’s time to enjoy the fruits (or rather, vegetables) of your labor! Kohlrabi can be eaten raw or cooked.
* Raw: Peel the bulb and slice it thinly. It has a crisp, slightly sweet flavor that’s perfect for salads or snacking.
* Cooked: Kohlrabi can be steamed, roasted, sautéed, or added to soups and stews. It
Conclusion
So, there you have it! Growing kohlrabi in small spaces isn’t just a possibility; it’s a rewarding and surprisingly simple endeavor. We’ve walked through the key steps, from selecting the right variety to optimizing your limited space with clever container gardening techniques. But why is this DIY trick a must-try?
Firstly, consider the unparalleled freshness. Imagine stepping onto your balcony or patio and harvesting crisp, juicy kohlrabi moments before adding it to your salad or stir-fry. The flavor difference compared to store-bought produce is remarkable. You’ll experience a sweetness and subtle peppery bite that’s truly unique.
Secondly, think about the cost savings. While the initial investment in seeds, soil, and containers might seem like a hurdle, the long-term benefits are undeniable. You’ll be reducing your grocery bills and enjoying a sustainable source of fresh vegetables right at your fingertips.
Thirdly, and perhaps most importantly, growing kohlrabi in small spaces is incredibly empowering. It’s a tangible connection to nature, a chance to nurture something from seed to harvest, and a source of immense satisfaction. It’s a reminder that even in the most urban environments, we can cultivate our own little pockets of green.
But the fun doesn’t stop there! Feel free to experiment with different kohlrabi varieties. ‘Early White Vienna’ and ‘Purple Vienna’ are classic choices, but don’t be afraid to try something more exotic like ‘Superschmelz’ for larger bulbs or ‘Kossak’ for its exceptional disease resistance. You can also explore companion planting. Marigolds, nasturtiums, and herbs like dill and chamomile can help deter pests and attract beneficial insects to your kohlrabi patch.
Consider vertical gardening techniques to maximize your space even further. Trellises or stacked planters can provide additional support for climbing varieties or allow you to grow other vegetables alongside your kohlrabi. You can also try succession planting, sowing new seeds every few weeks to ensure a continuous harvest throughout the growing season.
Don’t be intimidated if you’re a beginner gardener. Kohlrabi is a relatively forgiving plant, and with a little attention and care, you’ll be enjoying a bountiful harvest in no time. Remember to monitor your plants regularly for pests and diseases, and adjust your watering schedule as needed.
We wholeheartedly encourage you to give this DIY trick a try. It’s a fun, rewarding, and sustainable way to enjoy fresh, delicious kohlrabi, even if you’re short on space. And most importantly, we want to hear about your experience! Share your photos, tips, and challenges in the comments below. Let’s create a community of small-space kohlrabi growers and inspire others to embrace the joys of urban gardening. Your insights could be invaluable to someone just starting out. So, grab your seeds, get your hands dirty, and let the kohlrabi growing adventure begin! Let us know how your **kohlrabi** growing journey goes.
Frequently Asked Questions (FAQ)
What is the best time of year to plant kohlrabi in containers?
The ideal time to plant kohlrabi depends on your climate. Generally, it’s best to plant kohlrabi in early spring or late summer for a fall harvest. In cooler climates, start seeds indoors 4-6 weeks before the last expected frost and transplant them outdoors once the soil has warmed up. In warmer climates, you can direct sow seeds in late summer for a fall or winter harvest. Avoid planting during the hottest months of summer, as high temperatures can cause the kohlrabi to bolt (go to seed prematurely).
How much sunlight does kohlrabi need when grown in containers?
Kohlrabi thrives in full sun, which means it needs at least 6-8 hours of direct sunlight per day. If you’re growing kohlrabi indoors or in a partially shaded area, you may need to supplement with artificial lighting to ensure adequate growth. Insufficient sunlight can result in leggy plants with small, underdeveloped bulbs.
What type of soil is best for growing kohlrabi in containers?
Kohlrabi prefers well-draining, fertile soil with a slightly acidic to neutral pH (6.0-7.5). A good potting mix for kohlrabi should contain a blend of peat moss, perlite, and vermiculite. You can also amend your potting mix with compost or other organic matter to improve drainage and nutrient content. Avoid using heavy clay soil, as it can become waterlogged and inhibit root growth.
How often should I water kohlrabi grown in containers?
Kohlrabi needs consistent moisture to thrive, especially when grown in containers. Water your kohlrabi plants deeply whenever the top inch of soil feels dry to the touch. Avoid overwatering, as this can lead to root rot. During hot, dry weather, you may need to water your plants more frequently. Mulching around the base of the plants can help retain moisture and suppress weeds.
How do I fertilize kohlrabi grown in containers?
Kohlrabi is a heavy feeder, so it’s important to fertilize your plants regularly. Start by incorporating a slow-release fertilizer into your potting mix at planting time. Then, supplement with a liquid fertilizer every 2-3 weeks throughout the growing season. Choose a fertilizer that is high in nitrogen and potassium, as these nutrients are essential for bulb development. Avoid over-fertilizing, as this can lead to excessive foliage growth at the expense of bulb formation.
What are some common pests and diseases that affect kohlrabi?
Kohlrabi is susceptible to a variety of pests and diseases, including aphids, cabbage worms, flea beetles, and clubroot. To prevent pest infestations, inspect your plants regularly and remove any pests by hand. You can also use insecticidal soap or neem oil to control pests. To prevent diseases, choose disease-resistant varieties and practice good sanitation. Avoid overhead watering, as this can create a humid environment that promotes fungal growth.
When is kohlrabi ready to harvest?
Kohlrabi is typically ready to harvest 6-8 weeks after planting. The bulbs should be about 2-3 inches in diameter. Don’t let the bulbs get too large, as they can become tough and woody. To harvest, simply cut the bulb from the stem with a sharp knife. You can also harvest the leaves, which are edible and can be used in salads or stir-fries.
Can I grow kohlrabi indoors?
Yes, you can grow kohlrabi indoors, but it requires a lot of light. You’ll need to provide at least 6-8 hours of direct sunlight per day or supplement with artificial lighting. Choose a dwarf variety that is well-suited for container gardening. Make sure your container has drainage holes and use a well-draining potting mix. Water regularly and fertilize every 2-3 weeks.
What are some creative ways to use kohlrabi in cooking?
Kohlrabi is a versatile vegetable that can be used in a variety of dishes. It can be eaten raw, cooked, or pickled. Raw kohlrabi has a crisp, slightly sweet flavor that is similar to broccoli stems. It can be grated into salads, sliced into crudités, or used as a topping for tacos. Cooked kohlrabi can be steamed, roasted, sautéed, or added to soups and stews. It pairs well with herbs like dill, parsley, and chives. Pickled kohlrabi is a tangy and refreshing condiment that can be used to add flavor to sandwiches and salads.
How do I store kohlrabi after harvesting?
To store kohlrabi, remove the leaves and store the bulbs in the refrigerator. Kohlrabi can be stored for several weeks in the refrigerator. The leaves can also be stored in the refrigerator, but they will only last for a few days. To extend the shelf life of kohlrabi, you can freeze it. Blanch the kohlrabi for 2-3 minutes, then transfer it to an ice bath to stop the cooking process. Drain the kohlrabi and freeze it in a single layer on a baking sheet. Once frozen, transfer the kohlrabi to a freezer bag or container.
Leave a Comment