
Growing kale in soil bags is a game-changer for anyone dreaming of fresh, homegrown greens without the hassle of traditional gardening! Imagine stepping outside your door and harvesting vibrant, nutrient-packed kale, even if you only have a tiny balcony or patio. Forget back-breaking tilling and weeding; this DIY method is all about simplicity and maximizing your yield with minimal effort.
Humans have cultivated kale for over 2,000 years, with its origins tracing back to the eastern Mediterranean. It was a staple food in ancient Rome and Greece, prized for its hardiness and nutritional value. Today, we’re taking this ancient superfood and giving its cultivation a modern, space-saving twist!
Let’s face it, not everyone has the space, time, or energy for a full-fledged garden. That’s where growing kale in soil bags comes in. This method is perfect for apartment dwellers, busy professionals, or anyone who wants to enjoy the benefits of fresh kale without the commitment of a traditional garden. Plus, it’s incredibly budget-friendly and allows you to control the soil quality, ensuring your kale thrives. I’m excited to share this easy and effective DIY trick that will have you enjoying delicious, homegrown kale in no time!
Kohl Anbauen in Pflanzsäcken: Eine Einfache DIY Anleitung
Ich liebe es, frisches Gemüse direkt aus dem Garten zu ernten, und Kohl ist da keine Ausnahme! Aber nicht jeder hat den Platz für ein riesiges Beet. Deshalb zeige ich euch heute, wie ihr Kohl ganz einfach in Pflanzsäcken anbauen könnt. Das ist platzsparend, superpraktisch und funktioniert auch auf dem Balkon oder der Terrasse. Los geht’s!
Was du brauchst:
* Pflanzsäcke (am besten aus robustem Material, mindestens 40 Liter Volumen pro Sack)
* Hochwertige Pflanzerde (am besten Bio-Qualität)
* Kohlpflanzen (Setzlinge, verschiedene Sorten möglich: Grünkohl, Palmkohl, Schwarzkohl, etc.)
* Organischer Dünger (z.B. Hornspäne, Kompost)
* Gießkanne oder Gartenschlauch
* Messer oder Schere
* Optional: Mulchmaterial (z.B. Stroh, Holzhackschnitzel)
* Optional: Schneckenzaun oder Schneckenkorn (je nach Bedarf)
Warum Pflanzsäcke?
* Platzsparend: Ideal für Balkone, Terrassen oder kleine Gärten.
* Mobil: Du kannst die Säcke leicht umstellen, um die Pflanzen optimal mit Sonne zu versorgen.
* Gute Drainage: Überschüssiges Wasser kann leicht ablaufen, was Staunässe verhindert.
* Einfache Handhabung: Kein Umgraben, kein Unkraut jäten im Beet (zumindest weniger!).
* Flexibel: Du kannst verschiedene Kohlsorten in separaten Säcken anbauen.
Schritt-für-Schritt Anleitung: Kohl Anbauen im Pflanzsack
1. Vorbereitung der Pflanzsäcke
1. Pflanzsäcke auswählen: Wähle Pflanzsäcke aus, die groß genug sind. Ich empfehle mindestens 40 Liter Volumen pro Sack, damit der Kohl genügend Platz zum Wachsen hat. Achte auf robustes Material, damit die Säcke nicht gleich reißen.
2. Drainagelöcher prüfen: Stelle sicher, dass die Pflanzsäcke ausreichend Drainagelöcher am Boden haben. Wenn nicht, kannst du mit einem Messer oder einer Schere vorsichtig ein paar zusätzliche Löcher schneiden. Das ist wichtig, damit überschüssiges Wasser ablaufen kann und die Wurzeln nicht faulen.
3. Standort wählen: Suche einen sonnigen Standort für deine Pflanzsäcke. Kohl braucht mindestens 6 Stunden Sonne pro Tag, um gut zu wachsen. Achte auch darauf, dass der Standort windgeschützt ist, da Kohlpflanzen bei starkem Wind leicht umknicken können.
2. Befüllen der Pflanzsäcke
1. Erde einfüllen: Fülle die Pflanzsäcke mit hochwertiger Pflanzerde. Ich verwende am liebsten Bio-Erde, da sie keine schädlichen Chemikalien enthält. Lass oben etwa 5-10 cm Platz, damit du später noch gießen kannst, ohne dass die Erde überschwappt.
2. Dünger hinzufügen: Mische organischen Dünger unter die Erde. Hornspäne oder Kompost sind eine gute Wahl, da sie den Kohl mit wichtigen Nährstoffen versorgen. Befolge die Dosierungsanleitung auf der Verpackung des Düngers.
3. Erde anfeuchten: Gieße die Erde leicht an, bevor du die Kohlpflanzen einsetzt. Das hilft, die Erde zu verdichten und die Wurzeln besser zu befeuchten.
3. Einpflanzen der Kohlpflanzen
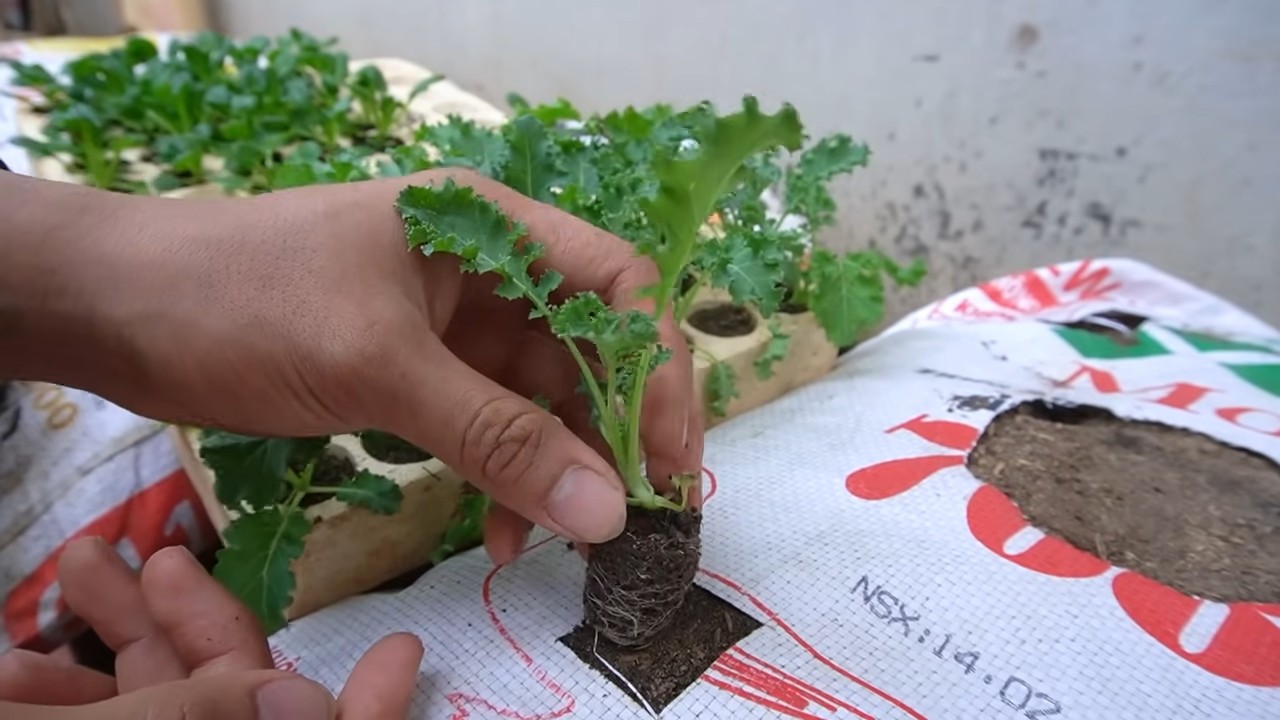
1. Pflanzen vorbereiten: Nimm die Kohlpflanzen vorsichtig aus ihren Töpfen. Lockere die Wurzeln etwas auf, damit sie sich besser in der neuen Erde ausbreiten können.
2. Pflanzlöcher graben: Grabe in jedem Pflanzsack ein oder mehrere Pflanzlöcher, je nachdem, wie viele Kohlpflanzen du pro Sack pflanzen möchtest. Achte darauf, dass die Löcher groß genug sind, damit die Wurzelballen der Pflanzen gut hineinpassen.
3. Pflanzen einsetzen: Setze die Kohlpflanzen in die Pflanzlöcher ein. Die Oberkante des Wurzelballens sollte mit der Erdoberfläche abschließen. Fülle die Löcher mit Erde auf und drücke sie leicht an.
4. Angießen: Gieße die Kohlpflanzen nach dem Einsetzen gründlich an. Das hilft, die Erde um die Wurzeln herum zu verdichten und die Pflanzen mit ausreichend Wasser zu versorgen.
4. Pflege der Kohlpflanzen
1. Regelmäßiges Gießen: Kohl braucht viel Wasser, besonders während der Wachstumsphase. Gieße die Pflanzen regelmäßig, besonders an heißen Tagen. Achte darauf, dass die Erde immer leicht feucht ist, aber nicht nass. Vermeide Staunässe, da dies zu Wurzelfäule führen kann.
2. Düngen: Dünge die Kohlpflanzen regelmäßig mit organischem Dünger. Ich dünge meine Pflanzen alle 2-3 Wochen mit Flüssigdünger oder streue Hornspäne um die Pflanzen herum. Das sorgt für ein gesundes Wachstum und eine reiche Ernte.
3. Unkraut entfernen: Entferne regelmäßig Unkraut, das in den Pflanzsäcken wächst. Unkraut konkurriert mit den Kohlpflanzen um Nährstoffe und Wasser.
4. Schutz vor Schädlingen: Kohl ist anfällig für verschiedene Schädlinge, wie z.B. Kohlweißlinge, Blattläuse und Schnecken. Kontrolliere die Pflanzen regelmäßig auf Schädlinge und bekämpfe sie bei Bedarf. Gegen Kohlweißlinge hilft ein Gemüseschutznetz. Blattläuse können mit einem Wasserstrahl abgespült oder mit einem biologischen Insektizid bekämpft werden. Gegen Schnecken hilft ein Schneckenzaun oder Schneckenkorn.
5. Mulchen: Mulche die Erde um die Kohlpflanzen herum mit Stroh oder Holzhackschnitzeln. Das hilft, die Feuchtigkeit im Boden zu halten, Unkraut zu unterdrücken und den Boden vor Erosion zu schützen.
6. Stützen: Wenn die Kohlpflanzen größer werden, können sie bei starkem Wind leicht umknicken. Stütze die Pflanzen bei Bedarf mit Stäben oder Bambusstäben.
5. Ernte
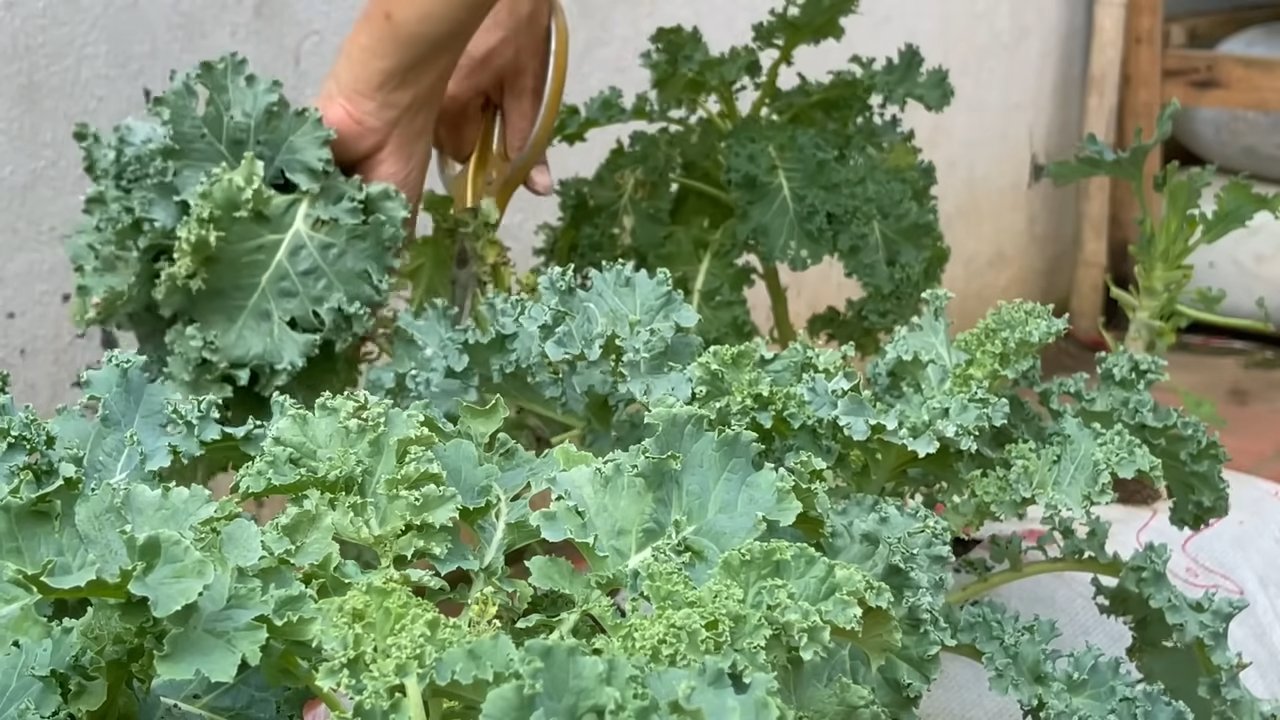
1. Erntezeitpunkt: Die Erntezeit hängt von der Kohlsorte ab. Grünkohl kann in der Regel ab Herbst geerntet werden, Palmkohl und Schwarzkohl etwas später. Ernte die Blätter, wenn sie groß genug sind und eine schöne Farbe haben.
2. Erntetechnik: Ernte die Blätter von unten nach oben. Lass die oberen Blätter stehen, damit die Pflanze weiterwachsen kann. Du kannst die Blätter entweder mit einem Messer abschneiden oder einfach abbrechen.
3. Lagerung: Frischer Kohl ist am besten, wenn er sofort verzehrt wird. Du kannst ihn aber auch im Kühlschrank lagern. Wickle die Blätter in ein feuchtes Tuch, damit sie nicht austrocknen.
Zusätzliche Tipps und Tricks
* Sortenwahl: Wähle Kohlsorten, die für den Anbau im Topf geeignet sind. Es gibt viele verschiedene Sorten, die sich gut für den Anbau im Pflanzsack eignen. Informiere dich vor dem Kauf, welche Sorten für deine Region und deinen Standort am besten geeignet sind.
* Fruchtfolge: Baue Kohl nicht jedes Jahr am selben Standort an. Wechsle die Pflanzen ab, um Krankheiten und Schädlingen vorzubeugen.
* Begleitpflanzen: Pflanze Begleitpflanzen wie Ringelblumen, Kapuzinerkresse oder Knoblauch neben den Kohl. Diese Pflanzen können Schädlinge abwehren und das Wachstum des Kohls fördern.
* Schneckenbekämpfung: Schnecken lieben Kohl! Schütze deine Pflanzen vor Schnecken, indem du einen Schneckenzaun aufstellst oder Schneckenkorn streust. Du kannst auch Bierfallen aufstellen, um Schnecken anzulocken und zu fangen.
* Kohlweißling: Der Kohlweißling ist ein häufiger Schädling, der Kohlpflanzen befällt. Die Raupen fressen die Blätter und können die Pflanzen stark schädigen. Schütze deine Pflanzen vor Kohlweißlingen, indem du ein Gemüseschutznetz über die Pflanzen spannst.
* Blattläuse: Blattläuse können Kohlpflanzen ebenfalls befallen. Sie saugen den Pflanzensaft und schwächen die Pflanzen. Bekämp
Conclusion
So, there you have it! Growing kale in soil bags is not just a gardening hack; it’s a game-changer, especially if you’re short on space, dealing with poor soil quality, or simply looking for a more manageable and efficient way to cultivate this nutritional powerhouse. We’ve walked you through the simple steps, highlighting the benefits and addressing potential challenges. Now, it’s time to ditch the preconceived notions about traditional gardening and embrace this innovative approach.
Why is this a must-try? Because it offers a level of control and convenience that traditional gardening often lacks. You’re in charge of the soil composition, ensuring your kale gets the perfect blend of nutrients. You can easily move the bags to chase the sun or shelter them from harsh weather. And let’s not forget the reduced weeding and pest control – a significant win for any gardener!
But don’t stop there! Feel free to experiment with different kale varieties. Curly kale, Lacinato kale (also known as dinosaur kale), and Red Russian kale all thrive in soil bags. You can also companion plant with herbs like rosemary or thyme to deter pests and enhance the flavor of your kale. Consider adding a slow-release fertilizer specifically formulated for leafy greens to the soil mix for an extra boost.
For those looking to take their soil bag gardening to the next level, consider setting up a simple drip irrigation system. This will ensure consistent watering, especially during hot summer months, and minimize water waste. You can also add a layer of mulch, such as straw or wood chips, around the base of the plants to help retain moisture and suppress weeds.
The beauty of growing kale in soil bags lies in its adaptability. Whether you’re a seasoned gardener or a complete beginner, this method is accessible and rewarding. It’s a fantastic way to enjoy fresh, homegrown kale, packed with vitamins and minerals, right at your fingertips.
We’re confident that once you try this method, you’ll be hooked. The satisfaction of harvesting your own vibrant, healthy kale is unparalleled. So, grab some soil bags, your favorite kale seeds, and get ready to experience the joy of successful, space-saving gardening.
Don’t just take our word for it. We encourage you to embark on this gardening adventure and share your experiences with us. Let us know what works best for you, what challenges you encounter, and any tips or tricks you discover along the way. Together, we can create a community of soil bag kale growers, sharing knowledge and inspiring others to embrace this innovative approach to gardening. Happy growing! Remember, the key to success is proper preparation and consistent care. With a little effort, you’ll be enjoying fresh, delicious kale in no time. This method of growing kale is truly a game changer.
Frequently Asked Questions (FAQ)
What type of soil should I use for growing kale in soil bags?
The best soil mix for growing kale in soil bags is a well-draining, nutrient-rich blend. A good starting point is a mix of equal parts compost, peat moss (or coco coir as a sustainable alternative), and perlite or vermiculite. The compost provides essential nutrients, the peat moss or coco coir helps retain moisture, and the perlite or vermiculite improves drainage and aeration. You can also add a slow-release fertilizer specifically formulated for leafy greens to the mix to provide a steady supply of nutrients throughout the growing season. Avoid using heavy clay soil, as it can become waterlogged and hinder root development.
How often should I water my kale plants in soil bags?
Watering frequency depends on several factors, including the weather, the size of the soil bag, and the stage of growth of the kale plants. Generally, you should water your kale plants whenever the top inch of soil feels dry to the touch. During hot, dry weather, you may need to water them daily, while during cooler, wetter periods, you may only need to water them every few days. Be sure to water thoroughly, allowing the water to drain out of the bottom of the bag. Avoid overwatering, as this can lead to root rot. A good rule of thumb is to check the soil moisture regularly and adjust your watering schedule accordingly. Using a moisture meter can also be helpful.
How much sunlight do kale plants need when grown in soil bags?
Kale thrives in full sun, which means at least 6 hours of direct sunlight per day. However, it can also tolerate partial shade, especially in hotter climates. If you live in an area with intense summer heat, providing some afternoon shade can help prevent the leaves from scorching. When positioning your soil bags, choose a location that receives ample sunlight throughout the day. If you’re growing kale indoors, you’ll need to supplement with grow lights to provide sufficient light. Rotate the soil bags regularly to ensure that all sides of the plants receive equal sunlight.
What are some common pests and diseases that affect kale grown in soil bags, and how can I prevent them?
Common pests that can affect kale include aphids, cabbage worms, flea beetles, and slugs. Diseases include black rot, downy mildew, and clubroot. To prevent these problems, start with healthy, disease-free seeds or seedlings. Inspect your plants regularly for signs of pests or diseases. Handpick pests whenever possible. Use row covers to protect your plants from insects. Apply organic pesticides, such as neem oil or insecticidal soap, as needed. Ensure good air circulation to prevent fungal diseases. Rotate your crops each year to prevent soilborne diseases from building up. Remove any infected leaves or plants promptly to prevent the spread of disease.
Can I grow kale in soil bags during the winter?
Yes, kale is a cold-hardy vegetable that can be grown in soil bags during the winter in many regions. In mild climates, you can simply leave the soil bags outdoors. In colder climates, you may need to provide some protection, such as covering the bags with a frost blanket or moving them to a sheltered location, such as a greenhouse or unheated garage. Choose a winter-hardy variety of kale, such as Winterbor or Red Russian. Reduce watering during the winter months, as the plants will not need as much water. Harvest the leaves as needed throughout the winter.
How do I harvest kale from soil bags?
Harvest kale leaves by cutting them off at the base of the plant, leaving the central bud intact. This will allow the plant to continue producing new leaves. Start harvesting when the leaves are about 4-6 inches long. Harvest the outer leaves first, working your way towards the center of the plant. Avoid harvesting more than one-third of the plant at a time, as this can stress the plant and reduce its productivity. Wash the harvested leaves thoroughly before using them.
Can I reuse the soil bags for growing kale again?
Yes, you can reuse the soil bags for growing kale again, but it’s important to replenish the nutrients in the soil. After harvesting your kale, remove any remaining plant debris from the soil bag. Amend the soil with fresh compost and a slow-release fertilizer. You may also want to add some lime to adjust the pH of the soil. Allow the soil to rest for a few weeks before planting new kale seeds or seedlings. Alternatively, you can use the soil bags for growing other vegetables or herbs that have similar nutrient requirements.
What are some good companion plants for kale grown in soil bags?
Good companion plants for kale include herbs like rosemary, thyme, sage, and dill, which can help deter pests. Marigolds are also effective at repelling nematodes and other soil pests. Garlic and onions can help prevent fungal diseases. Legumes, such as beans and peas, can fix nitrogen in the soil, which benefits kale. Avoid planting kale near members of the nightshade family, such as tomatoes, peppers, and eggplants, as they can compete for nutrients and attract similar pests.
How big should the soil bags be for growing kale?
The ideal size for soil bags for growing kale depends on the variety of kale and the number of plants you want to grow in each bag. A good starting point is a bag that is at least 10 gallons in size. This will provide enough space for the roots to grow and develop. For larger varieties of kale, you may need to use a larger bag, such as a 20-gallon bag. You can also use multiple smaller bags if you prefer. Make sure the bags have drainage holes to prevent waterlogging.
How do I know if my kale plants are getting enough nutrients in the soil bags?
Signs that your kale plants are not getting enough nutrients include yellowing leaves, stunted growth, and poor leaf development. If you notice these symptoms, you can amend the soil with a fertilizer specifically formulated for leafy greens. You can also perform a soil test to determine the nutrient levels in the soil and adjust your fertilization accordingly. Be careful not to over-fertilize, as this can also harm the plants. Follow the instructions on the fertilizer label carefully.
Leave a Comment