
Growing Kale in Containers: Unlock the secrets to a thriving, leafy green garden, even without a sprawling backyard! Have you ever dreamt of snipping fresh, vibrant kale leaves right outside your kitchen door? I know I have! It’s easier than you think, and this DIY guide will show you exactly how to make that dream a reality.
For centuries, kale has been a nutritional powerhouse, gracing tables from peasant kitchens to royal feasts. Its resilience and adaptability have made it a staple crop in diverse cultures worldwide. But you don’t need to be a seasoned farmer to enjoy its benefits. In today’s fast-paced world, access to fresh, healthy food is more important than ever. Growing Kale in Containers offers a simple, space-saving solution for anyone wanting to cultivate their own organic greens.
This DIY article is packed with practical tips and tricks to help you succeed, whether you’re a complete beginner or have a bit of gardening experience. I’ll walk you through everything from choosing the right container and soil to providing the perfect amount of sunlight and water. Say goodbye to expensive, store-bought kale and hello to a bountiful harvest right at your fingertips! Let’s get started and transform your balcony, patio, or even a sunny windowsill into a thriving kale oasis.
Growing Kale in Containers: A Beginner’s Guide
Hey there, fellow gardening enthusiasts! I’m so excited to share my experience with growing kale in containers. It’s surprisingly easy, even if you don’t have a huge backyard. Fresh, homegrown kale is so much tastier than anything you can buy at the store, and it’s packed with nutrients. Plus, it’s incredibly rewarding to watch those leafy greens thrive under your care. Let’s dive in!
Choosing the Right Container and Soil
Before we get our hands dirty, let’s talk about the essentials: the container and the soil. These are crucial for healthy kale growth.
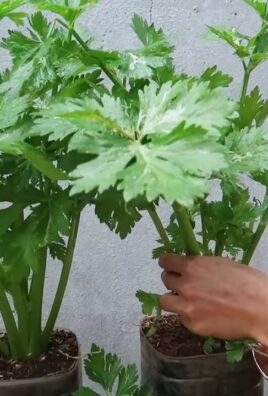
* Container Size: Kale needs room to spread its roots. I recommend a container that’s at least 12 inches in diameter and 12 inches deep. Bigger is always better, especially if you plan on growing multiple kale plants in the same container. A 5-gallon bucket works perfectly!
* Drainage: This is non-negotiable! Kale hates soggy roots. Make sure your container has plenty of drainage holes at the bottom. If not, you can drill some yourself.
* Material: Plastic, terracotta, or even fabric pots will work. I personally prefer terracotta because it allows the soil to breathe a bit better, but plastic is more budget-friendly and retains moisture well.
* Soil: Forget garden soil! It’s too heavy and compacts easily in containers. You’ll want a high-quality potting mix. Look for one that’s specifically formulated for vegetables or containers. It should be light, airy, and well-draining. I like to amend my potting mix with compost for extra nutrients.
Selecting Your Kale Variety
There are so many different types of kale to choose from! Here are a few of my favorites:
* Curly Kale (e.g., ‘Dwarf Blue Curled Vates’): This is the classic kale with frilly, blue-green leaves. It’s very cold-hardy and easy to grow.
* Lacinato Kale (also known as Dinosaur Kale or Tuscan Kale): This kale has long, dark green, almost black leaves with a slightly bumpy texture. It’s known for its mild flavor and is great in soups and salads.
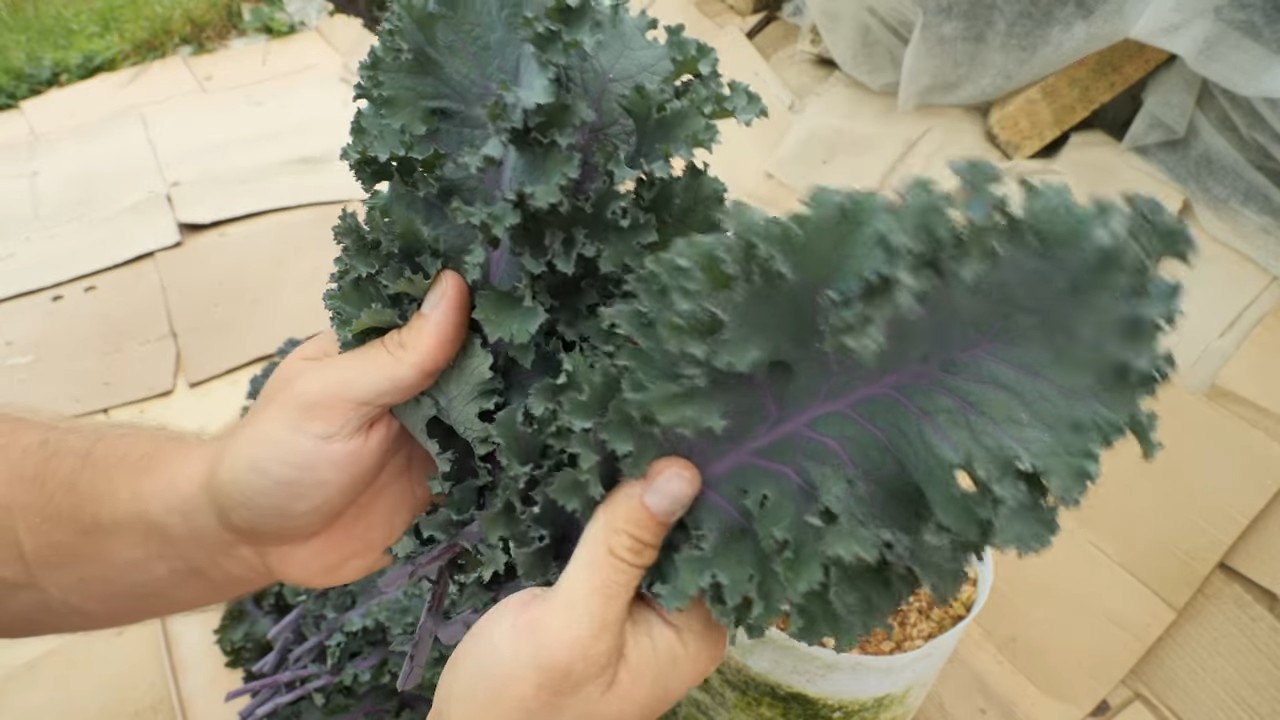
* Red Russian Kale: This variety has flat, fringed leaves with purple stems. It’s slightly sweeter than other kales and adds a beautiful pop of color to your garden.
* Redbor Kale: This is a stunning kale with deeply ruffled, purple-red leaves. It’s not only delicious but also makes a beautiful ornamental plant.
Consider your taste preferences and growing conditions when choosing your kale variety. Some varieties are more heat-tolerant than others.
Planting Your Kale
Now for the fun part! Here’s how to plant your kale in containers:
1. Gather Your Supplies: You’ll need your container, potting mix, kale seeds or seedlings, a trowel, and watering can.
2. Fill the Container: Fill your container with potting mix, leaving about an inch or two of space at the top.
3. Sowing Seeds (Optional): If you’re starting from seeds, sow them about 1/4 inch deep and 1 inch apart. Gently water the soil. You’ll need to thin the seedlings later, keeping only the strongest ones.
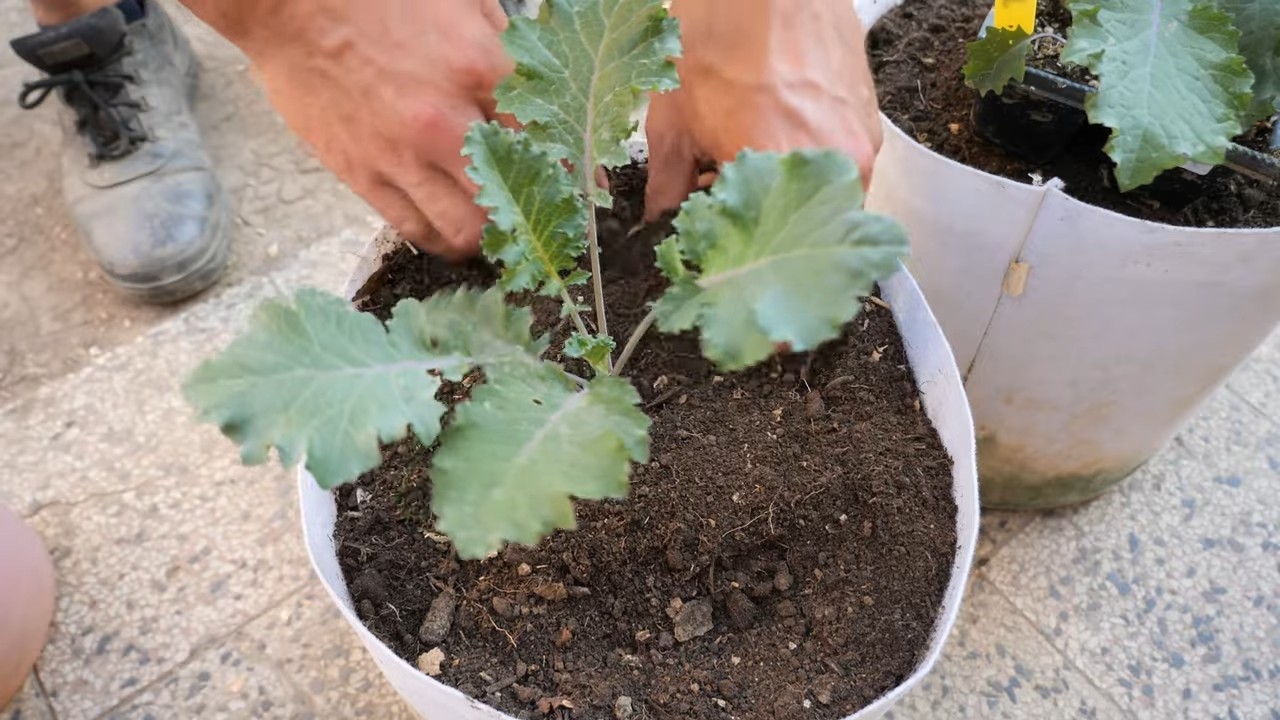
4. Planting Seedlings: If you’re using seedlings, gently remove them from their nursery pots. Loosen the roots slightly.
5. Dig Holes: Dig holes in the potting mix that are large enough to accommodate the root balls of your seedlings. Space the seedlings about 6-8 inches apart.
6. Place Seedlings: Place the seedlings in the holes and gently backfill with potting mix.
7. Water Thoroughly: Water the seedlings thoroughly until the water drains out of the bottom of the container.
8. Mulch (Optional): Add a layer of mulch around the base of the plants to help retain moisture and suppress weeds. I like to use straw or shredded leaves.
Caring for Your Kale
Once your kale is planted, it’s important to provide it with the right care to ensure healthy growth.
* Sunlight: Kale needs at least 6 hours of sunlight per day. Place your container in a sunny spot in your garden or on your balcony. If you live in a very hot climate, some afternoon shade can be beneficial.
* Watering: Kale needs consistent moisture, but it doesn’t like to be waterlogged. Water deeply whenever the top inch of soil feels dry to the touch. Avoid overhead watering, as this can lead to fungal diseases.
* Fertilizing: Kale is a heavy feeder, so it needs regular fertilization. I like to use a balanced organic fertilizer every 2-3 weeks. You can also use compost tea or fish emulsion.
* Pest Control: Kale can be susceptible to pests like aphids, cabbage worms, and flea beetles. Regularly inspect your plants for signs of infestation. You can handpick pests, use insecticidal soap, or apply Bacillus thuringiensis (Bt) for cabbage worms.
* Weeding: Keep your container free of weeds, as they can compete with your kale for nutrients and water.
* Crop Rotation: If you’re growing kale in the same container year after year, it’s a good idea to practice crop rotation. This means planting different types of vegetables in the container each year to prevent soilborne diseases.
Harvesting Your Kale
The best part of growing kale is harvesting it! You can start harvesting kale leaves when they are about 4-6 inches long.
* Harvesting Technique: Harvest the outer leaves first, leaving the inner leaves to continue growing. This is called “cut-and-come-again” harvesting.
* How to Harvest: Use a sharp knife or scissors to cut the leaves off at the base of the stem.
* Harvesting Time: You can harvest kale throughout the growing season, even in winter in mild climates.
* Storage: Freshly harvested kale can be stored in the refrigerator for up to a week. Wrap it in a damp paper towel and place it in a plastic bag.
Troubleshooting Common Problems
Even with the best care, you might encounter some problems while growing kale. Here are a few common issues and how to address them:
* Yellowing Leaves: This can be caused by overwatering, underwatering, nutrient deficiencies, or pests. Check the soil moisture, fertilize your plants, and inspect them for pests.
* Holes in Leaves: This is usually caused by cabbage worms or flea beetles. Handpick the pests or use insecticidal soap or Bt.
* Powdery Mildew: This is a fungal disease that appears as a white powdery coating on the leaves. Improve air circulation, avoid overhead watering, and apply a fungicide if necessary.
* Aphids: These tiny insects can suck the sap from your kale plants, causing them to become weak and stunted. Spray your plants with insecticidal soap or blast them with a strong stream of water.
Extending Your Kale Season
Want to enjoy fresh kale for as long as possible? Here are a few tips for extending your kale season:
* Succession Planting: Plant new kale seeds or seedlings every few weeks to ensure a continuous harvest.
* Cold Frames or Greenhouses: If you live in a cold climate, you can use a cold frame or greenhouse to protect your kale from frost and extend the growing season.
* Overwintering: In mild climates, you can overwinter kale plants. Cut them back in the fall and cover them with mulch to protect them from the cold. They will start growing again in the spring.
Delicious Ways to Enjoy Your Homegrown Kale
Now that you’ve harvested your kale, it’s time to enjoy it! Here are a few of my favorite ways to use homegrown kale:
* Kale Salad: Massage kale leaves with olive oil, lemon juice, and salt. Add your favorite toppings, such as nuts, seeds, dried cranberries, and cheese.
* Kale Chips: Toss kale leaves with olive oil and salt. Bake at 350°F (175°C) for 10-15 minutes, or until crispy.
* Kale Smoothies: Add a handful of kale to your favorite smoothie recipe.
* Kale Soup: Add kale to soups and stews for extra nutrients and flavor.
* Sautéed Kale: Sauté kale with garlic, olive oil, and a pinch of red pepper flakes.
* Kale Pesto: Use kale instead of basil in your favorite pesto recipe.
Growing kale in containers is a rewarding and easy way to enjoy fresh, healthy greens. With a little bit of care and attention, you can have a thriving kale garden right on your balcony or patio. Happy gardening!
Conclusion
So, there you have it! Growing kale in containers is not only achievable, it’s downright rewarding. From the vibrant greens adorning your balcony to the fresh, nutritious leaves gracing your dinner plate, the benefits are undeniable. We’ve walked through the simple steps, debunked common myths, and armed you with the knowledge to cultivate your own thriving kale patch, even without a traditional garden.
Why is this DIY trick a must-try? Because it empowers you to take control of your food source, ensuring you have access to fresh, organic kale whenever you desire. No more wilted supermarket greens or mysterious origins. You’ll know exactly where your kale comes from and how it was grown, giving you peace of mind and a boost to your health. Plus, it’s incredibly satisfying to nurture a plant from seed to harvest, witnessing the miracle of nature unfold right before your eyes.
But the beauty of container gardening lies in its adaptability. Feel free to experiment with different kale varieties. Try the classic curly kale, the robust dinosaur kale (lacinato), or the vibrant red Russian kale. Each offers a unique flavor and texture, adding variety to your culinary creations. You can also companion plant your kale with herbs like rosemary or thyme, which can help deter pests and enhance the overall health of your container garden. Consider adding some colorful flowers like marigolds to attract beneficial insects and add a touch of beauty to your setup.
Don’t be afraid to get creative with your container choices too. While we’ve recommended specific sizes, you can repurpose old buckets, tubs, or even grow bags. Just ensure they have adequate drainage to prevent waterlogging. And remember, location is key. Kale thrives in sunlight, so choose a spot that receives at least six hours of direct sunlight each day.
We understand that embarking on a new gardening venture can be daunting, but we encourage you to take the plunge. The rewards far outweigh the effort. Imagine the delicious kale salads, smoothies, and stir-fries you’ll be able to create with your homegrown harvest. Think of the satisfaction of sharing your bounty with friends and family. And consider the positive impact you’ll be making on your health and the environment.
So, grab your seeds, your soil, and your containers, and get ready to experience the joy of growing kale in containers. We’re confident that you’ll be amazed by the results. And most importantly, we want to hear about your journey! Share your experiences, your successes, and your challenges in the comments below. Let’s create a community of container kale growers, supporting each other and celebrating the abundance of nature. Happy gardening!
Frequently Asked Questions (FAQ)
What is the best type of container to use for growing kale?
The ideal container for growing kale should be at least 12 inches deep and 12 inches in diameter. This provides ample space for the roots to develop and allows the plant to thrive. You can use plastic pots, terracotta pots, or even repurposed containers like buckets or tubs. Just make sure the container has drainage holes to prevent waterlogging, which can lead to root rot. Fabric grow bags are also an excellent option, as they allow for better aeration and drainage. Consider the material of the container as well. Dark-colored containers can heat up quickly in direct sunlight, potentially damaging the roots, so opt for lighter colors or provide shade during the hottest part of the day. Ultimately, the best container is one that is appropriately sized, provides good drainage, and suits your aesthetic preferences.
How often should I water my container kale?
Watering frequency depends on several factors, including the weather, the size of the container, and the type of soil you’re using. Generally, you should water your kale when the top inch of soil feels dry to the touch. During hot, dry weather, you may need to water daily, while during cooler, wetter periods, you may only need to water every few days. Avoid overwatering, as this can lead to root rot. When you water, water deeply, ensuring that the entire root ball is saturated. Water at the base of the plant to avoid wetting the leaves, which can increase the risk of fungal diseases. A good rule of thumb is to water until you see water draining from the drainage holes. Monitor your plants closely and adjust your watering schedule as needed.
What kind of soil is best for growing kale in containers?
Kale thrives in well-draining, nutrient-rich soil. A good potting mix specifically formulated for vegetables is an excellent choice. You can also create your own mix by combining equal parts of compost, peat moss (or coconut coir), and perlite or vermiculite. Compost provides essential nutrients, peat moss (or coconut coir) helps retain moisture, and perlite or vermiculite improves drainage. Avoid using garden soil in containers, as it can become compacted and doesn’t drain well. Before planting, amend the soil with a slow-release fertilizer to provide a steady supply of nutrients throughout the growing season. You can also add bone meal to provide phosphorus, which promotes strong root development.
How much sunlight does container kale need?
Kale needs at least six hours of direct sunlight per day to thrive. Choose a location for your container garden that receives ample sunlight throughout the day. If you live in a particularly hot climate, you may need to provide some afternoon shade to prevent the leaves from scorching. If you don’t have a sunny spot, you can supplement with grow lights. Position the grow lights about 6-12 inches above the plants and provide 12-14 hours of light per day. Rotate your containers regularly to ensure that all sides of the plant receive equal sunlight. Insufficient sunlight can lead to leggy growth and reduced yields.
How do I fertilize my container kale?
Container-grown kale requires regular fertilization to maintain healthy growth and abundant yields. Start by incorporating a slow-release fertilizer into the soil at planting time. This will provide a steady supply of nutrients for several weeks. After that, you can supplement with a liquid fertilizer every 2-3 weeks. Choose a fertilizer that is high in nitrogen, which promotes leafy growth. You can also use a balanced fertilizer, such as a 10-10-10 or 20-20-20 formula. Follow the instructions on the fertilizer label carefully to avoid over-fertilizing, which can burn the roots. Organic options like fish emulsion or compost tea are also excellent choices.
How do I deal with pests and diseases on my container kale?
Container kale can be susceptible to various pests and diseases, including aphids, cabbage worms, and fungal diseases. Regularly inspect your plants for signs of infestation or disease. If you spot aphids, you can spray them off with a strong stream of water or use insecticidal soap. Cabbage worms can be handpicked or treated with Bacillus thuringiensis (Bt), a natural insecticide. To prevent fungal diseases, ensure good air circulation around your plants and avoid overwatering. You can also apply a fungicide if necessary. Companion planting with herbs like rosemary or thyme can help deter pests. Neem oil is another effective organic solution for controlling a wide range of pests and diseases.
When and how do I harvest my container kale?
You can start harvesting kale leaves when they are about 4-6 inches long. Harvest the outer leaves first, leaving the inner leaves to continue growing. This will encourage the plant to produce more leaves. Use a sharp knife or scissors to cut the leaves cleanly from the stem. Avoid tearing the leaves, as this can damage the plant. You can harvest kale throughout the growing season, even into the winter in mild climates. After harvesting, wash the leaves thoroughly and store them in the refrigerator for up to a week.
Can I grow kale in containers indoors?
Yes, you can grow kale in containers indoors, but you’ll need to provide adequate light. A sunny south-facing window is ideal, but you may still need to supplement with grow lights. Choose a compact kale variety that is well-suited for indoor growing. Ensure that the container is large enough to accommodate the plant’s root system. Water regularly and fertilize as needed. Monitor your plants for pests and diseases and take action promptly if you spot any problems. With proper care, you can enjoy fresh, homegrown kale even during the winter months.
Leave a Comment