
Growing grapevines from grapes might sound like something only seasoned horticulturalists can achieve, but I’m here to tell you it’s totally within your reach! Forget those intimidating nursery price tags; imagine the satisfaction of nurturing a thriving grapevine from a simple grape you picked up at the grocery store.
For centuries, grapevines have held a special place in human culture, symbolizing abundance, celebration, and even transformation. From ancient winemaking traditions to the lush vineyards that dot the landscapes of Europe and beyond, the grapevine’s story is deeply intertwined with our own. While traditionally propagated from cuttings, the idea of starting from the very beginning – from the fruit itself – adds a unique layer of connection to this historical plant.
Why should you try this DIY project? Well, for starters, it’s incredibly rewarding! Plus, it’s a fantastic way to experiment with different grape varieties and potentially discover a unique flavor profile. More importantly, in a world where sustainability and self-sufficiency are becoming increasingly important, learning how to propagate your own plants, like growing grapevines from grapes, is a valuable skill. It reduces your reliance on commercial nurseries, saves you money, and allows you to connect with nature in a more profound way. So, grab your gardening gloves, and let’s embark on this exciting journey together! I’ll guide you through each step, ensuring you have all the knowledge and confidence you need to successfully cultivate your own grapevine from a humble grape.
Weinreben aus Trauben ziehen: Ein DIY-Leitfaden für angehende Winzer
Hallo liebe Gartenfreunde! Habt ihr euch jemals gefragt, ob man wirklich Weinreben aus den Kernen von gekauften Trauben ziehen kann? Die Antwort ist: Ja, es ist möglich! Es ist zwar ein bisschen Arbeit und Geduld gefragt, aber es ist ein spannendes Projekt, um eure eigenen Weinreben zu züchten. Ich zeige euch, wie es geht!
Was ihr braucht:
* Trauben: Am besten Bio-Trauben, da diese weniger behandelt sind. Achtet auf reife, gesunde Trauben.
* Papiertücher: Zum Trocknen der Kerne.
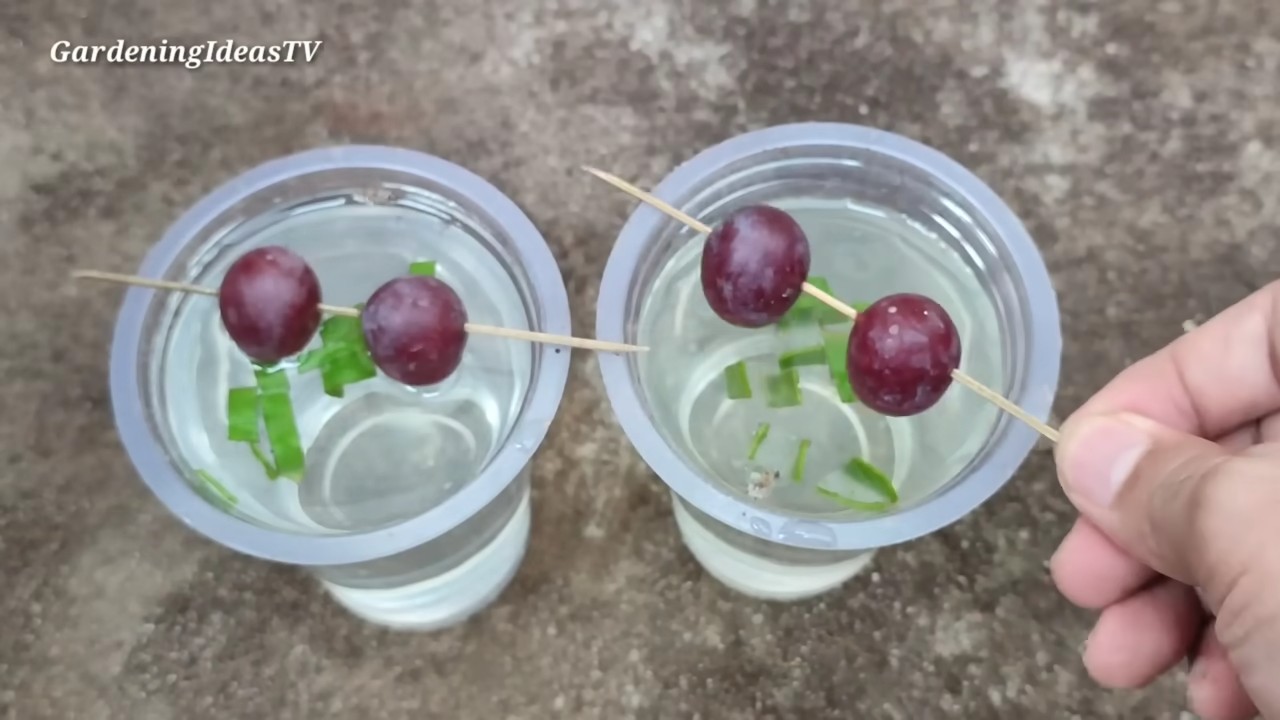
* Kleine Behälter: Zum Stratifizieren (Kältebehandlung) der Kerne. Ich verwende gerne kleine Plastikbehälter mit Deckel.
* Feuchtes Substrat: Vermiculit oder Torfmoos sind ideal.
* Anzuchttöpfe: Kleine Töpfe für die Keimlinge.
* Anzuchterde: Spezielle Erde für die Anzucht von Pflanzen.
* Sprühflasche: Zum Befeuchten der Erde.
* Geduld: Das Wichtigste!
Die Vorbereitung: Kerne extrahieren und reinigen
1. Kerne extrahieren: Nehmt die Trauben und entfernt vorsichtig das Fruchtfleisch, um die Kerne freizulegen. Achtet darauf, die Kerne nicht zu beschädigen. Ich mache das am liebsten über einer Schüssel, damit ich die Kerne nicht verliere.
2. Kerne reinigen: Spült die Kerne unter fließendem Wasser ab, um alle Fruchtfleischreste zu entfernen. Das ist wichtig, da Fruchtfleischreste schimmeln können.
3. Kerne trocknen: Legt die gereinigten Kerne auf ein Papiertuch und lasst sie an einem kühlen, trockenen Ort für etwa 2-3 Tage trocknen. Achtet darauf, dass sie nicht direktem Sonnenlicht ausgesetzt sind.
Die Stratifizierung: Der Kälteschlaf für die Kerne
Die Stratifizierung ist ein wichtiger Schritt, um die Keimung der Kerne zu fördern. Sie simuliert den Winter und hilft den Kernen, ihre Keimhemmung zu überwinden.
1. Substrat vorbereiten: Befeuchtet das Vermiculit oder Torfmoos, sodass es feucht, aber nicht nass ist. Es sollte sich wie ein ausgedrückter Schwamm anfühlen.
2. Kerne einbetten: Füllt die kleinen Behälter mit dem feuchten Substrat. Legt die getrockneten Kerne darauf und bedeckt sie mit einer dünnen Schicht Substrat. Achtet darauf, dass die Kerne nicht zu dicht beieinander liegen.
3. Behälter verschließen: Verschließt die Behälter mit den Deckeln.
4. Kältebehandlung: Stellt die Behälter für 6-8 Wochen in den Kühlschrank. Die ideale Temperatur liegt bei 1-5 Grad Celsius. Ich lege sie meistens in das Gemüsefach.
5. Regelmäßige Kontrolle: Überprüft die Behälter regelmäßig, um sicherzustellen, dass das Substrat feucht bleibt. Bei Bedarf leicht befeuchten. Achtet auch auf Schimmelbildung. Wenn ihr Schimmel entdeckt, entfernt die betroffenen Kerne sofort.
Die Aussaat: Der Start ins Leben
Nach der Stratifizierung sind die Kerne bereit für die Aussaat.
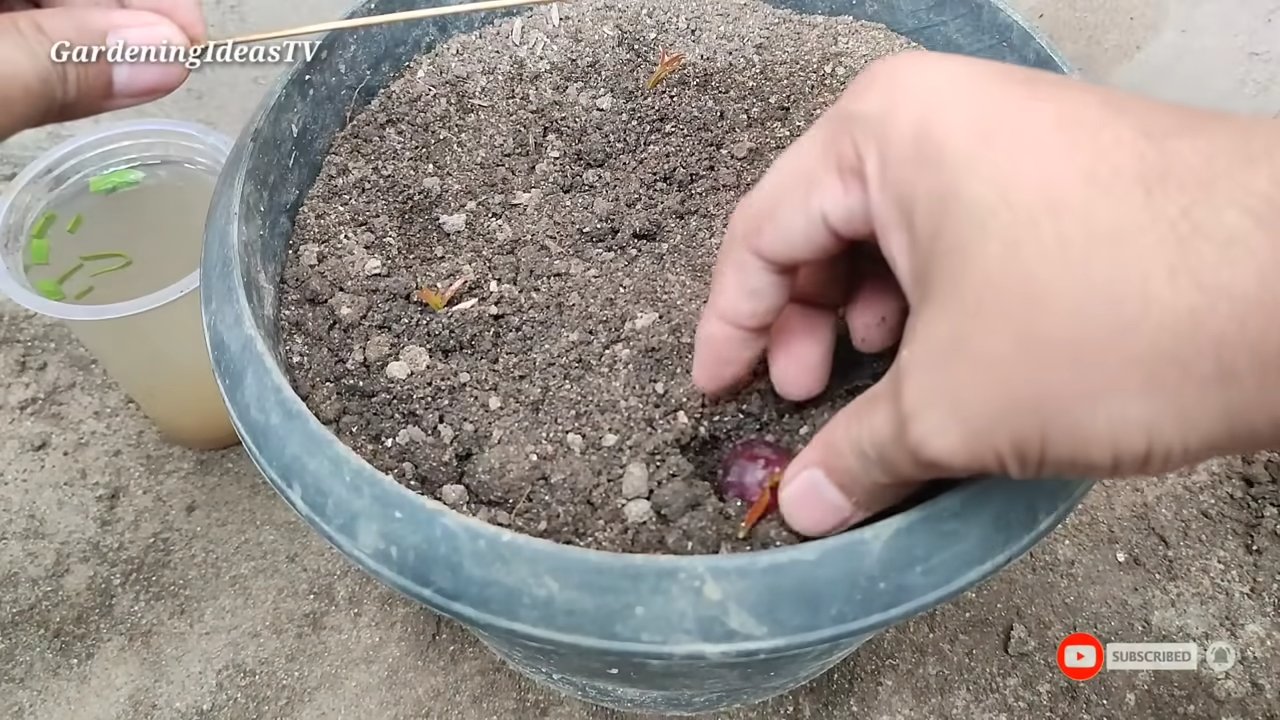
1. Anzuchttöpfe vorbereiten: Füllt die Anzuchttöpfe mit Anzuchterde.
2. Kerne aussäen: Nehmt die stratifizierten Kerne aus dem Kühlschrank und sät sie in die Anzuchttöpfe. Legt pro Topf 2-3 Kerne etwa 1 cm tief in die Erde.
3. Angießen: Gießt die Erde vorsichtig an, sodass sie gut durchfeuchtet ist. Ich verwende dafür am liebsten eine Sprühflasche, um die Erde nicht zu stark zu bewegen.
4. Standort wählen: Stellt die Anzuchttöpfe an einen hellen, warmen Ort. Direkte Sonneneinstrahlung sollte vermieden werden, da die jungen Keimlinge empfindlich sind. Eine Temperatur von 20-25 Grad Celsius ist ideal.
5. Feuchtigkeit halten: Haltet die Erde feucht, aber nicht nass. Besprüht die Erde regelmäßig mit Wasser.
Die Pflege: Geduld zahlt sich aus
Die Keimung kann einige Wochen dauern. Seid geduldig und gebt nicht auf!
1. Keimung beobachten: Beobachtet die Anzuchttöpfe regelmäßig. Nach einigen Wochen sollten die ersten Keimlinge erscheinen.
2. Vereinzeln: Wenn mehrere Keimlinge in einem Topf aufgehen, solltet ihr die schwächsten entfernen, um den stärksten Keimling zu fördern.
3. Umtopfen: Wenn die Keimlinge groß genug sind (etwa 10-15 cm hoch), könnt ihr sie in größere Töpfe umtopfen. Verwendet dafür eine gute Pflanzerde.
4. Düngen: Beginnt nach einigen Wochen mit dem Düngen. Verwendet einen speziellen Dünger für Weinreben oder einen organischen Dünger.
5. Gießen: Gießt die Pflanzen regelmäßig, aber vermeidet Staunässe.
6. Licht: Weinreben brauchen viel Licht. Stellt die Pflanzen an einen sonnigen Standort.
Die Auspflanzung: Der Umzug ins Freie
Nachdem die Pflanzen kräftig genug sind, könnt ihr sie ins Freie auspflanzen.
1. Standort wählen: Wählt einen sonnigen Standort mit gut durchlässigem Boden. Weinreben brauchen viel Sonne und Wärme.
2. Boden vorbereiten: Lockert den Boden gut auf und entfernt Unkraut.
3. Pflanzloch ausheben: Grabt ein ausreichend großes Pflanzloch. Es sollte doppelt so breit und tief sein wie der Wurzelballen.
4. Pflanze einsetzen: Setzt die Pflanze vorsichtig in das Pflanzloch. Achtet darauf, dass der Wurzelballen nicht beschädigt wird.
5. Pflanzloch füllen: Füllt das Pflanzloch mit Erde und drückt sie leicht an.
6. Angießen: Gießt die Pflanze gründlich an.
7. Stütze geben: Weinreben brauchen eine Stütze. Verwendet einen Pfahl oder ein Spalier.
Wichtige Tipps und Tricks:
* Sortenvielfalt: Beachtet, dass die aus Kernen gezogenen Pflanzen nicht unbedingt die gleichen Eigenschaften wie die Mutterpflanze haben. Es kann zu genetischen Veränderungen kommen.
* Veredelung: Um sicherzustellen, dass ihr die gewünschte Rebsorte erhaltet, könnt ihr die jungen Pflanzen später veredeln.
* Geduld: Es kann einige Jahre dauern, bis die Pflanzen Früchte tragen.
* Schutz: Schützt die jungen Pflanzen vor Frost und Schädlingen.
* Schnitt: Regelmäßiger Schnitt ist wichtig, um die Form und den Ertrag der Weinreben zu fördern. Informiert euch über die richtige Schnitttechnik für Weinreben.
* Bodenanalyse: Eine Bodenanalyse kann helfen, den Nährstoffbedarf der Pflanzen zu ermitteln.
* Regelmäßige Kontrolle: Kontrolliert die Pflanzen regelmäßig auf Krankheiten und Schädlinge.
Häufige Probleme und Lösungen:
* Keine Keimung: Möglicherweise waren die Kerne nicht lebensfähig oder die Stratifizierung war nicht ausreichend. Versucht es mit frischen Kernen und einer längeren Stratifizierungszeit.
* Schimmelbildung: Zu hohe Luftfeuchtigkeit oder unsaubere Kerne können zu Schimmelbildung führen. Achtet auf gute Belüftung und reinigt die Kerne gründlich.
* Schlechter Wuchs: Möglicherweise fehlt es den Pflanzen an Nährstoffen oder Licht. Düngt die Pflanzen regelmäßig und stellt sie an einen sonnigen Standort.
* Schädlinge: Kontrolliert die Pflanzen regelmäßig auf Schädlinge und bekämpft sie bei Bedarf mit geeigneten Mitteln.
Ich hoffe, dieser Leitfaden hilft euch dabei, eure eigenen Weinreben aus Trauben zu ziehen. Es ist ein spannendes Projekt, das viel Geduld erfordert, aber am Ende mit eigenen Trauben belohnt wird. Viel Erfolg!
Conclusion
So, there you have it! Growing grapevines from grapes might seem like a daunting task, reserved for seasoned horticulturalists, but with a little patience and the right approach, it’s an incredibly rewarding project accessible to anyone. This DIY trick isn’t just about saving money on nursery-bought vines; it’s about connecting with the natural world, understanding the life cycle of a plant, and experiencing the unique satisfaction of nurturing something from its very beginning.
Why is this a must-try? Because it empowers you to cultivate your own little piece of viticultural paradise, tailored to your specific tastes and climate. Imagine the pride you’ll feel serving wine made from grapes you personally propagated! Beyond the tangible benefits, this process offers a fascinating glimpse into the resilience and adaptability of nature. It’s a learning experience that extends far beyond the garden, fostering a deeper appreciation for the food and beverages we consume.
Don’t be afraid to experiment! While the method outlined focuses on using fresh grapes, you can also explore variations. For instance, try different grape varieties to see which ones thrive best in your region. Consider using rooting hormones to further enhance the success rate of your cuttings. You could even try grafting your newly grown vines onto established rootstock for increased vigor and disease resistance. The possibilities are endless!
We wholeheartedly encourage you to embark on this grape-growing adventure. It’s a journey filled with challenges and triumphs, but ultimately, it’s an incredibly fulfilling experience. Remember to document your progress, take pictures, and most importantly, share your experiences with us! We’d love to hear about your successes, your setbacks, and any tips or tricks you discover along the way. Let’s build a community of DIY grape growers, sharing knowledge and inspiring each other to cultivate our own little vineyards. So, grab some grapes, prepare your potting mix, and get ready to witness the magic of life unfold. You might just surprise yourself with what you can achieve! This method of growing grapevines from grapes is a testament to the power of DIY and the wonders of nature.
Frequently Asked Questions (FAQ)
Can I use any type of grape to grow a grapevine?
While technically you can try, the success rate varies greatly depending on the grape variety. Seedless grapes are obviously not an option. Table grapes, while containing seeds, are often hybrids and may not reliably produce vines that bear fruit true to the parent plant. Wine grapes, particularly those from established vineyards in your region, are generally the best choice. They are more likely to be adapted to your local climate and soil conditions, increasing your chances of success. Research which wine grape varieties thrive in your area and source your grapes accordingly.
How long does it take to grow a grapevine from a grape?
Patience is key! It can take several weeks, even months, for the seeds to germinate and for the seedlings to develop into viable grapevines. After germination, it will take at least a year or two before you have a vine strong enough to transplant into its permanent location. And it will likely take another 2-3 years after transplanting before you can expect a significant grape harvest. So, from grape to grapes, you’re looking at a timeframe of 4-5 years, possibly longer.
What kind of soil is best for growing grapevines from grapes?
Grapevines prefer well-draining soil that is rich in organic matter. A slightly acidic to neutral pH (around 6.0-7.0) is ideal. When starting your seeds, use a high-quality seed-starting mix. Once the seedlings are large enough to transplant, you can use a potting mix amended with compost or well-rotted manure. In their final planting location, ensure the soil is well-draining and amend it with organic matter as needed. Avoid heavy clay soils, as they can retain too much moisture and lead to root rot.
How much sunlight do grapevines need?
Grapevines are sun-loving plants and require at least 6-8 hours of direct sunlight per day to thrive. Choose a planting location that receives ample sunlight throughout the growing season. Insufficient sunlight can result in weak growth, poor fruit production, and increased susceptibility to diseases.
How often should I water my grapevines?
Water deeply and infrequently, allowing the soil to dry out slightly between waterings. Overwatering can lead to root rot, while underwatering can stress the plants and hinder their growth. During the first year, water regularly to help the vines establish a strong root system. Once established, grapevines are relatively drought-tolerant and require less frequent watering. Monitor the soil moisture and water accordingly, especially during dry spells.
Do I need to fertilize my grapevines?
Grapevines benefit from regular fertilization, especially during the growing season. Use a balanced fertilizer specifically formulated for fruit-bearing plants. Apply the fertilizer according to the manufacturer’s instructions. Avoid over-fertilizing, as this can lead to excessive vegetative growth at the expense of fruit production. Soil testing can help determine the specific nutrient needs of your grapevines.
How do I prune my grapevines?
Pruning is essential for maintaining the health and productivity of your grapevines. Prune annually during the dormant season (late winter or early spring) to remove dead, damaged, or diseased wood. Pruning also helps to shape the vines, improve air circulation, and promote fruit production. There are various pruning methods, so research the best method for your grape variety and growing conditions.
What are some common pests and diseases that affect grapevines?
Grapevines are susceptible to a variety of pests and diseases, including aphids, spider mites, Japanese beetles, powdery mildew, downy mildew, and black rot. Monitor your vines regularly for signs of infestation or disease. Implement preventative measures, such as proper sanitation, good air circulation, and the use of disease-resistant varieties. If pests or diseases become a problem, treat them promptly with appropriate insecticides or fungicides.
Can I grow grapevines in containers?
Yes, you can grow grapevines in containers, but it requires careful planning and management. Choose a large container (at least 20 gallons) with good drainage. Use a high-quality potting mix and provide regular watering and fertilization. Container-grown grapevines may require more frequent pruning and may be more susceptible to temperature fluctuations. Select a compact grape variety that is well-suited for container growing.
What if my grape seeds don’t germinate?
Germination rates can vary, so don’t be discouraged if some of your seeds don’t sprout. Ensure that the seeds are properly stratified (cold-treated) before planting. Maintain consistent moisture levels and provide adequate warmth. If you’ve tried these steps and still have no luck, try again with a fresh batch of grapes. Sometimes, the viability of the seeds can be a factor.

Leave a Comment