
Growing Garlic Indoors might seem like a challenge reserved for seasoned gardeners, but I’m here to tell you it’s totally achievable, even if you’re a complete beginner! Forget those expensive grocery store cloves – imagine the satisfaction of harvesting your own pungent, flavorful garlic right from your windowsill.
For centuries, garlic has been revered not only for its culinary uses but also for its medicinal properties. From ancient Egypt, where it fueled the pyramid builders, to traditional Chinese medicine, garlic has been a staple in cultures worldwide. Now, you can bring this historical powerhouse into your home, regardless of your outdoor space.
Why should you learn this DIY trick? Well, think about it: fresh garlic on demand! No more last-minute trips to the store when your recipe calls for it. Plus, growing garlic indoors is a fantastic way to add a touch of green to your living space, especially during the colder months when outdoor gardening is limited. It’s also a surprisingly easy and rewarding project that can brighten up your kitchen and your cooking. I’m excited to share my favorite tips and tricks to help you successfully grow your own indoor garlic crop!
Knoblauch im Topf: So ziehst du dein eigenes Knoblauchgrün in der Wohnung
Hey Leute! Habt ihr Lust auf frischen Knoblauchgeschmack, ohne ständig zum Supermarkt rennen zu müssen? Dann seid ihr hier genau richtig! Ich zeige euch, wie ihr ganz einfach Knoblauch in der Wohnung ziehen könnt. Das ist nicht nur super praktisch, sondern sieht auch noch richtig hübsch aus! Und das Beste: Ihr braucht dafür keine grünen Daumen. Versprochen!
Was du brauchst: Die Materialliste
Bevor wir loslegen, hier eine Liste mit allem, was du benötigst:
* Knoblauchzehen: Am besten Bio-Knoblauch, da dieser nicht mit Wachstumsinhibitoren behandelt wurde. Wähle feste, gesunde Zehen aus.
* Blumenerde: Eine gute, nährstoffreiche Blumenerde ist wichtig für das Wachstum.
* Töpfe: Wähle Töpfe mit ausreichend Drainage (Löcher im Boden), damit das Wasser gut ablaufen kann. Die Töpfe sollten mindestens 15 cm Durchmesser haben.
* Drainagematerial: Blähton, Kies oder Tonscherben für den Topfboden.
* Gießkanne: Zum Bewässern der Pflanzen.
* (Optional) Pflanzschaufel: Hilft beim Einpflanzen der Zehen.
* (Optional) Dünger: Flüssigdünger für Gemüse oder Kräuter, um das Wachstum zu fördern.
Schritt-für-Schritt-Anleitung: Knoblauch pflanzen
So, jetzt geht’s ans Eingemachte! Folge diesen Schritten, um deinen Knoblauch erfolgreich anzupflanzen:
1. Vorbereitung der Töpfe: Zuerst kümmern wir uns um die Töpfe. Lege eine Schicht Drainagematerial (Blähton, Kies oder Tonscherben) auf den Boden des Topfes. Das verhindert Staunässe, die Knoblauch gar nicht mag. Fülle den Topf dann mit Blumenerde, aber lass etwa 2-3 cm Platz bis zum Rand.
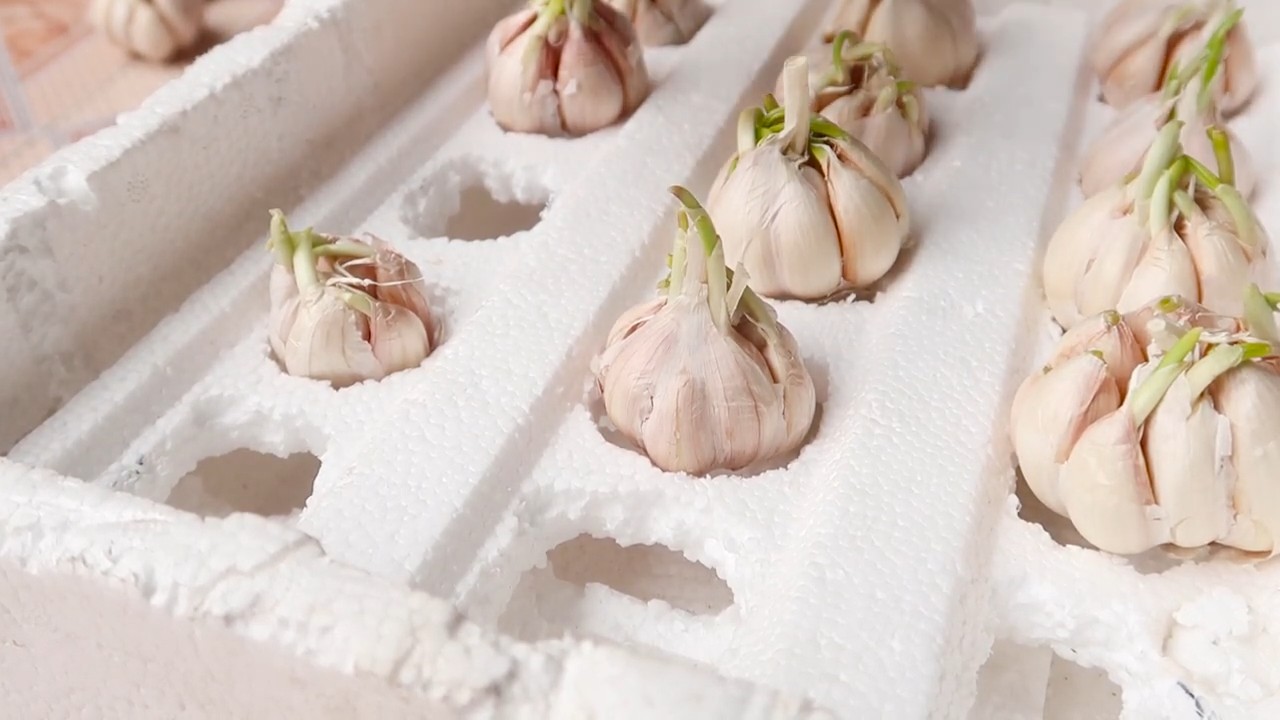
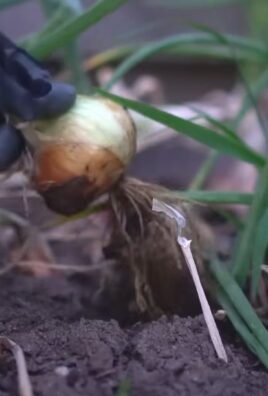
2. Knoblauchzehen vorbereiten: Trenne die Knoblauchzehen vorsichtig vom Knoblauchkopf. Achte darauf, dass du die Zehen nicht beschädigst. Wähle die größten und gesündesten Zehen aus, denn die haben die besten Chancen, gut zu wachsen.
3. Knoblauchzehen einpflanzen: Drücke die Knoblauchzehen etwa 5-8 cm tief in die Erde, mit der Spitze nach oben. Der Abstand zwischen den Zehen sollte etwa 5-8 cm betragen, damit sie genug Platz zum Wachsen haben. In einen Topf mit 15 cm Durchmesser passen also etwa 3-4 Zehen.
4. Angießen: Gieße die Erde vorsichtig an, bis sie gut durchfeuchtet ist. Achte darauf, dass du nicht zu viel gießt, denn Staunässe ist, wie gesagt, der Feind des Knoblauchs.
5. Standort wählen: Stelle die Töpfe an einen hellen, sonnigen Standort. Knoblauch braucht viel Licht, um gut zu wachsen. Ein Fensterbrett nach Süden oder Westen ist ideal.
Pflege-Tipps: So bleibt dein Knoblauch glücklich
Damit dein Knoblauch auch prächtig gedeiht, hier noch ein paar wichtige Pflege-Tipps:
* Gießen: Gieße den Knoblauch regelmäßig, aber nicht zu viel. Die Erde sollte immer leicht feucht sein, aber nicht nass. Überprüfe die Feuchtigkeit der Erde, indem du deinen Finger etwa 2 cm tief in die Erde steckst. Wenn sie sich trocken anfühlt, ist es Zeit zum Gießen.
* Düngen: Um das Wachstum zu fördern, kannst du den Knoblauch alle 2-3 Wochen mit einem Flüssigdünger für Gemüse oder Kräuter düngen. Achte darauf, die Dosierungsanleitung auf der Verpackung zu befolgen.
* Schädlinge: Kontrolliere die Pflanzen regelmäßig auf Schädlinge wie Blattläuse oder Spinnmilben. Wenn du Schädlinge entdeckst, kannst du sie mit einem milden Insektizid oder einer Seifenlauge bekämpfen.
* Temperatur: Knoblauch mag es nicht zu heiß. Eine Temperatur zwischen 15 und 20 Grad Celsius ist ideal.
Erntezeit: Wann ist der Knoblauch fertig?
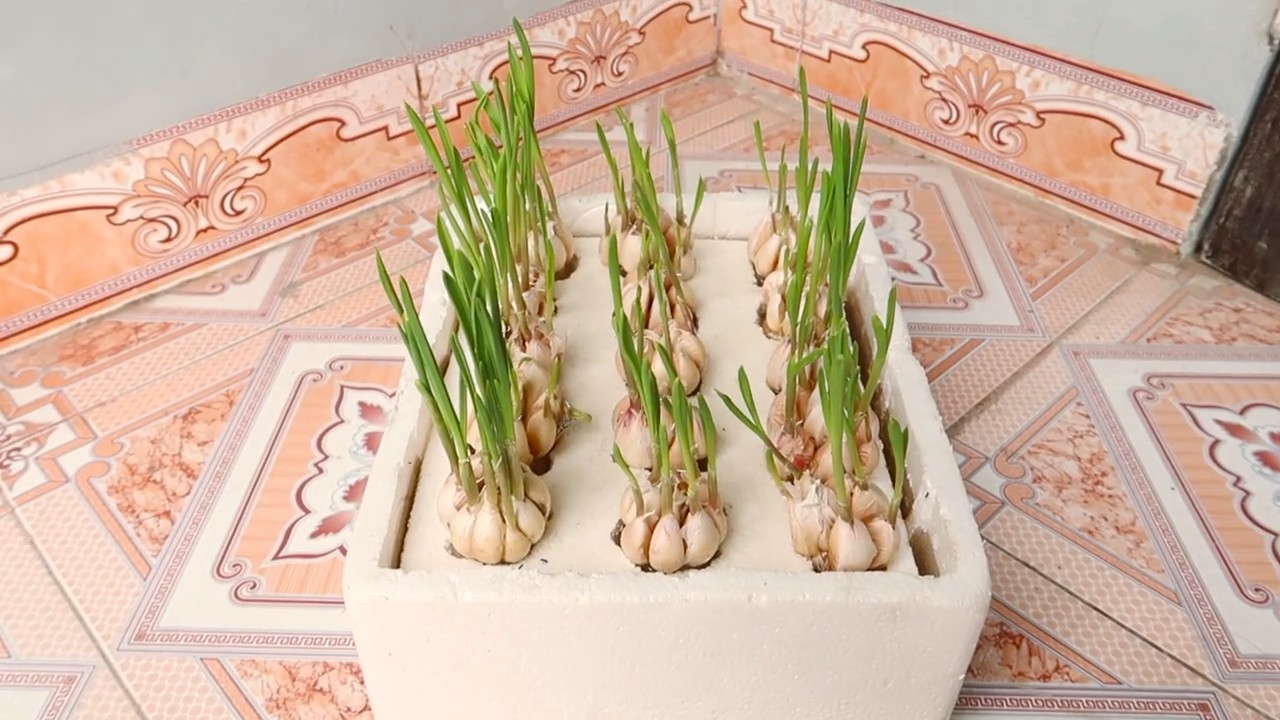
Du kannst das Knoblauchgrün schon nach wenigen Wochen ernten. Schneide einfach die grünen Blätter mit einer Schere ab. Sie schmecken wunderbar in Salaten, Suppen oder als Topping für deine Lieblingsgerichte.
Wenn du auch die Knoblauchknollen ernten möchtest, musst du etwas länger warten. Die Knollen sind reif, wenn die Blätter gelb werden und absterben. Das ist normalerweise nach etwa 8-9 Monaten der Fall. Grabe die Knollen vorsichtig aus und lass sie an einem trockenen, luftigen Ort trocknen, bevor du sie lagerst.
Extra-Tipp: Knoblauchgrün immer wieder ernten
Das Tolle am Knoblauchziehen in der Wohnung ist, dass du das Knoblauchgrün immer wieder ernten kannst. Schneide einfach die Blätter ab, wenn du sie brauchst, und die Pflanze wird neue Blätter bilden. So hast du immer frischen Knoblauchgeschmack zur Hand!
Häufige Probleme und Lösungen
Auch beim Knoblauchziehen können mal Probleme auftreten. Hier sind ein paar häufige Probleme und wie du sie lösen kannst:
* Gelbe Blätter: Gelbe Blätter können ein Zeichen für Überwässerung, Nährstoffmangel oder Schädlingsbefall sein. Überprüfe die Feuchtigkeit der Erde, dünge die Pflanzen und kontrolliere sie auf Schädlinge.
* Schimmel: Schimmel kann auftreten, wenn die Erde zu feucht ist oder die Luftzirkulation schlecht ist. Sorge für eine gute Drainage, gieße weniger und stelle die Pflanzen an einen luftigeren Standort.
* Langsames Wachstum: Langsames Wachstum kann an zu wenig Licht, Nährstoffmangel oder einer zu niedrigen Temperatur liegen. Stelle die Pflanzen an einen helleren Standort, dünge sie und achte auf eine angemessene Temperatur.
Knoblauchsorten für den Topf: Welche eignen sich am besten?
Nicht jede Knoblauchsorte eignet sich gleich gut für den Anbau im Topf. Hier sind ein paar Sorten, die ich empfehlen kann:
* Softneck-Knoblauch: Diese Sorte ist besonders robust und einfach anzubauen. Sie bildet keine Blütenstängel und ist daher ideal für den Anbau im Topf.
* Hardneck-Knoblauch: Diese Sorte ist etwas anspruchsvoller, aber sie hat einen intensiveren Geschmack. Sie bildet Blütenstängel (sogenannte “Scapes”), die du ebenfalls ernten und verwenden kannst.
* Elephant Knoblauch: Obwohl er “Knoblauch” im Namen trägt, ist er eigentlich enger mit der Lauch verwandt. Er produziert riesige Zehen und hat einen milderen Geschmack. Er ist auch gut für den Anbau im Topf geeignet.
Knoblauchgrün verwenden: Rezeptideen
Das Knoblauchgrün ist vielseitig einsetzbar und verleiht vielen Gerichten eine besondere Note. Hier sind ein paar Rezeptideen:
* Knoblauchbutter: Vermische weiche Butter mit gehacktem Knoblauchgrün, Salz und Pfeffer. Schmeckt hervorragend zu Brot, Gegrilltem oder Gemüse.
* Knoblauchöl: Gib gehacktes Knoblauchgrün in Olivenöl und lass es ziehen. Verwende das Öl zum Braten, Marinieren oder als Dressing für Salate.
* Knoblauchpesto: Ersetze einen Teil des Basilikums in deinem Pesto-Rezept durch Knoblauchgrün.
* Knoblauchsuppe: Gib gehacktes Knoblauchgrün in deine Lieblingssuppe.
* Knoblauch-Dip: Vermische Joghurt oder Quark mit gehacktem Knoblauchgrün, Salz, Pfeffer und etwas Zitronensaft.
Ich hoffe, diese Anleitung hat dir geholfen und du hast bald deinen eigenen Knoblauch im Topf! Viel Spaß beim Gärtnern!
Conclusion
So, there you have it! Growing garlic indoors is not only possible, but it’s also a surprisingly rewarding experience. Forget those last-minute dashes to the store when you realize you’re out of this essential ingredient. Imagine the satisfaction of snipping fresh, vibrant garlic greens right from your windowsill to add a burst of flavor to your dishes. This simple DIY trick transforms your kitchen into a miniature garden, offering a continuous supply of fresh garlic flavor without ever leaving your home.
But why is this a must-try? Beyond the convenience, growing garlic indoors allows you to control the growing environment, minimizing the risk of pests and diseases that can plague outdoor crops. You’re also extending the growing season, enjoying fresh garlic even when the weather outside is less than ideal. Plus, let’s be honest, it’s just plain cool to watch those little green shoots emerge and thrive under your care.
Don’t be afraid to experiment with different varieties of garlic. Softneck varieties, like those often found in grocery stores, tend to be more adaptable to indoor growing. However, you can also try hardneck varieties, known for their bolder flavor and the production of delicious scapes (those curly flower stalks that are a culinary delight in their own right). Consider using different types of containers, from repurposed yogurt containers to stylish terracotta pots, to find what works best for your space and aesthetic. You can even try hydroponic systems for a more advanced approach to indoor garlic cultivation.
Another variation to consider is growing garlic for its greens only. This is a fantastic option if you’re primarily interested in the mild, chive-like flavor of garlic greens, rather than the full bulb. Simply plant the cloves closer together and harvest the greens regularly, allowing the bulbs to develop only partially. This method provides a continuous supply of fresh greens for salads, stir-fries, and garnishes.
We wholeheartedly encourage you to give this DIY trick a try. It’s an easy, affordable, and incredibly satisfying way to bring a touch of freshness and flavor into your home. Whether you’re a seasoned gardener or a complete beginner, growing garlic indoors is a project that anyone can tackle.
Once you’ve embarked on your indoor garlic growing adventure, we’d love to hear about your experience! Share your tips, tricks, and photos with us in the comments below. Let’s build a community of indoor garlic growers and learn from each other’s successes (and occasional mishaps!). Your insights could inspire others to discover the joy of growing their own fresh garlic at home. So, grab some garlic cloves, some potting soil, and get ready to experience the magic of growing garlic indoors!
Frequently Asked Questions (FAQ)
1. What kind of garlic should I use for growing indoors?
The best type of garlic for indoor growing is generally a softneck variety. Softneck garlic is more adaptable to indoor conditions and tends to produce well in containers. You can often find softneck garlic at your local grocery store. Hardneck varieties can also be grown indoors, but they may require a bit more attention and cooler temperatures to thrive. Experimenting with different varieties is part of the fun!
2. What kind of soil is best for growing garlic indoors?
Use a well-draining potting mix. Avoid using garden soil, as it can become compacted in containers and doesn’t provide adequate drainage. A good quality potting mix will provide the necessary nutrients and aeration for healthy garlic growth. You can also amend your potting mix with compost or other organic matter to further improve its fertility.
3. How much sunlight does indoor garlic need?
Garlic needs at least 6-8 hours of direct sunlight per day to thrive. Place your garlic plants in a sunny windowsill, preferably one that faces south or west. If you don’t have enough natural light, you can supplement with grow lights. LED grow lights are an energy-efficient option that can provide the necessary light spectrum for healthy plant growth.
4. How often should I water my indoor garlic?
Water your garlic plants when the top inch of soil feels dry to the touch. Avoid overwatering, as this can lead to root rot. Ensure that your containers have drainage holes to allow excess water to escape. During the active growing season, you may need to water more frequently.
5. How long does it take to grow garlic indoors?
Growing garlic bulbs indoors can take several months, typically around 6-8 months. However, you can harvest the garlic greens much sooner, usually within a few weeks of planting. If you’re growing garlic primarily for the greens, you can harvest them regularly as needed.
6. Can I grow garlic indoors year-round?
Yes, you can grow garlic indoors year-round. However, garlic typically requires a period of cold dormancy to form bulbs properly. To mimic this dormancy period indoors, you can place your garlic plants in a cool, dark location (around 40-50°F) for a few weeks before planting. This will help to encourage bulb formation.
7. What are garlic scapes, and can I grow them indoors?
Garlic scapes are the curly flower stalks that grow from hardneck garlic varieties. They are a culinary delicacy with a mild garlic flavor. You can grow garlic scapes indoors if you’re growing a hardneck variety. Simply allow the scapes to develop and then harvest them when they are still tender and curly.
8. How do I harvest garlic greens?
To harvest garlic greens, simply snip them off with scissors or shears. Avoid cutting the entire plant down to the base, as this will prevent it from regrowing. Harvest the outer leaves first, allowing the inner leaves to continue growing. You can harvest garlic greens regularly as needed.
9. What are some common problems when growing garlic indoors?
Some common problems when growing garlic indoors include pests, diseases, and nutrient deficiencies. Pests such as aphids and spider mites can be controlled with insecticidal soap or neem oil. Diseases such as fungal infections can be prevented by ensuring good air circulation and avoiding overwatering. Nutrient deficiencies can be addressed by fertilizing your garlic plants with a balanced fertilizer.
10. How do I fertilize my indoor garlic plants?
Fertilize your indoor garlic plants every few weeks with a balanced fertilizer. You can use a liquid fertilizer or a slow-release granular fertilizer. Follow the instructions on the fertilizer package for proper application rates. Avoid over-fertilizing, as this can damage your plants.
11. Can I reuse the soil from my garlic plants?
It’s generally not recommended to reuse the soil from your garlic plants, as it may contain pests or diseases. However, if you choose to reuse the soil, you can sterilize it by baking it in the oven at 200°F for 30 minutes. This will kill any harmful organisms that may be present.
12. What do I do with the garlic bulbs after they’ve matured?
Once the garlic bulbs have matured, you can harvest them and cure them for storage. To cure garlic, hang the bulbs in a cool, dry, well-ventilated location for several weeks. This will allow the bulbs to dry out and develop a protective outer layer. Cured garlic can be stored for several months in a cool, dry place.
Leave a Comment