
Growing Figs in Bottles might sound like something out of a fairytale, but trust me, it’s a surprisingly simple and rewarding DIY project! Have you ever dreamt of plucking ripe, juicy figs straight from your own miniature orchard, even if you only have a small balcony or patio? Well, dream no more! This ingenious method allows you to cultivate these delicious fruits in a compact and controlled environment, bringing a touch of Mediterranean magic to your home.
Figs have a rich history, dating back to ancient civilizations. They were revered in ancient Greece and Rome, symbolizing prosperity and peace. Imagine, you can now participate in this age-old tradition, but with a modern, space-saving twist!
But why growing figs in bottles, you ask? Well, many of us struggle with limited space, poor soil conditions, or even harsh climates that make traditional fig cultivation challenging. This DIY trick bypasses those obstacles, offering a controlled environment that promotes healthy growth and abundant fruit production. Plus, it’s a fantastic way to recycle those empty bottles and add a unique, eye-catching element to your garden. I’m excited to share this simple yet effective method with you, so you can enjoy the sweet taste of homegrown figs, no matter where you live!
Feigen im Glas ziehen: Dein DIY-Guide für Mini-Feigenbäume
Hey Feigenliebhaber! Hast du schon immer davon geträumt, deinen eigenen Feigenbaum zu haben, aber wenig Platz? Oder suchst du nach einem coolen und einzigartigen DIY-Projekt? Dann bist du hier genau richtig! Ich zeige dir, wie du Feigen in Flaschen ziehen kannst – eine super platzsparende und dekorative Methode, um deine eigenen kleinen Feigenbäume zu züchten. Es ist einfacher, als du denkst, und das Ergebnis ist einfach fantastisch. Lass uns loslegen!
Was du brauchst:
* Feigenzweige: Am besten von einem gesunden, fruchttragenden Feigenbaum. Wähle Zweige, die etwa bleistiftdick sind und mindestens 3-4 Knospen haben.
* Glasflaschen: Leere Wein-, Saft- oder Wasserflaschen sind perfekt. Achte darauf, dass sie sauber und desinfiziert sind.
* Bewurzelungshormon: Pulver oder Gel, um die Wurzelbildung zu fördern.
* Bewurzelungsmedium: Vermiculit, Perlit oder eine Mischung aus beidem. Du kannst auch Kokosfasersubstrat verwenden.
* Scharfes Messer oder Gartenschere: Zum Schneiden der Feigenzweige.
* Sprühflasche: Zum Befeuchten der Stecklinge.
* Plastiktüten oder Frischhaltefolie: Um eine hohe Luftfeuchtigkeit zu gewährleisten.
* Geduld: Die Wurzelbildung kann einige Wochen dauern.
Die Vorbereitung: Der Schlüssel zum Erfolg
Bevor wir mit dem eigentlichen Einpflanzen beginnen, ist eine gute Vorbereitung das A und O. Das gilt sowohl für die Zweige als auch für die Flaschen und das Bewurzelungsmedium.
1. Die Flaschen vorbereiten: Reinige die Glasflaschen gründlich mit heißem Wasser und Spülmittel. Spüle sie anschließend gut aus, um alle Spülmittelreste zu entfernen. Du kannst die Flaschen auch mit einer milden Bleichlösung desinfizieren, um sicherzustellen, dass keine schädlichen Bakterien oder Pilze vorhanden sind. Das ist besonders wichtig, um spätere Probleme mit Schimmel oder Krankheiten zu vermeiden. Lass die Flaschen vollständig trocknen, bevor du mit dem nächsten Schritt fortfährst.
2. Das Bewurzelungsmedium vorbereiten: Vermiculit und Perlit sind beides hervorragende Medien für die Bewurzelung von Stecklingen. Sie sind leicht, gut belüftet und halten Feuchtigkeit, ohne zu Staunässe zu führen. Wenn du eine Mischung verwendest, mische Vermiculit und Perlit im Verhältnis 1:1. Befeuchte das Medium leicht, sodass es feucht, aber nicht nass ist. Du solltest es ausdrücken können, ohne dass Wasser herausläuft.
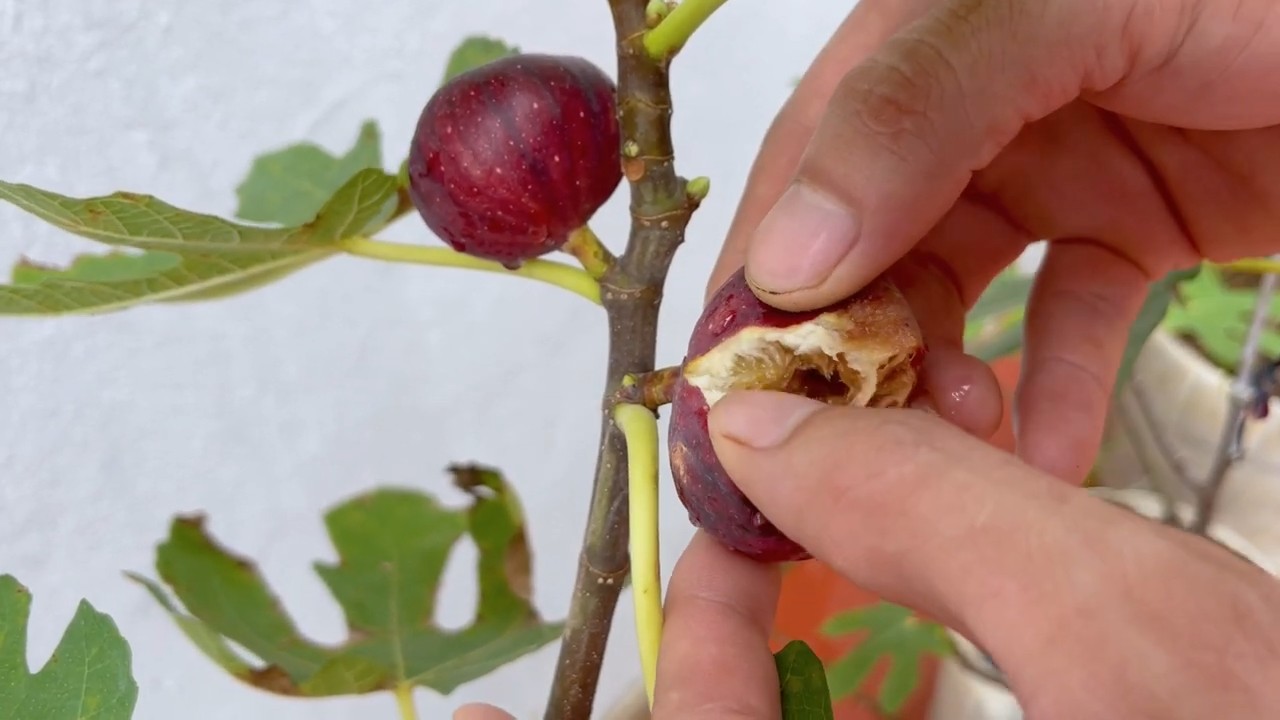
3. Die Feigenzweige auswählen und schneiden: Der beste Zeitpunkt, um Feigenzweige zu schneiden, ist im späten Winter oder frühen Frühling, bevor die Knospen austreiben. Wähle gesunde, kräftige Zweige von einem Baum, der bereits Früchte trägt. Schneide die Zweige mit einem scharfen Messer oder einer Gartenschere in etwa 15-20 cm lange Stücke. Achte darauf, dass jedes Stück mindestens 3-4 Knospen hat. Schneide den unteren Teil des Zweigs direkt unterhalb einer Knospe ab, da sich hier die Wurzeln bilden werden. Entferne die unteren Blätter, um Fäulnis zu vermeiden.
Schritt-für-Schritt-Anleitung: So ziehst du deine Feigen im Glas
Jetzt kommt der spannende Teil! Folge diesen Schritten, um deine Feigenzweige erfolgreich in Flaschen zu ziehen:
1. Bewurzelungshormon auftragen: Tauche das untere Ende des Feigenzweigs in das Bewurzelungshormon. Das Hormon fördert die Wurzelbildung und schützt den Steckling vor Pilzbefall. Schüttle überschüssiges Pulver ab.
2. Die Flasche befüllen: Fülle die vorbereitete Glasflasche mit dem angefeuchteten Bewurzelungsmedium. Lasse etwa 2-3 cm Platz bis zum Rand der Flasche.
3. Den Steckling einpflanzen: Mache mit einem Stift oder einem kleinen Stock ein Loch in das Bewurzelungsmedium. Stecke den Feigenzweig vorsichtig in das Loch, sodass das untere Ende gut mit dem Medium bedeckt ist. Drücke das Medium leicht um den Steckling herum an, um ihn zu stabilisieren.
4. Für hohe Luftfeuchtigkeit sorgen: Feigenstecklinge benötigen eine hohe Luftfeuchtigkeit, um erfolgreich Wurzeln zu bilden. Besprühe den Steckling und das Innere der Flasche mit Wasser. Stülpe dann eine Plastiktüte oder Frischhaltefolie über die Flasche, um einen Mini-Gewächshaus-Effekt zu erzeugen. Befestige die Tüte oder Folie mit einem Gummiband oder Klebeband am Flaschenhals.
5. Den richtigen Standort wählen: Stelle die Flasche an einen hellen, warmen Ort, aber vermeide direkte Sonneneinstrahlung. Ein Fensterbrett mit indirektem Licht ist ideal. Die Temperatur sollte idealerweise zwischen 20 und 25 Grad Celsius liegen.
6. Regelmäßige Pflege: Überprüfe regelmäßig die Feuchtigkeit des Bewurzelungsmediums. Es sollte immer leicht feucht sein, aber nicht nass. Besprühe den Steckling und das Innere der Flasche bei Bedarf mit Wasser. Lüfte die Flasche alle paar Tage, um Schimmelbildung zu vermeiden. Entferne die Plastiktüte oder Folie für etwa eine Stunde, um frische Luft zuzuführen.
7. Geduld haben: Die Wurzelbildung kann einige Wochen dauern. Du kannst die Wurzeln durch die Glasflasche beobachten. Sobald die Wurzeln gut entwickelt sind (etwa 2-3 cm lang), kannst du den kleinen Feigenbaum in einen Topf mit Erde umpflanzen.
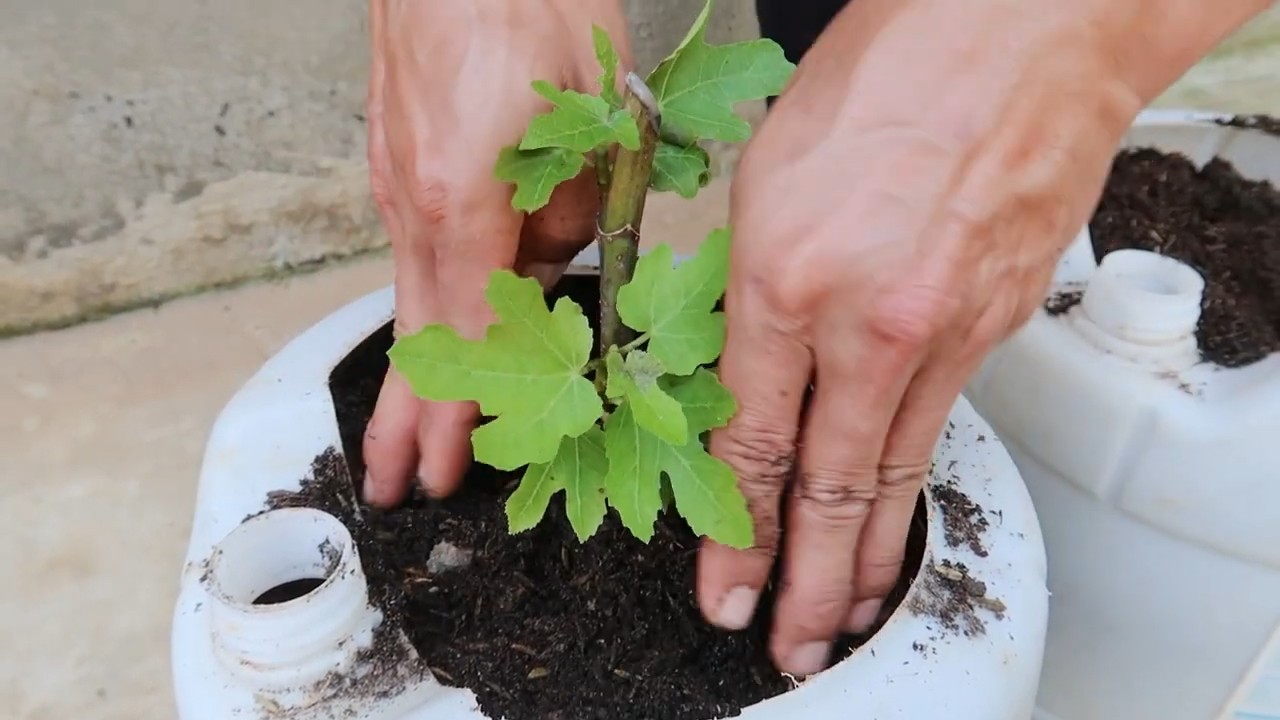
Umpflanzen und Weiterpflege: Vom Glas in den Topf
Sobald dein Feigenbäumchen im Glas kräftige Wurzeln gebildet hat, ist es Zeit für den Umzug in ein größeres Zuhause – einen Topf mit Erde.
1. Den richtigen Zeitpunkt wählen: Warte, bis die Wurzeln gut entwickelt sind und den Boden der Flasche erreichen. Das ist ein Zeichen dafür, dass der Feigenbaum bereit für den Umzug ist.
2. Den Topf vorbereiten: Wähle einen Topf, der etwas größer ist als die Flasche. Achte darauf, dass der Topf Drainagelöcher hat, damit überschüssiges Wasser ablaufen kann. Fülle den Topf mit einer hochwertigen Blumenerde, die gut durchlässig ist.
3. Den Feigenbaum vorsichtig entfernen: Sei beim Entfernen des Feigenbaums aus der Flasche besonders vorsichtig, um die Wurzeln nicht zu beschädigen. Du kannst die Flasche vorsichtig aufschneiden oder den Feigenbaum langsam herausziehen.
4. Einpflanzen: Setze den Feigenbaum in den vorbereiteten Topf und fülle ihn mit Erde auf. Drücke die Erde leicht an, um den Feigenbaum zu stabilisieren.
5. Gießen: Gieße den Feigenbaum nach dem Einpflanzen gründlich.
6. Weiterpflege: Stelle den Feigenbaum an einen hellen, sonnigen Ort. Gieße ihn regelmäßig, aber vermeide Staunässe. Dünge den Feigenbaum während der Wachstumsperiode (Frühling und Sommer) alle paar Wochen mit einem Flüssigdünger.
Häufige Probleme und Lösungen: Was tun, wenn etwas schiefgeht?
Auch beim Feigenziehen im Glas können Probleme auftreten. Hier sind einige häufige Probleme und wie du sie lösen kannst:
* Schimmelbildung: Wenn sich Schimmel in der Flasche bildet, lüfte die Flasche häufiger und reduziere die Luftfeuchtigkeit. Du kannst auch ein Fungizid verwenden, um den Schimmel zu bekämpfen.
* Fäulnis: Wenn der Steckling fault, ist das Bewurzelungsmedium zu nass. Reduziere die Bewässerung und sorge für eine bessere Belüftung.
* Keine Wurzelbildung: Wenn sich nach einigen Wochen keine Wurzeln bilden, versuche es mit einem anderen Steckling oder einem anderen Bewurzelungshormon. Stelle sicher, dass der Steckling genügend Licht und Wärme bekommt.
Fazit: Dein eigener Mini-Feigenbaum ist zum Greifen nah!
Mit dieser Anleitung kannst du ganz einfach deine eigenen Feigen im Glas ziehen. Es ist ein tolles DIY-Projekt, das
Conclusion
So, there you have it – a surprisingly simple and effective method for growing figs in bottles! This isn’t just a quirky gardening experiment; it’s a game-changer for anyone with limited space, challenging climates, or simply a desire to control the growing environment of their precious fig trees. We’ve walked you through the process, highlighting the benefits of this unique approach, and hopefully, dispelled any initial doubts you might have had.
The beauty of growing figs in bottles lies in its adaptability. You’re not confined to a specific fig variety. Experiment with different types – perhaps a dwarf variety like ‘Little Miss Figgy’ for a truly compact setup, or a ‘Brown Turkey’ for its reliable fruit production. Consider the size of your bottle when selecting your fig cutting or sapling. A larger bottle will naturally accommodate a larger root system and potentially a more robust plant.
Beyond the variety, you can also play with the growing medium. While we recommended a well-draining potting mix, you could incorporate elements like perlite or vermiculite to further enhance drainage and aeration. Adding a slow-release fertilizer to the mix will provide your fig tree with a steady supply of nutrients, promoting healthy growth and abundant fruit production.
Don’t be afraid to get creative with your bottle selection, too! While clear plastic bottles are ideal for monitoring root development, you could also use glass bottles, provided you’re careful when handling them. Just remember to ensure adequate drainage holes, regardless of the material you choose.
The key takeaway here is that growing figs in bottles offers a level of control and customization that traditional gardening methods often lack. You can easily move your fig tree indoors during harsh weather, protect it from pests and diseases, and even manipulate the fruiting season by adjusting the temperature and light exposure.
But perhaps the most compelling reason to try this DIY trick is the sheer satisfaction of nurturing a thriving fig tree in such an unconventional container. It’s a testament to the power of ingenuity and a reminder that even the smallest spaces can yield incredible results.
We strongly encourage you to give this method a try. Start with a single bottle and a healthy fig cutting or sapling, and watch as your miniature fig orchard takes shape. Document your progress, experiment with different techniques, and most importantly, share your experiences with the gardening community. Your insights could inspire others to embrace this innovative approach and unlock the joys of growing their own delicious figs, no matter where they live.
Remember, the success of your fig tree depends on consistent care and attention. Monitor the moisture levels in the soil, provide adequate sunlight, and fertilize regularly. With a little patience and dedication, you’ll be rewarded with a bountiful harvest of sweet, juicy figs, all thanks to the magic of growing figs in bottles. So, grab a bottle, get your hands dirty, and embark on this exciting gardening adventure today!
Frequently Asked Questions (FAQ)
What type of bottle is best for growing figs?
The ideal bottle for growing figs is a clear plastic bottle, such as a large water bottle or soda bottle. The clarity allows you to easily monitor the root development of your fig tree. However, glass bottles can also be used, but handle them with care to avoid breakage. The size of the bottle should be appropriate for the size of the fig cutting or sapling you intend to grow. A larger bottle will provide more space for the roots to expand. Ensure that the bottle has adequate drainage holes at the bottom to prevent waterlogging.
How often should I water my fig tree grown in a bottle?
The frequency of watering depends on several factors, including the size of the bottle, the type of potting mix, the climate, and the size of the fig tree. As a general rule, water your fig tree when the top inch of soil feels dry to the touch. Avoid overwatering, as this can lead to root rot. When you water, water thoroughly until water drains out of the drainage holes at the bottom of the bottle. During the growing season (spring and summer), you may need to water more frequently than during the dormant season (fall and winter).
What kind of soil should I use for growing figs in bottles?
Use a well-draining potting mix specifically formulated for container gardening. A good potting mix will provide adequate drainage and aeration, which are essential for healthy root growth. You can also amend the potting mix with perlite or vermiculite to further improve drainage. Avoid using garden soil, as it can be too heavy and may not drain well in a container. Adding a slow-release fertilizer to the potting mix will provide your fig tree with a steady supply of nutrients.
How much sunlight does a fig tree grown in a bottle need?
Fig trees need at least 6-8 hours of direct sunlight per day to thrive. Place your bottle-grown fig tree in a sunny location, such as a south-facing window or a sunny patio. If you don’t have enough natural sunlight, you can supplement with artificial grow lights. Rotate the bottle regularly to ensure that all sides of the fig tree receive adequate sunlight. Insufficient sunlight can lead to leggy growth and reduced fruit production.
Can I grow any type of fig tree in a bottle?
While most fig varieties can be grown in bottles, dwarf varieties like ‘Little Miss Figgy’ are particularly well-suited for this method due to their compact size. Other popular varieties like ‘Brown Turkey’ and ‘Black Mission’ can also be grown in bottles, but you may need to prune them more frequently to control their size. Consider the size of your bottle when selecting your fig variety. A larger bottle will accommodate a larger fig tree.
How do I fertilize my fig tree grown in a bottle?
Fertilize your fig tree regularly during the growing season (spring and summer) with a balanced fertilizer. You can use a liquid fertilizer diluted to half strength or a slow-release fertilizer incorporated into the potting mix. Follow the instructions on the fertilizer packaging for application rates. Avoid over-fertilizing, as this can damage the roots. During the dormant season (fall and winter), reduce or stop fertilizing altogether.
How do I protect my fig tree grown in a bottle from pests and diseases?
Regularly inspect your fig tree for signs of pests and diseases. Common pests that can affect fig trees include aphids, spider mites, and scale. Treat infestations promptly with insecticidal soap or neem oil. To prevent diseases, ensure good air circulation around the fig tree and avoid overwatering. If you notice any signs of disease, such as leaf spots or fungal growth, treat with an appropriate fungicide.
Can I move my fig tree grown in a bottle indoors during the winter?
Yes, one of the advantages of growing figs in bottles is that you can easily move them indoors during the winter to protect them from frost and freezing temperatures. Before bringing your fig tree indoors, inspect it for pests and diseases and treat accordingly. Place the fig tree in a cool, bright location indoors, such as a sunroom or near a window. Reduce watering during the winter months, as the fig tree will be dormant.
How long does it take for a fig tree grown in a bottle to produce fruit?
The time it takes for a fig tree to produce fruit depends on several factors, including the variety of fig, the age of the tree, and the growing conditions. Some fig varieties can produce fruit within a year or two of planting, while others may take longer. Providing your fig tree with adequate sunlight, water, and fertilizer will help to promote fruit production. Pruning can also encourage fruiting.
What are some common problems when growing figs in bottles and how can I fix them?
Some common problems include:
* **Yellowing leaves:** This can be caused by overwatering, underwatering, nutrient deficiencies, or pest infestations. Adjust your watering schedule, fertilize regularly, and inspect for pests.
* **Leaf drop:** This can be caused by sudden changes in temperature, overwatering, or underwatering. Maintain consistent growing conditions and adjust your watering schedule accordingly.
* **Lack of fruit production:** This can be caused by insufficient sunlight, improper fertilization, or inadequate pruning. Provide your fig tree with adequate sunlight, fertilize regularly, and prune as needed.
* **Root rot:** This is caused by overwatering and poor drainage. Ensure that your bottle has adequate drainage holes and avoid overwatering.
By addressing these common problems promptly, you can ensure the health and productivity of your fig tree grown in a bottle.

Leave a Comment