
Growing Brussels Sprouts Beginners, listen up! Have you ever looked at those tiny cabbages on a stalk at the grocery store and thought, “I could never grow those”? Well, I’m here to tell you that you absolutely can! Forget the intimidation factor; growing your own Brussels sprouts is surprisingly achievable, even for the most novice gardener.
For centuries, Brussels sprouts have been a staple in European cuisine, with their cultivation dating back to, you guessed it, Brussels, Belgium! They’ve earned a reputation (sometimes unfairly!) for being bitter, but freshly harvested, homegrown Brussels sprouts are a world away from the store-bought variety. They’re sweeter, nuttier, and packed with vitamins.
Why should you embark on this DIY adventure? Because nothing beats the satisfaction of harvesting your own food, knowing exactly where it came from and what went into growing it. Plus, learning growing Brussels sprouts beginners tips and tricks will save you money at the grocery store and impress your friends and family with your green thumb. This guide will break down the process into easy-to-follow steps, ensuring you have a bountiful harvest of these delicious and nutritious veggies. Let’s get started!
Rosenkohl Anbauen für Anfänger: Dein DIY-Leitfaden
Hallo Gartenfreunde! Rosenkohl, diese kleinen, kohlartigen Kugeln, sind nicht nur super gesund, sondern auch überraschend einfach selbst anzubauen. Ich zeige dir, wie du auch ohne grünen Daumen eine reiche Ernte erzielen kannst. Los geht’s!
Was du brauchst:
* Rosenkohlsamen oder Jungpflanzen
* Anzuchterde (falls du mit Samen startest)
* Töpfe oder Anzuchtschalen (falls du mit Samen startest)
* Gartenboden (gut durchlässig und nährstoffreich)
* Kompost oder organischen Dünger
* Gartengeräte: Spaten, Harke, Gießkanne
* Pflanzstäbe (optional, für zusätzlichen Halt)
* Schutznetz gegen Schädlinge (optional, aber sehr empfehlenswert)
Der richtige Zeitpunkt:
* Aussaat: Für eine Herbsternte solltest du die Samen im Frühjahr (März/April) vorziehen. Für eine Winterernte kannst du im Mai/Juni direkt ins Beet säen.
* Pflanzung: Jungpflanzen können ab Mai/Juni ins Beet gesetzt werden, sobald keine Frostgefahr mehr besteht.
Aussaat und Vorziehen (optional):
Wenn du mit Samen startest, ist das Vorziehen im Haus eine gute Idee, um den Pflanzen einen Vorsprung zu verschaffen.
1. Vorbereitung der Anzuchtgefäße: Fülle deine Anzuchtschalen oder kleinen Töpfe mit Anzuchterde. Drücke die Erde leicht an.
2. Aussaat der Samen: Lege pro Topf oder Zelle 2-3 Samen etwa 1 cm tief in die Erde. Bedecke sie leicht mit Erde und gieße vorsichtig an.
3. Der richtige Standort: Stelle die Anzuchtgefäße an einen hellen und warmen Ort (z.B. Fensterbank). Die ideale Keimtemperatur liegt bei 18-20°C.
4. Feuchtigkeit halten: Halte die Erde feucht, aber nicht nass. Am besten sprühst du die Erde regelmäßig mit einer Sprühflasche ein.
5. Pikieren: Sobald die Sämlinge 2-3 echte Blätter haben (nicht nur die Keimblätter), kannst du sie pikieren. Das bedeutet, du setzt jeden Sämling einzeln in einen größeren Topf. Wähle dafür die kräftigsten Pflanzen aus.
6. Abhärten: Bevor du die Jungpflanzen ins Beet setzt, solltest du sie abhärten. Stelle sie dafür tagsüber für einige Stunden ins Freie (an einen geschützten Ort) und hole sie abends wieder rein. So gewöhnen sie sich langsam an die Bedingungen im Garten.
Pflanzung im Beet:
Jetzt geht es ans Eingemachte! Die Jungpflanzen sind bereit für ihr neues Zuhause im Garten.
1. Bodenvorbereitung: Lockere den Boden gründlich auf und entferne Unkraut. Rosenkohl liebt nährstoffreichen Boden. Arbeite Kompost oder organischen Dünger ein.
2. Pflanzabstand: Rosenkohl braucht Platz! Halte einen Pflanzabstand von 60-70 cm zwischen den Pflanzen und 70-80 cm zwischen den Reihen ein.
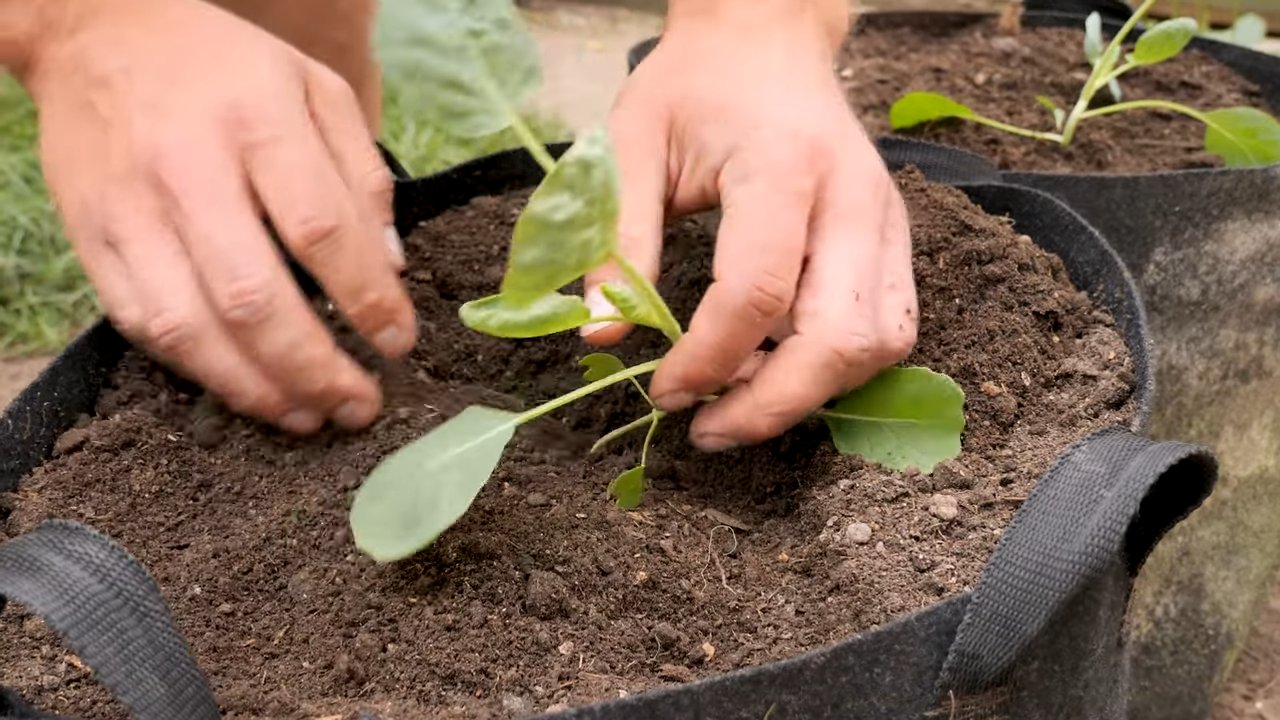
3. Pflanzlöcher ausheben: Grabe Pflanzlöcher, die etwas größer sind als die Wurzelballen der Jungpflanzen.
4. Einsetzen der Pflanzen: Setze die Jungpflanzen vorsichtig in die Pflanzlöcher. Achte darauf, dass der Wurzelballen nicht beschädigt wird. Die Oberkante des Wurzelballens sollte mit der Erdoberfläche abschließen.
5. Anhäufeln und Angießen: Fülle die Pflanzlöcher mit Erde auf und drücke sie leicht an. Gieße die Pflanzen anschließend gründlich an.
6. Pflanzstäbe (optional): Wenn du in einer windigen Gegend wohnst, kannst du den Pflanzen mit Pflanzstäben zusätzlichen Halt geben.
Pflege:
Rosenkohl ist relativ pflegeleicht, aber ein paar Dinge solltest du beachten, um eine reiche Ernte zu erzielen.
1. Gießen: Gieße die Pflanzen regelmäßig, besonders in trockenen Perioden. Achte darauf, dass der Boden nicht austrocknet.
2. Düngen: Rosenkohl ist ein Starkzehrer. Dünge die Pflanzen während der Wachstumsphase regelmäßig mit Kompost, organischem Dünger oder einem speziellen Kohl-Dünger.
3. Unkraut entfernen: Halte das Beet unkrautfrei. Unkraut konkurriert mit dem Rosenkohl um Nährstoffe und Wasser.
4. Häufeln: Häufle die Pflanzen regelmäßig an. Das fördert die Wurzelbildung und gibt den Pflanzen zusätzlichen Halt.
5. Schutz vor Schädlingen: Rosenkohl ist leider anfällig für verschiedene Schädlinge, wie Kohlweißlinge, Erdflöhe und Blattläuse. Ein Schutznetz kann helfen, die Pflanzen vor diesen Schädlingen zu schützen.
* Kohlweißlinge: Die Raupen des Kohlweißlings fressen die Blätter des Rosenkohls. Sammle die Raupen regelmäßig ab oder verwende ein biologisches Insektizid.
* Erdflöhe: Erdflöhe sind kleine, springende Käfer, die Löcher in die Blätter fressen. Halte den Boden feucht und verwende ein Schutznetz.
* Blattläuse: Blattläuse saugen Pflanzensaft und können die Pflanzen schwächen. Spritze die Pflanzen mit einem Wasserstrahl ab oder verwende ein biologisches Insektizid.
6. Ausgeizen: Entferne regelmäßig die Seitentriebe unterhalb der Rosenkohlröschen. Das fördert die Entwicklung der Röschen.
Ernte:
Endlich! Die Erntezeit ist gekommen.
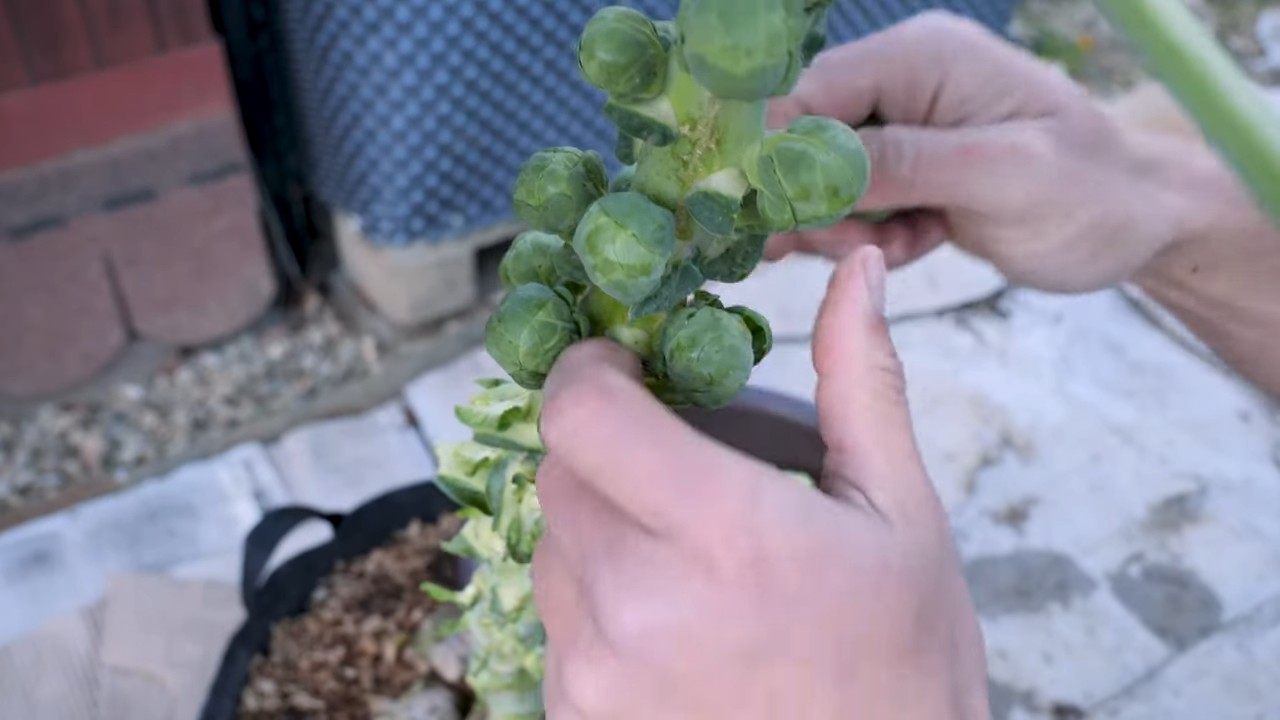
1. Erntezeitpunkt: Die Rosenkohlröschen sind erntereif, wenn sie fest und geschlossen sind und eine Größe von etwa 2-4 cm haben.
2. Erntemethode: Breche die Röschen von unten nach oben ab. Die unteren Röschen reifen zuerst.
3. Lagerung: Rosenkohl kann im Kühlschrank einige Tage gelagert werden. Du kannst ihn auch einfrieren.
Zusätzliche Tipps für eine reiche Ernte:
* Fruchtfolge beachten: Baue Rosenkohl nicht jedes Jahr am selben Standort an. Wechsle die Kulturen, um Krankheiten und Schädlingen vorzubeugen.
* Bodenanalyse: Eine Bodenanalyse kann dir helfen, den Nährstoffgehalt deines Bodens zu bestimmen und ihn entsprechend zu düngen.
* Sortenwahl: Es gibt verschiedene Rosenkohlsorten. Wähle eine Sorte, die für dein Klima und deine Bedürfnisse geeignet ist.
* Beobachtung: Beobachte deine Pflanzen regelmäßig. So kannst du Probleme frühzeitig erkennen und beheben.
Häufige Probleme und Lösungen:
* Gelbe Blätter: Gelbe Blätter können ein Zeichen für Nährstoffmangel, Wassermangel oder Schädlingsbefall sein. Überprüfe die Bodenfeuchtigkeit, dünge die Pflanzen und kontrolliere sie auf Schädlinge.
* Kleine Röschen: Kleine Röschen können ein Zeichen für Nährstoffmangel oder zu wenig Sonnenlicht sein. Dünge die Pflanzen und stelle sicher, dass sie ausreichend Sonnenlicht bekommen.
* Schädlinge: Schädlinge können die Pflanzen schwächen und die Ernte beeinträchtigen. Verwende ein Schutznetz oder ein biologisches Insektizid.
Rosenkohl in der Küche:
Rosenkohl ist vielseitig einsetzbar. Du kannst ihn kochen, braten, dünsten, grillen oder roh im Salat verwenden. Er schmeckt besonders gut mit Speck, Nüssen oder Käse.
Hier ein paar Ideen:
* Gebratener Rosenkohl mit Speck und Balsamico: Ein Klassiker!
* Rosenkohl-Gratin: Mit Käse überbacken ein Gedicht!
* Rosenkohl-Salat mit Granatapfel und Walnüssen: Eine frische und knackige Variante.
* Rosenkohl-Suppe: Wärmt von innen!
Fazit:
Rosenkohl anbauen ist gar nicht so schwer, wie du vielleicht denkst. Mit ein wenig Geduld und Pflege kannst du eine reiche Ernte erzielen und dich über
Conclusion
So, there you have it! Growing Brussels sprouts, while it might seem intimidating at first, is entirely achievable for beginners with a little patience and the right approach. We’ve walked you through the entire process, from selecting the perfect variety to harvesting those delicious, miniature cabbages. The beauty of this DIY project lies not only in the satisfaction of nurturing your own food but also in the superior flavor and freshness you simply can’t replicate with store-bought options.
Think about it: no more bland, overcooked Brussels sprouts! Instead, imagine plates piled high with tender, slightly sweet sprouts, roasted to perfection with a drizzle of balsamic glaze, or perhaps shredded into a vibrant salad with cranberries and pecans. The possibilities are endless, and the flavor is undeniably superior when you’ve grown them yourself.
But the benefits extend beyond just taste. By growing your own Brussels sprouts, you’re also contributing to a more sustainable lifestyle. You’re reducing your carbon footprint by eliminating the need for transportation and packaging, and you’re gaining a deeper connection to the food you eat. Plus, gardening is a fantastic way to relieve stress and get some much-needed fresh air and sunshine.
Don’t be afraid to experiment with different varieties to find your favorites. Consider trying ‘Long Island Improved’ for a classic flavor, or ‘Redarling’ for a beautiful splash of color in your garden. You can also adjust the spacing between plants to influence the size of the sprouts – closer spacing will result in smaller sprouts, while wider spacing will allow them to grow larger.
And remember, even experienced gardeners encounter challenges. Don’t get discouraged if you face setbacks along the way. Learn from your mistakes, adapt your approach, and keep trying. The reward of harvesting your own homegrown Brussels sprouts is well worth the effort.
We wholeheartedly encourage you to give this DIY project a try. It’s a rewarding experience that will not only enhance your culinary skills but also connect you with nature in a meaningful way. We are confident that you will find the process of **growing Brussels sprouts** to be both enjoyable and fulfilling.
Once you’ve harvested your first crop, we’d love to hear about your experience! Share your tips, tricks, and triumphs in the comments below. Let’s build a community of Brussels sprout enthusiasts and learn from each other. Happy gardening!
Frequently Asked Questions (FAQs)
Q: How long does it take to grow Brussels sprouts from seed?
A: Generally, it takes around 80 to 100 days from transplanting seedlings to harvesting your Brussels sprouts. Starting from seed indoors adds a few weeks to that timeframe, so plan accordingly. The exact time can vary depending on the variety you choose and the specific growing conditions in your area. Keep a close eye on your plants and check for signs of maturity, such as firm, tightly closed sprouts.
Q: What are the most common pests and diseases that affect Brussels sprouts, and how can I prevent them?
A: Brussels sprouts are susceptible to several pests and diseases, including cabbage worms, aphids, clubroot, and downy mildew. To prevent these problems, practice crop rotation, use row covers to protect your plants from pests, and choose disease-resistant varieties. Regularly inspect your plants for signs of infestation or disease, and take action promptly if you notice any problems. Organic pest control methods, such as insecticidal soap or neem oil, can be effective for managing pests. Ensure good air circulation around your plants to minimize the risk of fungal diseases.
Q: Can I grow Brussels sprouts in containers?
A: Yes, you can grow Brussels sprouts in containers, but you’ll need to choose a large container (at least 12 inches in diameter and depth) to accommodate their root system. Use a high-quality potting mix and ensure the container has good drainage. Container-grown Brussels sprouts may require more frequent watering and fertilization than those grown in the ground. Choose a compact variety that is well-suited for container gardening.
Q: How often should I water my Brussels sprouts?
A: Brussels sprouts need consistent moisture, especially during hot, dry weather. Water deeply whenever the top inch of soil feels dry to the touch. Avoid overwatering, as this can lead to root rot. Mulching around your plants can help retain moisture and suppress weeds.
Q: When is the best time to harvest Brussels sprouts?
A: Brussels sprouts are typically ready to harvest in the fall or early winter, after they’ve been exposed to a few light frosts. Frost actually improves the flavor of Brussels sprouts, making them sweeter and more tender. Harvest the sprouts from the bottom of the stalk upwards, as they mature. The sprouts should be firm, tightly closed, and about 1 to 2 inches in diameter.
Q: How do I store harvested Brussels sprouts?
A: Store harvested Brussels sprouts in the refrigerator in a plastic bag or container. They will keep for up to a week. For longer storage, you can freeze Brussels sprouts after blanching them for a few minutes.
Q: What kind of fertilizer should I use for Brussels sprouts?
A: Brussels sprouts are heavy feeders and benefit from regular fertilization. Use a balanced fertilizer with a higher phosphorus content to promote root development. You can also amend the soil with compost or well-rotted manure before planting. Side-dress your plants with fertilizer every few weeks during the growing season.
Q: Can I grow Brussels sprouts in partial shade?
A: While Brussels sprouts prefer full sun (at least 6 hours of direct sunlight per day), they can tolerate partial shade. However, plants grown in partial shade may produce smaller sprouts and take longer to mature. If you live in a hot climate, providing some afternoon shade can help prevent the sprouts from becoming bitter.
Q: My Brussels sprouts are bolting (going to seed). What should I do?
A: Bolting is usually caused by stress, such as extreme heat or drought. Once Brussels sprouts start to bolt, the sprouts will become bitter and inedible. To prevent bolting, provide consistent moisture, protect your plants from extreme temperatures, and harvest the sprouts as soon as they are mature.
Q: Are there any companion plants that are beneficial for Brussels sprouts?
A: Yes, several companion plants can benefit Brussels sprouts. These include herbs like rosemary, thyme, and sage, which can help repel pests. Marigolds are also effective at deterring nematodes. Planting legumes like beans or peas nearby can help fix nitrogen in the soil, which is beneficial for Brussels sprouts. Avoid planting Brussels sprouts near other members of the cabbage family, as they can attract the same pests and diseases.

Leave a Comment