
Growing bell peppers indoors might seem like a challenge reserved for seasoned gardeners, but trust me, it’s totally achievable, even if you’re just starting out! Have you ever dreamt of plucking a vibrant, juicy bell pepper straight from your own indoor garden, even when the snow is falling outside? Well, stop dreaming and start doing! This guide is packed with simple, effective DIY tricks and hacks that will transform your windowsill into a mini pepper paradise.
Bell peppers, originating from Central and South America, have been cultivated for thousands of years, becoming a staple in cuisines worldwide. From the fiery flavors of Mexican dishes to the colorful additions in Mediterranean salads, bell peppers bring a unique sweetness and crunch to our plates. But why rely solely on grocery stores when you can cultivate your own supply, tailored to your exact preferences?
In today’s world, where access to fresh, healthy produce can sometimes be limited or expensive, learning how to grow your own food is more important than ever. Growing bell peppers indoors not only provides you with delicious, organic peppers, but it also offers a therapeutic and rewarding experience. Imagine the satisfaction of nurturing a tiny seed into a thriving plant, knowing exactly where your food comes from and how it was grown. Plus, it’s a fantastic way to add a touch of green to your living space and boost your mood! So, let’s dive into these easy-to-follow DIY tricks and unlock the secrets to a bountiful indoor bell pepper harvest!
Paprika im Haus anbauen: Dein umfassender DIY-Leitfaden
Hallo liebe Gartenfreunde! Habt ihr auch genug von teuren Paprika aus dem Supermarkt, die kaum Geschmack haben? Oder wohnt ihr in einer Gegend, in der das Wetter einfach nicht mitspielt? Keine Sorge, ich zeige euch, wie ihr eure eigenen, saftigen Paprika ganz einfach im Haus anbauen könnt! Es ist einfacher als ihr denkt und macht unglaublich viel Spaß. Lasst uns loslegen!
Was du brauchst: Die richtige Ausrüstung
Bevor wir anfangen, müssen wir sicherstellen, dass wir alles haben, was wir brauchen. Hier ist eine Liste der wichtigsten Dinge:
* Paprikasamen: Wählt eure Lieblingssorten! Es gibt unzählige Farben und Geschmacksrichtungen. Achtet darauf, dass die Samen für den Anbau in Töpfen geeignet sind.
* Anzuchttöpfe oder -schalen: Kleine Töpfe oder Schalen sind perfekt für den Start.
* Anzuchterde: Diese Erde ist speziell für junge Pflanzen formuliert und enthält alle wichtigen Nährstoffe.
* Größere Töpfe: Wenn die Pflanzen größer werden, brauchen sie mehr Platz. Töpfe mit einem Durchmesser von mindestens 20 cm sind ideal.
* Blumenerde: Eine gute Blumenerde sorgt für eine optimale Nährstoffversorgung.
* Pflanzenlampe (optional, aber empfohlen): Paprika brauchen viel Licht. Eine Pflanzenlampe hilft, besonders in den dunkleren Monaten.
* Sprühflasche: Zum Befeuchten der Erde.
* Dünger: Ein Flüssigdünger für Gemüse ist ideal.
* Pflanzstäbe oder Rankgitter: Um die Pflanzen zu stützen, wenn sie Früchte tragen.
Phase 1: Die Aussaat – Der Start ins Paprika-Glück
Die Aussaat ist der erste und wichtigste Schritt. Hier legen wir den Grundstein für eine reiche Ernte.
1. Vorbereitung der Anzuchttöpfe: Füllt die Anzuchttöpfe oder -schalen mit Anzuchterde. Drückt die Erde leicht an.
2. Aussaat der Samen: Legt 2-3 Samen pro Topf auf die Erde. Bedeckt die Samen mit einer dünnen Schicht Erde (ca. 0,5 cm).
3. Bewässerung: Befeuchtet die Erde vorsichtig mit einer Sprühflasche. Die Erde sollte feucht, aber nicht nass sein.
4. Abdeckung (optional): Ihr könnt die Töpfe mit Frischhaltefolie oder einem Deckel abdecken, um die Luftfeuchtigkeit zu erhöhen. Vergesst nicht, regelmäßig zu lüften, um Schimmelbildung zu vermeiden.
5. Standort: Stellt die Töpfe an einen warmen und hellen Ort. Eine Temperatur von 20-25°C ist ideal.
6. Geduld: Jetzt heißt es warten. Die Keimung dauert in der Regel 1-3 Wochen. Haltet die Erde feucht und lüftet regelmäßig.
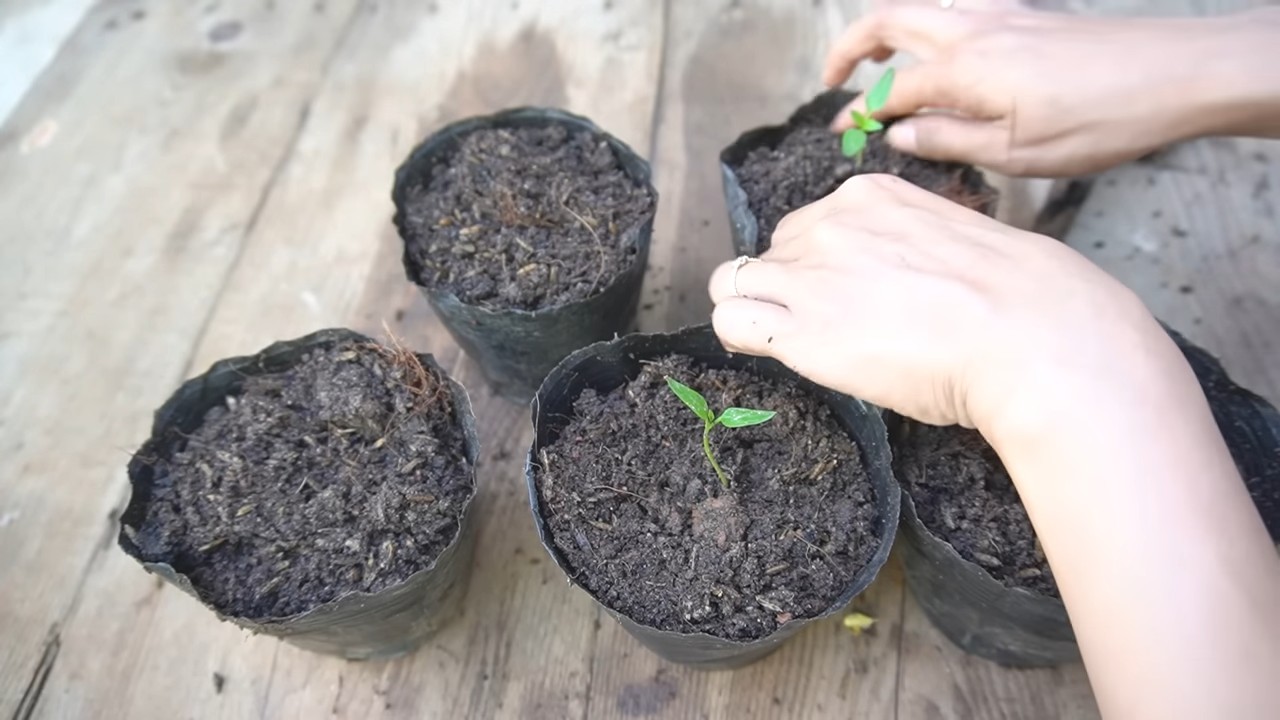
Phase 2: Pikieren – Den Pflanzen mehr Raum geben
Sobald die Sämlinge ihre ersten richtigen Blätter (neben den Keimblättern) entwickelt haben, ist es Zeit zum Pikieren. Das bedeutet, dass wir die kleinen Pflanzen in größere Töpfe umsetzen, damit sie mehr Platz zum Wachsen haben.
1. Vorbereitung der größeren Töpfe: Füllt die größeren Töpfe mit Blumenerde. Macht in der Mitte ein kleines Loch.
2. Entnahme der Sämlinge: Löst die Sämlinge vorsichtig aus den Anzuchttöpfen. Achtet darauf, die Wurzeln nicht zu beschädigen. Ihr könnt dafür einen kleinen Löffel oder einen Pikierstab verwenden.
3. Einsetzen der Sämlinge: Setzt die Sämlinge in die vorbereiteten Löcher in den größeren Töpfen. Füllt die Löcher mit Erde auf und drückt sie leicht an.
4. Bewässerung: Gießt die Pflanzen vorsichtig an.
5. Standort: Stellt die Töpfe an einen hellen und warmen Ort.
Phase 3: Pflege – Damit die Paprika prächtig gedeihen
Die richtige Pflege ist entscheidend für eine reiche Ernte. Hier sind einige Tipps, die ihr beachten solltet:
* Bewässerung: Gießt die Paprikapflanzen regelmäßig, aber vermeidet Staunässe. Die Erde sollte immer leicht feucht sein.
* Düngung: Düngt die Pflanzen alle 2-3 Wochen mit einem Flüssigdünger für Gemüse. Achtet auf die Dosierungsanleitung auf der Verpackung.
* Licht: Paprika brauchen viel Licht. Wenn ihr nicht genügend Sonnenlicht habt, solltet ihr eine Pflanzenlampe verwenden. Die Pflanzen sollten mindestens 6-8 Stunden Licht pro Tag bekommen.
* Temperatur: Die ideale Temperatur für Paprika liegt zwischen 20 und 25°C. Vermeidet extreme Temperaturschwankungen.
* Belüftung: Sorgt für eine gute Belüftung, um Schimmelbildung zu vermeiden.
* Stützung: Wenn die Pflanzen Früchte tragen, können sie schwer werden. Stützt die Pflanzen mit Pflanzstäben oder Rankgittern, um zu verhindern, dass sie umknicken.
* Ausgeizen: Entfernt regelmäßig die Seitentriebe (Geiztriebe), die zwischen dem Haupttrieb und den Blättern wachsen. Dadurch wird die Energie der Pflanze in die Fruchtbildung gelenkt.
Phase 4: Bestäubung – Hilfe für die Fruchtbildung
Paprika sind selbstbestäubend, aber manchmal brauchen sie etwas Hilfe. Besonders im Haus, wo es keine Insekten gibt, die die Bestäubung übernehmen können.
1. Manuelle Bestäubung: Ihr könnt die Blüten vorsichtig mit einem kleinen Pinsel bestäuben. Streicht einfach mit dem Pinsel über die Staubgefäße (die gelben Teile in der Blüte) und dann über die Narbe (den klebrigen Teil in der Mitte der Blüte).
2. Schütteln: Ihr könnt die Pflanzen auch vorsichtig schütteln, um die Pollen zu verteilen.
Phase 5: Ernte – Der Lohn der Mühe
Endlich ist es soweit! Die Paprika sind reif und können geerntet werden.
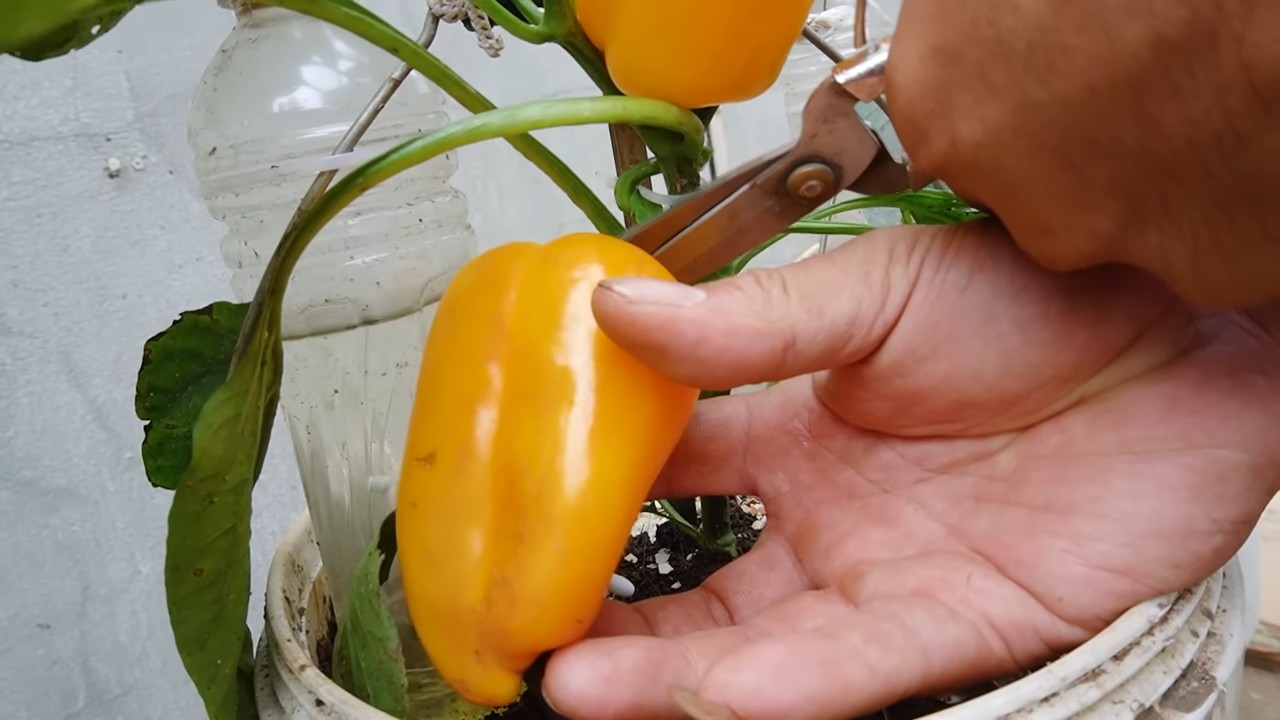
1. Reife erkennen: Die Paprika sind reif, wenn sie ihre endgültige Farbe erreicht haben und sich fest anfühlen.
2. Ernten: Schneidet die Paprika mit einem scharfen Messer oder einer Schere ab. Achtet darauf, die Pflanze nicht zu beschädigen.
3. Genießen: Jetzt könnt ihr eure selbst angebauten Paprika genießen! Sie schmecken frisch und aromatisch.
Zusätzliche Tipps und Tricks
* Schädlinge: Achtet auf Schädlinge wie Blattläuse oder Spinnmilben. Bei Befall könnt ihr die Pflanzen mit einem natürlichen Insektizid behandeln.
* Krankheiten: Achtet auf Krankheiten wie Mehltau oder Grauschimmel. Bei Befall solltet ihr die befallenen Blätter entfernen und die Pflanzen mit einem Fungizid behandeln.
* Sortenwahl: Wählt Sorten, die für den Anbau in Töpfen geeignet sind. Es gibt viele Zwergsorten, die sich besonders gut eignen.
* Umpflanzen ins Freie: Wenn das Wetter es zulässt, könnt ihr die Paprikapflanzen auch ins Freie umpflanzen. Achtet darauf, sie langsam an die Sonne zu gewöhnen, um Sonnenbrand zu vermeiden.
Häufige Fehler vermeiden
* Zu viel Gießen: Staunässe kann zu Wurzelfäule führen. Gießt die Pflanzen nur, wenn die Erde trocken ist.
* Zu wenig Licht: Paprika brauchen viel Licht. Wenn sie zu wenig Licht bekommen, werden sie lang und dünn.
* Falsche Erde: Verwendet die richtige Erde für Paprika. Anzuchterde für die Aussaat und Blumenerde für die größeren Töpfe.
* Zu wenig Dünger: Paprika brauchen regelmäßig Dünger, um gut zu wachsen und Früchte zu tragen.
* Schädlinge ignorieren: Kontrolliert die Pflanzen regelmäßig auf Schädlinge und behandelt sie bei Befall.
Ich hoffe, dieser Leitfaden hilft euch dabei, eure eigenen Paprika im Haus anzubauen. Es ist ein lohnendes Hobby, das euch mit frischen
Conclusion
So, there you have it! Growing bell peppers indoors might seem like a daunting task at first, but with the right knowledge, a little patience, and our simple DIY trick, you can enjoy fresh, vibrant bell peppers straight from your home, regardless of the season. This method isn’t just about convenience; it’s about taking control of your food source, reducing your carbon footprint, and experiencing the immense satisfaction of nurturing life from seed to harvest.
Why is this DIY trick a must-try? Because it empowers you to bypass the limitations of climate and space. No longer are you beholden to the unpredictable whims of the weather or the constraints of a large garden. You can cultivate delicious, nutritious bell peppers in a sunny corner of your apartment, on a balcony, or even under grow lights in a basement. This method is also incredibly cost-effective in the long run. Think about it: no more trips to the grocery store for overpriced, often lackluster bell peppers. You’ll have a steady supply of fresh produce, grown with your own hands, and free from harmful pesticides.
But the benefits extend beyond the practical. There’s a certain magic to watching a tiny seed sprout, grow, and eventually bear fruit. It’s a connection to nature that can be incredibly grounding and rewarding, especially in our increasingly urbanized world. And let’s not forget the sheer deliciousness of a homegrown bell pepper, bursting with flavor and sweetness that you simply can’t find in store-bought varieties.
Looking for variations? Absolutely! Experiment with different bell pepper varieties. Try growing miniature bell peppers for snacking, or opt for colorful varieties like purple, yellow, or orange for a visually stunning and flavorful addition to your meals. You can also adjust the soil mix to suit your specific needs. Some gardeners prefer a slightly more acidic soil, while others find that adding compost tea regularly enhances growth and fruit production. Consider companion planting within your indoor garden. Basil, for example, is known to repel pests and improve the flavor of bell peppers. Marigolds are another excellent choice for pest control.
Don’t be afraid to get creative with your lighting setup. While natural sunlight is ideal, grow lights can be a game-changer, especially during the darker months. Experiment with different types of grow lights to find what works best for your space and budget. LED grow lights are energy-efficient and long-lasting, making them a popular choice for indoor gardeners.
The most important thing is to start! Don’t let the fear of failure hold you back. Gardening is a learning process, and even experienced gardeners encounter challenges along the way. Embrace the journey, learn from your mistakes, and celebrate your successes.
We wholeheartedly encourage you to try this DIY trick for growing bell peppers indoors. It’s a rewarding experience that will not only provide you with fresh, delicious produce but also connect you to the natural world in a meaningful way. Once you’ve given it a try, we’d love to hear about your experience! Share your tips, tricks, and photos with us in the comments below. Let’s build a community of indoor bell pepper enthusiasts and inspire others to embark on this exciting journey. Let us know what challenges you faced and how you overcame them. What varieties did you try? What did you learn? Your insights could be invaluable to other aspiring indoor gardeners. Together, we can unlock the secrets to successful indoor bell pepper cultivation and enjoy the bounty of our own homegrown harvests. Remember, the key to successful **growing bell peppers indoors** is patience, observation, and a willingness to learn. Happy gardening!
FAQ
What is the best location for growing bell peppers indoors?
The ideal location for growing bell peppers indoors is a spot that receives at least 6-8 hours of direct sunlight per day. A south-facing window is often the best option. If you don’t have access to sufficient natural light, you’ll need to supplement with grow lights. Position the grow lights about 6-12 inches above the plants and ensure they provide a full spectrum of light. Rotate your plants regularly to ensure even light exposure on all sides.
What type of soil is best for indoor bell peppers?
Bell peppers thrive in well-draining, nutrient-rich soil. A good potting mix for indoor bell peppers should consist of a combination of peat moss, perlite, and vermiculite. You can also add compost or aged manure to enrich the soil and provide essential nutrients. Avoid using garden soil, as it can be too heavy and may contain pests or diseases. The ideal pH level for bell pepper soil is between 6.0 and 6.8.
How often should I water my indoor bell pepper plants?
Water your bell pepper plants regularly, keeping the soil consistently moist but not waterlogged. Check the soil moisture level by sticking your finger about an inch deep into the soil. If it feels dry, it’s time to water. Water deeply, allowing the excess water to drain out of the bottom of the pot. Avoid overwatering, as this can lead to root rot. During hot weather, you may need to water more frequently.
What kind of fertilizer should I use for my bell pepper plants?
Bell peppers are heavy feeders and require regular fertilization to produce abundant fruit. Use a balanced fertilizer with an NPK ratio of 10-10-10 or 14-14-14. Start fertilizing your plants about two weeks after transplanting them into their final pots. Follow the instructions on the fertilizer label for application rates. You can also use organic fertilizers such as compost tea or fish emulsion. Avoid over-fertilizing, as this can burn the roots of your plants.
How do I pollinate my indoor bell pepper plants?
Bell peppers are self-pollinating, but they may need a little help when grown indoors, where there are no bees or other pollinators. You can hand-pollinate your plants by gently shaking the flowers or using a small paintbrush to transfer pollen from one flower to another. Do this in the morning when the pollen is most viable. You can also use a fan to circulate air around the plants, which can help to distribute the pollen.
What are some common pests and diseases that affect indoor bell peppers?
Common pests that can affect indoor bell peppers include aphids, spider mites, and whiteflies. You can control these pests by spraying your plants with insecticidal soap or neem oil. Regularly inspect your plants for signs of infestation and take action promptly. Diseases that can affect indoor bell peppers include powdery mildew and blossom end rot. Powdery mildew can be treated with a fungicide, while blossom end rot is caused by a calcium deficiency and can be prevented by adding calcium to the soil.
How long does it take for bell peppers to mature indoors?
Bell peppers typically take 60-90 days to mature after transplanting, depending on the variety. The time it takes for your peppers to mature indoors may vary depending on the growing conditions. Be patient and continue to provide your plants with the care they need. You’ll know your peppers are ready to harvest when they are fully colored and firm to the touch.
Can I grow bell peppers indoors year-round?
Yes, you can grow bell peppers indoors year-round, provided you have adequate light and temperature control. During the winter months, you may need to supplement with grow lights to ensure your plants receive enough light. Maintain a consistent temperature of 70-80°F during the day and 60-70°F at night. With proper care, you can enjoy fresh, homegrown bell peppers all year long.
What size pot should I use for growing bell peppers indoors?
Use a pot that is at least 5 gallons in size. This will give the roots enough room to grow and support the plant. Make sure the pot has drainage holes to prevent waterlogging.
How do I prevent blossom end rot on my bell peppers?
Blossom end rot is caused by a calcium deficiency. To prevent it, make sure your soil is rich in calcium and that you are watering your plants consistently. You can also add calcium to the soil by using bone meal or eggshells.
Leave a Comment