
Growing Basil Indoors can seem like a daunting task, conjuring images of withered leaves and leggy stems. But fear not, fellow plant enthusiasts! I’m here to tell you that fresh, fragrant basil is absolutely within your reach, no matter the season or the size of your outdoor space. Forget those sad, expensive bunches from the grocery store – imagine snipping vibrant, aromatic leaves right from your kitchen windowsill whenever you need them!
Basil, with its origins tracing back to ancient India, has been revered for centuries, not just for its culinary prowess but also for its medicinal and even spiritual significance. In some cultures, it’s a symbol of love and good fortune. While we might not be warding off evil spirits with our indoor basil, we *are* bringing a touch of that ancient magic into our homes, one delicious pesto at a time.
So, why should you bother learning these DIY tricks for growing basil indoors? Well, for starters, it’s incredibly rewarding! There’s something deeply satisfying about nurturing a plant from seed to harvest. Plus, having fresh basil on hand elevates any dish, from simple pasta sauces to gourmet pizzas. And let’s be honest, in today’s world, saving a few bucks while enjoying fresh, homegrown herbs is a win-win. This article will equip you with simple, effective DIY hacks to ensure your indoor basil thrives, bringing a burst of flavor and fragrance to your life, all year round. Let’s get started!
Growing Basil Indoors: Your DIY Guide for Fresh Greens All Year Round
Hello, dear garden friends! Who doesn’t love the scent of fresh basil? Whether in pasta, pesto, or simply as a garnish—basil is a true all-rounder. But what happens when summer is over and the garden goes into hibernation? Don’t worry, I’ll show you how you can easily grow basil indoors, so you have fresh greens all year round!
What You Need: The Basic Basil Equipment
Before we get started, here is a list of everything you’ll need for your indoor basil project:
- Basil seeds: It’s best to choose organic seeds to ensure they haven’t been treated with pesticides. There are various basil varieties, such as Genovese, Thai, or lemon basil. Try them out to see which one you like best!
- Seed-starting mix: Regular potting soil is often too nutrient-rich for the delicate seedlings. Seed-starting mix is finer and contains fewer nutrients, which promotes root growth.
- Small starter pots or a seed tray: These come in different sizes and materials. Peat-free options are more environmentally friendly.
- Larger pots (approx. 10-15 cm / 4-6 inches in diameter): Once the basil plants get bigger, they will need more space.
- Potting soil: Here you can use a high-quality potting soil that drains well and contains enough nutrients.
- A spray bottle: For moistening the soil.
- A bright windowsill or a grow light: Basil needs a lot of light!
- Optional: Small scissors or tweezers: For thinning out the seedlings.
- Optional: Liquid fertilizer for herbs: For an optimal supply of nutrients.
Sowing: The Start of Your Basil Garden
Now let’s get down to it! Sowing is the first step to your own indoor basil.
- Prepare the starter pots: Fill the starter pots with seed-starting mix. Press the soil down lightly, but not too firmly. It should remain loose and airy.
- Sow the seeds: Sprinkle the basil seeds evenly over the soil. Since basil is a light germinator, cover the seeds only lightly with soil. A thin layer is perfectly sufficient.
- Water: Gently moisten the soil with the spray bottle. The soil should be damp, but not wet. Avoid waterlogging, as this can lead to mold.
- The right location: Place the starter pots in a warm and bright location. A south-facing windowsill is ideal. The temperature should be between 20 and 25 degrees Celsius (68-77°F).
- Patience is key: Now it’s time to wait. Germination usually takes 7-14 days. Keep the soil moist during this time, but avoid waterlogging. You can also cover the pots with plastic wrap to increase humidity. But don’t forget to ventilate the wrap regularly to prevent mold.
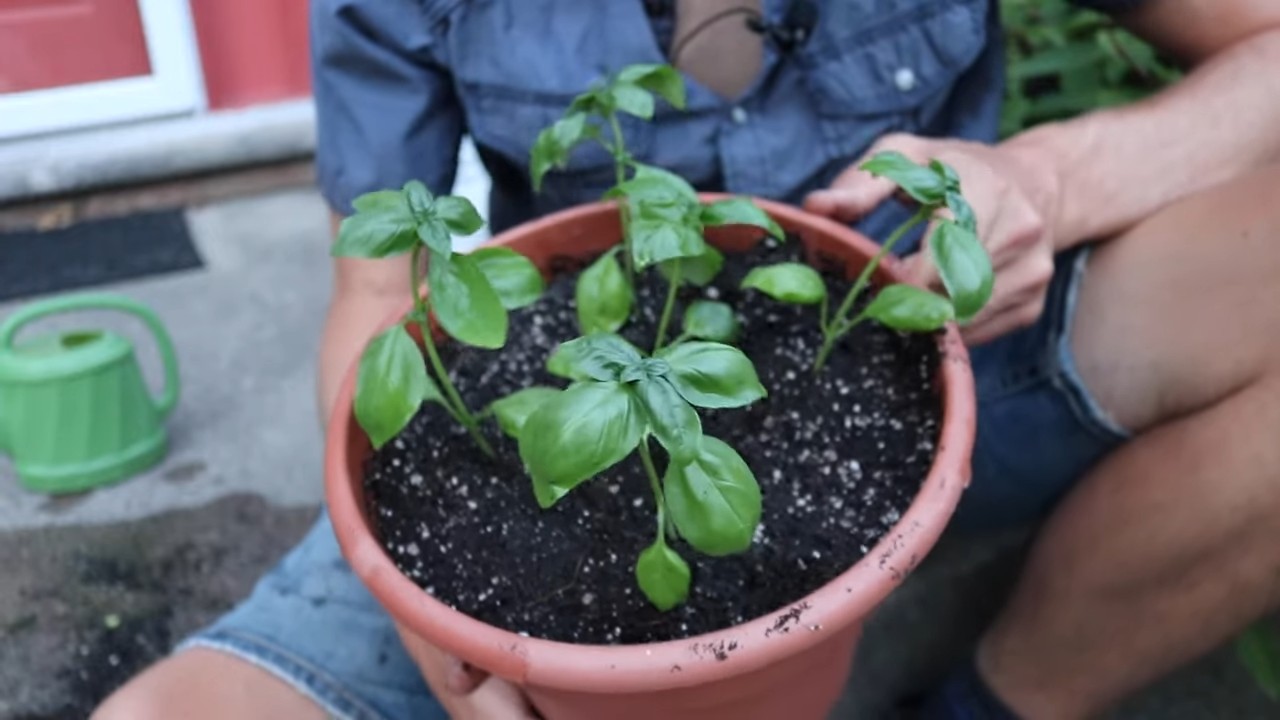
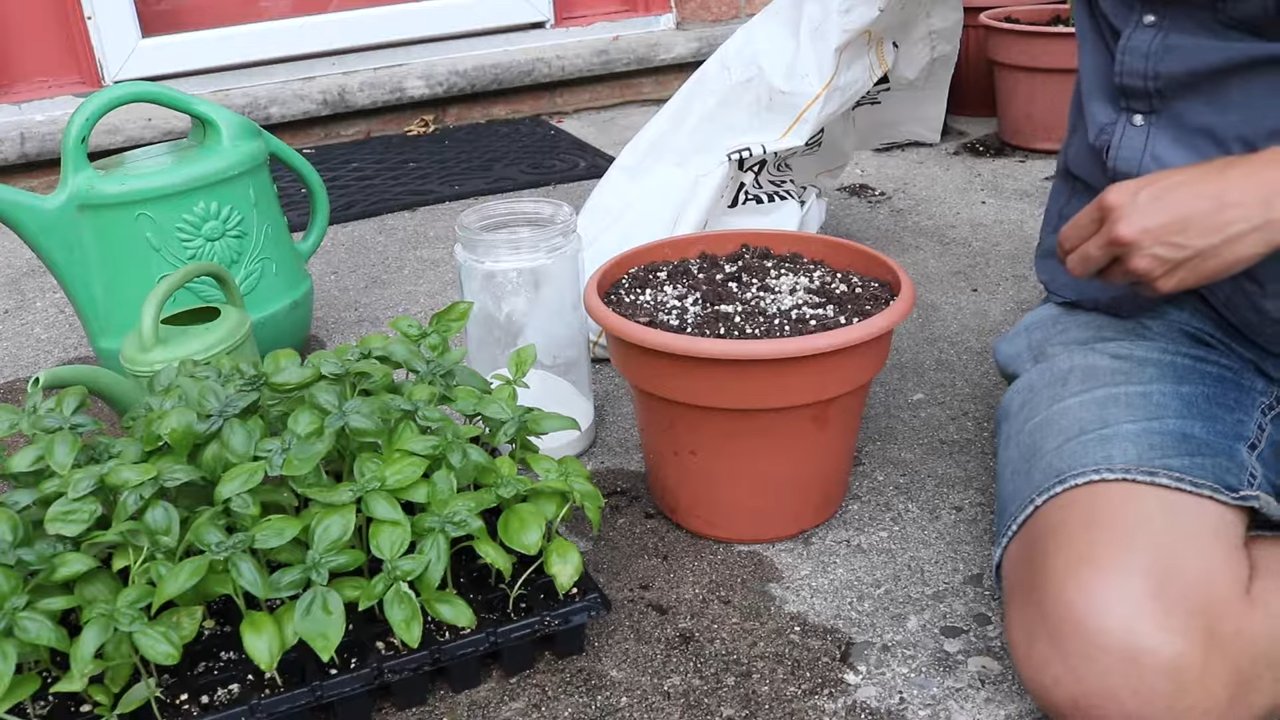
Thinning Out: Making Room for Growth
As soon as the first seedlings appear, it’s time to thin them out. This means you transplant the small plantlets into larger pots so they have enough space to grow.
- Select the strongest seedlings: Choose the strongest and healthiest seedlings. These usually have a thick stem and healthy leaves.
- Careful removal: Gently loosen the seedlings from the soil with small scissors or tweezers. Be careful not to damage the roots.
- Transplant into larger pots: Fill the larger pots with potting soil. Make a small hole in the soil and place the seedling inside. Fill the hole with soil and press it down lightly.
- Water: Gently water the transplanted seedlings.
- The right location: Place the pots in a bright and warm location.
Care: So Your Basil Thrives
Proper care is crucial for the growth and health of your basil.
- Watering: Basil needs regular water, but waterlogging should be avoided. Water the plants when the top layer of soil feels dry.
- Light: Basil needs a lot of light, at least 6 hours per day. If you don’t have a bright windowsill, you can use a grow light.
- Fertilizing: Fertilize the basil plants every 2-3 weeks with a liquid fertilizer for herbs. Be sure to follow the dosage instructions on the packaging.
- Regular harvesting: By regularly harvesting the leaves, you promote the growth of the plant. It’s best to cut the leaves just above a leaf node. This will cause the plant to branch out and become bushier.
- Remove flowers: If your basil produces flowers, you should remove them. Flowering costs the plant a lot of energy and reduces leaf production.
Common Problems and Solutions
Even with indoor basil, problems can occur. Here are some common problems and how you can solve them:
- Yellow leaves: Yellow leaves can be a sign of overwatering, nutrient deficiency, or too little light. Check your watering habits, fertilize the plant, and move it to a brighter location.
- Mold formation: Mold can be caused by excessive humidity or waterlogging. Ensure good ventilation and avoid waterlogging.
- Pests: Indoor basil can also be infested by pests, such as aphids or spider mites. Spray the plant with a natural insecticide or wipe the leaves with a damp cloth.
Harvest: The Reward for Your Effort
After a few weeks, you can finally harvest your own basil!
- The right time: Harvest the leaves when they are large enough. It’s best to harvest in the morning when the leaves are still full of essential oils.
- The right technique: Cut the leaves just above a leaf node. This will cause the plant to branch out and become bushier.
- Use: Use the fresh basil immediately or freeze it to make it last longer.
Additional Tips for Basil Success
- Rotate the pots regularly: So that all sides of the plant receive even light.
- Pay attention to humidity: Basil likes high humidity. You can increase the humidity by placing a bowl of water near the plant or by regularly spraying the leaves with water.
- Use good potting soil: High-quality potting soil is important for the growth and health of the plant.
- Be patient: Basil takes time to grow. Be patient and don’t give up!
With these tips and tricks, you can easily grow your own basil indoors and enjoy fresh greens all year round. Happy gardening
Conclusion
So, there you have it! Mastering the art of growing basil indoors is not only achievable but also incredibly rewarding. We’ve walked through the essential steps, from selecting the right variety and providing optimal lighting to ensuring proper watering and addressing potential challenges. But why is this DIY trick a must-try?
Firstly, imagine the convenience of having fresh, fragrant basil readily available at your fingertips, regardless of the season. No more last-minute trips to the grocery store or settling for dried herbs that lack the vibrant flavor of fresh basil. This is especially beneficial for those who live in colder climates or have limited access to outdoor gardening space.
Secondly, growing your own basil allows you to control the quality and source of your herbs. You can be confident that your basil is free from harmful pesticides and herbicides, ensuring a healthier and more flavorful addition to your meals. Plus, it’s a sustainable practice that reduces your carbon footprint by eliminating the need for transportation and packaging.
Thirdly, and perhaps most importantly, growing basil indoors is a deeply satisfying experience. Nurturing a plant from seed to harvest is a rewarding process that connects you with nature and provides a sense of accomplishment. Watching your basil thrive under your care is a simple pleasure that can brighten your day.
Now, let’s talk about variations and suggestions. While we’ve focused on traditional sweet basil, don’t be afraid to experiment with other varieties. Thai basil, with its anise-like flavor, is perfect for Asian-inspired dishes. Lemon basil adds a citrusy twist to salads and sauces. Purple basil brings a beautiful color and unique flavor to your culinary creations. You can even try growing multiple varieties in separate pots to create a diverse herb garden.
Consider using different types of containers as well. While terracotta pots are classic and allow for good drainage, you can also use self-watering pots, which are particularly helpful for beginners. Vertical planters are a great option for maximizing space in small apartments.
Another suggestion is to propagate your basil cuttings. Once your basil plant is established, you can easily take cuttings and root them in water to create new plants. This is a cost-effective way to expand your basil garden and share your bounty with friends and family.
Finally, remember that growing basil indoors is a learning process. Don’t be discouraged if you encounter challenges along the way. Experiment with different techniques, observe your plants closely, and adjust your approach as needed. The key is to be patient, persistent, and passionate about your basil.
We are confident that with a little effort and attention, you can successfully grow your own thriving basil indoors. So, what are you waiting for? Grab a pot, some seeds, and get started today! We encourage you to try this DIY trick and share your experience with us. Let us know what varieties you’re growing, what challenges you’ve faced, and what tips you’ve discovered. Share your photos and stories on social media using [Your Hashtag Here] and join our community of indoor basil enthusiasts. We can’t wait to see your green thumbs in action!
Frequently Asked Questions (FAQ)
1. What is the best type of basil to grow indoors?
The best type of basil to grow indoors is generally sweet basil (Ocimum basilicum). It’s relatively easy to grow, adapts well to indoor conditions, and is widely used in various cuisines. However, you can also experiment with other varieties like Thai basil, lemon basil, or purple basil, depending on your preferences and culinary needs. Each variety has its unique flavor profile and may require slightly different care. For example, Thai basil might need a bit more warmth, while lemon basil could benefit from slightly less watering. Consider your personal taste and the types of dishes you plan to use the basil in when making your selection.
2. How much light does indoor basil need?
Basil requires a significant amount of light to thrive indoors. Ideally, it needs at least 6-8 hours of direct sunlight per day. If you don’t have a sunny windowsill, you can supplement with artificial grow lights. Fluorescent or LED grow lights are excellent options. Position the lights a few inches above the plants and keep them on for 12-14 hours a day. Insufficient light can lead to leggy growth, pale leaves, and reduced flavor. Observe your plants closely; if they are stretching towards the light, it’s a sign that they need more illumination.
3. How often should I water my indoor basil plant?
Watering frequency depends on several factors, including the size of the pot, the type of soil, and the ambient temperature. Generally, you should water your basil plant when the top inch of soil feels dry to the touch. Avoid overwatering, as this can lead to root rot. Ensure that the pot has drainage holes to allow excess water to escape. During warmer months, you may need to water more frequently than during cooler months. Check the soil moisture regularly and adjust your watering schedule accordingly. A good rule of thumb is to water deeply but infrequently, allowing the soil to dry out slightly between waterings.
4. What kind of soil is best for growing basil indoors?
The best soil for growing basil indoors is a well-draining potting mix. Avoid using garden soil, as it can be too heavy and may not drain properly. A mix of peat moss, perlite, and vermiculite is a good option. You can also add some compost to provide extra nutrients. The soil should be loose and airy to allow for good root development. Ensure that the pH level is slightly acidic to neutral (around 6.0-7.0). You can test the soil pH using a soil testing kit.
5. How do I fertilize my indoor basil plant?
Basil is a relatively heavy feeder and benefits from regular fertilization. Use a balanced liquid fertilizer diluted to half strength every 2-4 weeks. Avoid over-fertilizing, as this can lead to excessive foliage growth at the expense of flavor. Look for a fertilizer that is specifically formulated for herbs or vegetables. You can also use organic fertilizers like compost tea or fish emulsion. Apply the fertilizer after watering to prevent root burn.
6. How do I prevent pests and diseases on my indoor basil plant?
To prevent pests and diseases on your indoor basil plant, start with healthy plants and use clean potting mix. Regularly inspect your plants for signs of pests like aphids, spider mites, or whiteflies. If you spot any pests, you can try washing them off with a strong stream of water or using insecticidal soap. Avoid overcrowding your plants, as this can create a humid environment that is conducive to fungal diseases. Ensure good air circulation by placing a small fan near your plants. If you notice any signs of disease, such as yellowing leaves or powdery mildew, remove the affected leaves immediately and treat the plant with a fungicide if necessary.
7. How do I harvest basil leaves from my indoor plant?
To harvest basil leaves from your indoor plant, pinch off the leaves at the stem, just above a set of leaves. This will encourage the plant to branch out and produce more leaves. Avoid removing more than one-third of the plant’s leaves at a time, as this can stress the plant. You can harvest basil leaves throughout the growing season. The best time to harvest is in the morning, after the dew has dried.
8. How do I propagate basil from cuttings?
Propagating basil from cuttings is a simple and effective way to create new plants. Take a 4-6 inch cutting from a healthy basil plant, removing the lower leaves. Place the cutting in a glass of water, ensuring that the leaves are above the water line. Place the glass in a bright, indirect light location. Change the water every few days. Within a week or two, roots will begin to form. Once the roots are about an inch long, you can transplant the cutting into a pot filled with well-draining potting mix.
9. Why are my basil leaves turning yellow?
Yellowing basil leaves can be caused by several factors, including overwatering, underwatering, nutrient deficiencies, or pests. Check the soil moisture to ensure that you are not overwatering or underwatering. If the soil is consistently wet, reduce your watering frequency. If the soil is dry, water more frequently. If you suspect a nutrient deficiency, fertilize your plant with a balanced liquid fertilizer. Inspect your plants for pests and treat them accordingly.
10. My basil plant is flowering. What should I do?
When basil plants start to flower, they tend to produce fewer leaves and the leaves may become bitter. To prevent flowering, pinch off the flower buds as soon as you see them. This will encourage the plant to focus its energy on producing more leaves. If your basil plant has already flowered, you can still harvest the leaves, but they may not be as flavorful. You can also collect the seeds from the flowers and use them to grow new basil plants.
Leave a Comment