
Grow watermelons early season? Absolutely! Imagine sinking your teeth into a juicy, sun-ripened watermelon weeks before your neighbors even think about planting theirs. Sounds like a dream, right? Well, it doesn’t have to be! This DIY guide is packed with simple, effective tricks to help you jumpstart your watermelon growing season and enjoy a bountiful harvest sooner than you ever thought possible.
Watermelons have been cultivated for thousands of years, with evidence suggesting their origins trace back to Africa. They’ve always been a symbol of summer, abundance, and sweet refreshment. But traditionally, growing them required patience and a long, warm growing season. What if you could bypass some of that waiting and enjoy that sweet summer taste earlier?
That’s where these DIY hacks come in. Many of us struggle with short summers or unpredictable weather, making it challenging to grow watermelons early season. This article will provide you with practical, easy-to-follow techniques to protect your young plants from late frosts, warm the soil quickly, and give your watermelons the head start they need to thrive. I’m excited to share these tips with you, so you can enjoy the satisfaction of harvesting your own delicious watermelons well before the summer heat truly kicks in!
Wassermelonen-Frühstart: So gelingt dir die frühe Ernte!
Ich liebe Wassermelonen! Aber hier in Deutschland kann die Saison manchmal kurz sein. Deshalb habe ich mir ein paar Tricks angeeignet, um meine Wassermelonen so früh wie möglich zu ernten. Und ich teile sie gerne mit dir! Mit dieser Anleitung kannst auch du deine eigenen, saftigen Wassermelonen genießen, bevor der Sommer überhaupt richtig losgeht.
Die Vorbereitung ist alles: Der richtige Start
Bevor wir loslegen, ist es wichtig, dass wir alles vorbereiten. Das ist die halbe Miete für eine erfolgreiche frühe Ernte.
* Wähle die richtige Sorte: Nicht alle Wassermelonen sind gleich! Einige Sorten reifen schneller als andere. Achte auf Sorten, die als “frühreif” oder “kurztägig” gekennzeichnet sind. Beliebte Optionen sind ‘Sugar Baby’, ‘Bush Sugar Baby’, ‘Golden Midget’ oder ‘Blacktail Mountain’. Diese Sorten sind speziell dafür gezüchtet, in kürzerer Zeit zu reifen.
* Besorge dir das richtige Saatgut: Kaufe dein Saatgut am besten bei einem vertrauenswürdigen Händler. Achte auf frisches Saatgut, da die Keimfähigkeit mit der Zeit abnimmt.
* Der richtige Zeitpunkt: Starte die Anzucht etwa 6-8 Wochen vor dem letzten erwarteten Frost. Das gibt den Pflanzen genug Zeit, um kräftig zu werden, bevor sie ins Freie kommen.
* Die richtige Erde: Verwende eine hochwertige Anzuchterde. Diese ist in der Regel feiner und nährstoffärmer als normale Blumenerde und fördert so die Wurzelbildung.
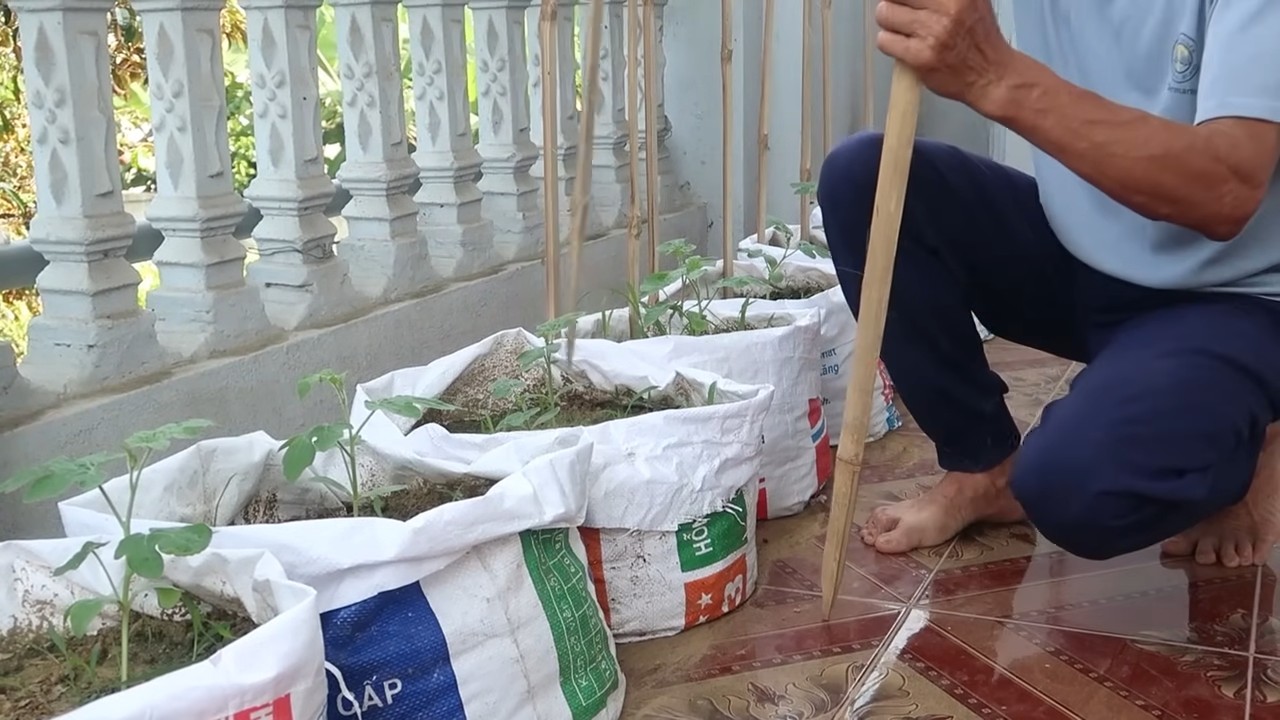
* Die richtigen Töpfe: Wassermelonen entwickeln schnell große Wurzeln. Verwende daher Töpfe mit einem Durchmesser von mindestens 10 cm. Noch besser sind biologisch abbaubare Töpfe, die du später einfach mit der Pflanze ins Beet setzen kannst. Das vermeidet unnötigen Stress für die Wurzeln.
* Der richtige Standort: Wassermelonen lieben Wärme und Licht! Wähle einen sonnigen Platz für die Anzucht, idealerweise auf einer Fensterbank nach Süden.
Schritt-für-Schritt-Anleitung zur Anzucht
Jetzt geht’s ans Eingemachte! Folge diesen Schritten, um deine Wassermelonen-Samen erfolgreich vorzuziehen:
1. Samen vorbereiten (optional): Um die Keimung zu beschleunigen, kannst du die Samen vorquellen lassen. Lege sie dazu für 24 Stunden in lauwarmes Wasser. Das weicht die harte Schale auf und erleichtert das Keimen.
2. Töpfe befüllen: Fülle die Töpfe mit der Anzuchterde. Drücke die Erde leicht an, aber nicht zu fest.
3. Samen säen: Lege pro Topf 2-3 Samen etwa 1-2 cm tief in die Erde. Das gibt dir eine höhere Wahrscheinlichkeit, dass mindestens eine Pflanze keimt.
4. Angießen: Gieße die Erde vorsichtig an, sodass sie gut durchfeuchtet ist. Vermeide Staunässe!
5. Warm und hell stellen: Stelle die Töpfe an einen warmen und hellen Ort. Die ideale Keimtemperatur liegt zwischen 25 und 30 Grad Celsius. Eine Heizmatte kann hier sehr hilfreich sein.
6. Feucht halten: Halte die Erde gleichmäßig feucht, aber nicht nass. Besprühe die Erde bei Bedarf mit einer Sprühflasche.
7. Geduld haben: Die Keimung dauert in der Regel 7-14 Tage. Sobald die ersten Keimlinge erscheinen, kannst du die schwächsten entfernen, sodass nur die kräftigste Pflanze pro Topf übrig bleibt.
Die Umgewöhnung: Abhärten der Pflanzen
Bevor du deine kleinen Wassermelonen-Pflanzen ins Freie pflanzt, musst du sie langsam an die Bedingungen draußen gewöhnen. Dieser Prozess nennt sich “Abhärten” und ist entscheidend, um Schocks und Schäden zu vermeiden.
* Beginne langsam: Stelle die Pflanzen für ein paar Stunden am Tag ins Freie, an einen geschützten Ort ohne direkte Sonneneinstrahlung und Wind.
* Steigere die Zeit: Verlängere die Zeit im Freien jeden Tag um ein paar Stunden.
* Achte auf das Wetter: Vermeide es, die Pflanzen bei starkem Wind, Regen oder Frost ins Freie zu stellen.
* Nach einer Woche: Nach etwa einer Woche sollten die Pflanzen an die Bedingungen draußen gewöhnt sein und können den ganzen Tag im Freien bleiben.
Das Auspflanzen: Der große Tag
Endlich ist es soweit! Deine Wassermelonen-Pflanzen sind bereit, ins Beet umzuziehen.
* Der richtige Zeitpunkt: Warte, bis keine Frostgefahr mehr besteht und die Bodentemperatur mindestens 18 Grad Celsius beträgt. Das ist in der Regel Mitte Mai bis Anfang Juni der Fall.
* Der richtige Standort: Wähle einen sonnigen Standort mit gut durchlässigem Boden. Wassermelonen brauchen viel Platz! Plane etwa 1-1,5 Meter Abstand zwischen den Pflanzen ein.
* Boden vorbereiten: Lockere den Boden gut auf und reicher ihn mit Kompost oder gut verrottetem Mist an. Wassermelonen sind Starkzehrer und brauchen viele Nährstoffe.
* Pflanzlöcher graben: Grabe Pflanzlöcher, die etwas größer sind als die Töpfe, in denen die Pflanzen gewachsen sind.
* Pflanzen einsetzen: Nimm die Pflanzen vorsichtig aus den Töpfen. Wenn du biologisch abbaubare Töpfe verwendet hast, kannst du sie einfach mit der Pflanze ins Beet setzen. Ansonsten achte darauf, die Wurzeln nicht zu beschädigen.
* Angießen: Gieße die Pflanzen nach dem Einsetzen gründlich an.
* Mulchen: Bedecke den Boden um die Pflanzen mit Mulch, z.B. Stroh oder Holzhackschnitzel. Das hält die Feuchtigkeit im Boden, unterdrückt Unkraut und wärmt den Boden auf.
Die Pflege: So bleiben deine Wassermelonen glücklich
Nach dem Auspflanzen ist es wichtig, deine Wassermelonen gut zu pflegen, damit sie prächtig gedeihen.
* Gießen: Gieße die Pflanzen regelmäßig, besonders während trockener Perioden. Wassermelonen brauchen viel Wasser, besonders während der Fruchtbildung. Gieße am besten morgens, damit die Blätter über den Tag abtrocknen können. Das beugt Pilzkrankheiten vor.
* Düngen: Dünge die Pflanzen regelmäßig mit einem organischen Dünger oder einem speziellen Wassermelonen-Dünger. Achte auf eine ausgewogene Nährstoffversorgung.
* Unkraut jäten: Halte das Beet unkrautfrei, damit die Wassermelonen nicht um Nährstoffe und Wasser konkurrieren müssen.
* Schutz vor Schädlingen: Achte auf Schädlinge wie Schnecken, Blattläuse oder Gurkenkäfer. Bekämpfe sie bei Bedarf mit natürlichen Mitteln.
* Rankhilfe (optional): Wenn du wenig Platz hast, kannst du die Wassermelonen an einer Rankhilfe hochziehen. Das spart Platz und sorgt für eine bessere Belüftung der Pflanzen.
* Fruchtansatz fördern: Um den Fruchtansatz zu fördern, kannst du die weiblichen Blüten von Hand bestäuben. Das ist besonders wichtig, wenn es wenig Bienen oder andere Bestäuber in deinem Garten gibt.
Der Trick mit dem schwarzen Mulch
Ein weiterer Trick, um die Wassermelonen-Ernte zu beschleunigen, ist die Verwendung von schwarzem Mulch. Schwarzer Mulch erwärmt den Boden schneller und speichert die Wärme besser. Das fördert das Wachstum der Pflanzen und die Reifung der Früchte. Du kannst entweder fertige Mulchfolie kaufen oder einfach schwarze Plastiktüten zerschneiden und als Mulch verwenden. Achte aber darauf, dass das Wasser noch gut ablaufen kann.
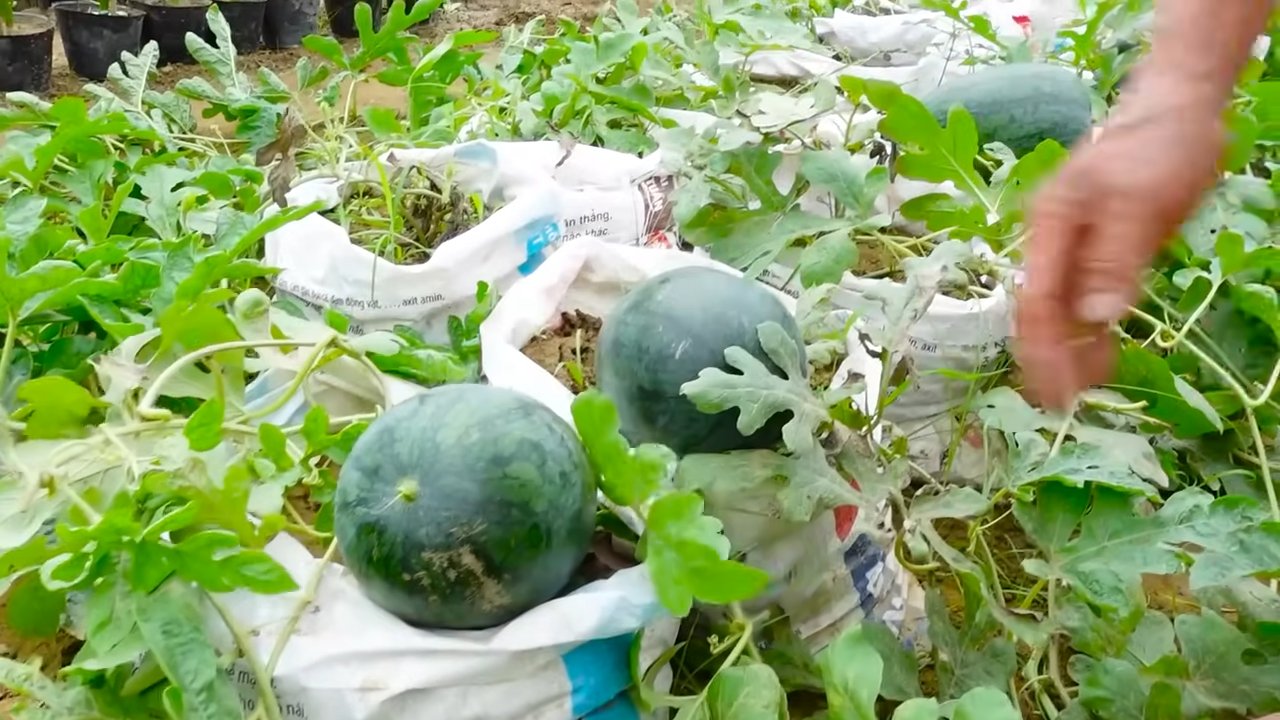
Die Ernte: Der Lohn der Mühe
Nach all der Mühe ist es endlich Zeit, die Früchte deiner Arbeit zu ernten!
* Der richtige Zeitpunkt: Der Zeitpunkt der Ernte ist entscheidend für den Geschmack der Wassermelone. Achte auf folgende Anzeichen:
* Die Ranke, die mit der Frucht verbunden ist, beginnt zu vertrocknen.
* Die Stelle, an der die Wassermelone auf dem Boden liegt, wird gelblich.
* Wenn du auf die Wassermelone kl
Conclusion
So, there you have it! Mastering the art of starting your watermelon seeds indoors is not just a gardening hack; it’s a game-changer for anyone eager to enjoy the sweet taste of homegrown watermelon earlier in the season. By taking control of the initial growing environment, you’re essentially giving your watermelon plants a head start, shielding them from unpredictable weather, pests, and diseases that can often plague young seedlings outdoors. This simple DIY trick dramatically increases your chances of a bountiful harvest, allowing you to savor those juicy slices weeks, even months, before your neighbors who rely solely on direct sowing.
Think about it: no more anxiously watching the weather forecast, hoping for a late frost to spare your precious seedlings. No more battling slugs and snails that seem to have a particular fondness for tender watermelon leaves. Starting your watermelons indoors eliminates these worries, giving you peace of mind and a significant advantage in the race to ripeness.
But the benefits extend beyond just an earlier harvest. Starting indoors also allows you to select the strongest, healthiest seedlings for transplanting. You can carefully monitor their growth, ensuring they receive optimal light, water, and nutrients. This translates to more robust plants that are better equipped to withstand the challenges of the outdoor garden.
Don’t be afraid to experiment with different varieties of watermelon. From the classic Crimson Sweet to the smaller, personal-sized Sugar Baby, there’s a watermelon out there for everyone. You can even try growing heirloom varieties for a unique and flavorful experience. Consider using different types of seed starting mixes to see which one works best for you. Some gardeners swear by peat-based mixes, while others prefer coconut coir or a blend of both.
And why stop at watermelons? This same technique can be applied to other warm-season crops like cantaloupe, honeydew, and even cucumbers. Once you’ve mastered the art of starting seeds indoors, you’ll be amazed at the possibilities.
We encourage you to embrace this DIY trick and experience the satisfaction of growing your own watermelons from seed. It’s a rewarding process that connects you to nature and provides you with delicious, homegrown produce.
Don’t just take our word for it! Try it yourself and see the difference it makes. We’re confident that you’ll be amazed at the results.
Once you’ve successfully grown your own watermelons early season, we’d love to hear about your experience. Share your tips, tricks, and photos in the comments below. Let’s create a community of watermelon enthusiasts and help each other grow the best watermelons possible! Happy gardening!
Frequently Asked Questions (FAQ)
Q: When is the best time to start watermelon seeds indoors?
A: The ideal time to start your watermelon seeds indoors is approximately 3-4 weeks before the last expected frost date in your area. This timing allows the seedlings to develop a strong root system and several sets of true leaves before being transplanted outdoors. To determine your last frost date, consult your local weather service or agricultural extension office. Starting too early can result in overgrown, leggy seedlings that struggle to adapt to outdoor conditions. Starting too late may not give them enough of a head start to produce a good harvest.
Q: What type of containers should I use for starting watermelon seeds?
A: Watermelons have delicate root systems and don’t like to be transplanted, so it’s best to use biodegradable pots like peat pots, coco coir pots, or even newspaper pots. These can be planted directly into the ground, minimizing root disturbance. Alternatively, you can use larger individual pots (at least 4 inches in diameter) to give the seedlings ample room to grow. Avoid using small seed starting trays, as the roots will quickly become root-bound. Ensure that your chosen containers have drainage holes to prevent waterlogging.
Q: What kind of soil should I use for starting watermelon seeds?
A: Use a high-quality seed starting mix that is lightweight, well-draining, and sterile. Avoid using garden soil, as it can be too heavy and may contain pathogens that can harm young seedlings. A good seed starting mix will provide the necessary nutrients and aeration for healthy root development. You can also make your own seed starting mix by combining equal parts peat moss (or coconut coir), vermiculite, and perlite.
Q: How much light do watermelon seedlings need?
A: Watermelon seedlings require plenty of light to grow strong and healthy. Ideally, they should receive at least 6-8 hours of direct sunlight per day. If you don’t have a sunny window, you can use grow lights to supplement the natural light. Place the grow lights a few inches above the seedlings and adjust the height as they grow. Rotate the seedlings regularly to ensure even light exposure.
Q: How often should I water watermelon seedlings?
A: Keep the soil consistently moist but not waterlogged. Water the seedlings when the top inch of soil feels dry to the touch. Avoid overwatering, as this can lead to root rot. Use a gentle watering can or spray bottle to avoid disturbing the seedlings.
Q: What is the ideal temperature for germinating watermelon seeds?
A: Watermelon seeds germinate best at temperatures between 70-85°F (21-29°C). You can use a heat mat to provide bottom heat and speed up germination. Once the seeds have germinated, you can remove the heat mat and lower the temperature slightly to around 65-75°F (18-24°C).
Q: How do I harden off watermelon seedlings before transplanting them outdoors?
A: Hardening off is the process of gradually acclimating seedlings to outdoor conditions before transplanting them. About a week before transplanting, start by placing the seedlings outdoors in a sheltered location for a few hours each day. Gradually increase the amount of time they spend outdoors each day, exposing them to more sunlight and wind. This will help them adjust to the temperature fluctuations and stronger sunlight.
Q: When is the best time to transplant watermelon seedlings outdoors?
A: Transplant watermelon seedlings outdoors after the last frost date and when the soil has warmed up to at least 60°F (15°C). Choose a sunny location with well-drained soil. Space the plants according to the variety you are growing, typically 2-3 feet apart.
Q: Can I grow watermelons in containers?
A: Yes, you can grow watermelons in containers, but you’ll need to choose a large container (at least 20 gallons) and a compact variety like Sugar Baby or Bush Sugar Baby. Ensure that the container has drainage holes and use a high-quality potting mix. Watermelons grown in containers will require more frequent watering and fertilization than those grown in the ground.
Q: What are some common problems when growing watermelons?
A: Some common problems when growing watermelons include powdery mildew, vine borers, and blossom-end rot. Powdery mildew is a fungal disease that can be treated with fungicides. Vine borers are pests that can be controlled with insecticides or by wrapping the base of the vines with aluminum foil. Blossom-end rot is caused by calcium deficiency and can be prevented by adding calcium to the soil and ensuring consistent watering.
Q: How do I know when a watermelon is ripe?
A: There are several ways to tell when a watermelon is ripe. The tendril closest to the fruit should be brown and dry. The underside of the watermelon (where it rests on the ground) should be yellow or cream-colored. And when you thump the watermelon, it should sound hollow.

Leave a Comment