
Grow Potatoes at Home – imagine harvesting a bounty of fresh, earthy potatoes right from your own backyard! Forget those bland, store-bought spuds; we’re diving into the wonderful world of DIY potato growing, and trust me, it’s easier than you think. For centuries, potatoes have been a staple food, nourishing communities across the globe. From the Andes Mountains, where they were first cultivated, to the Irish countryside, where they became a cornerstone of the diet, potatoes have a rich and fascinating history.
But why should you bother growing your own? Well, for starters, the taste is simply unparalleled. Homegrown potatoes have a freshness and flavor that you just can’t find in the supermarket. Plus, you have complete control over the growing process, ensuring that your potatoes are free from harmful chemicals and pesticides. In today’s world, where we’re all looking for ways to connect with nature and be more self-sufficient, learning how to grow potatoes at home is a fantastic skill to acquire.
This DIY guide is packed with simple, effective tricks and hacks that will help you cultivate a thriving potato patch, even if you have limited space or experience. We’ll cover everything from choosing the right potato varieties to preparing your soil and protecting your crop from pests. So, grab your gardening gloves, and let’s get started on this exciting journey to homegrown potato goodness!
Grow Your Own Delicious Potatoes: A Beginner’s Guide
Hey there, fellow gardening enthusiasts! Ever dreamt of digging up your own homegrown potatoes, bursting with flavor and freshness? Well, dream no more! Growing potatoes at home is surprisingly easy and rewarding, even if you’re a complete beginner. I’m going to walk you through everything you need to know, from choosing the right potatoes to harvesting your bountiful crop. Let’s get our hands dirty!
Choosing Your Seed Potatoes
First things first, you can’t just plant any old potato from the grocery store. Those are often treated to prevent sprouting. You need “seed potatoes,” which are specifically grown for planting. You can find these at your local garden center or online.
* Certified Seed Potatoes: These are the best option because they’re guaranteed to be disease-free.
* Variety Matters: Different potato varieties have different characteristics. Consider what you want to use your potatoes for.
* Russets: Great for baking and frying.
* Yukon Golds: All-purpose potatoes, good for boiling, mashing, and roasting.
* Red Potatoes: Hold their shape well when boiled, perfect for potato salad.
* Size Matters (Sort Of): You don’t need huge seed potatoes. Smaller ones, about the size of a chicken egg, are perfectly fine. Larger ones can be cut into pieces, but make sure each piece has at least one or two “eyes” (those little buds that sprout).
Preparing Your Seed Potatoes
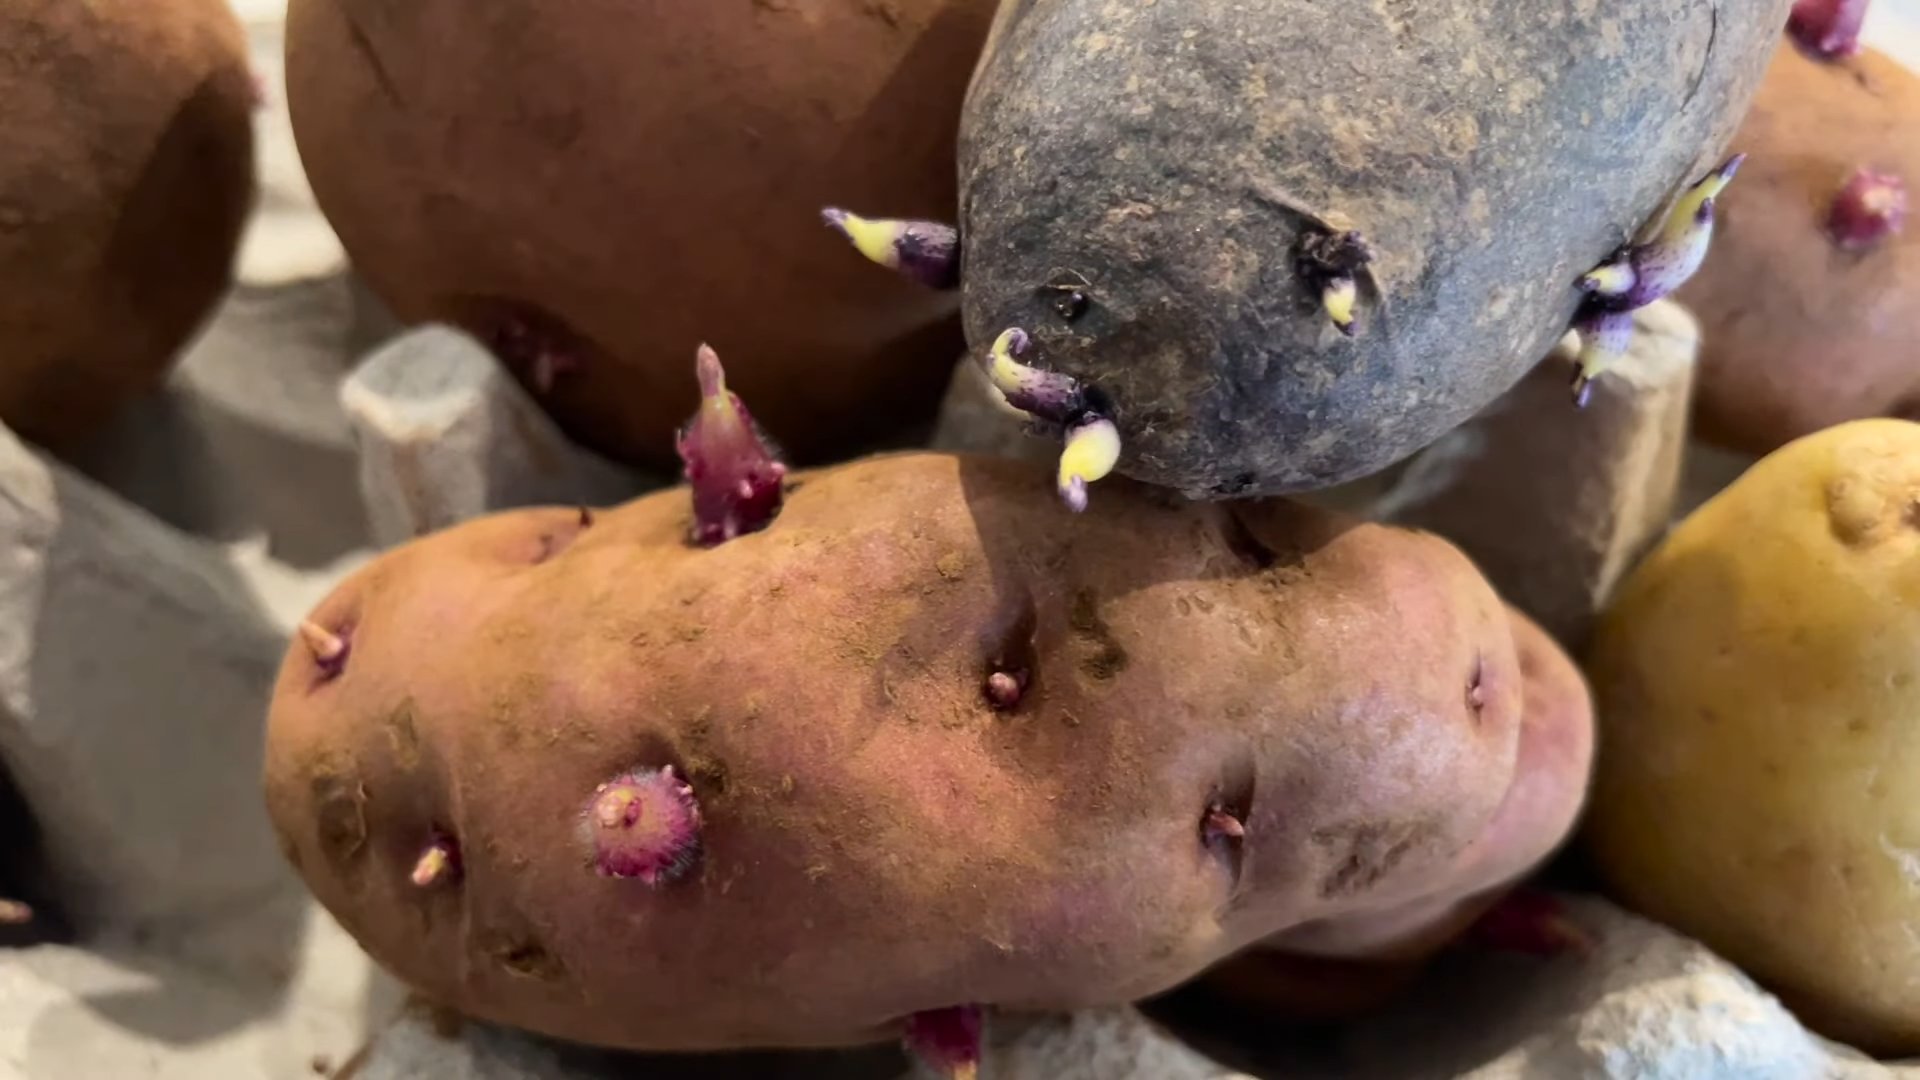
This step, called “chitting,” isn’t strictly necessary, but it gives your potatoes a head start and can result in an earlier harvest.
* What is Chitting?: It’s basically pre-sprouting your seed potatoes.
* How to Chit:
* Place your seed potatoes in a cool, bright location (but not direct sunlight) for about 4-6 weeks before planting. An egg carton or a tray works well.
* The “eyes” will start to sprout, forming short, green shoots.
* Handle them carefully to avoid breaking off the sprouts.
Preparing Your Planting Site
Potatoes need plenty of sunlight and well-drained soil.
* Sunlight: Aim for at least 6-8 hours of direct sunlight per day.
* Soil: Potatoes prefer slightly acidic soil (pH 6.0-6.5). Amend your soil with compost or well-rotted manure to improve drainage and fertility.
* Loosen the Soil: Dig down at least 12 inches and loosen the soil thoroughly. Remove any rocks or debris.
* Consider Raised Beds: If your soil is heavy clay, raised beds are a great option to improve drainage.
Planting Your Potatoes
Now for the fun part!
1. Dig Trenches: Dig trenches that are about 6-8 inches deep and 2-3 feet apart.
2. Place Seed Potatoes: Place your seed potatoes (or cut pieces) in the trenches, sprout-side up, about 12 inches apart.
3. Cover with Soil: Cover the seed potatoes with about 4 inches of soil.
4. Water Well: Water the area thoroughly after planting.
“Hilling” Your Potatoes
This is a crucial step for maximizing your potato yield.
* What is Hilling?: It’s the process of gradually mounding soil around the potato plants as they grow.
* Why Hill?:
* It encourages more potato production along the buried stem.
* It protects the developing potatoes from sunlight, which can cause them to turn green and produce solanine (a toxic compound).
* It provides support for the growing plants.
* How to Hill:
* When the potato plants are about 6-8 inches tall, use a hoe or shovel to pull soil from between the rows and mound it around the base of the plants, burying the lower part of the stem.
* Repeat this process every 2-3 weeks as the plants grow, until you have a mound of soil about 12 inches high.
Watering and Fertilizing
Potatoes need consistent moisture, especially during tuber formation.
* Watering: Water deeply whenever the top inch of soil feels dry. Avoid overwatering, which can lead to rot.
* Fertilizing: Potatoes are heavy feeders. Side-dress your plants with a balanced fertilizer (e.g., 10-10-10) about 4-6 weeks after planting and again after hilling. Follow the instructions on the fertilizer package.
Dealing with Pests and Diseases
Keep an eye out for common potato pests and diseases.
* Colorado Potato Beetles: These beetles can defoliate your plants. Handpick them off or use an organic insecticide like neem oil.
* Flea Beetles: These tiny beetles create small holes in the leaves. Use row covers to protect your plants or spray with insecticidal soap.
* Potato Blight: This fungal disease can cause leaves and stems to turn brown and rot. Choose blight-resistant varieties and practice good sanitation (remove infected plants). Copper-based fungicides can also help.
* Scab: This disease causes rough, scabby patches on the potato skins. Avoid planting potatoes in alkaline soil and use disease-free seed potatoes.
Harvesting Your Potatoes
The moment you’ve been waiting for!
* When to Harvest:
* “New” Potatoes: You can harvest small, immature potatoes about 2-3 weeks after the plants flower. These are delicious boiled or roasted.
* Mature Potatoes: For full-sized potatoes, wait until the plants have flowered and the foliage starts to die back. This usually takes about 80-100 days.
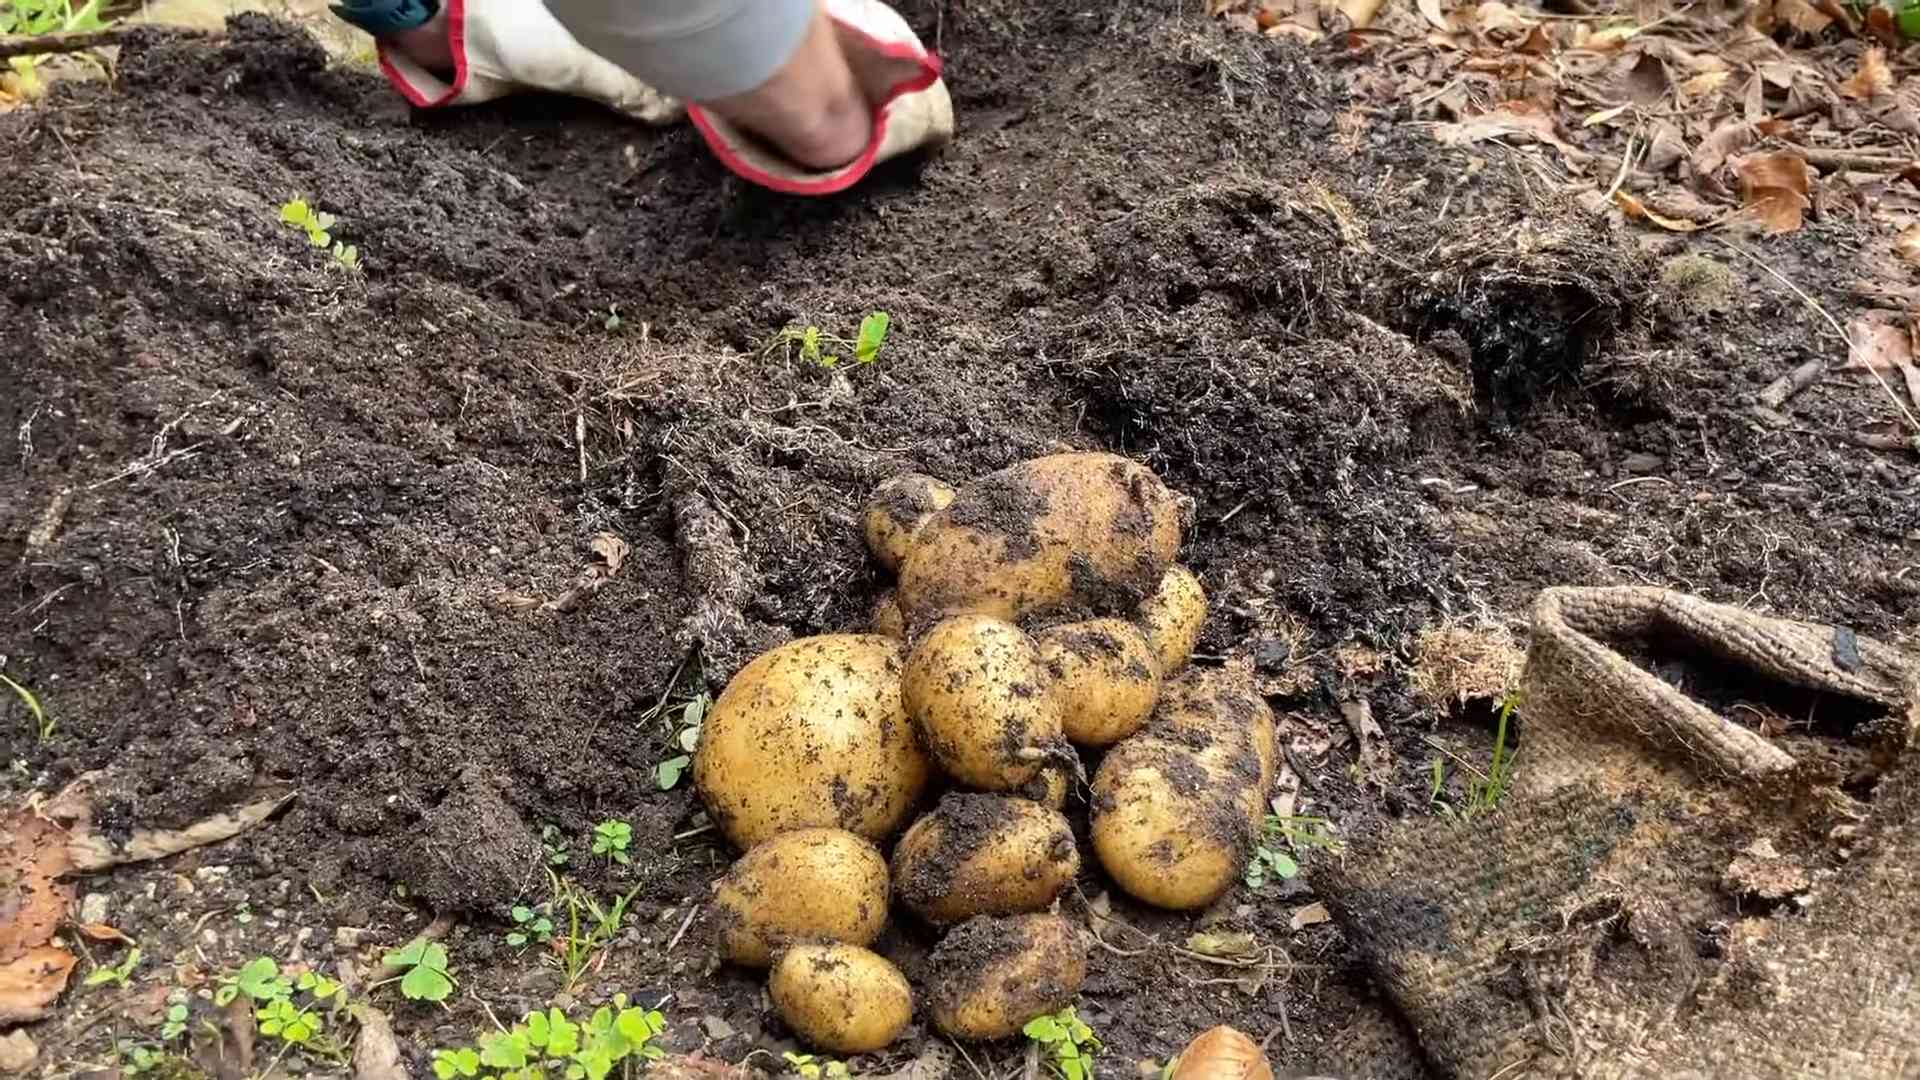
* How to Harvest:
* Gently dig around the base of the plants with a garden fork, being careful not to damage the potatoes.
* Lift the plants and carefully remove the potatoes from the soil.
* Let the potatoes dry in the sun for a few hours to cure them. This helps to toughen the skins and prevent rot.
Storing Your Potatoes
Proper storage is essential for keeping your potatoes fresh for months.
* Curing: After harvesting, cure your potatoes in a cool, dark, and well-ventilated place for about 1-2 weeks. This allows the skins to harden and heal any minor cuts or bruises.
* Storage Conditions: Store your cured potatoes in a cool (40-50°F), dark, and humid (80-90%) place. A root cellar is ideal, but a cool basement or garage can also work.
* Avoid Light: Exposure to light will cause potatoes to turn green and produce solanine.
* Don’t Wash: Don’t wash your potatoes before storing them, as this can promote rot.
* Check Regularly: Check your stored potatoes regularly and remove any that are showing signs of rot.
Troubleshooting
Even with the best planning, things can sometimes go wrong. Here are a few common issues and how to address them:
* Green Potatoes: As mentioned earlier, green potatoes contain solanine and should not be eaten. This is caused by exposure to light. Make sure to hill your potatoes properly and store them in a dark place.
* Small Potatoes: This can be caused by overcrowding, poor soil fertility, or insufficient watering. Space your seed potatoes properly, amend your soil with compost, and water regularly.
* Rotting Potatoes: This is usually caused by overwatering or poor drainage. Make sure your soil is well-drained and avoid overwatering.
Enjoying Your Homegrown Potatoes
Congratulations! You’ve successfully grown your own potatoes. Now it’s time to enjoy the fruits (or rather, tubers) of your labor.
* Cooking: The possibilities are endless! Bake them, boil them, mash them, roast them, fry them, make potato salad, potato soup… the list goes on.
* Sharing: Share your bounty with friends and family. They’ll be amazed by the flavor of homegrown potatoes.
* Saving Seed Potatoes: If you want to grow potatoes again next year, you can save some of your best potatoes as seed potatoes. Just make sure they’re disease-free and store them properly.
Growing potatoes at home is a rewarding experience that connects you to nature and provides you with delicious, fresh food. So, grab your gardening gloves, get your hands dirty, and start growing your own potatoes today! You won’t regret it!
Conclusion
So, there you have it! Growing potatoes at home, especially using the container gardening method, is not just a fun project; it’s a rewarding experience that brings the farm-to-table concept right to your doorstep. We’ve explored the simplicity and accessibility of this DIY trick, highlighting how even those with limited space can enjoy the satisfaction of harvesting their own homegrown potatoes.
Why is this a must-try? Because it empowers you to take control of your food source. You know exactly what goes into growing your potatoes – no mystery chemicals or questionable farming practices. Plus, the taste of freshly dug, homegrown potatoes is simply unparalleled. The flavor is richer, earthier, and far more satisfying than anything you can find at the grocery store.
Beyond the taste and control, growing potatoes at home is also incredibly educational, especially for children. It’s a fantastic way to teach them about the life cycle of plants, the importance of sustainable practices, and the joy of nurturing something from seed (or in this case, a seed potato) to harvest.
But the benefits don’t stop there! Consider the variations you can explore. Experiment with different potato varieties – from the classic Russet to the vibrant Yukon Gold or the fingerling potatoes with their unique shapes and textures. Each variety offers a distinct flavor profile and culinary application, allowing you to tailor your potato harvest to your specific preferences.
You can also play around with different container sizes and materials. While we’ve focused on using large containers, you can also try growing potatoes in grow bags, raised beds, or even repurposed items like old tires or laundry baskets (just make sure they have drainage holes!). Each method offers its own set of advantages and challenges, so feel free to experiment and find what works best for you.
Another exciting variation is to explore companion planting. Certain plants, like marigolds, basil, and nasturtiums, can help deter pests and attract beneficial insects to your potato plants, creating a healthier and more productive growing environment.
And don’t forget about the power of organic fertilizers! Composting kitchen scraps and using organic fertilizers like bone meal or kelp meal can provide your potato plants with the essential nutrients they need to thrive, without the use of harmful chemicals.
Ultimately, the key to successful home-grown potatoes lies in experimentation and adaptation. Don’t be afraid to try new things, learn from your mistakes, and adjust your approach as needed. The more you experiment, the more you’ll learn about the specific needs of your potato plants and the unique growing conditions in your area.
So, what are you waiting for? Grab some seed potatoes, a container, some soil, and get ready to embark on a rewarding journey of growing potatoes at home. We encourage you to try this DIY trick and experience the joy of harvesting your own delicious, homegrown potatoes.
And most importantly, we want to hear about your experience! Share your photos, tips, and stories with us in the comments below. Let’s create a community of home gardeners who are passionate about growing their own food and sharing their knowledge with others. Your insights could inspire someone else to take the plunge and discover the magic of growing potatoes at home. Let’s get growing!
Frequently Asked Questions (FAQ)
What kind of potatoes should I use for seed potatoes?
You should use certified seed potatoes, which are potatoes specifically grown for planting. These are disease-free and will give you the best chance of a successful harvest. You can purchase them from garden centers or online retailers. Avoid using potatoes from the grocery store, as they may have been treated to prevent sprouting or may carry diseases. If you absolutely must use grocery store potatoes, choose organic ones that haven’t been treated. Look for potatoes that have “eyes” (small buds) on them.
How do I prepare my seed potatoes before planting?
Chitting, or pre-sprouting, your seed potatoes can give them a head start. A few weeks before planting, place the seed potatoes in a cool, bright location (but not in direct sunlight) with the eyes facing upwards. This will encourage them to sprout short, green shoots. Once the shoots are about an inch long, you can cut the larger potatoes into smaller pieces, ensuring that each piece has at least one or two eyes. Let the cut pieces dry for a day or two to callous over before planting. This helps prevent rot.
What kind of soil is best for growing potatoes in containers?
Potatoes prefer well-draining, slightly acidic soil. A good mix is equal parts potting soil, compost, and peat moss (or coconut coir as a sustainable alternative). Avoid using garden soil, as it can be too heavy and may contain diseases. Make sure your container has drainage holes to prevent waterlogging.
How often should I water my potato plants?
Water your potato plants regularly, especially during hot, dry weather. The soil should be consistently moist but not soggy. Check the soil moisture by sticking your finger about an inch into the soil. If it feels dry, it’s time to water. Avoid overwatering, as this can lead to root rot.
How much sunlight do potato plants need?
Potato plants need at least six hours of sunlight per day. Choose a location that receives plenty of direct sunlight. If you live in a very hot climate, some afternoon shade may be beneficial.
When should I start “hilling” my potato plants?
Start hilling your potato plants when the stems are about 6-8 inches tall. Add more soil or compost around the base of the plants, burying the lower portion of the stems. This encourages the plants to produce more potatoes along the buried stems. Repeat this process every few weeks as the plants grow, until the container is nearly full.
How do I know when my potatoes are ready to harvest?
The timing of your harvest will depend on the variety of potato you’re growing. Generally, early-season potatoes can be harvested when the plants begin to flower. These potatoes will be smaller and have thinner skins. For larger, more mature potatoes, wait until the foliage starts to turn yellow and die back. This usually takes about 2-3 months after planting.
How do I harvest potatoes from a container?
The easiest way to harvest potatoes from a container is to simply dump the container out onto a tarp or other surface. Gently sift through the soil to find the potatoes. Be careful not to damage the potatoes with your hands or tools.
What are some common pests and diseases that affect potato plants?
Common pests that affect potato plants include aphids, potato beetles, and flea beetles. Diseases include early blight, late blight, and potato scab. You can control pests with insecticidal soap or neem oil. Prevent diseases by using disease-free seed potatoes, providing good air circulation, and avoiding overwatering.
Can I grow potatoes in a container indoors?
While it’s possible to grow potatoes indoors, it can be challenging. Potato plants need a lot of sunlight, so you’ll need to provide supplemental lighting. You’ll also need to ensure good air circulation and proper drainage. It’s generally easier and more rewarding to grow potatoes outdoors in containers.
How do I store my harvested potatoes?
Store your harvested potatoes in a cool, dark, and well-ventilated place. A root cellar is ideal, but a basement or garage can also work. Avoid storing potatoes in the refrigerator, as this can cause them to develop a sweet taste. Store potatoes away from apples and bananas, as these fruits release ethylene gas, which can cause potatoes to sprout prematurely. Properly stored potatoes can last for several months.
Can I reuse the soil from my potato container for other plants?
Yes, you can reuse the soil from your potato container for other plants, but it’s a good idea to amend it with fresh compost or other organic matter. This will replenish the nutrients that were used by the potato plants. Avoid using the soil for other members of the nightshade family (tomatoes, peppers, eggplants), as they are susceptible to the same diseases.
Leave a Comment