
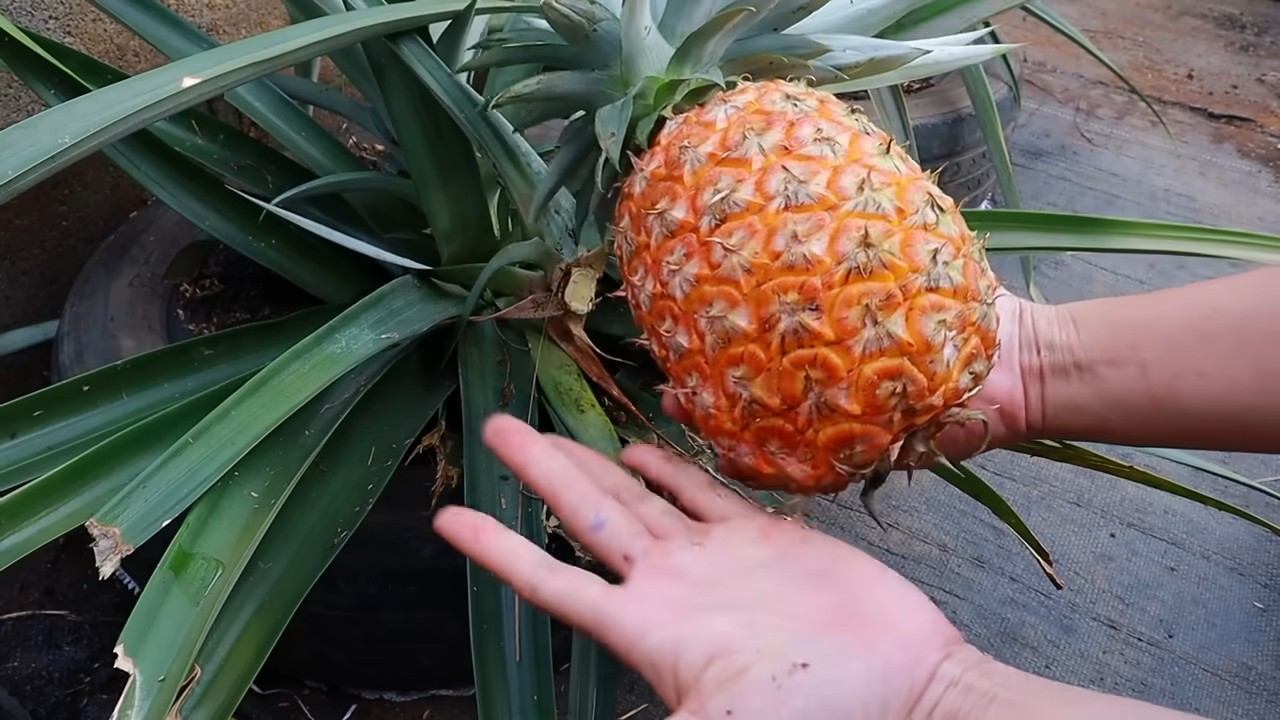
Grow pineapple on terrace? Absolutely! Imagine plucking a juicy, sun-ripened pineapple straight from your own terrace garden. Sounds like a tropical dream, right? Well, it’s more achievable than you might think! For centuries, pineapples have been a symbol of hospitality and luxury, gracing tables from royal feasts to welcoming gatherings. Originating in South America, this bromeliad fruit has traveled the globe, captivating taste buds and inspiring gardeners alike.
But why should you bother learning how to grow pineapple on terrace? In today’s world, where fresh, locally sourced produce is highly valued, cultivating your own pineapple offers a unique opportunity to enjoy organic, delicious fruit while reducing your carbon footprint. Plus, it’s a fantastic conversation starter and a rewarding hobby! This DIY guide will walk you through simple, step-by-step instructions, ensuring you can successfully cultivate this tropical delight in your own urban oasis. Get ready to transform your terrace into a pineapple paradise!
Ananas auf der Terrasse ziehen: Dein tropischer Traum wird wahr!
Hey Leute! Habt ihr euch jemals vorgestellt, eure eigene Ananas auf der Terrasse zu ernten? Klingt verrückt, oder? Aber ich sage euch, es ist absolut machbar! Ich habe es selbst ausprobiert und war total begeistert, als ich meine erste selbstgezogene Ananas geerntet habe. In diesem Artikel zeige ich euch Schritt für Schritt, wie ihr das auch schaffen könnt. Lasst uns gemeinsam ein Stück Tropen auf euren Balkon oder eure Terrasse bringen!
Was du brauchst: Die Zutaten für deinen Ananas-Erfolg
Bevor wir loslegen, hier eine Liste mit allem, was du für dein Ananas-Abenteuer benötigst:
* Eine reife Ananas: Am besten eine aus dem Supermarkt, die schon leicht duftet und eine schöne, grüne Krone hat. Achte darauf, dass die Blätter gesund aussehen und nicht braun oder welk sind.
* Ein scharfes Messer: Ein Küchenmesser oder ein scharfes Taschenmesser tut es auch.
* Ein Glas Wasser: Um die Ananas-Krone wurzeln zu lassen.
* Ein Pflanzgefäß: Ein Topf mit einem Durchmesser von mindestens 25 cm ist ideal.
* Pflanzerde: Am besten eine Mischung aus Blumenerde und Sand, damit das Wasser gut ablaufen kann. Ananas mag es nicht, in Staunässe zu stehen.
* Optional: Wurzelhormon: Das hilft der Ananas-Krone, schneller Wurzeln zu bilden.
* Geduld: Ananas wächst nicht über Nacht. Es braucht Zeit und Pflege, bis du deine eigene Frucht ernten kannst.
Die Vorbereitung: Die Ananas-Krone zum Leben erwecken
Jetzt geht es ans Eingemachte! Wir bereiten die Ananas-Krone vor, damit sie Wurzeln schlagen kann.
1. Die Krone abtrennen: Nimm dein scharfes Messer und schneide die Krone vorsichtig vom Fruchtfleisch ab. Achte darauf, dass du etwa 2-3 cm Fruchtfleisch an der Krone lässt.
2. Fruchtfleisch entfernen: Entferne das restliche Fruchtfleisch von der Krone. Das ist wichtig, da das Fruchtfleisch sonst faulen kann und die Wurzelbildung behindert. Du kannst das Fruchtfleisch einfach mit dem Messer abschneiden oder es vorsichtig abziehen.
3. Die unteren Blätter entfernen: Entferne die untersten Blätter der Krone, etwa 2-3 cm hoch. Dadurch werden die Stellen freigelegt, an denen die Wurzeln später wachsen werden. Ziehe die Blätter einfach vorsichtig nach unten ab.
4. Trocknen lassen: Lass die Ananas-Krone nun für 2-3 Tage an einem trockenen und luftigen Ort trocknen. Das hilft, Fäulnis zu vermeiden. Du kannst die Krone einfach auf ein Küchenpapier legen.
Die Wurzelbildung: Geduld ist gefragt
Nachdem die Krone getrocknet ist, können wir sie ins Wasser stellen, damit sie Wurzeln bilden kann.
1. Ins Wasser stellen: Fülle ein Glas mit Wasser und stelle die Ananas-Krone so hinein, dass nur der untere Teil, wo du die Blätter entfernt hast, im Wasser steht. Die Blätter sollten nicht im Wasser sein, da sie sonst faulen können.
2. Standort wählen: Stelle das Glas an einen hellen, aber nicht direkten Sonnenplatz. Ein Fensterbrett ist ideal.
3. Wasser wechseln: Wechsle das Wasser alle 2-3 Tage, um Fäulnis zu vermeiden.
4. Warten und beobachten: Jetzt heißt es warten! Nach etwa 2-8 Wochen sollten sich die ersten Wurzeln bilden. Hab Geduld, es kann manchmal etwas länger dauern. Du kannst die Wurzelbildung beschleunigen, indem du dem Wasser etwas Wurzelhormon hinzufügst.
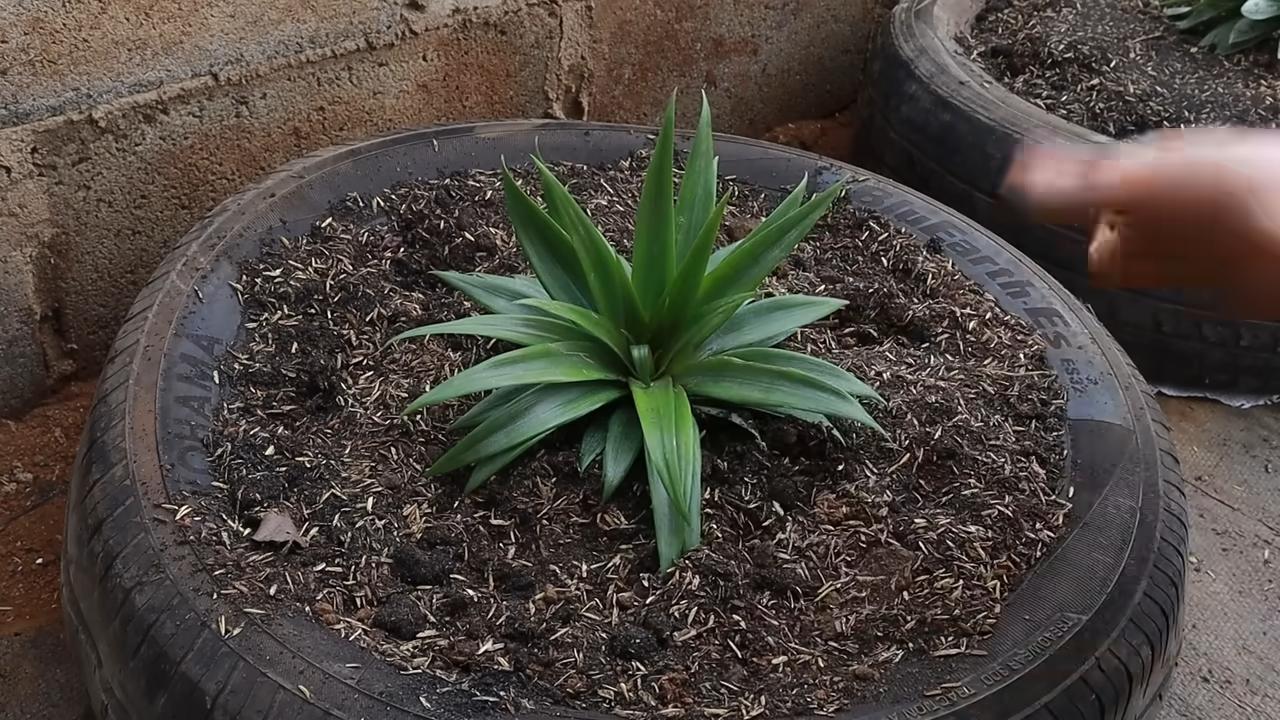
Das Einpflanzen: Der Start ins Ananas-Leben
Sobald die Wurzeln etwa 2-3 cm lang sind, ist es Zeit, die Ananas-Krone einzupflanzen.
1. Den Topf vorbereiten: Fülle den Topf mit der Pflanzerde-Sand-Mischung. Achte darauf, dass der Topf Löcher im Boden hat, damit das Wasser gut ablaufen kann.
2. Die Ananas-Krone einpflanzen: Grabe ein kleines Loch in die Erde und setze die Ananas-Krone vorsichtig hinein. Achte darauf, dass die Wurzeln gut mit Erde bedeckt sind.
3. Angießen: Gieße die Ananas-Krone nach dem Einpflanzen gut an.
4. Standort wählen: Stelle den Topf an einen sonnigen und warmen Ort. Ananas liebt die Sonne!
Die Pflege: Damit deine Ananas sich wohlfühlt
Damit deine Ananas gut wächst und Früchte trägt, ist die richtige Pflege wichtig.
1. Gießen: Gieße die Ananas regelmäßig, aber nicht zu viel. Die Erde sollte immer leicht feucht sein, aber nicht nass. Vermeide Staunässe, da dies zu Fäulnis führen kann. Im Winter musst du weniger gießen.
2. Düngen: Dünge die Ananas während der Wachstumsperiode (Frühling und Sommer) alle 2-3 Wochen mit einem Flüssigdünger für Zimmerpflanzen.
3. Überwintern: Im Winter solltest du die Ananas an einen hellen und kühlen Ort stellen. Die Temperatur sollte nicht unter 15 Grad Celsius fallen. Gieße weniger und dünge nicht.
4. Umpflanzen: Wenn die Ananas zu groß für den Topf wird, solltest du sie in einen größeren Topf umpflanzen.
5. Blütenbildung anregen: Um die Blütenbildung anzuregen, kannst du die Ananas mit Ethylen begasen. Das geht ganz einfach, indem du einen Apfel in eine Plastiktüte steckst und die Ananas mit in die Tüte stellst. Verschließe die Tüte gut und lass sie für ein paar Tage stehen. Der Apfel gibt Ethylen ab, was die Blütenbildung anregt.
Die Ernte: Der Lohn deiner Mühe
Nach etwa 1-3 Jahren (ja, es dauert so lange!) kannst du deine erste selbstgezogene Ananas ernten.
1. Reife erkennen: Die Ananas ist reif, wenn sie einen angenehmen Duft verströmt und die Schale leicht gelblich wird.
2. Ernten: Schneide die Ananas mit einem scharfen Messer vom Strunk ab.
3. Genießen: Und jetzt kommt der beste Teil: Genieße deine selbstgezogene Ananas! Sie schmeckt garantiert besser als jede gekaufte Ananas.
Zusätzliche Tipps und Tricks: Für noch mehr Ananas-Erfolg
* Luftfeuchtigkeit erhöhen: Ananas liebt eine hohe Luftfeuchtigkeit. Du kannst die Luftfeuchtigkeit erhöhen, indem du die Ananas regelmäßig mit Wasser besprühst oder eine Schale mit Wasser in die Nähe stellst.
* Schädlinge bekämpfen: Achte auf Schädlinge wie Spinnmilben oder Wollläuse. Bei Befall kannst du die Ananas mit einem Insektizid behandeln.
* Geduld haben: Ananas wächst langsam. Hab Geduld und lass dich nicht entmutigen, wenn es nicht sofort klappt.
Ich hoffe, diese Anleitung hilft dir dabei, deine eigene Ananas auf der Terrasse zu ziehen. Es ist ein tolles Gefühl, seine eigene tropische Frucht zu ernten. Viel Erfolg und viel Spaß beim Gärtnern!
Conclusion
So, there you have it! Cultivating your own pineapple on your terrace isn’t just a gardening project; it’s an adventure that brings a slice of the tropics right to your doorstep. We’ve walked you through the process, from selecting the perfect pineapple top to nurturing your plant to maturity. The satisfaction of harvesting a homegrown pineapple, bursting with flavor and sunshine, is an experience that store-bought fruit simply can’t replicate.
Why is this DIY trick a must-try? Because it’s sustainable, rewarding, and surprisingly easy. You’re reducing food waste by repurposing a pineapple top that would otherwise be discarded. You’re connecting with nature in a tangible way, observing the slow and steady growth of your plant. And you’re gaining access to incredibly fresh, delicious fruit that you can proudly say you grew yourself. Plus, it’s a fantastic conversation starter! Imagine the look on your friends’ faces when you tell them you’re growing pineapples on your terrace.
But the fun doesn’t stop there! Feel free to experiment with different varieties of pineapple. While the smooth Cayenne is a popular choice, you might want to try growing a Sugarloaf or a Red Spanish pineapple for a unique flavor profile. You can also explore different potting mixes to see what works best for your climate and growing conditions. Consider adding organic fertilizers to boost growth and fruit production.
For those living in colder climates, consider bringing your pineapple plant indoors during the winter months. A sunny windowsill or a grow light will help it thrive until warmer weather returns. You can also experiment with different container sizes to optimize growth. Remember, patience is key. It takes time for a pineapple plant to mature and produce fruit, but the wait is well worth it.
We wholeheartedly encourage you to give this DIY pineapple growing trick a try. It’s a fantastic way to add a touch of the tropics to your life, reduce food waste, and enjoy the unparalleled flavor of homegrown fruit. Don’t be afraid to get your hands dirty and experiment. Gardening is all about learning and adapting.
And most importantly, we want to hear about your experience! Share your photos, tips, and challenges with us in the comments below. Let’s create a community of pineapple enthusiasts who are passionate about growing their own food and sharing their knowledge with others. Your success story could inspire someone else to embark on their own pineapple-growing adventure. So, grab a pineapple, get your hands dirty, and start growing your own tropical paradise today! Let’s make terrace gardening even more exciting with this **grow pineapple on terrace** guide.
Frequently Asked Questions (FAQ)
How long does it take to grow a pineapple from a top?
Growing a pineapple from a top is a patience-testing endeavor, but the reward is well worth the wait. Generally, it takes anywhere from 2 to 3 years for a pineapple plant grown from a top to produce fruit. Several factors influence this timeline, including climate, sunlight exposure, soil quality, and the specific variety of pineapple. Warmer climates with ample sunlight tend to promote faster growth. Consistent watering and fertilization are also crucial for accelerating the process. While it may seem like a long time, remember that you’re essentially creating a new plant from scratch. Each stage of growth, from rooting the top to watching the fruit develop, is a fascinating learning experience.
What kind of soil is best for growing pineapples?
Pineapples thrive in well-draining, slightly acidic soil. A sandy loam mix is ideal, as it provides excellent drainage and aeration, preventing root rot. You can create your own mix by combining equal parts of potting soil, sand, and perlite or vermiculite. The acidity level should be between 5.5 and 6.5 pH. You can test the pH of your soil using a soil testing kit available at most garden centers. If your soil is too alkaline, you can amend it with sulfur or peat moss to lower the pH. Avoid using heavy clay soils, as they retain too much moisture and can suffocate the roots. Good drainage is paramount for pineapple growth.
How much sunlight does a pineapple plant need?
Pineapples are sun-loving plants and require at least 6 hours of direct sunlight per day to thrive. The more sunlight they receive, the better they will grow and the more likely they are to produce fruit. If you live in a climate with limited sunlight, consider supplementing with grow lights, especially during the winter months. Place your pineapple plant in the sunniest spot on your terrace or balcony. If you’re growing it indoors, a south-facing window is usually the best option. Rotate the plant regularly to ensure that all sides receive equal sunlight exposure.
How often should I water my pineapple plant?
Watering frequency depends on several factors, including climate, soil type, and the size of the pot. Generally, you should water your pineapple plant when the top inch of soil feels dry to the touch. Avoid overwatering, as this can lead to root rot. During the warmer months, you may need to water more frequently than during the cooler months. Ensure that the pot has drainage holes to allow excess water to escape. You can also mist the leaves occasionally to increase humidity, especially in dry climates.
How do I fertilize my pineapple plant?
Pineapples are heavy feeders and benefit from regular fertilization. Use a balanced fertilizer with a ratio of 10-10-10 or 14-14-14. Apply the fertilizer every 2-3 months during the growing season (spring and summer). Follow the instructions on the fertilizer package carefully. You can also use organic fertilizers, such as compost tea or fish emulsion. Avoid over-fertilizing, as this can burn the roots. A foliar feeding with diluted fertilizer can also be beneficial.
How do I know when my pineapple is ripe?
Determining when a pineapple is ripe can be tricky, but there are several indicators to look for. The color of the pineapple will change from green to yellow or golden-orange, depending on the variety. The fruit will also emit a sweet, fragrant aroma. Gently tug on one of the leaves near the top of the pineapple. If it comes off easily, the pineapple is likely ripe. The bottom of the pineapple should also feel slightly soft to the touch. Avoid squeezing the pineapple too hard, as this can damage the fruit. Once harvested, a pineapple will not ripen further, so it’s important to pick it at the peak of ripeness.
Can I grow a pineapple indoors?
Yes, you can successfully grow a pineapple indoors, especially if you live in a climate with cold winters. Provide your pineapple plant with plenty of sunlight, well-draining soil, and regular watering and fertilization. A sunny windowsill or a grow light will help it thrive. Maintain a consistent temperature and humidity level. Be patient, as it may take longer for an indoor pineapple plant to produce fruit.
What are some common problems when growing pineapples?
Some common problems when growing pineapples include root rot, mealybugs, and scale insects. Root rot is caused by overwatering and poor drainage. To prevent root rot, ensure that your soil is well-draining and avoid overwatering. Mealybugs and scale insects are sap-sucking pests that can weaken your pineapple plant. You can control these pests by spraying your plant with insecticidal soap or neem oil. Regularly inspect your plant for signs of pests and diseases.
Can I grow multiple pineapples from one plant?
While the original pineapple plant will only produce one fruit, it will also produce “pups” or “suckers” at the base of the plant. These pups can be removed and planted to grow new pineapple plants. This allows you to propagate your pineapple plant and create a continuous supply of pineapples. Wait until the pups are about one-third the size of the original plant before removing them.
What if my pineapple plant doesn’t produce fruit?
There are several reasons why your pineapple plant may not be producing fruit. The most common reason is insufficient sunlight. Ensure that your plant is receiving at least 6 hours of direct sunlight per day. Another reason could be a lack of nutrients. Fertilize your plant regularly with a balanced fertilizer. It may also simply be a matter of time. Remember that it takes 2-3 years for a pineapple plant to mature and produce fruit. You can also try forcing your pineapple plant to fruit by exposing it to ethylene gas. Place a ripe apple or banana near the plant and cover it with a plastic bag for a few days. The ethylene gas released by the fruit will stimulate flowering.


Leave a Comment