
Grow mushrooms at home? Absolutely! Imagine the satisfaction of harvesting fresh, flavorful mushrooms right from your own kitchen. Forget those bland, store-bought varieties – we’re talking about gourmet delights, bursting with earthy goodness, cultivated by your own two hands. This isn’t some far-fetched fantasy; it’s a surprisingly accessible and rewarding DIY project that anyone can undertake.
For centuries, mushrooms have held a revered place in various cultures, from ancient medicinal practices in the East to culinary staples in Europe. Their unique flavor profiles and nutritional benefits have made them a prized ingredient worldwide. But what if you could bypass the grocery store and tap into this ancient tradition yourself?
In today’s world, where sustainability and self-sufficiency are increasingly valued, learning to grow mushrooms at home offers a fantastic way to connect with nature and reduce your environmental footprint. Plus, let’s be honest, who wouldn’t want to impress their friends and family with their newfound mycological skills? This DIY guide will walk you through the process step-by-step, revealing simple yet effective techniques to cultivate your own delicious mushrooms, regardless of your experience level. Get ready to embark on a fascinating journey into the world of fungi!
Pilzzucht zu Hause: Dein umfassender DIY-Leitfaden
Hallo Pilzfreunde! Habt ihr euch jemals gefragt, wie es wäre, eure eigenen köstlichen Pilze zu Hause zu züchten? Ich kann euch sagen, es ist einfacher als ihr denkt und unglaublich befriedigend! In diesem Artikel zeige ich euch Schritt für Schritt, wie ihr das ganz einfach selbst machen könnt. Lasst uns eintauchen!
Was du brauchst: Die Zutaten für deinen Pilzgarten
Bevor wir loslegen, brauchen wir natürlich die richtigen Materialien. Hier ist eine Liste von Dingen, die ihr besorgen solltet:
* Pilzbrut: Das ist das Herzstück unseres Projekts! Ihr könnt verschiedene Arten von Pilzbrut online oder in spezialisierten Gartencentern kaufen. Beliebte Optionen sind Austernpilze, Shiitake oder Kräuterseitlinge. Achtet darauf, eine Sorte zu wählen, die euch schmeckt und die für eure Umgebung geeignet ist.
* Substrat: Das Substrat ist das Material, auf dem eure Pilze wachsen werden. Hier gibt es verschiedene Möglichkeiten, je nach Pilzart. Beliebte Optionen sind Stroh, Sägemehl oder Kaffeesatz.
* Behälter: Ihr braucht einen Behälter, um euer Substrat und die Pilzbrut unterzubringen. Das kann ein Eimer, ein Plastiksack oder sogar ein alter Blumentopf sein. Wichtig ist, dass er sauber ist und Löcher für die Belüftung hat.
* Sprühflasche: Um die Feuchtigkeit aufrechtzuerhalten, ist eine Sprühflasche unerlässlich.
* Alkohol (70% Isopropylalkohol): Für die Sterilisation eurer Arbeitsgeräte und Oberflächen. Sauberkeit ist das A und O!
* Handschuhe: Um Kontamination zu vermeiden, solltet ihr während des gesamten Prozesses Handschuhe tragen.
* Optional: Ein Thermometer und ein Hygrometer, um Temperatur und Luftfeuchtigkeit zu überwachen.
Schritt-für-Schritt-Anleitung: Dein Weg zum eigenen Pilzgarten
Jetzt, wo wir alles haben, können wir mit der eigentlichen Arbeit beginnen!
1. Vorbereitung des Substrats
Die Vorbereitung des Substrats ist ein entscheidender Schritt, da es die Grundlage für das Wachstum eurer Pilze bildet.
1. Substrat auswählen: Je nach Pilzart wählt ihr das passende Substrat aus. Für Austernpilze ist Stroh eine gute Wahl, für Shiitake Sägemehl.
2. Substrat pasteurisieren: Um unerwünschte Mikroorganismen abzutöten, müsst ihr das Substrat pasteurisieren.
* Stroh pasteurisieren: Das Stroh in einem großen Topf mit Wasser für 60-90 Minuten kochen. Danach gut abkühlen lassen und überschüssiges Wasser ausdrücken. Es sollte feucht, aber nicht tropfnass sein.
* Sägemehl pasteurisieren: Das Sägemehl mit Wasser vermischen, bis es feucht ist. Dann in einem hitzebeständigen Behälter in den Ofen geben und bei 80°C für 2 Stunden pasteurisieren. Alternativ könnt ihr es auch in einem Dampfkochtopf für 90 Minuten sterilisieren.
* Kaffeesatz pasteurisieren: Kaffeesatz ist oft schon pasteurisiert, da er beim Brühen erhitzt wird. Trotzdem könnt ihr ihn zur Sicherheit noch einmal kurz in der Mikrowelle erhitzen.
3. Substrat abkühlen lassen: Lasst das pasteurisierte Substrat vollständig abkühlen, bevor ihr mit dem nächsten Schritt fortfahrt.
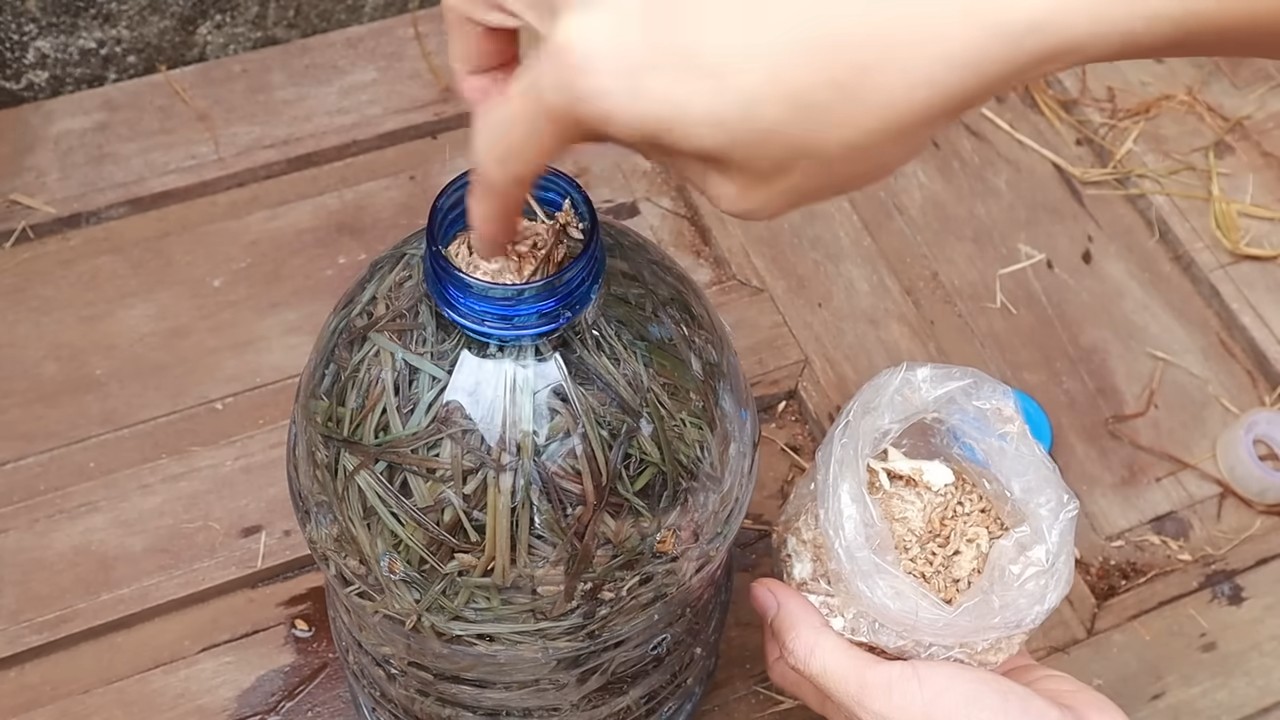
2. Inokulation: Die Pilzbrut ins Substrat bringen
Die Inokulation ist der Prozess, bei dem ihr die Pilzbrut in das vorbereitete Substrat einbringt.
1. Arbeitsbereich sterilisieren: Reinigt euren Arbeitsbereich gründlich mit Alkohol. Tragt Handschuhe und eine Maske, um Kontamination zu vermeiden.
2. Substrat und Pilzbrut mischen: Mischt das abgekühlte Substrat und die Pilzbrut in einem sauberen Behälter. Verteilt die Pilzbrut gleichmäßig im Substrat. Ein Verhältnis von 1:10 (Pilzbrut zu Substrat) ist ein guter Ausgangspunkt.
3. Substrat in den Behälter füllen: Füllt das Gemisch aus Substrat und Pilzbrut in euren vorbereiteten Behälter. Drückt es leicht an, aber nicht zu fest.
4. Behälter abdecken: Deckt den Behälter mit einem Deckel oder einer Plastikfolie ab. Achtet darauf, dass genügend Luftlöcher vorhanden sind, um die Belüftung zu gewährleisten.
3. Inkubation: Das Myzel wachsen lassen
Die Inkubation ist die Phase, in der das Myzel (das Wurzelgeflecht des Pilzes) das Substrat durchwächst.
1. Geeigneten Standort wählen: Stellt den Behälter an einen dunklen, kühlen und gut belüfteten Ort. Die ideale Temperatur hängt von der Pilzart ab, liegt aber meist zwischen 18°C und 24°C.
2. Luftfeuchtigkeit kontrollieren: Die Luftfeuchtigkeit sollte hoch sein (80-90%). Besprüht das Substrat regelmäßig mit Wasser, um es feucht zu halten. Achtet darauf, dass es nicht zu nass wird.
3. Beobachten: Überprüft den Behälter regelmäßig auf Anzeichen von Wachstum. Nach einigen Tagen oder Wochen solltet ihr sehen, wie sich das Myzel als weißes, flaumiges Gewebe im Substrat ausbreitet.
4. Geduld haben: Die Inkubationszeit kann je nach Pilzart und Umgebungsbedingungen variieren. Habt Geduld und lasst das Myzel seine Arbeit machen.
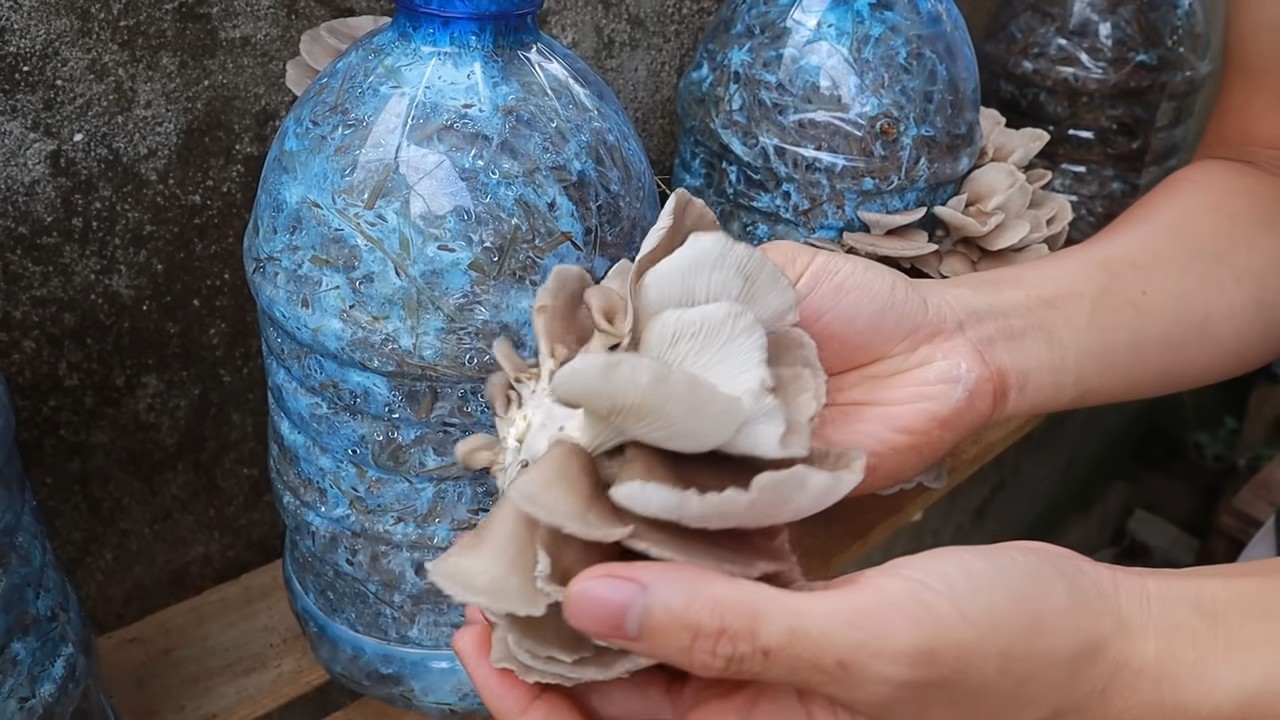
4. Fruchtung: Die Pilze ernten
Die Fruchtung ist die Phase, in der die eigentlichen Pilze wachsen.
1. Bedingungen anpassen: Sobald das Myzel das gesamte Substrat durchdrungen hat, ist es Zeit, die Bedingungen für die Fruchtung anzupassen.
* Licht: Bringt den Behälter an einen helleren Ort, aber vermeidet direkte Sonneneinstrahlung.
* Luftfeuchtigkeit: Erhöht die Luftfeuchtigkeit weiter. Besprüht die Oberfläche des Substrats mehrmals täglich mit Wasser.
* Belüftung: Sorgt für eine gute Belüftung, um Schimmelbildung zu vermeiden.
2. Pilze beobachten: Nach einigen Tagen solltet ihr kleine Pilzköpfe (Primordia) sehen, die aus dem Substrat sprießen.
3. Ernten: Erntet die Pilze, wenn sie ihre volle Größe erreicht haben, aber bevor sie anfangen, Sporen abzuwerfen. Schneidet sie vorsichtig mit einem scharfen Messer am Stiel ab.
5. Zweite Ernte (und mehr!)
Nach der ersten Ernte könnt ihr oft noch weitere Ernten erzielen.
1. Substrat vorbereiten: Entfernt alle Pilzreste vom Substrat und besprüht es erneut mit Wasser.
2. Bedingungen beibehalten: Haltet die gleichen Bedingungen wie bei der ersten Fruchtung aufrecht.
3. Wiederholen: Wiederholt den Prozess, bis das Substrat erschöpft ist.
Häufige Probleme und Lösungen
Auch beim Pilzzüchten können Probleme auftreten. Hier sind einige häufige Probleme und wie ihr sie lösen könnt:
* Schimmel: Wenn ihr Schimmel auf dem Substrat entdeckt, ist es wichtig, schnell zu handeln. Entfernt den befallenen Bereich vorsichtig und besprüht den Rest des Substrats mit einer verdünnten Wasserstoffperoxidlösung. Sorgt für eine bessere Belüftung und reduziert die Luftfeuchtigkeit.
* Kein Wachstum: Wenn das Myzel nicht wächst, kann das an verschiedenen Faktoren liegen. Überprüft die Temperatur, die Luftfeuchtigkeit und die Belüftung. Stellt sicher, dass das Substrat nicht zu trocken oder zu nass ist.
* Kleine Pilze: Wenn die Pilze klein bleiben, kann das an Nährstoffmangel liegen. Ihr könnt versuchen, das Substrat mit etwas organischem Dünger zu ergänzen.
Zusätzliche Tipps für den Erfolg
Hier sind noch ein paar zusätzliche Tipps, die euch helfen können, eure Pilzzucht zu Hause zu optimieren:
* Sauberkeit ist entscheidend: Achtet während des gesamten Prozesses auf absolute Sauberkeit, um Kontamination zu vermeiden
Conclusion
So, there you have it! Cultivating your own mushrooms at home is not only surprisingly simple but also incredibly rewarding. Forget those expensive, pre-packaged mushrooms from the grocery store. With a little patience and our easy-to-follow guide, you can enjoy a constant supply of fresh, flavorful fungi right from your kitchen.
Why is this DIY trick a must-try? Because it empowers you to take control of your food source, reduces your carbon footprint by eliminating transportation costs, and provides you with mushrooms that are undeniably fresher and more flavorful than anything you can buy. Plus, it’s a fascinating and educational experience that connects you to the natural world in a tangible way.
But the benefits don’t stop there. Growing your own mushrooms allows for endless experimentation. Try different substrates like coffee grounds, straw, or even cardboard to see how they affect the flavor and texture of your harvest. Explore different mushroom varieties, from the delicate oyster mushroom to the robust shiitake, each offering a unique culinary experience. Consider adding supplements like gypsum or bran to your substrate to boost yields and nutrient content. You can even experiment with different fruiting environments, adjusting temperature and humidity to optimize growth.
Don’t be intimidated by the process. While it may seem complex at first, growing mushrooms at home is actually quite forgiving. Even if you encounter a few bumps along the way, you’ll learn valuable lessons that will make you a more successful mushroom cultivator in the long run.
We encourage you to take the plunge and embark on your own mushroom-growing adventure. The satisfaction of harvesting your own homegrown mushrooms is truly unparalleled. Imagine the delicious meals you can create, the money you can save, and the knowledge you can gain.
Ready to start? Gather your supplies, follow our instructions carefully, and prepare to be amazed. And once you’ve harvested your first crop, we want to hear all about it! Share your experiences, tips, and photos in the comments below. Let’s build a community of home mushroom growers and inspire others to discover the joys of this rewarding hobby. Let us know what worked for you, what challenges you faced, and any creative variations you tried. Your feedback will help us improve our guide and empower even more people to **grow mushrooms at home** successfully. Happy growing!
Frequently Asked Questions (FAQ)
What are the easiest types of mushrooms to grow at home for beginners?
Oyster mushrooms are generally considered the easiest to grow for beginners. They are fast-growing, relatively tolerant of variations in temperature and humidity, and can thrive on a wide range of substrates, including straw, coffee grounds, and even cardboard. Shiitake mushrooms are another good option, although they require a bit more patience as they take longer to fruit. Button mushrooms, the kind you typically find in grocery stores, are more challenging to grow at home and are best left to experienced cultivators.
What kind of substrate should I use to grow mushrooms?
The best substrate depends on the type of mushroom you’re growing. Oyster mushrooms thrive on straw, coffee grounds, and cardboard. Shiitake mushrooms prefer hardwood sawdust or logs. Make sure your substrate is properly pasteurized or sterilized to eliminate competing molds and bacteria. Pasteurization involves heating the substrate to a temperature that kills harmful organisms but leaves beneficial ones intact, while sterilization involves heating to a higher temperature to kill all organisms.
How do I pasteurize or sterilize my substrate?
For straw, you can pasteurize it by soaking it in hot water (around 160-180°F) for an hour. For coffee grounds, you can simply microwave them for a few minutes. For sawdust, you’ll need to sterilize it in a pressure cooker or autoclave. Follow the manufacturer’s instructions for your specific equipment. Proper pasteurization or sterilization is crucial for preventing contamination and ensuring a successful mushroom harvest.
How long does it take to grow mushrooms at home?
The time it takes to grow mushrooms varies depending on the species and the growing conditions. Oyster mushrooms can fruit in as little as a few weeks, while shiitake mushrooms may take several months. Factors like temperature, humidity, and light can also affect the growth rate. Be patient and monitor your mushrooms regularly.
What are the ideal temperature and humidity conditions for growing mushrooms?
The ideal temperature and humidity conditions also vary depending on the species. Oyster mushrooms generally prefer temperatures between 60-75°F and high humidity (80-90%). Shiitake mushrooms prefer cooler temperatures (50-65°F) and slightly lower humidity (70-80%). You can use a humidifier and a thermometer to monitor and adjust the conditions in your growing area.
How do I know when my mushrooms are ready to harvest?
Mushrooms are typically ready to harvest when the caps have fully expanded but before they start to release spores. The edges of the caps may start to curl upwards slightly. Gently twist or cut the mushrooms off the substrate.
What are some common problems I might encounter when growing mushrooms at home, and how can I fix them?
Contamination is a common problem. Look out for green, black, or other colored molds growing on your substrate. If you see contamination, remove the affected area immediately to prevent it from spreading. Insufficient humidity can also be a problem. Use a humidifier or mist your mushrooms regularly to maintain high humidity levels. Pests like fungus gnats can also be a nuisance. Use sticky traps or beneficial nematodes to control them.
Can I grow mushrooms indoors without any special equipment?
Yes, you can grow mushrooms indoors without any special equipment, especially oyster mushrooms. A simple plastic tub or bucket can be used as a growing container. You can maintain humidity by misting regularly or placing a plastic bag over the container. A simple grow light can provide adequate lighting.
Are there any safety precautions I should take when growing mushrooms at home?
Always wash your hands thoroughly after handling mushrooms or substrate. Avoid inhaling spores, as they can cause allergic reactions in some people. Cook mushrooms thoroughly before eating them. Never eat wild mushrooms unless you are absolutely certain of their identification.
Can I reuse the substrate after harvesting mushrooms?
Yes, you can often get multiple flushes (harvests) from the same substrate. After harvesting, soak the substrate in water for a few hours to rehydrate it. You may also need to add some nutrients to the substrate to encourage further growth. Eventually, the substrate will become depleted and you’ll need to replace it. The spent substrate can be composted and used as a soil amendment in your garden.

Leave a Comment