
Grow Ginger at Home: Imagine stepping into your kitchen and snipping fresh ginger root, bursting with flavor, straight from your own little garden! Sounds dreamy, right? Well, it’s totally achievable, and this DIY guide is your ticket to making that dream a reality. Forget those bland, store-bought rhizomes – we’re diving into the wonderful world of homegrown ginger!
Ginger, with its fiery zest, has a rich history spanning millennia. Originating in South Asia, it’s been prized for its medicinal properties and culinary versatility for centuries. From ancient Ayurvedic practices to traditional Chinese medicine, ginger has been a go-to remedy for everything from nausea to inflammation. And let’s not forget its starring role in countless delicious dishes around the globe!
But why should you bother learning how to grow ginger at home? Simple: freshness and flavor! Store-bought ginger can often be dry and lacking in that vibrant zing. Plus, knowing exactly where your food comes from is incredibly satisfying. In this article, I’ll share my favorite tips and tricks for successfully cultivating ginger in your own backyard or even in a pot on your windowsill. Get ready to unleash your inner gardener and enjoy the incredible taste of homegrown ginger!
Growing Ginger at Home: A Comprehensive DIY Guide
Hello dear garden friends! Have you ever wondered how you can grow your own ginger at home? It’s easier than you think and incredibly rewarding! Fresh ginger from your own garden is not only more aromatic but also a great way to live more sustainably. In this article, I’ll show you step by step how you can easily do it yourself. Let’s get started!
What You Need for Growing Ginger
Before we begin, here is a list of the things you’ll need:
- Ginger root (rhizome): Make sure it is firm, plump, and has “eyes” (small buds). Organic ginger is often the better choice as it is less likely to have been treated with growth inhibitors.
- Planter: A pot with good drainage is important. It should be at least 30 cm wide and deep so the ginger can develop well.
- Potting soil: A well-draining, nutrient-rich soil is ideal. You can mix potting soil with some compost and perlite to improve drainage.
- Spray bottle: For moistening the soil.
- Watering can: For regular watering.
- Warm, bright location: Ginger loves warmth and indirect sunlight.
- Optional: Organic fertilizer for the growing phase.
Step-by-Step Guide: Planting Ginger
Here is a detailed guide on how to successfully plant your ginger:
1. Prepare the ginger root:
- Choose a ginger root that looks plump and healthy. It should have several “eyes” from which the new shoots will grow.
- If the root is very large, you can cut it into several pieces. Each piece should have at least one or two eyes.
- Let the cut pieces air dry for a few days so the cut surfaces can heal. This helps prevent rot.
2. Sprouting the ginger (optional, but recommended):
- This step is not strictly necessary, but it speeds up the process and increases the chances of success.
- Place the ginger pieces in a shallow dish with a little water. The bottom of the root should be slightly in the water.
- Place the dish in a warm, bright place, but not in direct sunlight.
- Change the water every few days.
- After a few weeks, small green shoots and roots should form.
3. Prepare the pot:
- Fill the pot with your prepared potting soil. Leave about 5 cm of space to the rim.
- Press the soil down lightly.
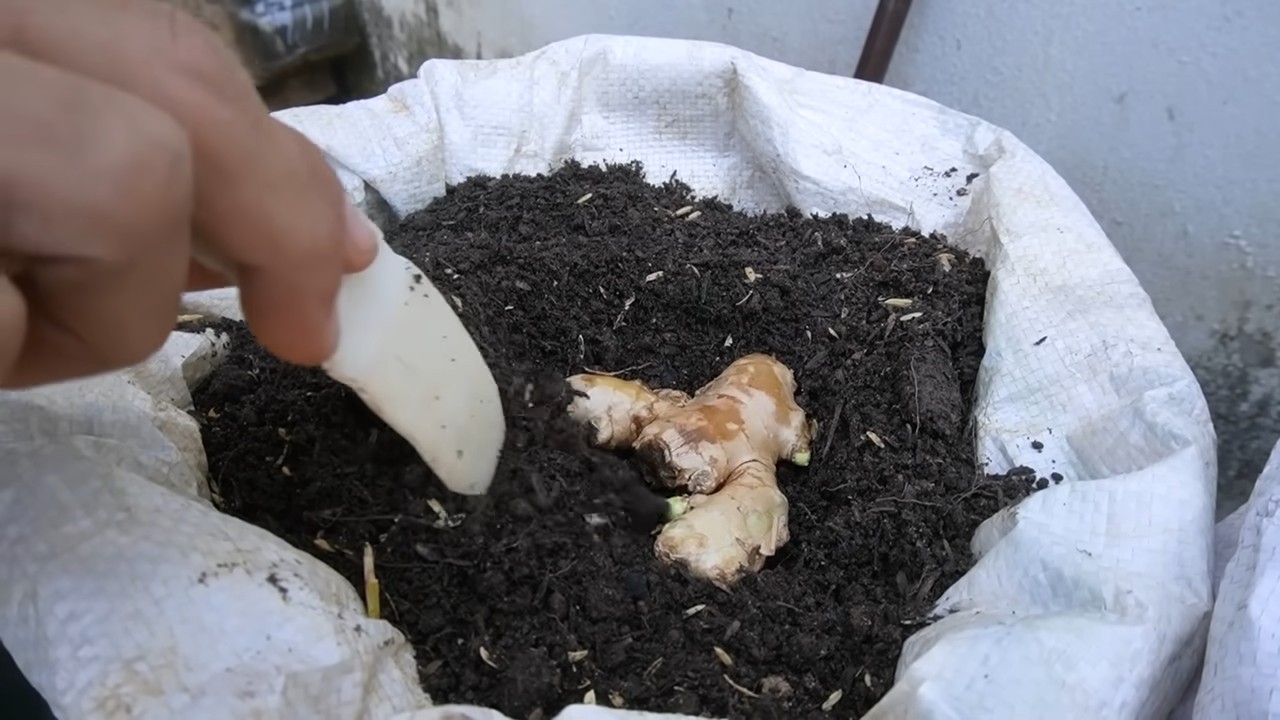
4. Plant the ginger:
- Make small holes in the soil, about 5-10 cm deep.
- Place the ginger pieces in the holes with the eyes facing up.
- Cover the ginger pieces with soil and press it down lightly.
- Water the soil carefully until it is moist but not soaked.
5. Choose the location:
- Place the pot in a warm, bright location. Ginger loves temperatures between 20 and 30 degrees Celsius.
- Avoid direct sunlight, as it can burn the leaves. A location with indirect light is ideal.
Caring for Ginger
Proper care is crucial for healthy growth. Here are some tips:
- Watering: Keep the soil moist, but not soaked. Water regularly, especially during the growing phase. Let the top layer of soil dry out slightly between waterings.
- Humidity: Ginger loves high humidity. You can spray the leaves regularly with water to increase humidity.
- Fertilizing: During the growing phase, you can fertilize the ginger every few weeks with an organic fertilizer. Be sure to follow the instructions on the packaging.
- Overwintering: Ginger is not winter-hardy. If you live in a region with cold winters, you must bring the ginger indoors before the first frost. Place it in a bright, cool location and reduce watering.
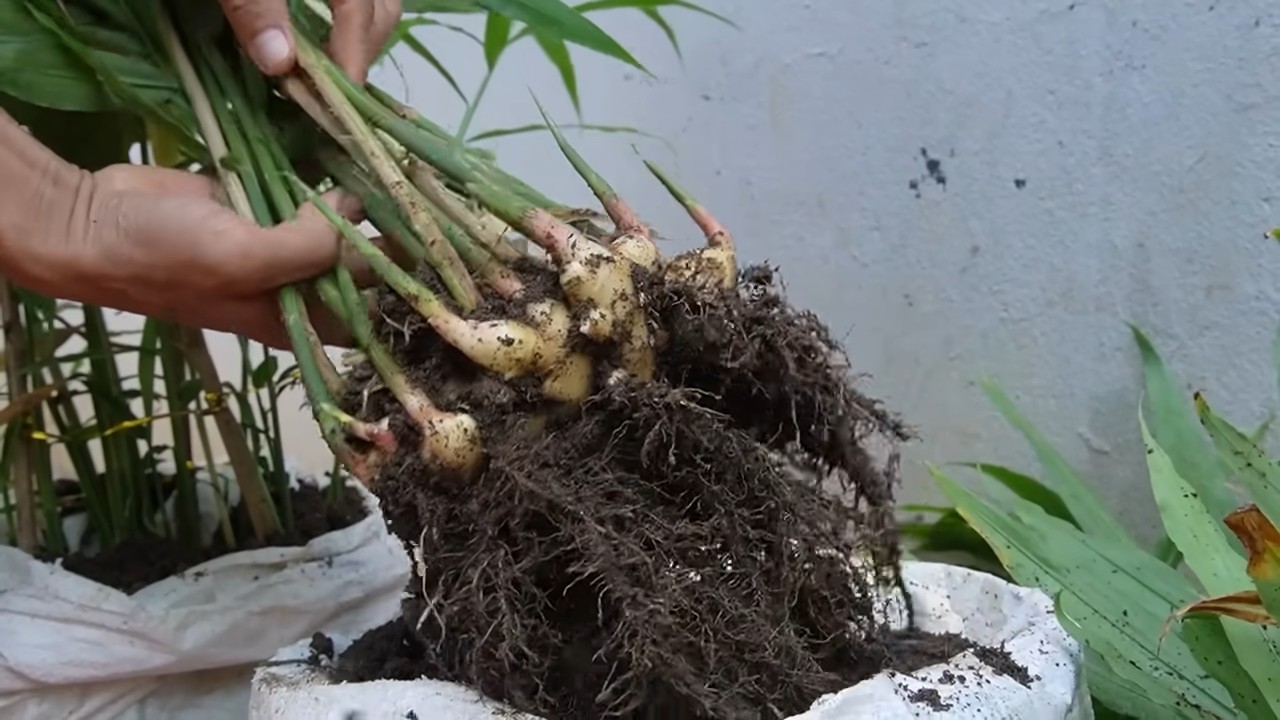
Harvest Time!
Harvest time is the most exciting part!
- When to harvest? You can harvest the ginger about 8-10 months after planting. The leaves will then turn yellow and begin to wither.
- How to harvest? Carefully dig the ginger root out of the pot. You can either harvest the whole root or just cut off a part and replant the rest.
- Storage: Fresh ginger can be stored in a plastic bag in the refrigerator. It also keeps well in the freezer.
Common Problems and Solutions
Problems can also arise when growing ginger. Here are some common problems and how you can solve them:
- Yellow leaves: Yellow leaves can be a sign of overwatering, underwatering, or nutrient deficiency. Check the soil moisture and fertilize if necessary.
- Rot: Rot can occur if the soil is too moist or the drainage is not good. Make sure the pot has good drainage holes and do not water too much.
- Pests: Ginger is relatively resistant to pests, but occasionally aphids or spider mites can appear. You can combat them with a natural insecticide or a soap solution.
Additional Tips for Successful Ginger Cultivation
Here are a few more tips that can help you optimize your ginger cultivation:
- Use high-quality seed stock: Make sure the ginger root you use for planting is healthy and of good quality.
- Pay attention to drainage: Good drainage is crucial to prevent rot.
- Water correctly: Water regularly, but not too much. Let the top layer of soil dry out slightly between waterings.
- Fertilize regularly: Fertilize the ginger regularly during the growing phase with an organic fertilizer.
- Observe your plants: Watch for signs of problems and act quickly to fix them.
Growing Ginger in Different Climates
Ginger is a tropical plant, but it can also be grown in cooler climates if you take some precautions.
- In colder climates: In colder climates, you should grow ginger in pots so you can bring it indoors in the winter. Place it in a bright, cool location and reduce watering.
- In warmer climates: In warmer climates, you can also grow ginger outdoors. Make sure it is protected from direct sunlight.
Harvesting and Using Ginger
After you have successfully harvested your ginger, you can use it in a variety of ways.
- Fresh ginger: Fresh ginger can be used in many dishes, such as soups, curries, smoothies, and teas.
- Dried ginger: Dried ginger can be used as a spice.
- Pickled ginger: Pickled ginger is a popular accompaniment to sushi.
- Ginger tea: Ginger tea is a soothing drink that can help with colds and nausea.
I hope this guide has helped you to grow ginger…
Conclusion
So, there you have it! Growing ginger at home is not only achievable, but it’s also a rewarding and surprisingly simple process. Forget those expensive trips to the grocery store for a knob of fresh ginger; imagine the satisfaction of harvesting your own, knowing exactly where it came from and how it was grown. This DIY trick transforms your kitchen into a mini-farm, offering a constant supply of this versatile and health-boosting spice.
But why is this a must-try? Beyond the cost savings, growing your own ginger allows you to enjoy a level of freshness and flavor that you simply can’t get from store-bought varieties. The ginger you harvest yourself will be bursting with vibrant, spicy notes, elevating your culinary creations to a whole new level. Plus, the act of nurturing a plant from rhizome to harvest is incredibly therapeutic and connects you to the natural world in a meaningful way.
Don’t be afraid to experiment! While we’ve outlined a basic method, there’s plenty of room for customization. Try different types of ginger – some varieties are spicier, while others have a more subtle, citrusy flavor. You can also experiment with different soil mixtures to see what works best in your climate. Consider adding organic fertilizers to boost growth and yield. If you’re feeling adventurous, try growing ginger in a container indoors, allowing you to enjoy fresh ginger year-round, regardless of the weather outside.
Think about the possibilities: fresh ginger tea brewed with your own homegrown ginger, fragrant ginger-infused stir-fries, or even homemade ginger ale with a uniquely vibrant flavor. The possibilities are endless!
We wholeheartedly encourage you to give this DIY trick a try. It’s a fantastic way to add fresh, flavorful ginger to your diet, save money, and connect with nature. And most importantly, we want to hear about your experiences! Share your photos, tips, and challenges in the comments below. Let’s create a community of home ginger growers and learn from each other. What are you waiting for? Get your hands dirty and start growing your own ginger today! You’ll be amazed at how easy and rewarding it is to cultivate this incredible spice right in your own home.
Frequently Asked Questions (FAQ)
1. What kind of ginger should I use to start growing?
The best ginger to use for planting is a fresh, plump rhizome from an organic grocery store or nursery. Look for rhizomes that are firm, with visible “eyes” or buds. Avoid ginger that is shriveled, moldy, or has been treated with growth inhibitors. Organic ginger is preferable because it’s less likely to have been treated with chemicals that could prevent sprouting. You can also source ginger rhizomes specifically intended for planting from online nurseries or garden centers. These are often guaranteed to sprout and grow.
2. How long does it take to grow ginger?
Ginger typically takes around 8-10 months to mature fully. However, you can start harvesting small pieces of ginger after about 4 months. The longer you let it grow, the larger and more flavorful the rhizomes will become. The exact time frame can vary depending on your climate, growing conditions, and the specific variety of ginger you are growing. Be patient and monitor your plant regularly.
3. What is the best soil for growing ginger?
Ginger thrives in well-draining, nutrient-rich soil. A good mix would be equal parts of potting soil, compost, and perlite or vermiculite. The compost provides essential nutrients, while the perlite or vermiculite improves drainage and aeration. Avoid heavy clay soils, as they can retain too much moisture and lead to root rot. You can also amend your soil with organic matter like aged manure or leaf mold to further improve its fertility and drainage.
4. How much sunlight does ginger need?
Ginger prefers partial shade, especially in hot climates. Direct sunlight can scorch the leaves. Aim for about 2-3 hours of morning sun or dappled sunlight throughout the day. If you’re growing ginger indoors, place it near a bright window but shield it from intense afternoon sun. You can also use a sheer curtain to filter the sunlight.
5. How often should I water my ginger plant?
Keep the soil consistently moist, but not waterlogged. Water thoroughly when the top inch of soil feels dry to the touch. Avoid overwatering, as this can lead to root rot. During the warmer months, you may need to water more frequently. In cooler months, reduce watering. Good drainage is crucial to prevent water from pooling around the roots.
6. What are some common problems when growing ginger?
Some common problems include root rot (caused by overwatering), pests like aphids and spider mites, and fungal diseases. To prevent root rot, ensure good drainage and avoid overwatering. Regularly inspect your plants for pests and treat them with insecticidal soap or neem oil if necessary. To prevent fungal diseases, provide good air circulation and avoid overhead watering.
7. Can I grow ginger indoors?
Yes, you can absolutely grow ginger indoors! Choose a large pot with drainage holes and use a well-draining potting mix. Place the pot near a bright window with indirect sunlight. Maintain consistent moisture and humidity. You can increase humidity by misting the plant regularly or placing a tray of water near the pot. Indoor-grown ginger may not grow as large as outdoor-grown ginger, but you can still harvest fresh ginger from it.
8. How do I harvest ginger?
You can start harvesting ginger after about 4 months by gently digging around the edges of the plant and cutting off a piece of the rhizome. Be careful not to disturb the rest of the plant. For a larger harvest, wait until the plant is about 8-10 months old. At this point, the leaves will start to turn yellow and die back. Dig up the entire plant and separate the rhizomes. Wash them thoroughly and store them in a cool, dry place.
9. How do I store harvested ginger?
Freshly harvested ginger can be stored in the refrigerator for several weeks. Wrap it in a paper towel and place it in a plastic bag to prevent it from drying out. You can also freeze ginger for longer storage. Peel and chop the ginger into small pieces or grate it before freezing. Store it in an airtight container or freezer bag. Frozen ginger can be used directly from the freezer.
10. Can I grow ginger from store-bought ginger?
Yes, you can grow ginger from store-bought ginger, but it’s important to choose organic ginger. Non-organic ginger may have been treated with growth inhibitors to prevent sprouting. Look for rhizomes that are plump, firm, and have visible “eyes” or buds. Soak the ginger in water overnight before planting to encourage sprouting.
11. What are the benefits of growing my own ginger?
Growing your own ginger offers several benefits, including:
* **Freshness and Flavor:** Homegrown ginger is often more flavorful and aromatic than store-bought ginger.
* **Cost Savings:** You can save money by growing your own ginger instead of buying it from the store.
* **Organic and Chemical-Free:** You have control over the growing process and can avoid using harmful chemicals.
* **Therapeutic Gardening:** Gardening can be a relaxing and rewarding hobby.
* **Sustainability:** Growing your own food reduces your carbon footprint.
12. What are some variations I can try when growing ginger?
* **Different Varieties:** Experiment with different varieties of ginger, such as common ginger, galangal, or turmeric (which is in the same family).
* **Container Gardening:** Grow ginger in containers on your patio or balcony.
* **Hydroponics:** Try growing ginger hydroponically for faster growth and higher yields.
* **Companion Planting:** Plant ginger alongside other beneficial plants, such as marigolds or basil.
* **Ginger Tea:** Use your homegrown ginger to make fresh and flavorful ginger tea.
Leave a Comment