
Grow Endive Indoors Successfully! Have you ever dreamt of plucking fresh, slightly bitter, and delightfully crunchy endive leaves right from your own home? Imagine adding a touch of gourmet flair to your salads and dishes, all thanks to your own indoor garden. Well, dream no more! This DIY guide will unlock the secrets to cultivating this unique vegetable within the cozy confines of your home.
Endive, with its intriguing history, has been enjoyed since the 16th century, with its cultivation perfected in Belgium. It’s a testament to human ingenuity, transforming a humble chicory root into a culinary delight. But why should you bother learning to grow endive indoors successfully? In today’s world, access to fresh, high-quality produce can be challenging and expensive. Plus, knowing exactly where your food comes from and how it’s grown offers unparalleled peace of mind.
I understand that the idea of growing vegetables indoors might seem daunting, but trust me, it’s easier than you think! This article will break down the process into simple, manageable steps, providing you with all the tips and tricks you need to enjoy a bountiful harvest of endive, regardless of your outdoor space or climate. So, let’s embark on this exciting journey together and transform your home into a thriving indoor garden!
Grow Endive Indoors: A Beginner’s Guide to Bitter Greens
Okay, so you’re thinking about growing endive indoors? Awesome! It’s totally doable, and while it might seem a little intimidating at first, I promise it’s a rewarding experience. Endive, with its slightly bitter and crisp leaves, is a fantastic addition to salads, sandwiches, or even grilled as a side dish. Plus, growing it yourself means you get the freshest possible flavor. Let’s dive in!
Choosing Your Endive Variety
First things first, let’s talk about the different types of endive you can grow. There are two main types: Belgian endive (also known as witloof) and curly endive (also known as frisée).
* **Belgian Endive (Witloof):** This is the one you typically see in the grocery store, with tightly packed, pale yellow leaves. It requires a two-stage growing process: first, you grow the roots, and then you force the chicons (the edible heads) in the dark.
* **Curly Endive (Frisée):** This type has frilly, green leaves and a more pronounced bitter flavor. It’s a bit easier to grow than Belgian endive because it doesn’t require the forcing process.
For beginners, I highly recommend starting with curly endive. It’s more forgiving and you’ll get to enjoy fresh greens much sooner. But if you’re feeling adventurous, we’ll cover Belgian endive too!
Materials You’ll Need
Before we get started, let’s gather everything you’ll need. This will make the whole process much smoother.
* **Endive Seeds:** Choose a variety that suits your taste and growing conditions. Reputable seed companies are your best bet.
* **Seed Starting Trays or Small Pots:** These are perfect for starting your seeds indoors.
* **Potting Mix:** Use a high-quality, well-draining potting mix. Avoid using garden soil, as it can be too heavy and may contain pests or diseases.
* **Larger Pots (for transplanting):** Once your seedlings are big enough, you’ll need to transplant them into larger pots. Choose pots that are at least 6 inches in diameter.
* **Grow Lights (optional but recommended):** Endive needs plenty of light, especially during the winter months. Grow lights can help supplement natural light and ensure healthy growth.
* **Watering Can or Spray Bottle:** For gentle watering.
* **Fertilizer (optional):** A balanced liquid fertilizer can help boost growth.
* **Dark Container (for forcing Belgian endive):** If you’re growing Belgian endive, you’ll need a dark container, like a bucket or a large pot with a lid, to force the chicons.
Growing Curly Endive (Frisée) – The Easy Route
This is the simpler method, perfect for getting your feet wet with indoor endive growing.
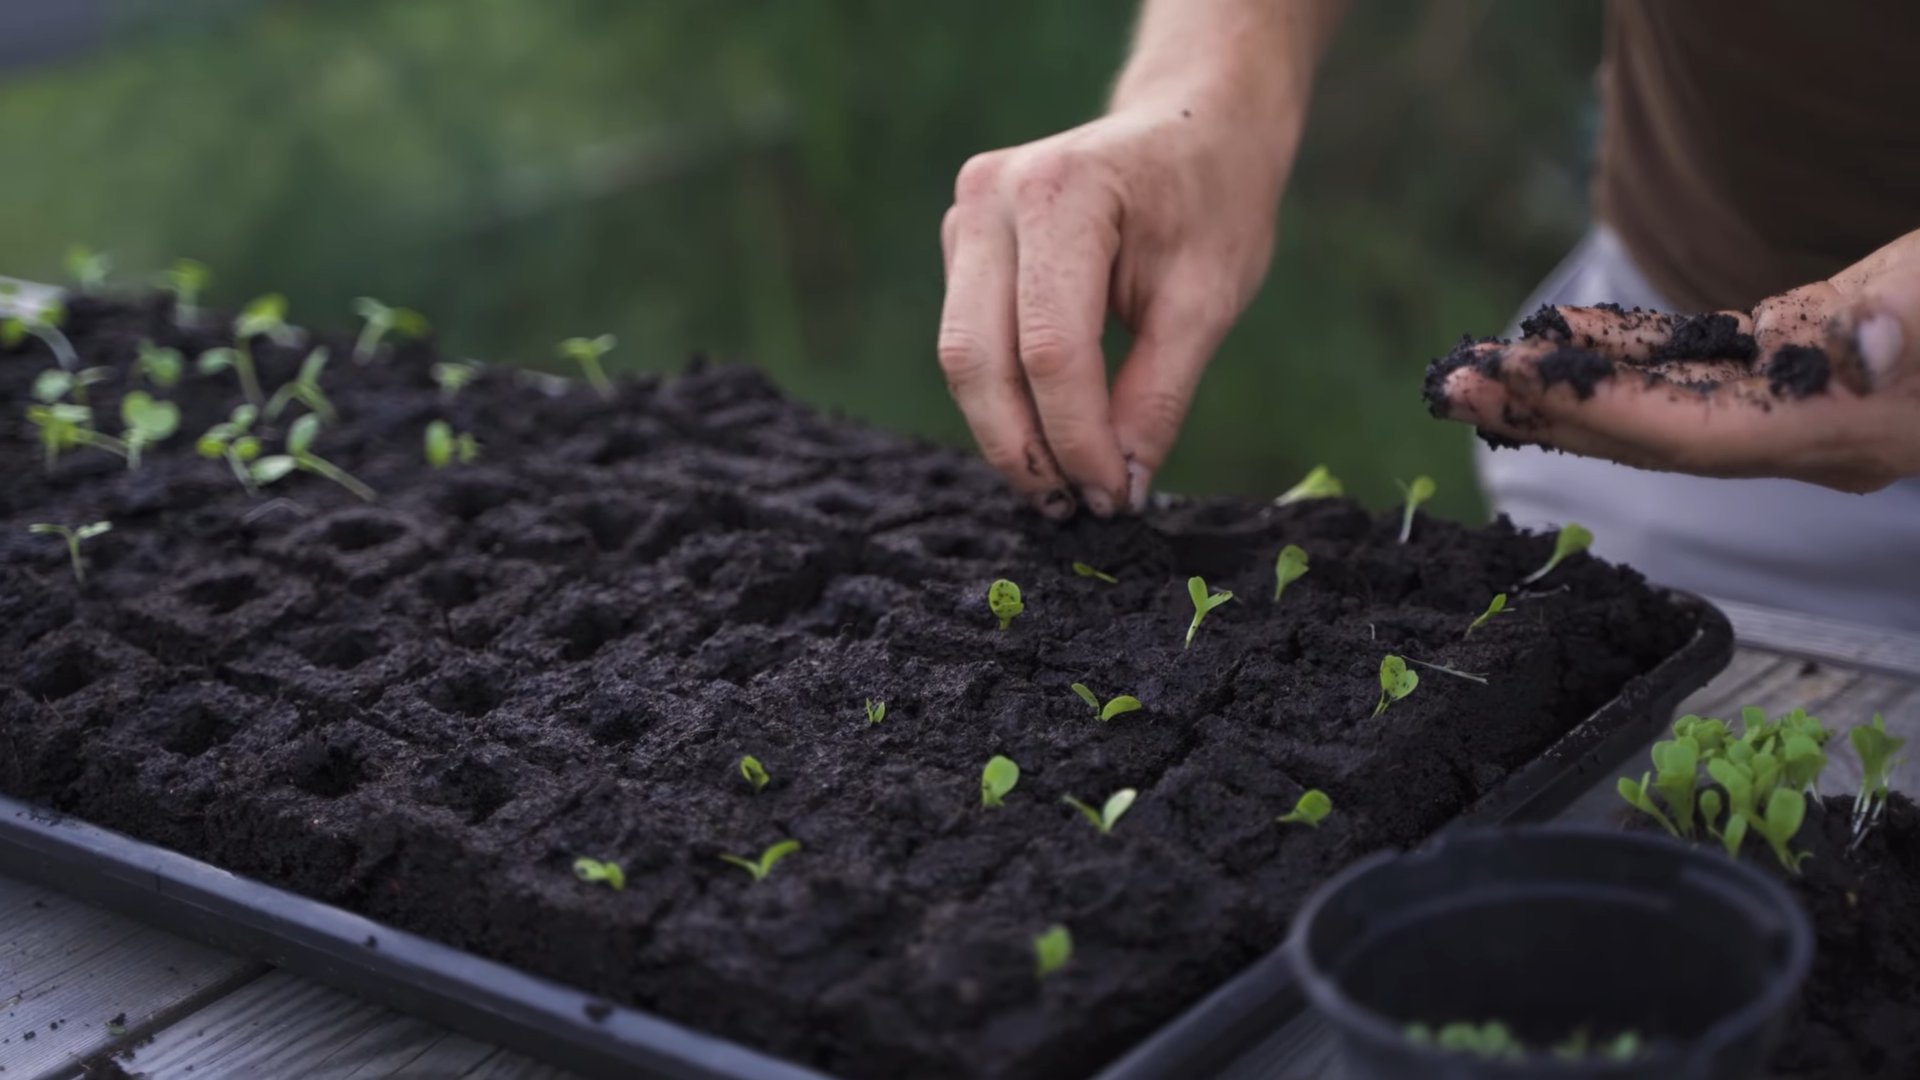
Step 1: Starting the Seeds
1. **Moisten the Potting Mix:** Before you sow the seeds, moisten the potting mix in your seed starting trays or small pots. You want it to be damp, but not soggy.
2. **Sow the Seeds:** Sprinkle the endive seeds evenly over the surface of the soil. You don’t need to bury them too deep; just gently press them into the soil.
3. **Cover Lightly:** Cover the seeds with a very thin layer of potting mix or vermiculite.
4. **Water Gently:** Water the seeds gently using a spray bottle to avoid disturbing them.
5. **Provide Warmth:** Endive seeds germinate best in warm conditions (around 60-70°F or 15-21°C). You can use a heat mat to help speed up germination.
6. **Keep Moist:** Keep the soil consistently moist, but not waterlogged. You can cover the seed starting trays with a plastic dome or plastic wrap to help retain moisture.
7. **Wait for Germination:** Endive seeds typically germinate in 7-14 days.
Step 2: Caring for the Seedlings
1. **Provide Light:** Once the seedlings emerge, remove the plastic dome or plastic wrap and place them under grow lights or in a sunny window. Endive needs at least 6 hours of light per day.
2. **Water Regularly:** Water the seedlings regularly, allowing the top inch of soil to dry out between waterings.
3. **Thin the Seedlings:** If you sowed the seeds too thickly, thin them out to allow each seedling enough space to grow. Aim for about 2-3 inches between seedlings.
4. **Fertilize (Optional):** You can fertilize the seedlings with a diluted liquid fertilizer every 2-3 weeks.
Step 3: Transplanting
1. **Prepare the Larger Pots:** Fill the larger pots with fresh potting mix.
2. **Transplant the Seedlings:** Gently remove the seedlings from the seed starting trays or small pots and transplant them into the larger pots. Be careful not to damage the roots.
3. **Water Thoroughly:** Water the transplanted seedlings thoroughly.
4. **Provide Light and Care:** Continue to provide plenty of light and water regularly.
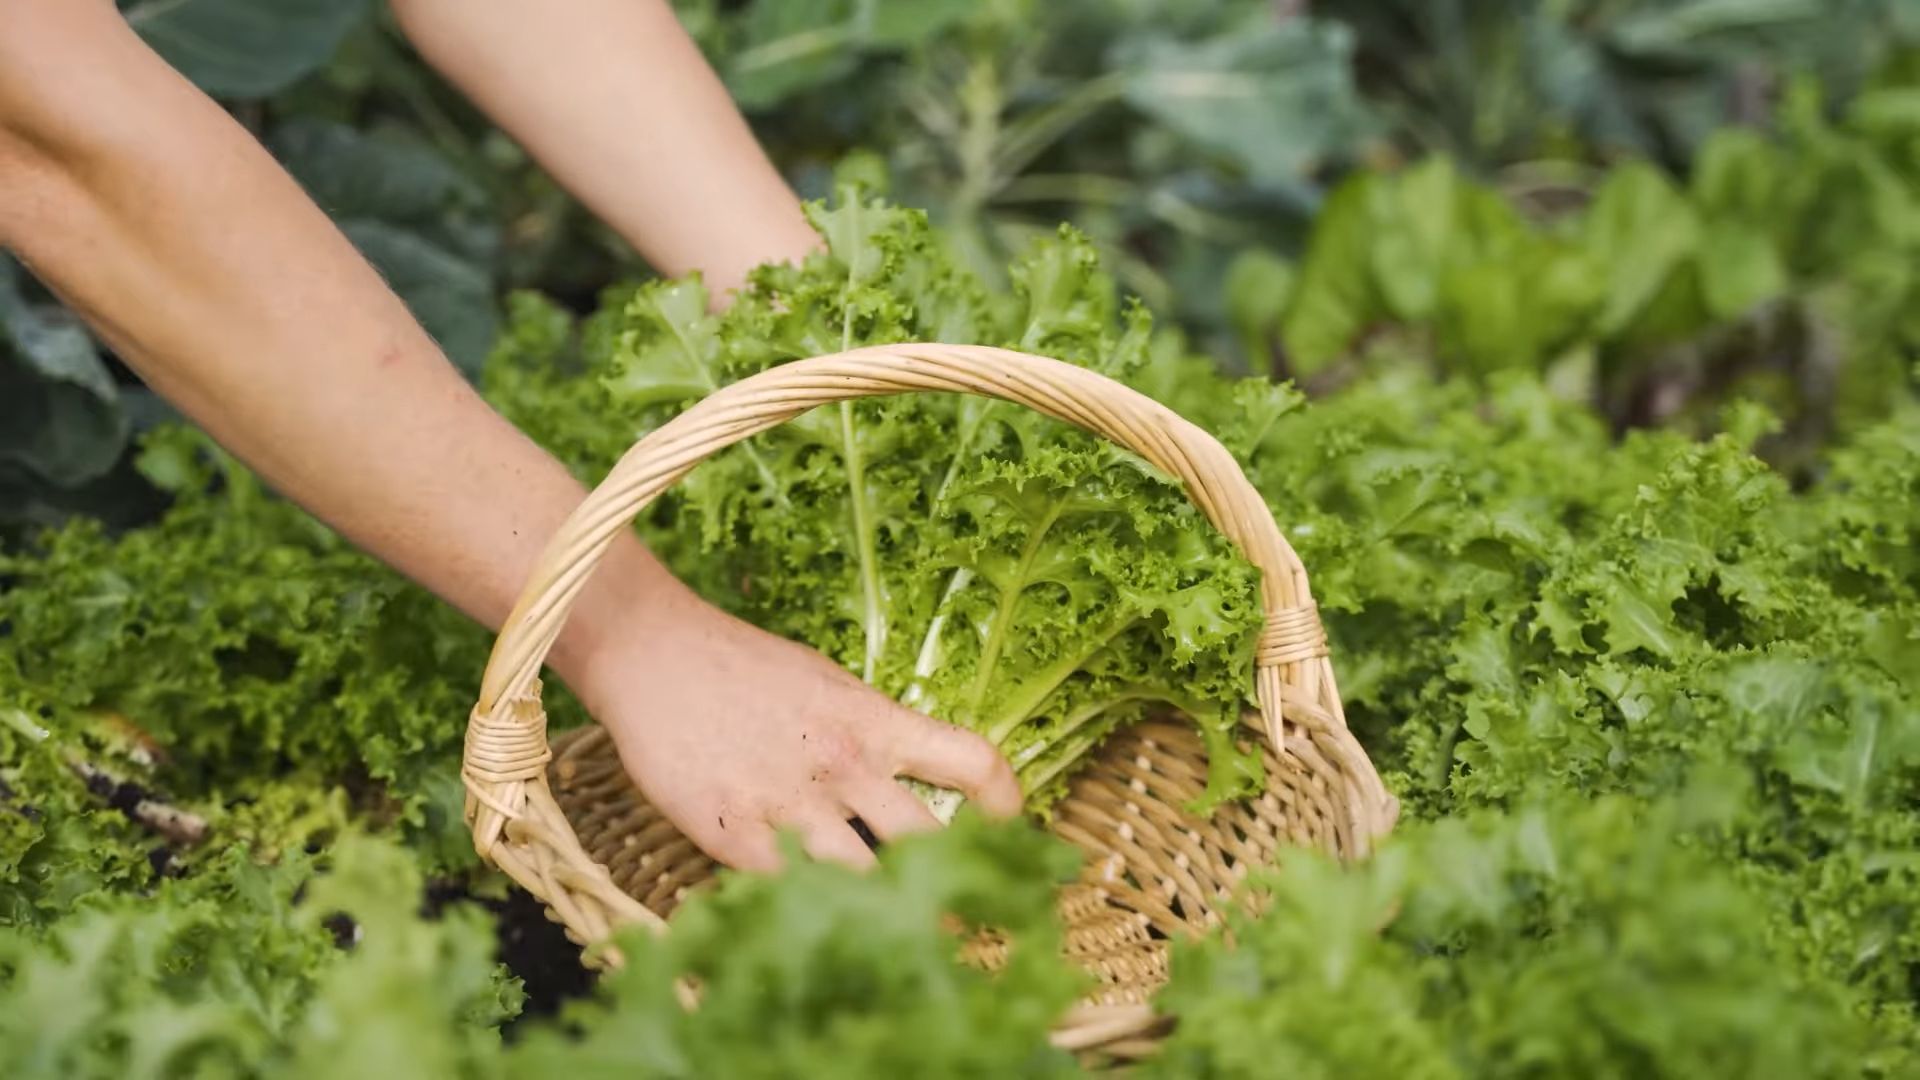
Step 4: Harvesting
1. **Harvest When Mature:** Curly endive is typically ready to harvest in about 60-70 days.
2. **Cut the Leaves:** You can harvest the entire head of endive at once, or you can harvest individual leaves as needed. Use a sharp knife or scissors to cut the leaves close to the base of the plant.
3. **Enjoy!** Wash the harvested endive leaves and enjoy them in salads, sandwiches, or other dishes.
Growing Belgian Endive (Witloof) – The Two-Stage Challenge
This method requires a bit more patience and effort, but the reward is those beautiful, pale yellow chicons.
Phase 1: Growing the Roots
This phase is all about developing strong, healthy roots.
1. **Start the Seeds (Same as Curly Endive):** Follow the same steps as outlined above for starting curly endive seeds.
2. **Care for the Seedlings (Same as Curly Endive):** Follow the same steps as outlined above for caring for curly endive seedlings.
3. **Transplant to Larger Pots (Same as Curly Endive):** Follow the same steps as outlined above for transplanting the seedlings to larger pots.
4. **Grow for Several Months:** Allow the plants to grow for several months, until the roots are about 1-2 inches in diameter. This may take 4-5 months.
5. Important Note: During this phase, you want to encourage root growth, so avoid fertilizing too heavily with nitrogen, which promotes leafy growth.
Phase 2: Forcing the Chicons
This is where the magic happens! We’re going to trick the plant into producing those delicious chicons in the dark.
1. **Harvest the Roots:** Once the roots are mature, carefully dig them up from the pots.
2. **Trim the Leaves:** Cut off the leaves, leaving about 1-2 inches of stem above the root.
3. **Prepare the Forcing Container:** Fill the dark container with moist sand or potting mix.
4. **Plant the Roots:** Plant the roots upright in the sand or potting mix, packing them closely together. Leave the top of the roots exposed.
5. **Water Thoroughly:** Water the roots thoroughly.
6. **Cover the Container:** Cover the container with a lid or another dark container to create a completely dark environment. This is crucial for producing pale, tender chicons.
7. **Maintain Cool Temperatures:** Keep the container in a cool, dark place (around 50-60°F or 10-15°C).
8. **Keep Moist:** Keep the sand or potting mix consistently moist, but not waterlogged.
9. **Wait for the Chicons to Grow:** It will take about 3-4 weeks for the chicons to grow to a harvestable size.
10. **Harvest the Chicons:** Once the chicons are about 4-6 inches long, carefully remove them from the container.
11. **Enjoy!** Wash the harvested chicons and enjoy them in salads, braised, or grilled.
Troubleshooting
Even with the best intentions, you might encounter some challenges along the way. Here are a few common problems and how to address them:
* **Poor Germination:** Make sure the seeds are fresh and that the soil is warm and moist.
* **Leggy Seedlings:** This is usually caused by insufficient light. Provide more light or move the seedlings closer to the light source.
* **Yellowing Leaves:** This could be a sign of overwatering, underwatering, or nutrient deficiency. Adjust your watering schedule and consider fertilizing with a balanced fertilizer.
* **Pests:** Keep an eye out for common pests like aphids and spider mites. You can control them with insecticidal soap or neem oil.
* **Bitter Taste:** Endive can
Conclusion
So, there you have it! Growing endive indoors successfully is not only achievable, but it’s also a deeply rewarding experience. Forget those wilted, overpriced heads of endive at the grocery store. With a little patience and this straightforward DIY trick, you can have a constant supply of fresh, crisp endive right at your fingertips.
Why is this a must-try? Because it puts you in control. You control the growing environment, ensuring optimal conditions for your endive. You control the quality, knowing exactly what goes into nurturing your plants. And you control the harvest, picking only what you need, when you need it. This means less waste, more flavor, and a significant boost to your culinary creations.
Beyond the basic method, there’s plenty of room for experimentation. Try different varieties of endive, such as the broad-leaved Batavian or the tightly packed Belgian endive. Adjust the lighting to see how it affects the bitterness of the leaves – more light generally leads to a more bitter flavor, while less light results in a milder taste. You can also experiment with different potting mixes to find what works best for your specific indoor environment. Consider adding a diluted liquid fertilizer specifically formulated for leafy greens every few weeks to boost growth.
For a unique twist, try forcing your endive roots for a second harvest. After the initial head is harvested, leave the roots in the soil and continue watering. You might be surprised to see a second, smaller head emerge. This is a great way to maximize your yield and get the most out of your endive plants.
Don’t be intimidated by the process. Even if you’re a novice gardener, this DIY trick is incredibly accessible. The steps are simple, the materials are readily available, and the results are well worth the effort. Imagine the satisfaction of serving a salad made with endive you grew yourself – the crisp texture, the slightly bitter bite, the undeniable freshness. It’s a conversation starter, a testament to your green thumb, and a delicious addition to any meal.
We wholeheartedly encourage you to give this DIY trick a try. Start small, with just a few plants, and see how it goes. Once you get the hang of it, you can expand your indoor endive garden and enjoy a continuous harvest throughout the year.
And most importantly, we want to hear about your experience! Share your successes, your challenges, and your tips in the comments below. Let’s create a community of indoor endive growers and learn from each other. What varieties did you try? What growing conditions worked best for you? What delicious recipes did you create with your homegrown endive? Your insights will be invaluable to other readers who are embarking on their own endive-growing journey. So, grab your seeds, prepare your potting mix, and get ready to enjoy the unparalleled flavor of homegrown endive. Happy growing!
Frequently Asked Questions (FAQ)
What is the best time of year to start growing endive indoors?
While you can technically grow endive indoors year-round, the best time to start is typically in the late summer or early fall. This allows the plants to mature during the cooler months, which they prefer. Starting in the fall also allows you to have a fresh supply of endive throughout the winter when it’s often harder to find fresh produce. However, with proper indoor climate control, you can adjust the temperature and lighting to mimic these conditions at any time of year.
How much light does endive need when grown indoors?
Endive requires at least 6-8 hours of light per day. If you don’t have a sunny window that provides enough natural light, you’ll need to supplement with artificial lighting. Fluorescent grow lights or LED grow lights are excellent options. Position the lights about 6-12 inches above the plants and adjust as needed to prevent burning. Remember that too much light can increase the bitterness of the endive, so monitor your plants and adjust accordingly.
What type of soil is best for growing endive indoors?
Endive prefers well-draining soil that is rich in organic matter. A good potting mix for endive would be a blend of peat moss, perlite, and vermiculite. You can also add compost or other organic amendments to improve the soil’s fertility and drainage. Avoid using heavy garden soil, as it can become compacted and prevent proper root growth.
How often should I water my endive plants?
Water your endive plants regularly, keeping the soil consistently moist but not waterlogged. Check the soil moisture by sticking your finger about an inch into the soil. If it feels dry, it’s time to water. Avoid overwatering, as this can lead to root rot. Water in the morning to allow the foliage to dry before nightfall, which can help prevent fungal diseases.
How do I prevent endive from becoming too bitter?
Bitterness is a common characteristic of endive, but there are a few things you can do to minimize it. First, provide adequate shade or filtered light, as excessive sunlight can increase bitterness. Second, harvest the endive when it is young and tender. Third, blanch the endive by covering the heads with a dark cloth or container for a few weeks before harvesting. This will reduce the amount of chlorophyll in the leaves, resulting in a milder flavor.
What are some common pests and diseases that affect endive?
Common pests that can affect endive include aphids, slugs, and snails. Aphids can be controlled with insecticidal soap or neem oil. Slugs and snails can be handpicked or trapped. Diseases that can affect endive include downy mildew and root rot. Downy mildew can be prevented by providing good air circulation and avoiding overhead watering. Root rot can be prevented by using well-draining soil and avoiding overwatering.
How do I harvest endive?
You can harvest endive when the heads are firm and compact, typically about 8-12 weeks after planting. To harvest, simply cut the head off at the base of the plant with a sharp knife. You can also harvest individual leaves as needed, but this will slow down the overall growth of the plant.
Can I grow endive from seed indoors?
Yes, you can absolutely grow endive from seed indoors. Start by sowing the seeds in seed trays or small pots filled with seed-starting mix. Keep the soil moist and warm, and the seeds should germinate in about 7-14 days. Once the seedlings have developed a few true leaves, you can transplant them into larger pots.
What are some creative ways to use homegrown endive?
Homegrown endive is incredibly versatile and can be used in a variety of dishes. It’s delicious in salads, either on its own or mixed with other greens. The leaves can also be used as edible spoons for appetizers or dips. Endive can be grilled, braised, or sautéed as a side dish. It’s also a great addition to soups and stews. The slightly bitter flavor of endive pairs well with sweet and savory ingredients alike.
Is growing endive indoors successfully difficult for beginners?
No, growing endive indoors successfully is quite manageable for beginners. The key is to provide the right growing conditions – adequate light, well-draining soil, and consistent moisture. Start with a small number of plants and follow the instructions carefully. Don’t be afraid to experiment and learn from your mistakes. With a little patience and attention, you’ll be enjoying fresh, homegrown endive in no time.

Leave a Comment