
Grow Cauliflower at Home? Absolutely! Imagine harvesting your own crisp, creamy cauliflower, knowing exactly where it came from and how it was grown. Forget those bland, overpriced heads at the grocery store – we’re diving into the rewarding world of homegrown cauliflower, and I’m so excited to share my favorite tips and tricks with you!
For centuries, cauliflower has been a culinary staple, gracing tables from humble farmhouses to royal banquets. Originating in the Mediterranean, this versatile vegetable has been cultivated and enjoyed for its unique flavor and nutritional benefits. But let’s be honest, sometimes growing cauliflower can feel a little intimidating, right?
That’s where this DIY guide comes in! Many gardeners struggle with common cauliflower challenges like pest infestations, bolting, and small, disappointing heads. But fear not! I’ve compiled a collection of easy-to-follow hacks and techniques that will help you grow cauliflower at home successfully, even if you’re a beginner. From choosing the right variety to mastering the art of blanching, we’ll cover everything you need to know to enjoy a bountiful cauliflower harvest. Get ready to roll up your sleeves and transform your garden into a cauliflower paradise!

Blumenkohl selbst anbauen: Dein umfassender DIY-Leitfaden
Hallo Gartenfreunde! Ich liebe es, mein eigenes Gemüse anzubauen, und Blumenkohl ist da keine Ausnahme. Es mag anfangs etwas einschüchternd wirken, aber mit der richtigen Vorbereitung und Pflege kannst du auch zu Hause köstlichen Blumenkohl ernten. In diesem Artikel zeige ich dir Schritt für Schritt, wie es geht. Los geht’s!
Die Grundlagen: Was du für den Blumenkohlanbau brauchst
Bevor wir loslegen, lass uns sicherstellen, dass wir alles Notwendige haben. Hier ist eine Liste der Dinge, die du brauchst:
* **Blumenkohlsamen oder Jungpflanzen:** Du kannst entweder mit Samen beginnen oder Jungpflanzen kaufen, um den Prozess zu beschleunigen. Ich persönlich mag es, mit Samen anzufangen, weil es mir mehr Kontrolle über den gesamten Prozess gibt.
* **Anzuchterde:** Spezielle Anzuchterde ist leichter und nährstoffärmer als normale Gartenerde und ideal für die Keimung von Samen.
* **Töpfe oder Anzuchtschalen:** Für die Anzucht der Samen.
* **Gartenerde:** Hochwertige Gartenerde, angereichert mit Kompost oder organischem Dünger.
* **Kompost oder organischer Dünger:** Blumenkohl ist ein Starkzehrer und benötigt viele Nährstoffe.
* **Gießkanne oder Gartenschlauch:** Zum Bewässern der Pflanzen.
* **Gartenwerkzeug:** Spaten, Schaufel, Hacke.
* **Mulch:** Stroh, Holzhackschnitzel oder Rasenschnitt, um den Boden feucht zu halten und Unkraut zu unterdrücken.
* **Insektenschutznetz (optional):** Um die Pflanzen vor Schädlingen zu schützen.
* **pH-Messgerät (optional):** Um den pH-Wert des Bodens zu überprüfen. Blumenkohl bevorzugt einen pH-Wert zwischen 6,0 und 7,0.
Phase 1: Die Anzucht (wenn du mit Samen beginnst)
Wenn du dich für Samen entschieden hast, ist die Anzucht der erste Schritt. Hier ist, wie ich es mache:
1. **Samen vorbereiten:** Weiche die Blumenkohlsamen für etwa 24 Stunden in lauwarmem Wasser ein. Das hilft, die Keimung zu beschleunigen.
2. **Anzuchtschalen vorbereiten:** Fülle die Anzuchtschalen oder Töpfe mit Anzuchterde. Drücke die Erde leicht an.
3. **Samen aussäen:** Säe die Samen etwa 1 cm tief in die Erde. Lege nicht zu viele Samen in einen Topf, da sie sonst um Platz und Nährstoffe konkurrieren.
4. **Bewässern:** Befeuchte die Erde vorsichtig mit einer Sprühflasche oder einer Gießkanne mit Brauseaufsatz. Die Erde sollte feucht, aber nicht nass sein.
5. **Warm stellen:** Stelle die Anzuchtschalen an einen warmen, hellen Ort. Eine Temperatur zwischen 18 und 24 Grad Celsius ist ideal. Ein Mini-Gewächshaus oder eine Fensterbank eignen sich gut.
6. **Feucht halten:** Halte die Erde feucht, indem du sie regelmäßig besprühst. Vermeide Staunässe.
7. **Keimung:** Die Samen sollten innerhalb von 5 bis 10 Tagen keimen.
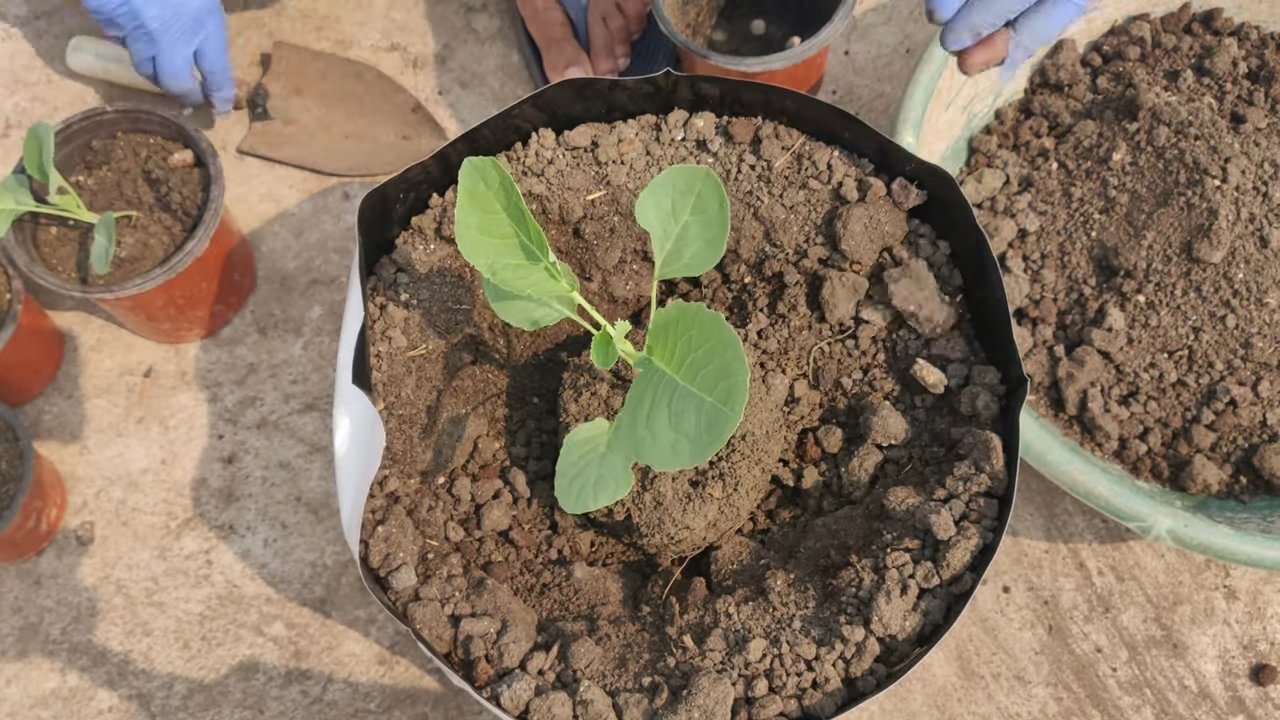
8. **Pikieren:** Sobald die Sämlinge ihre ersten richtigen Blätter (neben den Keimblättern) entwickelt haben, kannst du sie pikieren. Das bedeutet, dass du sie vorsichtig aus den Anzuchtschalen nimmst und in größere Töpfe umpflanzt. Achte darauf, die Wurzeln nicht zu beschädigen.
Phase 2: Vorbereitung des Beets
Egal, ob du mit Samen angefangen oder Jungpflanzen gekauft hast, die Vorbereitung des Beets ist entscheidend für den Erfolg.
1. **Standortwahl:** Wähle einen sonnigen Standort für dein Blumenkohlbeet. Blumenkohl benötigt mindestens 6 Stunden Sonnenlicht pro Tag.
2. **Boden vorbereiten:** Lockere den Boden gründlich auf und entferne Unkraut, Steine und andere Hindernisse.
3. **Boden verbessern:** Blumenkohl ist ein Starkzehrer, daher ist es wichtig, den Boden mit Kompost oder organischem Dünger anzureichern. Arbeite den Kompost oder Dünger gut in den Boden ein.
4. **pH-Wert überprüfen:** Überprüfe den pH-Wert des Bodens. Blumenkohl bevorzugt einen pH-Wert zwischen 6,0 und 7,0. Wenn der pH-Wert zu niedrig ist, kannst du Kalk hinzufügen, um ihn zu erhöhen. Wenn er zu hoch ist, kannst du Schwefel hinzufügen, um ihn zu senken.
5. **Beet ebnen:** Glätte das Beet, um eine ebene Oberfläche zu schaffen.
Phase 3: Das Auspflanzen
Jetzt kommt der spannende Teil: das Auspflanzen der Blumenkohlpflanzen!
1. **Pflanzen abhärten:** Bevor du die Pflanzen ins Beet setzt, solltest du sie abhärten. Das bedeutet, dass du sie für etwa eine Woche jeden Tag für ein paar Stunden ins Freie stellst, um sie an die Bedingungen im Freien zu gewöhnen. Beginne mit einer Stunde und steigere die Zeit jeden Tag.
2. **Pflanzabstand:** Pflanze die Blumenkohlpflanzen in einem Abstand von etwa 45 bis 60 cm zueinander. Die Reihen sollten etwa 60 bis 75 cm auseinander liegen.
3. **Pflanzlöcher graben:** Grabe Löcher, die groß genug sind, um die Wurzelballen der Pflanzen aufzunehmen.
4. **Pflanzen einsetzen:** Setze die Pflanzen vorsichtig in die Löcher und fülle die Löcher mit Erde auf. Drücke die Erde leicht an.
5. **Bewässern:** Gieße die Pflanzen gründlich, um sicherzustellen, dass die Erde gut durchfeuchtet ist.
6. **Mulchen:** Trage eine Schicht Mulch um die Pflanzen auf, um den Boden feucht zu halten und Unkraut zu unterdrücken.
Phase 4: Pflege und Bewässerung
Die richtige Pflege ist entscheidend, um gesunde Blumenkohlköpfe zu ernten.
1. **Bewässerung:** Blumenkohl benötigt regelmäßig Wasser, besonders während trockener Perioden. Gieße die Pflanzen tief, aber vermeide Staunässe. Am besten gießt du früh am Morgen, damit die Blätter tagsüber abtrocknen können.
2. **Düngung:** Dünge die Pflanzen alle paar Wochen mit einem organischen Dünger oder Komposttee. Blumenkohl ist ein Starkzehrer und benötigt viele Nährstoffe, um gut zu wachsen.
3. **Unkrautbekämpfung:** Halte das Beet unkrautfrei, indem du regelmäßig Unkraut jätest. Unkraut konkurriert mit den Blumenkohlpflanzen um Wasser und Nährstoffe.
4. **Schädlingsbekämpfung:** Überprüfe die Pflanzen regelmäßig auf Schädlinge wie Kohlweißlinge, Blattläuse und Kohlfliegen. Wenn du Schädlinge entdeckst, kannst du sie mit natürlichen Methoden bekämpfen, z. B. mit Neemöl oder Insektizidseife. Ein Insektenschutznetz kann auch helfen, Schädlinge fernzuhalten.
5. **Bodenpflege:** Lockere den Boden regelmäßig um die Pflanzen herum auf, um die Belüftung zu verbessern.
Phase 5: Das Bleichen (optional)
Einige Gärtner bleichen ihre Blumenkohlköpfe, um sie weißer und zarter zu machen. Das Bleichen ist optional, aber es kann die Qualität des Blumenkohls verbessern.
1. **Zeitpunkt:** Beginne mit dem Bleichen, wenn die Blumenkohlköpfe etwa 7 bis 10 cm groß sind.
2. **Methode:** Biege die äußeren Blätter über den Kopf und befestige sie mit einem Gummiband oder einer Wäscheklammer. Achte darauf, dass der Kopf vollständig bedeckt ist.
3. **Dauer:** Lasse die Blätter etwa 4 bis 7 Tage über dem Kopf, bis der Kopf die gewünschte Farbe hat.
4. **Kontrolle:** Überprüfe den Kopf regelmäßig, um sicherzustellen, dass er nicht fault oder von Schädlingen befallen wird.
Phase 6: Die Ernte
Endlich! Der Moment, auf den du gewartet hast: die Ernte deines selbst angebauten Blumenkohls!
1. **Zeitpunkt:** Ernte den Blumenkohl, wenn die Köpfe fest und
Conclusion
Growing your own cauliflower at home might seem daunting, but as you’ve discovered, it’s a surprisingly rewarding and achievable endeavor. Forget the often-bland, overpriced heads at the grocery store. With a little patience and the right approach, you can cultivate crisp, flavorful cauliflower that bursts with freshness, straight from your own garden. This isn’t just about saving money; it’s about connecting with your food, understanding its journey from seed to table, and enjoying the unparalleled taste of homegrown produce.
The benefits extend beyond just flavor. You have complete control over the growing process, ensuring your cauliflower is free from harmful pesticides and herbicides. You can choose heirloom varieties that offer unique colors, textures, and tastes that you simply won’t find commercially. Imagine serving a vibrant purple or orange cauliflower at your next dinner party – a conversation starter and a testament to your gardening prowess!
This DIY approach to growing cauliflower is a must-try for several reasons. First, the taste difference is undeniable. Homegrown cauliflower is sweeter and more tender than store-bought varieties. Second, it’s a sustainable practice that reduces your carbon footprint and supports local food systems. Third, it’s a deeply satisfying hobby that connects you with nature and provides a sense of accomplishment. Finally, mastering the art of growing cauliflower at home empowers you to become a more self-sufficient and resourceful individual.
Don’t be afraid to experiment with different varieties to find your favorites. Consider trying Romanesco cauliflower for its striking fractal patterns or purple cauliflower for its vibrant color and slightly sweeter taste. You can also adjust your planting schedule to extend your harvest season, ensuring a steady supply of fresh cauliflower throughout the year. Companion planting with herbs like rosemary and thyme can help deter pests and enhance the flavor of your cauliflower.
We encourage you to take the plunge and embark on your own cauliflower-growing adventure. Start small, learn from your mistakes, and don’t be afraid to ask for help. The gardening community is incredibly supportive, and there are countless resources available online and in your local area.
Once you’ve harvested your first head of homegrown cauliflower, we’d love to hear about your experience! Share your tips, tricks, and photos with us in the comments below. Let’s build a community of cauliflower enthusiasts and inspire others to discover the joys of growing their own food. Your success story could be the inspiration someone else needs to start their own garden. So, grab your seeds, prepare your soil, and get ready to enjoy the delicious rewards of growing cauliflower at home!
Frequently Asked Questions (FAQ)
1. How much space do I really need to grow cauliflower?
Cauliflower plants need a good amount of space to thrive. Ideally, you should aim for 18-24 inches between plants and 24-36 inches between rows. This allows for adequate air circulation, which helps prevent fungal diseases. However, if you’re short on space, you can try growing cauliflower in containers. Choose a large container, at least 12 inches in diameter, and make sure it has good drainage. You can also try growing smaller varieties of cauliflower that are specifically bred for container gardening. Remember that container-grown cauliflower will likely need more frequent watering and fertilization.
2. What are the most common problems when growing cauliflower, and how can I prevent them?
Several common problems can plague cauliflower plants. Cabbage worms are a frequent pest, munching on the leaves and heads. You can prevent them by using row covers, handpicking them off the plants, or applying Bacillus thuringiensis (Bt), a natural insecticide. Clubroot is a fungal disease that causes swollen roots and stunted growth. Prevent it by ensuring good soil drainage, rotating your crops, and liming the soil to raise the pH. Black rot is another bacterial disease that can cause yellowing and rotting of the leaves. Prevent it by using disease-free seeds, practicing crop rotation, and avoiding overhead watering. Finally, buttoning, where small, premature heads form, can be caused by stress factors like nutrient deficiencies or temperature fluctuations. Ensure your plants receive adequate nutrients and water, and protect them from extreme weather conditions.
3. How do I know when my cauliflower is ready to harvest?
Knowing when to harvest your cauliflower is crucial for optimal flavor and texture. The head should be firm, compact, and white (or the color of the variety you’re growing). The curds should be tightly packed together, and the head should be about 6-8 inches in diameter. Don’t wait too long to harvest, as the head can become loose and grainy if it overmatures. To harvest, simply cut the stem below the head, leaving a few leaves attached.
4. Can I grow cauliflower in the shade?
Cauliflower needs at least 6 hours of direct sunlight per day to thrive. While it can tolerate some partial shade, especially in hot climates, it won’t produce well in full shade. If you live in a very hot climate, providing some afternoon shade can help prevent the heads from bolting (going to seed prematurely).
5. What kind of soil is best for growing cauliflower?
Cauliflower prefers well-drained, fertile soil that is rich in organic matter. The ideal soil pH is between 6.0 and 7.0. Before planting, amend your soil with compost or well-rotted manure to improve its fertility and drainage. You can also add a slow-release fertilizer to provide your plants with the nutrients they need throughout the growing season.
6. How often should I water my cauliflower plants?
Cauliflower needs consistent moisture to thrive. Water deeply and regularly, especially during dry periods. Aim to keep the soil consistently moist but not waterlogged. Mulching around the plants can help retain moisture and suppress weeds.
7. Can I freeze cauliflower that I’ve grown?
Yes, you can freeze cauliflower that you’ve grown. To do so, blanch the florets in boiling water for 3 minutes, then immediately plunge them into ice water to stop the cooking process. Drain the florets thoroughly and spread them out on a baking sheet to freeze individually. Once frozen, transfer them to a freezer bag or container. Frozen cauliflower can be stored for up to 12 months.
8. What are some creative ways to use my homegrown cauliflower?
Beyond the traditional steamed or roasted cauliflower, there are countless creative ways to enjoy your homegrown harvest. Try making cauliflower rice as a healthy alternative to white rice. Use cauliflower to make a creamy soup or a cheesy gratin. Roast cauliflower florets with spices for a flavorful side dish. Or, get adventurous and make cauliflower pizza crust or cauliflower mashed potatoes. The possibilities are endless!
9. Is it possible to grow cauliflower indoors?
While it’s possible to start cauliflower seeds indoors, it’s generally not recommended to grow them to full maturity indoors. Cauliflower needs a lot of sunlight and space, which can be difficult to provide indoors. However, you can start seeds indoors 6-8 weeks before the last frost and then transplant them outdoors once the weather warms up.
10. What are some good companion plants for cauliflower?
Companion planting can help improve the health and yield of your cauliflower plants. Good companion plants include herbs like rosemary, thyme, and sage, which can help deter pests. Marigolds are also effective at repelling nematodes. Legumes like beans and peas can help fix nitrogen in the soil, which benefits cauliflower. Avoid planting cauliflower near members of the nightshade family, such as tomatoes and peppers, as they can compete for nutrients.


Leave a Comment