
Grow Cauliflower and Broccoli like a pro, even if you’ve never held a trowel before! Have you ever dreamed of harvesting your own crisp cauliflower and vibrant broccoli, fresh from your backyard? Imagine the satisfaction of serving a delicious, homegrown meal, knowing exactly where your food came from and how it was grown. This isn’t just a pipe dream; it’s an achievable reality with a few simple tricks and DIY hacks.
For centuries, cultivating brassicas like cauliflower and broccoli has been a cornerstone of healthy diets across various cultures. From the Roman Empire, where broccoli was highly prized, to the elaborate gardens of Renaissance Europe, these vegetables have held a significant place in culinary history. But you don’t need to be a seasoned gardener or have acres of land to enjoy the benefits of growing your own.
In today’s world, where concerns about food security and the quality of produce are ever-present, learning how to grow cauliflower and broccoli at home offers a sense of control and assurance. Plus, let’s be honest, store-bought vegetables often lack the vibrant flavor and freshness of homegrown ones. This DIY guide will equip you with the knowledge and practical tips to successfully cultivate these nutritious and delicious vegetables, regardless of your experience level. I’m excited to share these secrets with you, so let’s get started and transform your garden into a thriving source of fresh, healthy produce!

Kohlrabi und Brokkoli selbst anbauen: Ein umfassender DIY-Leitfaden
Hallo Gartenfreunde! Ich freue mich riesig, euch heute zu zeigen, wie ihr Kohlrabi und Brokkoli erfolgreich in eurem eigenen Garten anbauen könnt. Es ist gar nicht so schwer, wie man vielleicht denkt, und das frische, knackige Gemüse schmeckt einfach unschlagbar! Lasst uns loslegen!
Was ihr für den Anbau von Kohlrabi und Brokkoli braucht:
* Saatgut: Wählt hochwertige Samen von Kohlrabi und Brokkoli. Achtet auf Sorten, die für eure Region geeignet sind.
* Anzuchterde: Für die Voranzucht im Haus oder Gewächshaus.
* Anzuchttöpfe oder -schalen: Kleine Behälter für die Aussaat.
* Gartenerde: Gut vorbereiteter Boden im Gartenbeet.
* Kompost oder organischer Dünger: Zur Bodenverbesserung und Nährstoffversorgung.
* Gießkanne oder Gartenschlauch: Zum Bewässern der Pflanzen.
* Gartenwerkzeug: Spaten, Hacke, Pflanzkelle.
* Schutznetz (optional): Zum Schutz vor Schädlingen wie Kohlweißlingen.
* Pflanzstäbe (optional): Zur Unterstützung der Pflanzen, besonders bei Brokkoli.
Kohlrabi und Brokkoli: Ein kleiner Unterschied
Bevor wir ins Detail gehen, kurz ein paar Worte zu den Unterschieden. Kohlrabi ist ein Knollengemüse, das oberirdisch wächst. Brokkoli hingegen bildet Röschen aus, die wir ernten. Beide gehören zur Familie der Kreuzblütler und haben ähnliche Ansprüche an Boden und Pflege.
Aussaat und Voranzucht
Die Voranzucht ist besonders wichtig, wenn ihr in Regionen mit kürzeren Sommern wohnt. Sie gibt den Pflanzen einen Vorsprung und ermöglicht eine frühere Ernte.
Kohlrabi vorziehen:
1. Aussaatzeitpunkt: Beginnt etwa 4-6 Wochen vor dem letzten erwarteten Frost mit der Aussaat. In Deutschland ist das meist ab März der Fall.
2. Aussaat: Füllt eure Anzuchttöpfe mit Anzuchterde. Drückt die Erde leicht an und sät die Kohlrabisamen etwa 1 cm tief.
3. Bewässerung: Gießt die Erde vorsichtig an, sodass sie feucht, aber nicht nass ist.
4. Standort: Stellt die Töpfe an einen hellen, warmen Ort (ca. 18-20°C).
5. Keimung: Die Samen keimen in der Regel innerhalb von 5-10 Tagen.
6. Pflege: Haltet die Erde feucht und sorgt für ausreichend Licht. Wenn die Keimlinge zu dicht stehen, könnt ihr sie vereinzeln.
Brokkoli vorziehen:
1. Aussaatzeitpunkt: Ähnlich wie beim Kohlrabi, beginnt die Voranzucht etwa 4-6 Wochen vor dem letzten Frost.
2. Aussaat: Füllt Anzuchttöpfe mit Anzuchterde und sät die Brokkolisamen etwa 1 cm tief.
3. Bewässerung: Gießt die Erde vorsichtig an.
4. Standort: Stellt die Töpfe an einen hellen, warmen Ort.
5. Keimung: Die Samen keimen in der Regel innerhalb von 5-10 Tagen.
6. Pflege: Haltet die Erde feucht und sorgt für ausreichend Licht.
Vorbereitung des Gartenbeets
Ein gut vorbereitetes Beet ist das A und O für eine erfolgreiche Ernte.
1. Standortwahl: Wählt einen sonnigen Standort für eure Kohlrabi- und Brokkolipflanzen. Sie benötigen mindestens 6 Stunden Sonne pro Tag.
2. Bodenbearbeitung: Lockert den Boden gründlich auf und entfernt Unkraut, Steine und Wurzeln.
3. Bodenverbesserung: Mischt Kompost oder organischen Dünger unter die Erde, um die Nährstoffversorgung zu verbessern. Kohlrabi und Brokkoli sind Starkzehrer und benötigen viele Nährstoffe.
4. pH-Wert: Der ideale pH-Wert für Kohlrabi und Brokkoli liegt zwischen 6,0 und 7,0. Ihr könnt den pH-Wert mit einem Bodentest überprüfen und gegebenenfalls anpassen.
Auspflanzen der Jungpflanzen
Sobald die Jungpflanzen kräftig genug sind und keine Frostgefahr mehr besteht, können sie ins Freie gepflanzt werden.
Kohlrabi auspflanzen:
1. Abhärten: Bevor ihr die Pflanzen auspflanzt, solltet ihr sie einige Tage lang abhärten. Stellt sie dazu tagsüber ins Freie und holt sie nachts wieder rein.
2. Pflanzabstand: Pflanzt die Kohlrabipflanzen in einem Abstand von etwa 20-30 cm zueinander.
3. Pflanzloch: Grabt ein Pflanzloch, das etwas größer ist als der Wurzelballen der Pflanze.
4. Einsetzen: Setzt die Pflanze vorsichtig in das Loch und füllt es mit Erde auf. Drückt die Erde leicht an.
5. Bewässerung: Gießt die Pflanzen nach dem Einsetzen gründlich an.
Brokkoli auspflanzen:
1. Abhärten: Auch Brokkolipflanzen sollten vor dem Auspflanzen abgehärtet werden.
2. Pflanzabstand: Pflanzt die Brokkolipflanzen in einem Abstand von etwa 40-50 cm zueinander.
3. Pflanzloch: Grabt ein Pflanzloch, das etwas größer ist als der Wurzelballen der Pflanze.
4. Einsetzen: Setzt die Pflanze vorsichtig in das Loch und füllt es mit Erde auf. Drückt die Erde leicht an.
5. Bewässerung: Gießt die Pflanzen nach dem Einsetzen gründlich an.
Pflege während der Wachstumsphase
Die richtige Pflege ist entscheidend für eine reiche Ernte.
1. Bewässerung: Kohlrabi und Brokkoli benötigen regelmäßig Wasser, besonders während trockener Perioden. Achtet darauf, dass die Erde immer leicht feucht ist.
2. Düngung: Düngt die Pflanzen regelmäßig mit einem organischen Dünger oder Kompost. Eine zusätzliche Düngung mit einem stickstoffbetonten Dünger kann das Wachstum fördern.
3. Unkrautbekämpfung: Entfernt regelmäßig Unkraut, um die Nährstoffkonkurrenz zu minimieren.
4. Schädlingsbekämpfung: Achtet auf Schädlinge wie Kohlweißlinge, Erdflöhe und Blattläuse. Ein Schutznetz kann helfen, die Pflanzen vor Schädlingen zu schützen. Bei Bedarf könnt ihr auch biologische Schädlingsbekämpfungsmittel einsetzen.
5. Bodenpflege: Lockert den Boden regelmäßig auf, um die Belüftung zu verbessern.
Erntezeit
Endlich ist es soweit! Die Ernte steht vor der Tür.
Kohlrabi ernten:
1. Erntezeitpunkt: Kohlrabi kann geerntet werden, sobald die Knollen die gewünschte Größe erreicht haben. In der Regel ist das etwa 8-10 Wochen nach der Aussaat der Fall.
2. Ernte: Schneidet die Knollen mit einem scharfen Messer knapp über dem Boden ab.
3. Lagerung: Kohlrabi kann im Kühlschrank einige Tage gelagert werden.
Brokkoli ernten:
1. Erntezeitpunkt: Brokkoli kann geerntet werden, sobald die Röschen fest und geschlossen sind. Achtet darauf, dass die Röschen nicht zu blühen beginnen.
2. Ernte: Schneidet den Haupttrieb mit einem scharfen Messer ab. Oft bilden sich nach der Ernte des Haupttriebs noch Seitentriebe, die ebenfalls geerntet werden können.
3. Lagerung: Brokkoli kann im Kühlschrank einige Tage gelagert werden.
Häufige Probleme und Lösungen
Auch beim Anbau von Kohlrabi und Brokkoli können Probleme auftreten. Hier sind einige häufige Probleme und ihre Lösungen:
* Kohlhernie: Eine Pilzkrankheit, die die
Conclusion
So, there you have it! Growing your own cauliflower and broccoli isn’t just a rewarding gardening experience; it’s a pathway to fresher, more flavorful, and potentially more affordable produce. We’ve walked you through the essential steps, from selecting the right varieties and preparing your soil to nurturing your plants and protecting them from pests. The satisfaction of harvesting your own homegrown vegetables, knowing exactly where they came from and how they were grown, is truly unparalleled.
This DIY approach to growing cauliflower and broccoli is a must-try for several compelling reasons. First, you gain complete control over the growing process, ensuring that your vegetables are free from harmful pesticides and herbicides. This is especially important for those seeking organic and sustainable food options. Second, you can choose varieties that are not typically available in grocery stores, expanding your culinary horizons and enjoying unique flavors and textures. Imagine serving a vibrant purple cauliflower or a tender Romanesco broccoli that you nurtured from seed to table!
But the benefits extend beyond just taste and health. Gardening is a fantastic way to connect with nature, reduce stress, and get some exercise. It’s a mindful activity that can bring a sense of calm and accomplishment to your life. Plus, growing your own food is a tangible step towards reducing your carbon footprint and supporting local food systems.
Don’t be afraid to experiment with different varieties and growing techniques. For example, if you live in a warmer climate, consider heat-tolerant cauliflower and broccoli varieties. You can also try succession planting, sowing seeds every few weeks to ensure a continuous harvest throughout the growing season. Companion planting is another great way to enhance your garden’s health and productivity. Try planting marigolds near your cauliflower and broccoli to deter pests, or intercropping with legumes like beans or peas to improve soil fertility.
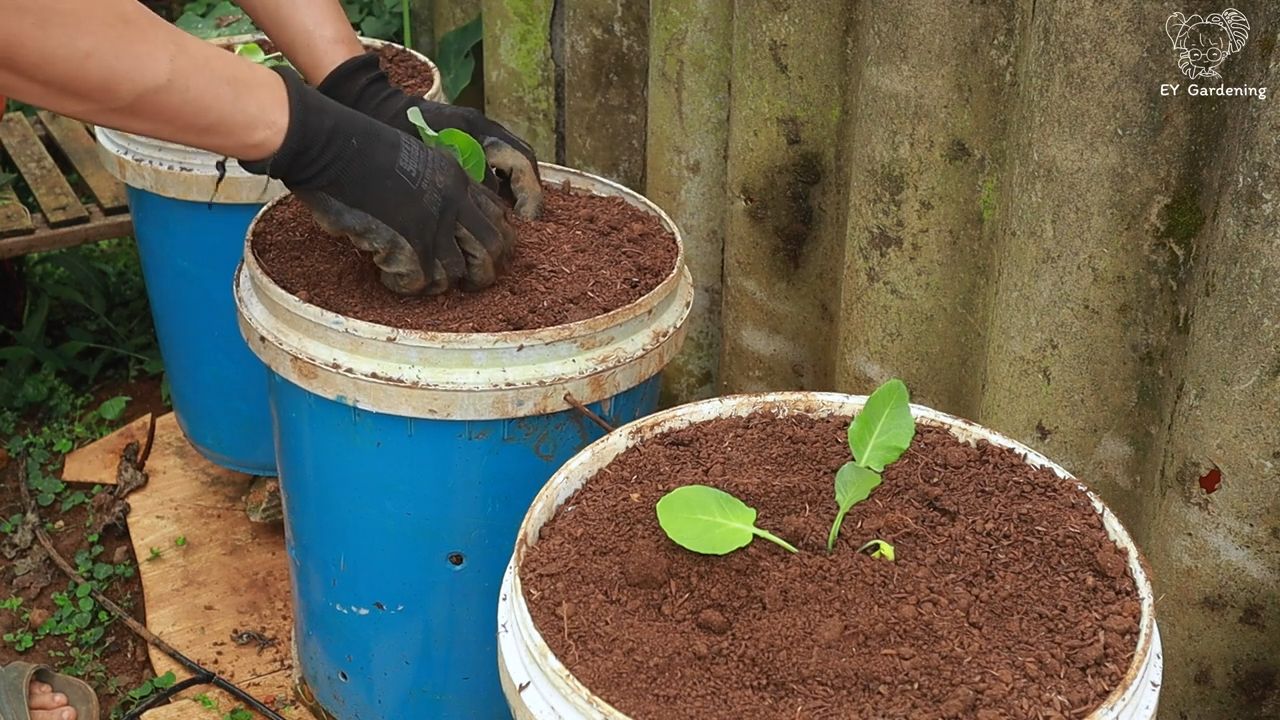
Consider growing cauliflower and broccoli in containers if you have limited space. Dwarf varieties are particularly well-suited for container gardening. Just make sure to choose a pot that is large enough to accommodate the plant’s root system and provide adequate drainage.
We understand that growing your own vegetables can seem daunting at first, but with a little planning and effort, you can achieve impressive results. Remember to start small, be patient, and learn from your mistakes. Every gardener, even the most experienced ones, faces challenges along the way. The key is to persevere and enjoy the journey.
We are confident that you will find this DIY trick of growing cauliflower and broccoli incredibly rewarding. So, grab your seeds, prepare your soil, and get ready to embark on a delicious and fulfilling gardening adventure. We encourage you to share your experiences with us! Post photos of your homegrown cauliflower and broccoli on social media using [Your Hashtag] and tell us about your successes and challenges. We can’t wait to see what you create! Happy gardening!
Frequently Asked Questions (FAQ)
Q: What are the best varieties of cauliflower and broccoli to grow for beginners?
A: For beginners, we recommend starting with relatively easy-to-grow varieties. For cauliflower, ‘Snowball Y Improved’ is a classic choice known for its reliability and uniform heads. ‘Cheddar’ cauliflower, with its vibrant orange color, is also a good option and offers a slightly sweeter flavor. For broccoli, ‘Waltham 29’ is a popular heirloom variety that produces large, flavorful heads. ‘Packman’ is another excellent choice, known for its early maturity and compact size, making it suitable for smaller gardens. These varieties are generally more forgiving and less prone to common problems, making them ideal for novice gardeners.
Q: How much sunlight do cauliflower and broccoli need?
A: Cauliflower and broccoli are sun-loving plants and require at least 6 hours of direct sunlight per day to thrive. Ideally, they should receive 8 hours or more. Insufficient sunlight can lead to leggy growth, smaller heads, and reduced yields. If you live in a particularly hot climate, providing some afternoon shade can help prevent the plants from bolting (going to seed prematurely). Observe your garden throughout the day to determine the areas that receive the most sunlight and plant your cauliflower and broccoli accordingly.
Q: What kind of soil is best for growing cauliflower and broccoli?
A: Cauliflower and broccoli prefer well-drained, fertile soil that is rich in organic matter. The ideal soil pH is between 6.0 and 7.0. Before planting, amend your soil with compost, aged manure, or other organic materials to improve its structure, drainage, and nutrient content. Heavy clay soils can be improved by adding sand and organic matter to increase drainage. Sandy soils can be improved by adding organic matter to help retain moisture and nutrients. A soil test can help you determine the pH and nutrient levels of your soil and guide you in making necessary amendments.
Q: How often should I water cauliflower and broccoli?
A: Cauliflower and broccoli need consistent moisture to grow properly. Water deeply and regularly, especially during dry periods. Aim to keep the soil consistently moist but not waterlogged. A good rule of thumb is to water when the top inch of soil feels dry to the touch. Mulching around the plants can help retain moisture and suppress weeds. Avoid overhead watering, as this can increase the risk of fungal diseases. Instead, water at the base of the plants using a soaker hose or drip irrigation system.
Q: What are some common pests and diseases that affect cauliflower and broccoli, and how can I control them?
A: Cauliflower and broccoli are susceptible to several pests and diseases, including cabbage worms, aphids, flea beetles, clubroot, and black rot. To control pests, you can use row covers to protect your plants from insects. Handpicking pests off the plants is also an effective method. Insecticidal soap or neem oil can be used to control aphids and other soft-bodied insects. To prevent diseases, choose disease-resistant varieties, practice crop rotation, and ensure good air circulation. Avoid overhead watering and remove any infected leaves or plants promptly. For clubroot, which is a soilborne disease, you can amend the soil with lime to raise the pH and improve drainage.
Q: When is the best time to harvest cauliflower and broccoli?
A: Cauliflower is ready to harvest when the head is firm, compact, and white (or the color of the variety you are growing). The head should be about 6-8 inches in diameter. Broccoli is ready to harvest when the head is firm and the florets are tightly closed. If the florets start to open and turn yellow, it’s time to harvest immediately. Cut the head off the plant with a sharp knife, leaving a few inches of stem. Side shoots may develop after the main head is harvested, providing you with additional smaller heads.
Q: Can I grow cauliflower and broccoli in containers?
A: Yes, you can grow cauliflower and broccoli in containers, especially dwarf varieties. Choose a pot that is at least 12 inches in diameter and 12 inches deep. Use a high-quality potting mix that is well-draining and rich in organic matter. Make sure the container has drainage holes to prevent waterlogging. Water regularly and fertilize every few weeks with a balanced fertilizer. Place the container in a location that receives at least 6 hours of direct sunlight per day.
Q: How can I prevent cauliflower and broccoli from bolting (going to seed prematurely)?
A: Bolting can be caused by several factors, including heat stress, drought stress, and nutrient deficiencies. To prevent bolting, choose heat-tolerant varieties if you live in a warm climate. Provide consistent moisture and avoid letting the soil dry out completely. Fertilize regularly to ensure that the plants have adequate nutrients. Mulching around the plants can help retain moisture and regulate soil temperature. If you experience a sudden heat wave, provide some afternoon shade to protect the plants from excessive heat.
Q: Can I save seeds from my cauliflower and broccoli plants?
A: Saving seeds from cauliflower and broccoli can be challenging because they are cross-pollinating plants. This means that they can easily cross with other members of the Brassica family, such as cabbage, kale, and Brussels sprouts. If you want to save true-to-type seeds, you need to isolate your plants from other Brassicas or hand-pollinate them. However, even with these precautions, there is still a risk of cross-pollination. For beginners, it is generally easier to purchase seeds from a reputable source.

Leave a Comment