
Grow Broccoli at Home? Absolutely! Imagine stepping into your backyard and harvesting fresh, vibrant broccoli heads, bursting with flavor and nutrients. It’s not just a dream; it’s an achievable reality with a little know-how and some simple DIY tricks. For centuries, cultivating our own food has been a cornerstone of self-sufficiency and a connection to the earth. From ancient Roman gardens to the victory gardens of World War II, growing your own vegetables has always been a way to nourish ourselves and our communities.
But let’s be honest, the idea of growing broccoli, especially for beginners, can feel a bit daunting. Store-bought broccoli is readily available, so why bother with the effort? Well, the taste of homegrown broccoli is simply unmatched – sweeter, crisper, and packed with more vitamins than anything you’ll find on a supermarket shelf. Plus, you have complete control over what goes into your food, avoiding harmful pesticides and herbicides.
This article is your ultimate guide to successfully grow broccoli at home, even if you have limited space or gardening experience. We’ll break down the process into easy-to-follow steps, sharing insider tips and DIY hacks that will have you harvesting delicious broccoli in no time. Get ready to unleash your inner gardener and enjoy the satisfaction of growing your own food!
Brokkoli zu Hause anbauen: Dein umfassender DIY-Leitfaden
Hey Gartenfreunde! Habt ihr euch jemals gefragt, wie ihr diesen gesunden und vielseitigen Gemüsekopf direkt in eurem Garten anbauen könnt? Brokkoli anzubauen ist einfacher als ihr denkt und mit ein wenig Geduld und den richtigen Schritten könnt ihr bald eure eigene frische Ernte genießen. Ich zeige euch, wie es geht!
Was du brauchst: Die Vorbereitung
Bevor wir loslegen, brauchen wir natürlich das richtige Equipment und die richtigen Materialien. Hier ist eine Liste, damit ihr alles griffbereit habt:
* Brokkolisamen oder Jungpflanzen: Ich empfehle, mit Jungpflanzen zu beginnen, wenn ihr wenig Zeit habt oder in einer Region mit kurzer Vegetationsperiode lebt. Samen sind aber auch super, wenn ihr den ganzen Prozess von Anfang an erleben wollt.
* Anzuchterde: Für die Samenanzucht ist spezielle Anzuchterde ideal, da sie nährstoffarm und locker ist.
* Töpfe oder Anzuchtschalen: Zum Vorziehen der Samen.
* Gartenerde: Gute, nährstoffreiche Gartenerde ist das A und O für gesunde Brokkolipflanzen.
* Kompost oder organischer Dünger: Um den Boden anzureichern und die Pflanzen mit Nährstoffen zu versorgen.
* Gartengeräte: Spaten, Harke, Gießkanne oder Gartenschlauch.
* Mulchmaterial: Stroh, Holzhackschnitzel oder Rasenschnitt, um den Boden feucht zu halten und Unkraut zu unterdrücken.
* Pflanzstäbe oder Rankgitter (optional): Für zusätzliche Unterstützung, besonders bei schweren Köpfen.
* Schutz vor Schädlingen (optional): Netze oder biologische Schädlingsbekämpfungsmittel.
Schritt-für-Schritt-Anleitung: Brokkoli anbauen
Hier kommt der spannende Teil! Ich führe euch durch jeden Schritt, damit ihr erfolgreich Brokkoli anbauen könnt.
1. Der richtige Zeitpunkt: Wann pflanzen?
Der Zeitpunkt ist entscheidend! Brokkoli bevorzugt kühles Wetter.
* Frühjahrspflanzung: Beginnt mit der Aussaat im Haus etwa 6-8 Wochen vor dem letzten erwarteten Frost. Die Jungpflanzen können dann nach dem Frost ins Freie gepflanzt werden.
* Herbstpflanzung: Für eine Herbsternte sät ihr die Samen im Sommer aus, etwa 10-12 Wochen vor dem ersten erwarteten Frost.
2. Die Aussaat: Samen zum Leben erwecken
Wenn ihr mit Samen beginnt, ist hier, wie ihr vorgeht:
1. Vorbereitung der Anzuchtschalen: Füllt die Anzuchtschalen oder Töpfe mit Anzuchterde.
2. Aussaat: Legt 2-3 Samen pro Topf etwa 1 cm tief in die Erde.
3. Bewässerung: Gießt die Erde vorsichtig an, sodass sie feucht, aber nicht nass ist.
4. Standort: Stellt die Anzuchtschalen an einen hellen, warmen Ort (ca. 20-25°C).
5. Feuchtigkeit: Haltet die Erde feucht, indem ihr sie regelmäßig besprüht oder gießt.
6. Keimung: Die Samen keimen in der Regel innerhalb von 5-10 Tagen.
7. Pikieren: Sobald die Sämlinge 2-3 echte Blätter haben, könnt ihr sie in größere Töpfe pikieren, falls ihr mehrere Samen pro Topf gesät habt.
3. Die Vorbereitung des Beets: Der perfekte Nährboden
Ein gut vorbereitetes Beet ist die halbe Miete!
1. Standortwahl: Wählt einen sonnigen Standort mit mindestens 6 Stunden Sonnenlicht pro Tag.
2. Bodenbearbeitung: Lockert den Boden mit einem Spaten auf und entfernt Unkraut, Steine und andere Hindernisse.
3. Bodenverbesserung: Mischt Kompost oder organischen Dünger in den Boden, um ihn mit Nährstoffen anzureichern. Brokkoli ist ein Starkzehrer und braucht viele Nährstoffe.
4. pH-Wert: Der ideale pH-Wert für Brokkoli liegt zwischen 6,0 und 7,0. Testet den Boden gegebenenfalls und passt ihn an.
4. Das Auspflanzen: Ab ins Freie!
Sobald die Jungpflanzen stark genug sind (ca. 15-20 cm hoch), können sie ins Freie gepflanzt werden.
1. Abhärten: Gewöhnt die Jungpflanzen langsam an die Bedingungen im Freien, indem ihr sie einige Tage vor dem Auspflanzen stundenweise nach draußen stellt.
2. Pflanzabstand: Pflanzt die Brokkolipflanzen in einem Abstand von 45-60 cm zueinander und 60-75 cm zwischen den Reihen.
3. Pflanzloch: Grabt ein Loch, das groß genug ist, um den Wurzelballen aufzunehmen.
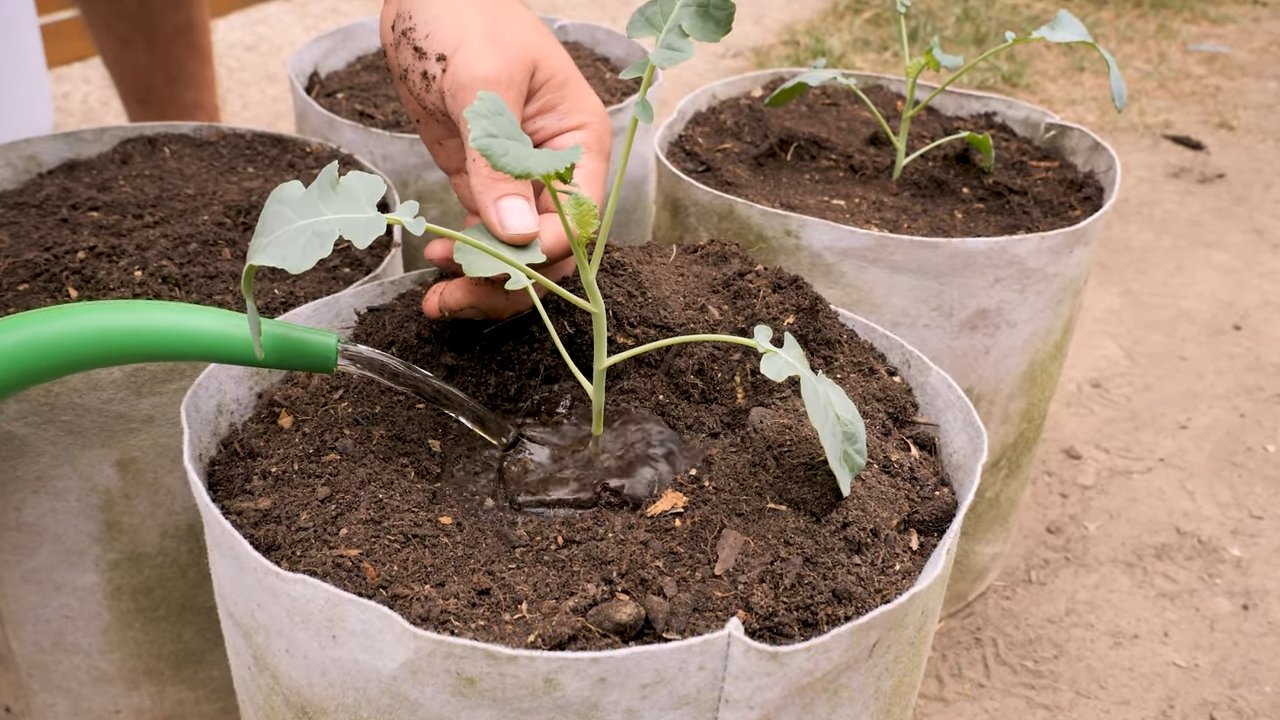
4. Einsetzen: Setzt die Pflanze vorsichtig in das Loch und füllt es mit Erde auf. Achtet darauf, dass der Wurzelballen vollständig bedeckt ist.
5. Bewässerung: Gießt die Pflanzen nach dem Einpflanzen gründlich an.
5. Die Pflege: Gießen, Düngen, Schützen
Die richtige Pflege ist entscheidend für eine reiche Ernte!
1. Bewässerung: Gießt die Brokkolipflanzen regelmäßig, besonders während trockener Perioden. Achtet darauf, dass der Boden feucht, aber nicht nass ist.
2. Düngung: Düngt die Pflanzen alle 2-3 Wochen mit einem organischen Dünger oder Komposttee.
3. Mulchen: Tragt eine Schicht Mulch um die Pflanzen auf, um den Boden feucht zu halten, Unkraut zu unterdrücken und den Boden zu kühlen.
4. Unkrautbekämpfung: Entfernt regelmäßig Unkraut, um die Konkurrenz um Nährstoffe und Wasser zu minimieren.
5. Schädlingsbekämpfung: Kontrolliert die Pflanzen regelmäßig auf Schädlinge wie Kohlweißlinge, Blattläuse oder Erdflöhe. Bei Bedarf könnt ihr biologische Schädlingsbekämpfungsmittel einsetzen oder die Pflanzen mit Netzen schützen.
6. Unterstützung: Bei schweren Brokkoliköpfen kann es sinnvoll sein, die Pflanzen mit Pflanzstäben oder Rankgittern zu unterstützen, um ein Umknicken zu verhindern.
Schädlinge und Krankheiten: Worauf du achten musst
Leider sind auch Brokkolipflanzen nicht vor Schädlingen und Krankheiten gefeit. Hier sind einige der häufigsten Probleme und wie ihr sie bekämpfen könnt:
* Kohlweißling: Die Raupen des Kohlweißlings fressen Löcher in die Blätter. Sammelt die Raupen ab oder verwendet ein biologisches Insektizid.
* Blattläuse: Blattläuse saugen Pflanzensaft und können die Pflanzen schwächen. Spritzt die Pflanzen mit einem Wasserstrahl ab oder verwendet eine Seifenlösung.
* Erdflöhe: Erdflöhe fressen kleine Löcher in die Blätter. Schützt die Pflanzen mit Netzen oder verwendet ein biologisches Insektizid.
* Kohlhernie: Kohlhernie ist eine Pilzkrankheit, die die Wurzeln befällt. Achtet auf eine gute Bodendrainage und vermeidet es, Brokkoli und andere Kreuzblütler auf demselben Beet anzubauen.
* Falscher Mehltau: Falscher Mehltau ist eine Pilzkrankheit, die sich durch gelbliche Flecken auf den Blättern äußert. Sorgt für eine gute Belüftung und vermeidet es, die Blätter beim Gießen zu benetzen.
Die Ernte: Der Lohn der Arbeit
Endlich ist es soweit! Die Erntezeit hängt von der Sorte und den Anbaubedingungen ab, aber in der Regel könnt ihr etwa 50-80 Tage nach dem Auspflanzen ernten.
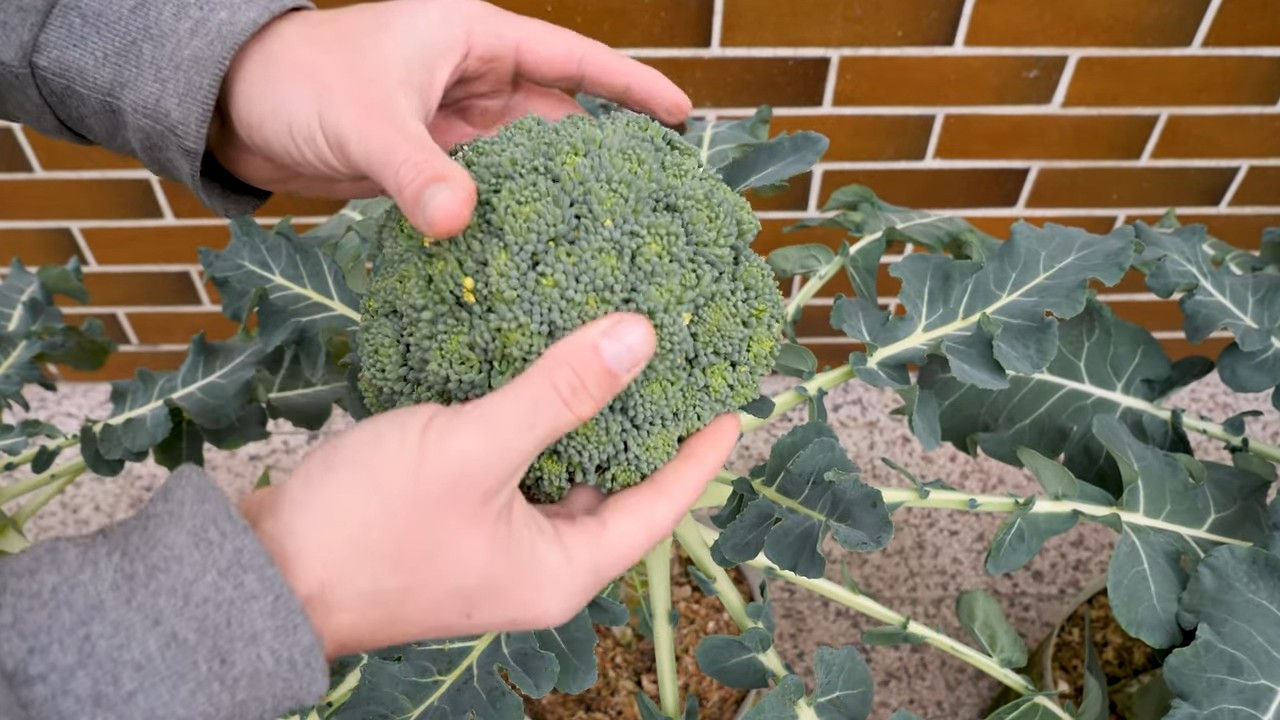
1. Reifezeichen: Der Brokkolikopf sollte fest und kompakt sein. Die einzelnen Blütenknospen sollten noch geschlossen sein.
2. Erntemethode: Schneidet den Brokkolikopf mit einem scharfen Messer ab, etwa 15-20 cm
Conclusion
So, there you have it! Growing your own broccoli at home is not just a rewarding experience; it’s a game-changer for your kitchen, your health, and even your wallet. We’ve walked you through the process, from selecting the right seeds to harvesting those beautiful, nutrient-packed heads. But why is this DIY trick a must-try?
Firstly, the taste difference is undeniable. Store-bought broccoli, often transported long distances and stored for extended periods, simply can’t compare to the fresh, vibrant flavor of homegrown broccoli. Imagine the satisfaction of serving a side dish that you nurtured from a tiny seed to a culinary masterpiece. The crispness, the sweetness, the sheer vitality – it’s an experience that will redefine your appreciation for this humble vegetable.
Secondly, you have complete control over the growing process. No more worrying about pesticides, herbicides, or other potentially harmful chemicals. You can choose to grow organically, ensuring that your broccoli is as pure and healthy as possible. This is especially important if you have young children or are simply conscious about what you put into your body.
Thirdly, growing broccoli at home is surprisingly accessible. Even if you don’t have a sprawling garden, you can still enjoy the benefits of homegrown broccoli by utilizing containers or raised beds. With a little planning and effort, you can transform a small balcony or patio into a thriving mini-farm.
But the benefits don’t stop there. Growing your own food is a fantastic way to connect with nature, reduce your carbon footprint, and even save money. Plus, it’s a great activity for the whole family! Get your kids involved in planting, watering, and harvesting – it’s a fun and educational way to teach them about where their food comes from.
Looking for variations? Consider experimenting with different varieties of broccoli. There’s Calabrese broccoli, the most common type, with its large, green head. But you could also try sprouting broccoli, which produces numerous smaller heads over a longer period. Or perhaps Romanesco broccoli, with its stunning fractal pattern and unique flavor. Don’t be afraid to get creative and find the varieties that you enjoy the most.
You can also experiment with companion planting. Broccoli thrives when planted alongside certain other vegetables and herbs, such as onions, garlic, and rosemary. These companions can help to deter pests, improve soil health, and even enhance the flavor of your broccoli.
And finally, don’t forget about the broccoli leaves! They are often discarded, but they are actually quite nutritious and delicious. You can sauté them, add them to soups, or even use them in salads. Just be sure to wash them thoroughly before using.
So, what are you waiting for? Grab some seeds, prepare your soil, and embark on your own broccoli-growing adventure. We’re confident that you’ll be amazed by the results. And once you’ve harvested your first crop, we encourage you to share your experience with us. Tell us about your successes, your challenges, and your favorite ways to enjoy your homegrown broccoli. Share your photos and recipes on social media using [Your Hashtag Here] – we can’t wait to see what you create! Embrace the joy of **growing broccoli at home** and discover the difference that fresh, homegrown produce can make. Happy gardening!
Frequently Asked Questions (FAQ)
1. What is the best time of year to plant broccoli?
The best time to plant broccoli depends on your climate. In cooler climates, you can plant broccoli in early spring for a summer harvest, or in late summer for a fall harvest. In warmer climates, it’s best to plant broccoli in the fall or winter for a spring harvest, as broccoli doesn’t thrive in extreme heat. Check your local frost dates to determine the optimal planting time for your region. Generally, you want to start seeds indoors 6-8 weeks before the last expected frost in spring, or 10-12 weeks before the first expected frost in fall.
2. What kind of soil does broccoli need?
Broccoli prefers well-drained, fertile soil with a pH between 6.0 and 7.0. Amend your soil with compost or other organic matter to improve its drainage and fertility. Broccoli is a heavy feeder, so it’s important to provide it with plenty of nutrients. Consider adding a slow-release fertilizer at planting time, or side-dressing with compost tea or fish emulsion every few weeks.
3. How much sunlight does broccoli need?
Broccoli needs at least 6 hours of sunlight per day to thrive. Choose a location in your garden that receives full sun. If you’re growing broccoli in containers, make sure to place them in a sunny spot. Insufficient sunlight can result in leggy plants with small heads.
4. How often should I water broccoli?
Broccoli needs consistent moisture to grow properly. Water deeply and regularly, especially during dry periods. Aim to keep the soil consistently moist, but not waterlogged. Mulching around your broccoli plants can help to retain moisture and suppress weeds. A good rule of thumb is to water when the top inch of soil feels dry to the touch.
5. What are some common pests and diseases that affect broccoli?
Broccoli is susceptible to a variety of pests and diseases, including cabbage worms, aphids, flea beetles, and clubroot. Regularly inspect your plants for signs of infestation or disease. Use organic pest control methods, such as hand-picking pests, using insecticidal soap, or applying Bacillus thuringiensis (Bt) to control cabbage worms. To prevent clubroot, ensure good soil drainage and avoid planting broccoli in the same location year after year. Crop rotation is key to preventing soil-borne diseases.
6. How do I know when my broccoli is ready to harvest?
Broccoli is ready to harvest when the head is firm and the florets are tightly closed. The size of the head will vary depending on the variety, but generally, you should harvest when the head is about 6-8 inches in diameter. Use a sharp knife to cut the head from the plant, leaving a few inches of stem. After harvesting the main head, the plant may produce smaller side shoots, which can also be harvested.
7. Can I grow broccoli in containers?
Yes, you can definitely grow broccoli in containers! Choose a large container, at least 12 inches in diameter, with good drainage holes. Use a high-quality potting mix and provide your broccoli plants with plenty of sunlight and water. Container-grown broccoli may require more frequent fertilization than broccoli grown in the ground.
8. What are some good companion plants for broccoli?
Good companion plants for broccoli include onions, garlic, rosemary, thyme, dill, and chamomile. These plants can help to deter pests, improve soil health, and even enhance the flavor of your broccoli. Avoid planting broccoli near tomatoes, peppers, or strawberries, as these plants can compete for nutrients or attract pests.
9. Can I eat the broccoli leaves?
Yes, you can eat broccoli leaves! They are nutritious and delicious. Sauté them, add them to soups, or use them in salads. Just be sure to wash them thoroughly before using. The leaves are a great way to utilize the entire plant and reduce waste.
10. My broccoli head is starting to flower. Is it still edible?
If your broccoli head is starting to flower, it’s still edible, but the flavor may be slightly bitter. Harvest it as soon as possible to prevent further flowering. You can still use the florets in cooked dishes, but they may not be as tender as they would have been if harvested earlier.

Leave a Comment