
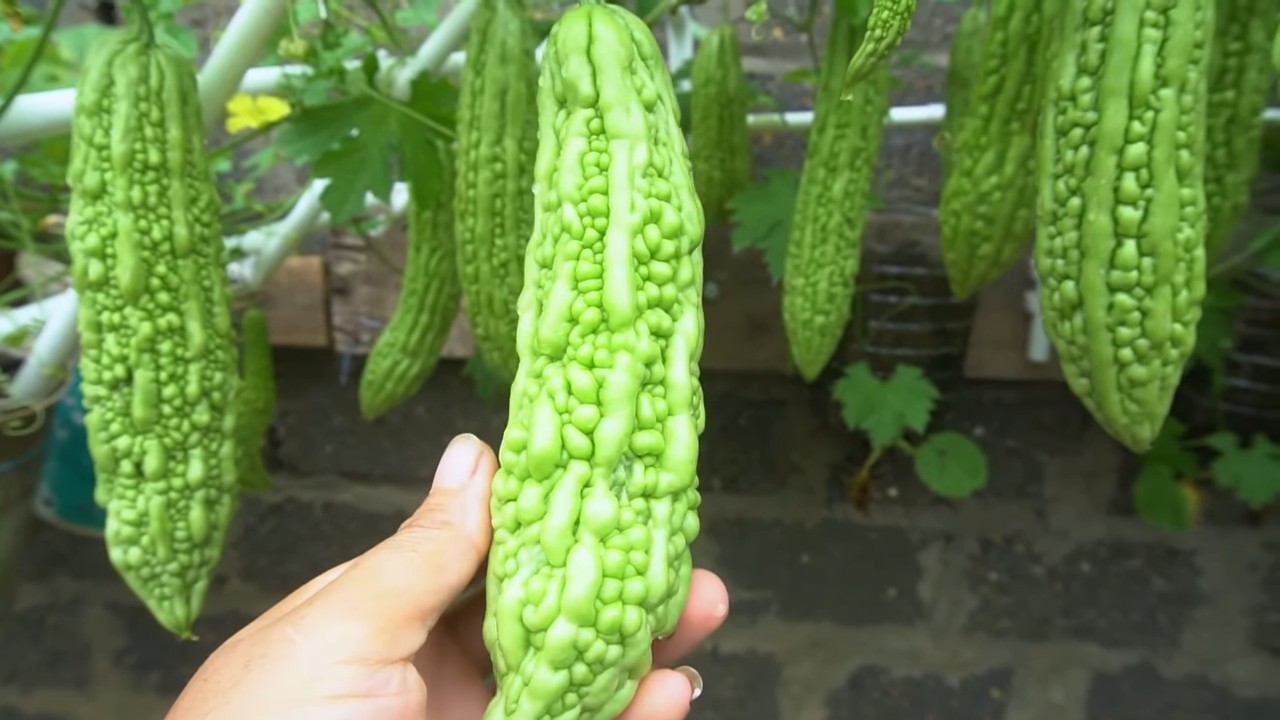
Grow Bitter Melon Anywhere, even if you think you don’t have the space! Have you ever craved the unique, slightly bitter taste of this nutritious vegetable but felt limited by a small garden or apartment balcony? Well, get ready to ditch those limitations because I’m about to share some incredible DIY tricks that will have you harvesting your own bitter melon, no matter where you live.
Bitter melon, also known as bitter gourd or karela, has a rich history, deeply rooted in Asian and African cultures. For centuries, it’s been celebrated not only for its distinctive flavor but also for its impressive health benefits. From traditional medicine to culinary delights, bitter melon has earned its place as a valuable plant. But let’s be honest, growing it can sometimes feel like a challenge, especially if you’re short on space.
That’s where these DIY hacks come in! I’ve compiled a collection of simple, yet effective techniques that will empower you to grow bitter melon anywhere. Imagine the satisfaction of plucking fresh, homegrown bitter melon right from your own little urban oasis. No more relying on grocery stores – you’ll have a sustainable source of this amazing vegetable right at your fingertips. Whether you’re a seasoned gardener or a complete beginner, these tips will help you overcome common obstacles and unlock the secrets to successful bitter melon cultivation. So, let’s get started and transform your space into a thriving bitter melon haven!
“`html
Bittermelone überall anbauen: Dein DIY-Leitfaden für den erfolgreichen Anbau
Hallo Gartenfreunde! Habt ihr schon mal Bittermelone probiert? Sie ist vielleicht nicht jedermanns Geschmack, aber ihre gesundheitlichen Vorteile sind unbestreitbar. Und das Beste daran? Ihr könnt sie ganz einfach selbst anbauen, egal ob ihr einen großen Garten oder nur einen kleinen Balkon habt. Ich zeige euch, wie!
Was du brauchst: Die Vorbereitung
Bevor wir loslegen, brauchen wir natürlich die richtigen Materialien. Keine Sorge, die meisten davon habt ihr wahrscheinlich schon zu Hause.
* Bittermelonensamen: Am besten kauft ihr sie in einem Gartencenter oder online. Achtet auf qualitativ hochwertige Samen für eine bessere Keimrate.
* Anzuchttöpfe oder -schalen: Diese sind ideal für die Voranzucht der Samen.
* Anzuchterde: Sie ist nährstoffarm und locker, perfekt für die Keimung.
* Pflanztöpfe oder ein Gartenbeet: Je nachdem, wo ihr die Bittermelone anbauen wollt.
* Gartenerde: Eine gute Mischung aus Kompost, Gartenerde und Sand ist ideal.
* Rankhilfe: Bittermelonen sind Kletterpflanzen und brauchen Unterstützung.
* Gießkanne oder Schlauch: Zum Bewässern der Pflanzen.
* Gartenschere: Zum Beschneiden der Pflanzen.
* Dünger: Ein organischer Dünger ist am besten geeignet.
* Geduld: Bittermelonen brauchen Zeit zum Wachsen und Reifen.
Schritt-für-Schritt-Anleitung: So gelingt der Anbau
Jetzt geht’s ans Eingemachte! Folgt diesen Schritten, und ihr werdet bald eure eigenen Bittermelonen ernten können.
1. Die Samen vorbereiten: Der Startschuss
Bittermelonensamen haben eine harte Schale, die die Keimung erschweren kann. Deshalb ist es ratsam, sie vorzubereiten.
1. Einweichen: Legt die Samen für 24 Stunden in lauwarmes Wasser. Das weicht die Schale auf und beschleunigt die Keimung.
2. Anritzen: Mit einem scharfen Messer oder einer Nagelfeile könnt ihr die Samenschale vorsichtig anritzen. Achtet darauf, den inneren Kern nicht zu beschädigen.
3. Abtrocknen: Lasst die Samen nach dem Einweichen und Anritzen kurz abtrocknen.
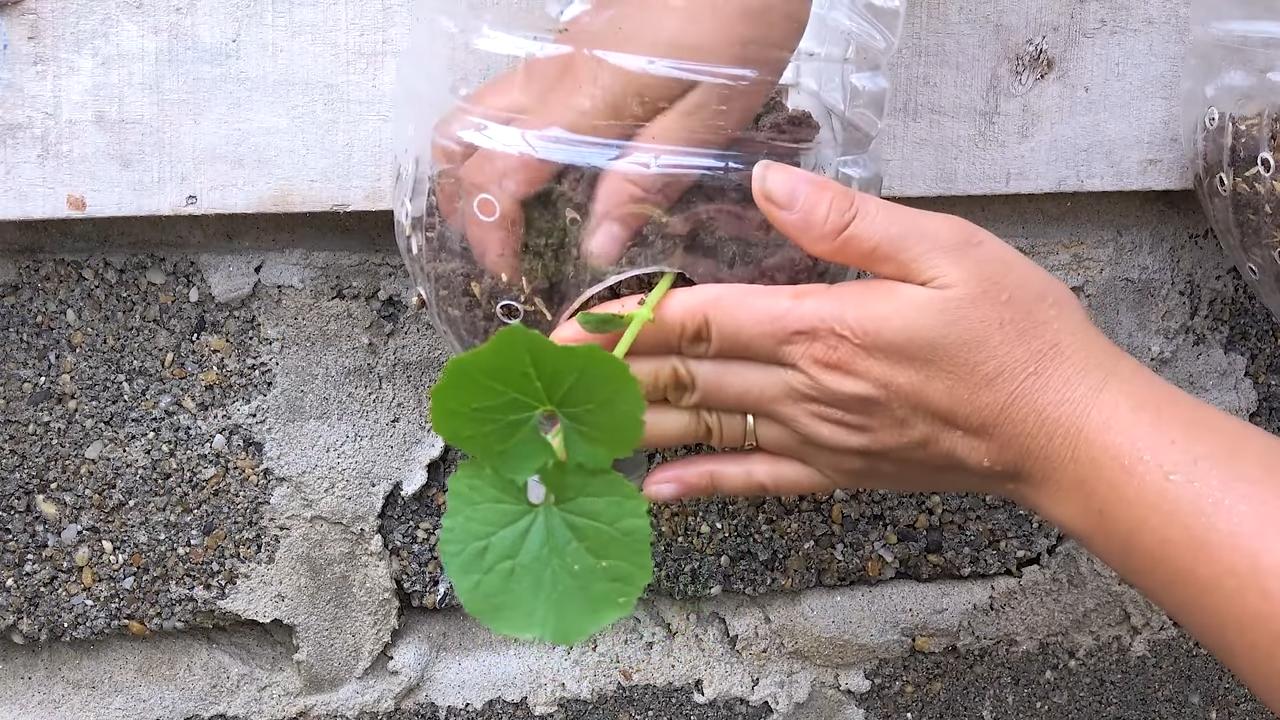
2. Die Voranzucht: Kleine Pflänzchen großziehen
Die Voranzucht in Anzuchttöpfen ist besonders in kälteren Regionen empfehlenswert. So haben die Pflanzen einen Vorsprung, bevor sie ins Freie kommen.
1. Anzuchttöpfe befüllen: Füllt die Anzuchttöpfe mit Anzuchterde.
2. Samen säen: Legt in jeden Topf ein bis zwei Samen, etwa 1-2 cm tief.
3. Gießen: Gießt die Erde vorsichtig an, sodass sie feucht, aber nicht nass ist.
4. Warm stellen: Stellt die Töpfe an einen warmen, hellen Ort. Eine Temperatur von 20-25°C ist ideal.
5. Feucht halten: Haltet die Erde feucht, indem ihr sie regelmäßig besprüht.
6. Warten: Nach etwa 1-2 Wochen sollten die Samen keimen.
3. Das Umpflanzen: Ab ins Freie oder in den Topf
Sobald die Pflänzchen kräftig genug sind (etwa 10-15 cm hoch), können sie umgepflanzt werden.
1. Vorbereitung des Beetes oder Topfes: Bereitet das Beet oder den Topf vor, indem ihr die Erde auflockert und mit Kompost anreichert.
2. Pflanzen vorsichtig aus den Töpfen nehmen: Achtet darauf, die Wurzeln nicht zu beschädigen.
3. Einpflanzen: Setzt die Pflänzchen in das Beet oder den Topf. Der Abstand zwischen den Pflanzen sollte etwa 50-60 cm betragen.
4. Angießen: Gießt die Pflanzen nach dem Einpflanzen gründlich an.
5. Rankhilfe anbringen: Bringt eine Rankhilfe an, an der die Bittermelone hochklettern kann. Das kann ein Zaun, ein Spalier oder ein Rankgitter sein.
4. Die Pflege: Damit die Bittermelone sich wohlfühlt
Die richtige Pflege ist entscheidend für eine reiche Ernte.
1. Bewässerung: Bittermelonen brauchen regelmäßig Wasser, besonders während der Blütezeit und Fruchtbildung. Gießt am besten morgens oder abends, um Verdunstung zu vermeiden.
2. Düngung: Düngt die Pflanzen alle 2-3 Wochen mit einem organischen Dünger.
3. Beschneidung: Entfernt regelmäßig Seitentriebe, um die Fruchtbildung zu fördern.
4. Schutz vor Schädlingen: Achtet auf Schädlinge wie Blattläuse oder Schnecken. Bei Bedarf könnt ihr biologische Schädlingsbekämpfungsmittel einsetzen.
5. Unkraut entfernen: Haltet das Beet oder den Topf unkrautfrei.
Spezielle Tipps für den Anbau im Topf
Wenn ihr die Bittermelone im Topf anbauen wollt, gibt es ein paar Dinge zu beachten:
* Topfgröße: Wählt einen ausreichend großen Topf (mindestens 30 Liter).
* Drainage: Sorgt für eine gute Drainage, damit das Wasser ablaufen kann.
* Standort: Stellt den Topf an einen sonnigen, warmen Ort.
* Bewässerung: Im Topf trocknet die Erde schneller aus, daher müsst ihr regelmäßig gießen.
* Düngung: Düngt die Pflanzen im Topf etwas häufiger als im Beet.
Die Ernte: Der Lohn der Mühe
Nach etwa 2-3 Monaten könnt ihr die ersten Bittermelonen ernten.
1. Reife erkennen: Die Bittermelonen sind reif, wenn sie eine grüne oder gelbliche Farbe haben und sich leicht vom Stiel lösen lassen.
2. Ernten: Schneidet die Bittermelonen mit einer Gartenschere ab.
3. Lagerung: Bittermelonen sind nicht lange haltbar. Am besten verarbeitet ihr sie sofort oder lagert sie im Kühlschrank.
Häufige Probleme und Lösungen
Auch beim Anbau von Bittermelonen können Probleme auftreten. Hier sind einige häufige Probleme und ihre Lösungen:
* Schlechte Keimung: Die Samen waren nicht frisch oder wurden nicht richtig vorbereitet. Verwendet frische Samen und beachtet die Vorbereitungshinweise.
* Gelbe Blätter: Die Pflanze bekommt zu wenig Nährstoffe oder Wasser. Düngt und gießt regelmäßig.
* Schädlinge: Bekämpft Schädlinge mit biologischen Mitteln.
* Keine Früchte: Die Pflanze bekommt zu wenig Sonne oder wurde nicht richtig bestäubt. Stellt die Pflanze an einen sonnigeren Ort und helft bei der Bestäubung nach, indem ihr die Blüten mit einem Pinsel bestäubt.
Zusätzliche Tipps für eine reiche Ernte
* Sonniger Standort: Bittermelonen lieben die Sonne. Wählt einen Standort, der mindestens 6 Stunden Sonne pro Tag bekommt.
* Gute Belüftung: Sorgt für eine gute Belüftung, um Pilzkrankheiten vorzubeugen.
* Mulchen: Mulcht das Beet oder den Topf, um die Feuchtigkeit zu halten und Unkraut zu unterdrücken.
* Regelmäßiges Gießen: Bittermelonen brauchen regelmäßig Wasser, besonders während der Blütezeit und Fruchtbildung.
* Geduld haben: Bittermelonen brauchen Zeit zum Wachsen und Reifen. Seid geduldig und gebt nicht auf!
Ich hoffe, dieser Leitfaden hilft euch dabei, eure eigenen Bittermelonen anzubauen. Viel Erfolg und guten Appetit!
“`
Conclusion
So, there you have it! Growing bitter melon, even if you lack a sprawling garden, is entirely within your reach. This DIY trick, focusing on container gardening and strategic support systems, opens up a world of possibilities for enjoying this unique and healthful vegetable, no matter where you live. It’s more than just a gardening project; it’s about embracing resourcefulness, connecting with your food source, and reaping the rewards of your own green thumb.
Why is this a must-try? Because it democratizes access to fresh, homegrown bitter melon. No longer are you limited by space or soil conditions. This method allows you to control the environment, optimize growth, and enjoy a bountiful harvest of this often-expensive vegetable right from your balcony, patio, or even a sunny windowsill. Imagine the satisfaction of serving a dish made with bitter melon you nurtured from seed to fruit!
Beyond the basic method, there’s ample room for experimentation. Consider these variations:
* Vertical Gardening Expansion: Explore different vertical structures. Instead of a simple trellis, try using stacked planters or a repurposed pallet to create a living wall of bitter melon vines. This maximizes space and adds a stunning visual element to your growing area.
* Companion Planting: Introduce companion plants to your container. Marigolds can deter pests, while basil can improve the overall health of your bitter melon. Research compatible pairings to create a thriving ecosystem within your container.
* Grafting for Enhanced Growth: For the more adventurous gardener, consider grafting your bitter melon onto a more vigorous rootstock. This can significantly improve disease resistance and overall yield.
* Different Varieties: Experiment with different varieties of bitter melon. Some are smaller and more compact, making them ideal for container gardening. Others have unique flavors and textures.
This DIY approach to growing bitter melon is not just about saving money; it’s about empowering yourself to cultivate healthy, delicious food in a sustainable way. It’s about learning new skills, connecting with nature, and enjoying the fruits (or vegetables!) of your labor.
We wholeheartedly encourage you to give this DIY trick a try. Don’t be intimidated if you’re a beginner; bitter melon is surprisingly resilient. Start small, follow the steps outlined, and be patient. The rewards are well worth the effort.
And most importantly, we want to hear about your experience! Share your successes, your challenges, and your creative adaptations in the comments below. Let’s build a community of urban bitter melon growers, sharing tips and inspiring each other to cultivate a greener, healthier future, one container at a time. Let us know what kind of soil you used, what kind of fertilizer you used, and how much sunlight you gave your bitter melon. Your insights could be invaluable to other aspiring gardeners. So, get your hands dirty, embrace the challenge, and let’s grow some bitter melon!
Frequently Asked Questions (FAQ)
What is the best time of year to start growing bitter melon?
Bitter melon thrives in warm weather, so the best time to start growing it is in late spring or early summer, after the last frost has passed. The ideal soil temperature for germination is between 70°F and 85°F (21°C and 29°C). If you live in a region with a short growing season, you can start the seeds indoors 4-6 weeks before the last expected frost. This will give your plants a head start and ensure a longer harvest period. Remember to harden off the seedlings gradually before transplanting them outdoors to acclimate them to the outdoor environment.
What kind of container is best for growing bitter melon?
Choose a large container, at least 12-18 inches in diameter and depth, to accommodate the extensive root system of the bitter melon vine. The container should have drainage holes to prevent waterlogging, which can lead to root rot. Terracotta pots, plastic containers, or even repurposed buckets can be used, as long as they meet these requirements. Consider the weight of the container, especially if you plan to move it around. A heavier container will provide more stability for the growing vine.
What type of soil should I use for growing bitter melon in a container?
Use a well-draining potting mix that is rich in organic matter. A good mix would include compost, peat moss, and perlite or vermiculite. Avoid using garden soil, as it can become compacted in containers and hinder drainage. The ideal pH level for bitter melon is between 6.0 and 6.8. You can amend the soil with lime to raise the pH or sulfur to lower it, if necessary. Adding slow-release fertilizer to the potting mix will provide essential nutrients for the plant’s growth.
How much sunlight does bitter melon need?
Bitter melon requires at least 6-8 hours of direct sunlight per day to thrive. Choose a location that receives ample sunlight throughout the day. If you live in a hot climate, provide some afternoon shade to prevent the leaves from scorching. If you are growing bitter melon indoors, use grow lights to supplement natural sunlight. Rotate the container regularly to ensure that all sides of the plant receive adequate light.
How often should I water bitter melon?
Water bitter melon regularly, especially during hot and dry weather. The soil should be kept consistently moist but not waterlogged. Check the soil moisture level by inserting your finger into the soil. If the top inch feels dry, it’s time to water. Water deeply, allowing the water to drain out of the drainage holes. Avoid overhead watering, as it can promote fungal diseases. Mulching around the base of the plant can help retain moisture and suppress weeds.
How do I support the bitter melon vine?
Bitter melon is a climbing vine and requires a support structure to grow properly. A trellis, fence, or even a sturdy stake can be used. The support structure should be at least 6 feet tall to accommodate the growing vine. Train the vine to climb the support structure by gently tying it with soft twine or plant ties. Prune the vine regularly to encourage branching and fruit production.
What are some common pests and diseases that affect bitter melon?
Common pests that affect bitter melon include aphids, spider mites, and squash bugs. These pests can be controlled with insecticidal soap or neem oil. Common diseases include powdery mildew and downy mildew. These diseases can be prevented by providing good air circulation and avoiding overhead watering. If diseases occur, treat them with a fungicide. Regularly inspect your plants for signs of pests or diseases and take action promptly to prevent them from spreading.
How long does it take for bitter melon to mature?
Bitter melon typically takes 60-90 days to mature after planting. The fruits are ready to harvest when they are green and firm. The size of the fruit will vary depending on the variety. Harvest the fruits regularly to encourage continued production. Overripe fruits will turn yellow or orange and become bitter.
Can I grow bitter melon from seeds saved from store-bought fruits?
While you can try growing bitter melon from seeds saved from store-bought fruits, the results may be unpredictable. The fruits may be hybrids, and the seeds may not be viable. It’s best to purchase seeds from a reputable source to ensure that you are growing a specific variety and that the seeds are of good quality.
How can I reduce the bitterness of bitter melon?
Bitter melon is known for its bitter taste, but there are ways to reduce the bitterness. Soaking the sliced bitter melon in salted water for 30 minutes before cooking can help draw out some of the bitterness. You can also blanch the bitter melon in boiling water for a few minutes before cooking. Cooking bitter melon with acidic ingredients, such as vinegar or lemon juice, can also help to balance the bitterness.

Leave a Comment