
Grow bag cantaloupe: sounds like a summer dream, right? Imagine biting into a juicy, sweet cantaloupe you nurtured from a tiny seed, all without needing a sprawling garden! For centuries, humans have cultivated melons, with evidence suggesting their presence in ancient Egypt and beyond. But let’s be honest, not everyone has acres of land to dedicate to these sun-loving fruits. That’s where the magic of grow bags comes in!
This isn’t just about growing cantaloupe; it’s about reclaiming your space and enjoying fresh, homegrown goodness, no matter how small your balcony or patio might be. I’m going to show you how to bypass the limitations of traditional gardening and unlock the secrets to successfully growing delicious cantaloupe in grow bags.
Think of it: no more trips to the grocery store for bland, mass-produced melons. Instead, you’ll have vibrant, flavorful cantaloupe bursting with sunshine, right at your fingertips. Plus, growing your own food is incredibly rewarding and a fantastic way to connect with nature. So, are you ready to learn some simple yet effective DIY tricks and hacks that will transform you into a grow bag cantaloupe pro? Let’s get started!

Growing Cantaloupe in Grow Bags: A Sweet Success Story (Yours!)
Hey there, fellow gardening enthusiasts! I’m so excited to share my experience growing cantaloupe in grow bags. I know, it might sound a little unconventional, but trust me, it’s totally doable and incredibly rewarding. If you’re short on space, have poor soil, or just want to try something new, growing cantaloupe in grow bags is the way to go. Get ready for some juicy, homegrown goodness!
Why Grow Bags? The Perks You’ll Love
Before we dive into the nitty-gritty, let’s talk about why grow bags are awesome for cantaloupe:
* Excellent Drainage: Cantaloupe hates soggy feet! Grow bags allow excess water to drain freely, preventing root rot and other moisture-related problems.
* Improved Aeration: The fabric of grow bags allows air to circulate around the roots, promoting healthy growth and nutrient uptake.
* Temperature Control: Grow bags warm up faster than the ground in spring, giving your cantaloupe a head start. They also help regulate soil temperature during hot summer months.
* Portability: Need to move your cantaloupe to a sunnier spot? No problem! Grow bags are lightweight and easy to move around.
* Space-Saving: Perfect for patios, balconies, or small gardens. You don’t need a huge plot of land to enjoy homegrown cantaloupe.
What You’ll Need: Gathering Your Supplies
Okay, let’s get our hands dirty! Here’s what you’ll need to embark on your cantaloupe-growing adventure:
* Grow Bags: I recommend using at least a 15-gallon grow bag per plant. A 20-gallon bag is even better, giving the roots plenty of room to spread out. Fabric grow bags are the best choice.
* Cantaloupe Seeds or Seedlings: Choose a variety that’s well-suited to your climate and growing season. Bush varieties are often a good choice for containers.
* High-Quality Potting Mix: Don’t skimp on the potting mix! Use a well-draining mix that’s rich in organic matter. I like to use a mix of compost, peat moss (or coco coir), and perlite.
* Slow-Release Fertilizer: Cantaloupe are heavy feeders, so a slow-release fertilizer will provide them with the nutrients they need throughout the growing season. Look for a fertilizer that’s specifically formulated for vegetables or fruits.
* Watering Can or Hose: You’ll need a way to water your cantaloupe regularly.
* Trellis or Support System (Optional): Cantaloupe vines can get quite long, so you may want to provide them with a trellis or other support system to keep them off the ground.
* Gardening Gloves: Protect your hands!
* Hand Trowel or Shovel: For filling the grow bags.
* Mulch (Optional): Mulch helps retain moisture, suppress weeds, and regulate soil temperature. Straw, wood chips, or shredded bark are all good options.
Getting Started: Planting Your Cantaloupe
Now for the fun part! Let’s get those cantaloupe seeds or seedlings into their new home.
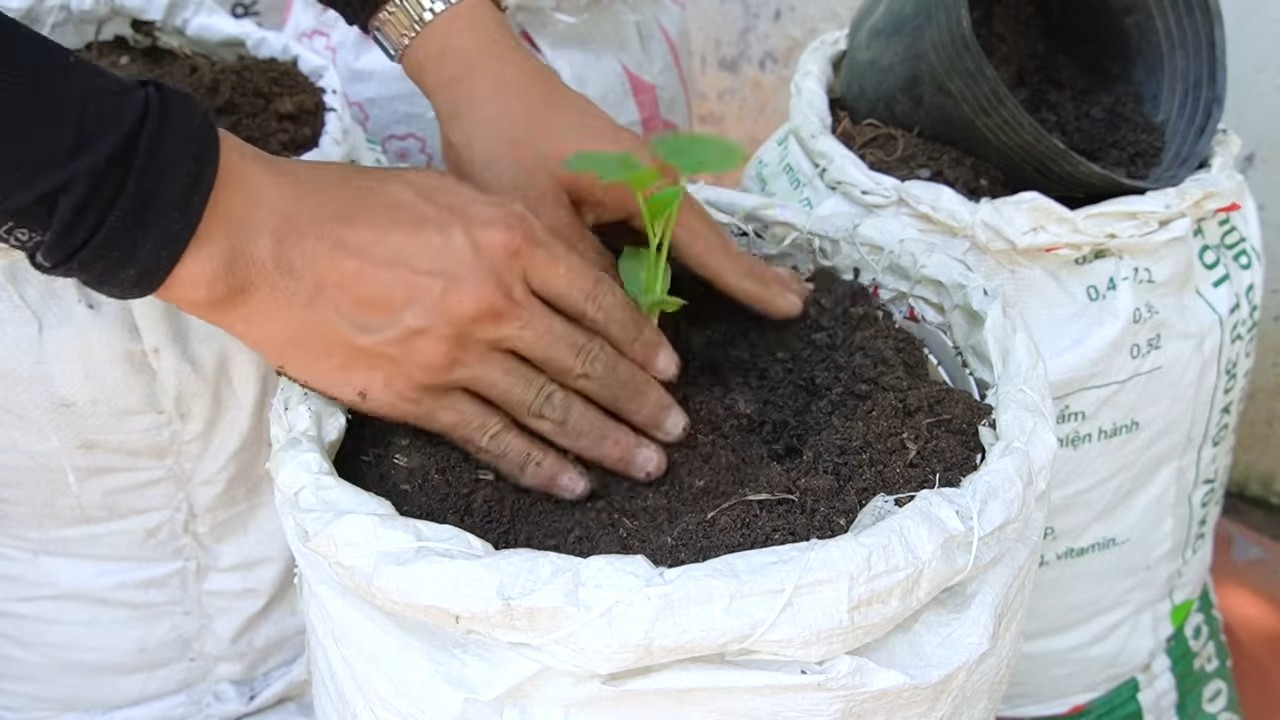
1. Prepare the Grow Bag: Unfold your grow bag and place it in a sunny location that receives at least 6-8 hours of direct sunlight per day. This is crucial for cantaloupe to thrive.
2. Fill the Grow Bag: Fill the grow bag with your high-quality potting mix, leaving a few inches of space at the top. Gently pat down the soil to remove any air pockets.
3. Add Slow-Release Fertilizer: Sprinkle the slow-release fertilizer evenly over the surface of the soil, following the instructions on the fertilizer package. Gently mix it into the top inch or two of soil.
4. Plant the Seeds or Seedlings:
* From Seed: Sow the cantaloupe seeds directly into the grow bag, planting them about 1 inch deep and spacing them a few inches apart. Water gently after planting. You can thin the seedlings later, keeping the strongest one per bag.
* From Seedling: Gently remove the cantaloupe seedling from its container. Loosen the roots slightly and plant the seedling in the center of the grow bag, making sure the top of the root ball is level with the soil surface. Water thoroughly after planting.
5. Mulch (Optional): Add a layer of mulch around the base of the plant to help retain moisture and suppress weeds.
6. Water Thoroughly: Water the grow bag thoroughly after planting, making sure the soil is evenly moist.
Caring for Your Cantaloupe: Nurturing Your Plants
Once your cantaloupe is planted, it’s time to provide them with the care they need to thrive.
1. Watering: Cantaloupe needs consistent moisture, especially during hot weather. Water deeply whenever the top inch of soil feels dry to the touch. Avoid overwatering, as this can lead to root rot. I usually check the soil moisture every day and water as needed.
2. Fertilizing: In addition to the slow-release fertilizer you added at planting, you may need to supplement with liquid fertilizer every few weeks, especially once the plants start to produce fruit. Use a balanced fertilizer or one that’s specifically formulated for fruits and vegetables. Follow the instructions on the fertilizer package.
3. Pruning (Optional): Some gardeners prune cantaloupe vines to encourage fruit production. You can remove some of the side shoots and leaves to improve air circulation and sunlight penetration. However, pruning is not essential, and you can still get a good harvest without it.
4. Pollination: Cantaloupe needs to be pollinated in order to produce fruit. If you’re growing your cantaloupe indoors or in an area with limited bee activity, you may need to hand-pollinate the flowers. To do this, use a small paintbrush to transfer pollen from the male flowers to the female flowers. Female flowers have a small fruit developing behind the flower, while male flowers do not.
5. Pest and Disease Control: Keep an eye out for common cantaloupe pests and diseases, such as aphids, squash bugs, and powdery mildew. Treat any problems promptly with organic pest control methods or fungicides. I like to use neem oil as a preventative measure.
6. Support System: As the cantaloupe vines grow, they may need a trellis or other support system to keep them off the ground. This will help prevent the fruit from rotting and make it easier to harvest. You can use a simple tomato cage or build a more elaborate trellis.
7. Sunlight: Ensure your cantaloupe plants receive at least 6-8 hours of direct sunlight daily. If you live in a very hot climate, some afternoon shade may be beneficial.
Harvesting Your Cantaloupe: The Sweet Reward
After all your hard work, it’s finally time to harvest your cantaloupe! This is the most exciting part, of course.
1. Check for Ripeness: Cantaloupe is ripe when it has a sweet aroma, the skin turns a golden color, and the stem starts to crack where it attaches to the fruit. You should also be able to gently twist the cantaloupe off the vine.
2. Harvest Carefully: Gently twist or cut the cantaloupe off the vine. Handle the fruit carefully to avoid bruising.
3. Enjoy Your Harvest: Store your cantaloupe in the refrigerator for up to a week. Enjoy it fresh, in salads, or in smoothies.
Troubleshooting: Common Problems and Solutions
Even with the best care, you may encounter some problems while growing cantaloupe in grow bags. Here are some common issues and how to address them:
* Yellowing Leaves: This can be caused by overwatering, underwatering, nutrient deficiencies, or pests. Check the soil moisture and adjust your watering schedule accordingly. Fertilize with a balanced fertilizer if necessary. Inspect the plants for pests and treat them as needed.
* Powdery Mildew: This fungal disease can cause a white, powdery coating on the leaves. Improve air circulation around the plants and treat with a fungicide.
* Lack of Fruit: This can be caused by poor pollination, nutrient deficiencies, or stress. Hand-pollinate the flowers if necessary. Fertilize with a balanced fertilizer. Ensure the plants are receiving enough sunlight and water.
* Fruit Rot: This can be caused by excessive moisture or contact with the soil. Provide a trellis or other support system to keep the fruit off the ground. Improve air circulation around the plants.
Variety Selection: Choosing the Right Cantaloupe for Your Grow Bag
Choosing the right cantaloupe variety is crucial for success in grow bags. Here are a few varieties that I’ve found to be particularly well-suited for container gardening:
* Minnesota Midget: This is a compact variety that produces small, sweet cantal
Conclusion
So, there you have it! Growing cantaloupe in grow bags isn’t just a trend; it’s a game-changer for home gardeners, especially those with limited space or challenging soil conditions. We’ve explored the ins and outs of this method, highlighting its benefits and providing you with the knowledge to cultivate your own sweet, juicy cantaloupes right at home.
Why is this DIY trick a must-try? Because it empowers you to overcome common gardening obstacles. Grow bags offer superior drainage, preventing root rot, a frequent culprit behind cantaloupe failures. They warm up faster in the spring, giving your seedlings a head start. And perhaps most importantly, they allow you to control the soil composition, ensuring your cantaloupes receive the precise nutrients they need to thrive.
But the beauty of this method lies in its adaptability. Feel free to experiment with different grow bag sizes to accommodate various cantaloupe varieties. Consider adding companion plants like marigolds or basil to deter pests naturally. And don’t be afraid to get creative with your trellising system – a sturdy support structure is crucial for maximizing space and preventing fruit from rotting on the ground.
Ready to embark on your grow bag cantaloupe adventure? We wholeheartedly encourage you to give it a try. The satisfaction of harvesting your own homegrown cantaloupe is unparalleled. Imagine biting into a perfectly ripe, sun-kissed melon, knowing you nurtured it from seed to fruit. It’s a truly rewarding experience.
And remember, gardening is a journey of learning and discovery. Don’t be discouraged by initial setbacks. Every season brings new opportunities to refine your techniques and improve your yields. The key is to observe your plants closely, adapt to their needs, and never stop learning.
We are confident that with a little effort and attention, you can successfully grow delicious cantaloupes in grow bags. So, grab your seeds, prepare your soil, and get ready to enjoy the fruits (literally!) of your labor.
We’d love to hear about your experiences! Share your tips, tricks, and triumphs in the comments below. Let’s build a community of grow bag cantaloupe enthusiasts and learn from each other. Happy gardening!
Frequently Asked Questions (FAQ)
What size grow bag is best for cantaloupe?
The ideal grow bag size for cantaloupe is typically between 15 and 25 gallons. This provides ample space for the root system to develop and ensures the plant receives sufficient nutrients and water. Smaller varieties might do well in 10-gallon bags, but for most cantaloupe types, err on the larger side. Remember, a larger bag also means more soil, which translates to better moisture retention and nutrient availability.
What type of soil should I use in my grow bag for cantaloupe?
Cantaloupes thrive in well-draining, nutrient-rich soil. A good mix consists of equal parts compost, potting soil, and perlite or vermiculite. The compost provides essential nutrients, the potting soil offers a good base, and the perlite or vermiculite improves drainage and aeration. Avoid using garden soil directly in your grow bags, as it can become compacted and hinder root growth. You can also amend your soil with slow-release fertilizer to provide a steady supply of nutrients throughout the growing season.
How often should I water my cantaloupe plants in grow bags?
Watering frequency depends on several factors, including the weather, the size of your grow bag, and the stage of plant growth. Generally, you should water deeply whenever the top inch of soil feels dry to the touch. During hot, dry periods, you may need to water daily. Grow bags tend to dry out faster than traditional garden beds, so it’s crucial to monitor the moisture levels regularly. Avoid overwatering, as this can lead to root rot. A good rule of thumb is to water until you see water draining from the bottom of the bag.
Do I need to fertilize my cantaloupe plants in grow bags?
Yes, cantaloupe plants are heavy feeders and require regular fertilization, especially when grown in grow bags. Start with a balanced fertilizer (e.g., 10-10-10) at planting time. Once the plants begin to flower, switch to a fertilizer higher in phosphorus and potassium to promote fruit development. You can use a liquid fertilizer every 2-3 weeks or incorporate slow-release fertilizer granules into the soil. Always follow the instructions on the fertilizer label and avoid over-fertilizing, as this can burn the roots.
How do I trellis cantaloupe plants in grow bags?
Trellising is essential for growing cantaloupe in grow bags, especially for larger varieties. A sturdy trellis will support the weight of the fruit and prevent it from rotting on the ground. You can use a variety of trellising methods, including A-frame trellises, vertical trellises, or even repurposed materials like old ladders or fencing. Secure the vines to the trellis using soft ties or twine, being careful not to damage the stems. As the fruit develops, you may need to provide additional support by using slings made from pantyhose or netting to cradle the melons.
What are some common pests and diseases that affect cantaloupe plants in grow bags?
Common pests that can affect cantaloupe plants include aphids, squash bugs, and vine borers. Diseases include powdery mildew, downy mildew, and fusarium wilt. Regularly inspect your plants for signs of pests or diseases and take action promptly. You can use insecticidal soap or neem oil to control pests and fungicides to treat diseases. Good air circulation and proper watering practices can also help prevent many problems. Consider planting disease-resistant varieties to minimize the risk of disease.
How long does it take to grow cantaloupe in grow bags?
The time it takes to grow cantaloupe from seed to harvest typically ranges from 75 to 90 days, depending on the variety and growing conditions. Start your seeds indoors 4-6 weeks before the last expected frost. Transplant the seedlings into your grow bags once the soil has warmed up and the risk of frost has passed. Provide consistent watering, fertilization, and pest control throughout the growing season. Harvest your cantaloupes when they are fully ripe, indicated by a sweet aroma, a slight softening of the rind, and a stem that easily slips from the vine.
Can I grow cantaloupe in grow bags in a greenhouse?
Yes, growing cantaloupe in grow bags in a greenhouse is an excellent way to extend the growing season and protect your plants from harsh weather conditions. Greenhouses provide a controlled environment that allows you to regulate temperature, humidity, and light levels. Ensure adequate ventilation to prevent the buildup of humidity, which can lead to fungal diseases. You may also need to provide supplemental lighting if your greenhouse doesn’t receive enough natural sunlight.
What are some good companion plants for cantaloupe in grow bags?
Companion planting can benefit cantaloupe plants by attracting beneficial insects, repelling pests, and improving soil health. Good companion plants for cantaloupe include marigolds, basil, nasturtiums, and radishes. Marigolds and nasturtiums deter pests like aphids and squash bugs, while basil repels flies and mosquitoes. Radishes can help break up the soil and improve drainage. Avoid planting cantaloupe near members of the cucurbit family, such as cucumbers and squash, as they can attract similar pests and diseases.
How do I know when my cantaloupe is ripe and ready to harvest from the grow bag?
Knowing when to harvest your cantaloupe is crucial for enjoying its full flavor and sweetness. Look for these signs of ripeness:
* **Aromatic fragrance:** A ripe cantaloupe will have a sweet, musky aroma near the stem end.
* **Color change:** The rind will change from green to a tan or yellowish color.
* **Stem slip:** The stem will easily separate from the vine with a gentle tug. This is known as “full slip.”
* **Softening:** The blossom end of the cantaloupe will feel slightly soft to the touch.
Avoid harvesting cantaloupes that are still green or hard, as they will not ripen properly off the vine. Enjoy your homegrown cantaloupe fresh or use it in a variety of recipes, such as smoothies, salads, and desserts.

Leave a Comment