
Grow asparagus at home, even if you think you don’t have the space or the green thumb! Have you ever dreamt of snipping fresh, vibrant asparagus spears right from your own backyard, ready to be steamed, grilled, or tossed into a delicious spring salad? It’s easier than you might think, and this DIY guide will show you how to make that dream a reality.
Asparagus has a rich history, dating back to ancient Greece and Rome, where it was prized for its medicinal properties and delicate flavor. Cultivating your own asparagus connects you to this long tradition, allowing you to enjoy a vegetable that has been cherished for centuries. Plus, store-bought asparagus simply can’t compare to the taste of freshly harvested, homegrown spears.
Why should you bother with this DIY project? Well, for starters, growing your own asparagus ensures you know exactly where your food is coming from and how it’s been treated. No more worrying about pesticides or long transportation distances! More importantly, grow asparagus at home is a fantastic way to save money in the long run. Asparagus can be quite expensive at the grocery store, but with a little patience and effort, you can have a continuous supply for years to come. So, let’s dive in and discover the secrets to successfully cultivating this delicious and rewarding vegetable in your own backyard!
Growing Asparagus: A DIY Guide to a Perennial Delight
Asparagus, with its delicate spears and unique flavor, is a true culinary treat. And the best part? You can grow it yourself! While it requires a bit of patience upfront, establishing an asparagus bed is a rewarding investment that will provide you with fresh spears for years to come. I’m going to walk you through everything you need to know to successfully grow asparagus at home.
Choosing the Right Asparagus Variety
Before you even think about digging, you need to select the right asparagus variety for your climate and preferences. Here are a few popular and reliable choices:
* ‘Jersey Knight’: This is an all-male hybrid, meaning it produces primarily male plants. Male plants are more productive because they don’t expend energy on seed production. ‘Jersey Knight’ is known for its high yields and disease resistance.
* ‘Jersey Giant’: Another all-male hybrid, ‘Jersey Giant’ is similar to ‘Jersey Knight’ but tends to produce slightly larger spears.
* ‘Mary Washington’: This is an older, open-pollinated variety that’s still popular for its reliability and good flavor. It produces both male and female plants.
* ‘Purple Passion’: If you’re looking for something a little different, ‘Purple Passion’ offers beautiful purple spears that turn green when cooked. It’s also known for being sweeter and more tender than green varieties.
Consider your local climate and soil conditions when making your choice. Your local nursery or agricultural extension office can provide recommendations specific to your area.
Preparing Your Asparagus Bed: Location, Location, Location!
Asparagus is a perennial, meaning it will live for many years in the same spot. Therefore, choosing the right location and preparing the soil properly is crucial for its long-term success.
* Sunlight: Asparagus needs at least 6-8 hours of direct sunlight per day. Choose a location that receives plenty of sunshine throughout the growing season.
* Soil: Asparagus thrives in well-drained, sandy loam soil with a pH between 6.5 and 7.0. Heavy clay soil can lead to root rot, so amending it is essential.
* Drainage: Excellent drainage is paramount. Asparagus crowns will rot if they sit in soggy soil.
* Space: Asparagus plants can grow quite large, so give them plenty of space. Allow at least 3-4 feet between rows and 12-18 inches between plants within a row.
* Weed Control: Choose a location that is relatively free of weeds. Asparagus is slow to establish, and weeds can easily outcompete it.
Step-by-Step Planting Guide
Now for the fun part – planting! You can start asparagus from seed, but it takes much longer to establish a productive bed. I highly recommend starting with asparagus crowns, which are one-year-old plants.
1. Timing: The best time to plant asparagus crowns is in early spring, as soon as the soil can be worked.
2. Soil Preparation: This is the most important step! Before planting, amend the soil with plenty of organic matter, such as compost, well-rotted manure, or peat moss. Dig a trench that is about 12-18 inches wide and 6-8 inches deep.
3. Soil Amendment: Mix the excavated soil with the organic matter. A good ratio is about 1 part organic matter to 2 parts soil. You can also add a slow-release fertilizer formulated for vegetables at this time, following the package instructions.
4. Creating a Ridge: Create a small ridge down the center of the trench. This ridge will support the asparagus crowns and help with drainage.
5. Placing the Crowns: Place the asparagus crowns on top of the ridge, spacing them 12-18 inches apart. Spread the roots out evenly around the crown.
6. Covering the Crowns: Gently cover the crowns with about 2-3 inches of the amended soil. Water thoroughly.
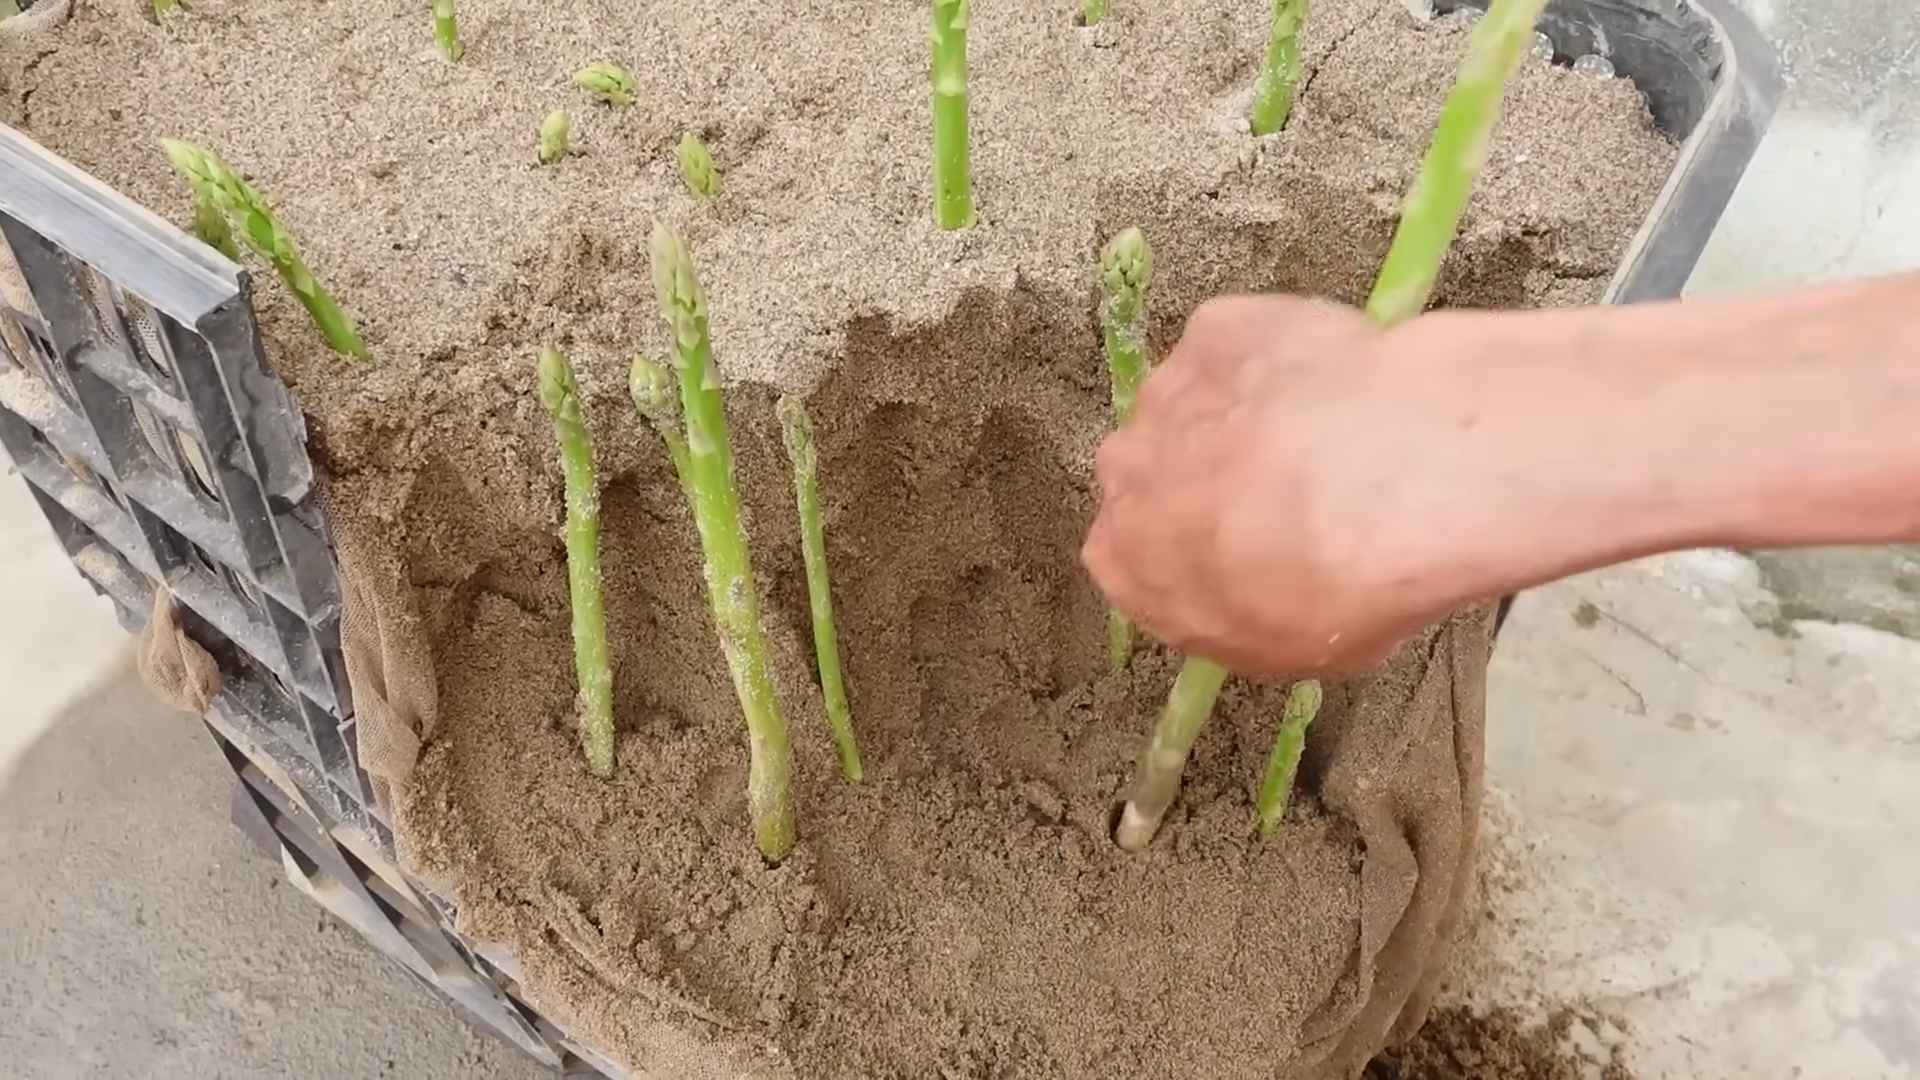
7. Gradual Filling: As the asparagus spears emerge, gradually fill in the trench with more soil. Continue this process until the trench is completely filled. This encourages the development of a strong root system.
8. Mulching: Apply a layer of mulch around the asparagus plants to help retain moisture, suppress weeds, and regulate soil temperature. Straw, wood chips, or shredded leaves are all good options.
Caring for Your Asparagus Bed: Patience is Key
Asparagus requires patience. Don’t expect to harvest a lot of spears in the first year or two. Allowing the plants to establish a strong root system is crucial for long-term productivity.
* Watering: Keep the soil consistently moist, especially during dry periods. Asparagus needs about 1 inch of water per week.
* Weeding: Regularly remove any weeds that emerge in the asparagus bed. Weeds can compete with the asparagus for nutrients and water.
* Fertilizing: Fertilize your asparagus bed in early spring with a balanced fertilizer. You can also side-dress with compost or well-rotted manure throughout the growing season.
* Pest and Disease Control: Asparagus is relatively pest and disease resistant, but keep an eye out for common problems like asparagus beetles and crown rot. If you notice any issues, take action promptly to prevent them from spreading.
* Cutting Back Foliage: In the fall, after the foliage has turned yellow or brown, cut it back to the ground. This helps to prevent disease and allows the plants to rest for the winter.
Harvesting Your Asparagus: The Sweet Reward
After two or three years of patience, you’ll finally be able to harvest your own homegrown asparagus!
* Harvesting Time: Begin harvesting asparagus spears when they are about 6-8 inches tall and about as thick as your finger.
* Harvesting Method: Use a sharp knife to cut the spears at ground level. Be careful not to damage the surrounding spears or the crown.
* Harvesting Period: Harvest asparagus spears for about 4-6 weeks in the spring. As the plants mature, you can extend the harvesting period.
* Stopping the Harvest: Stop harvesting when the spears become thin and spindly. This indicates that the plants need to replenish their energy reserves.
* Post-Harvest Care: After the harvesting period, allow the asparagus plants to grow and develop their foliage. This will help them to store energy for the next year’s harvest.
Troubleshooting Common Asparagus Problems
Even with the best care, you may encounter some problems when growing asparagus. Here are a few common issues and how to address them:
* Thin Spears: Thin spears can be caused by a variety of factors, including insufficient sunlight, poor soil, lack of nutrients, or over-harvesting. Make sure your asparagus bed is in a sunny location, the soil is well-amended, and you are fertilizing regularly. Also, avoid over-harvesting the spears.
* Yellowing Foliage: Yellowing foliage can be a sign of nutrient deficiency, disease, or pest infestation. Check the soil pH and nutrient levels. Inspect the plants for signs of disease or pests.
* Asparagus Beetles: Asparagus beetles are small, colorful beetles that can damage asparagus spears and foliage. Handpick the beetles or use an insecticidal soap to control them.
* Crown Rot: Crown rot is a fungal disease that can cause the asparagus crowns to rot. It is often caused by poor drainage. Improve drainage by amending the soil with organic matter. Avoid overwatering.
Extending the Life of Your Asparagus Bed
With proper care, your asparagus bed can produce spears for 15-20 years or even longer. Here are a few tips for extending the life of your asparagus bed:
* Regular Fertilizing: Fertilize your asparagus bed every year to provide the plants with the nutrients they need.
* Weed Control: Keep the asparagus bed free of weeds. Weeds can compete with the asparagus for nutrients and water.
* Mulching: Apply a layer of mulch around the asparagus plants to help retain moisture, suppress weeds, and regulate soil temperature.
* Dividing Crowns: After 10-15 years, you may need to divide the asparagus crowns to rejuvenate the bed. Dig up the crowns in early spring and divide them into smaller clumps. Replant the clumps in a new location.
Enjoying Your Homegrown Asparagus
There’s nothing quite like the taste of freshly harvested asparagus. Here are a few ideas for enjoying your homegrown spears:
* Steamed or Roasted: Simply steam or roast the asparagus spears with a little olive oil, salt, and pepper.
* Grilled: Grill the asparagus spears over medium heat until they are tender-crisp.
* In Salads: Add asparagus spears to salads for a fresh and flavorful touch.
* In Soups: Use asparagus spears to
Conclusion
So, there you have it! Growing asparagus at home isn’t just a gardening project; it’s an investment in years of delicious, nutritious harvests. Forget those bland, overpriced spears from the grocery store. Imagine stepping into your backyard and picking fresh, vibrant asparagus, bursting with flavor and packed with vitamins. This DIY trick transforms your garden into a source of culinary delight, offering a taste experience that store-bought asparagus simply can’t match.
Why is this a must-try? Because it’s more than just growing a vegetable; it’s about connecting with your food, understanding its journey from seed (or crown) to plate, and enjoying the satisfaction of nurturing something from the earth. It’s about reducing your carbon footprint by sourcing locally (from your own backyard!), and it’s about saving money in the long run. Plus, asparagus is a perennial, meaning once you establish your bed, you’ll be enjoying its bounty for 15-20 years!
But don’t think you’re limited to just the standard green asparagus. Experiment with different varieties! ‘Purple Passion’ offers a sweeter, nuttier flavor and a beautiful visual appeal. ‘Jersey Knight’ is known for its high yields and disease resistance, making it a great choice for beginners. You can even try growing white asparagus by blanching it (covering the spears with soil to prevent sunlight exposure), resulting in a milder, more delicate flavor. Consider companion planting with herbs like parsley, basil, and marigolds to deter pests and enhance growth. Adding a layer of compost each spring will also significantly boost your asparagus production.
We’ve covered the basics, but the real magic happens when you get your hands dirty. Don’t be intimidated by the initial setup. With a little patience and care, you’ll be rewarded with a thriving asparagus patch that will be the envy of your neighbors. The key is proper soil preparation, consistent watering, and diligent weed control. Remember to be patient during the first few years, as the plants need time to establish themselves. Resist the urge to harvest heavily in the early years; a light harvest in year three and a more substantial one in year four will ensure a long and productive lifespan for your asparagus bed.
We are confident that you will find success in your home garden. So, grab your gardening gloves, prepare your soil, and embark on this rewarding journey of growing asparagus at home. We encourage you to try this DIY trick and experience the joy of harvesting your own fresh asparagus.
And most importantly, we want to hear about your experiences! Share your tips, tricks, and triumphs in the comments below. Let us know which varieties you’re growing, what challenges you’ve faced, and what delicious dishes you’ve created with your homegrown asparagus. Your insights will help other aspiring gardeners and contribute to a thriving community of asparagus enthusiasts. Happy gardening!
Frequently Asked Questions (FAQ)
What is the best time of year to plant asparagus?
The best time to plant asparagus depends on whether you’re planting from seed or crowns. If you’re starting from seed, it’s best to sow them indoors in early spring, about 12-14 weeks before the last expected frost. Transplant the seedlings outdoors after the danger of frost has passed. If you’re planting crowns (which is the more common and recommended method), the ideal time is in early spring, as soon as the soil can be worked. This allows the crowns to establish themselves before the heat of summer arrives. In warmer climates, you can also plant crowns in the fall.
How much space does asparagus need?
Asparagus plants need plenty of space to spread out and thrive. When planting crowns, space them about 12-18 inches apart within the row. Rows should be spaced at least 4-5 feet apart to allow for easy access and good air circulation. This spacing allows the plants to develop a strong root system and produce abundant spears. Remember that asparagus is a perennial, so you’ll be investing in a long-term planting.
What kind of soil is best for growing asparagus?
Asparagus prefers well-drained, sandy loam soil with a pH between 6.5 and 7.5. Good drainage is crucial, as asparagus roots can rot in soggy conditions. Before planting, amend the soil with plenty of organic matter, such as compost or well-rotted manure, to improve drainage and fertility. Asparagus is a heavy feeder, so incorporating phosphorus and potassium into the soil is also beneficial. A soil test can help you determine the specific nutrient needs of your soil.
How long does it take for asparagus to produce spears?
Patience is key when growing asparagus! It typically takes 2-3 years from planting crowns before you can harvest a significant amount of spears. In the first year, allow the plants to establish themselves and focus on developing a strong root system. In the second year, you can harvest a few spears for a short period (about 2 weeks). By the third year, you can enjoy a more substantial harvest, lasting for 6-8 weeks. Harvesting too early can weaken the plants and reduce their long-term productivity.
How do I harvest asparagus?
Harvest asparagus spears when they are about 6-8 inches tall and the tips are still tightly closed. Use a sharp knife to cut the spears at ground level. Avoid damaging the surrounding spears or the crown. Harvest spears regularly during the harvest season to encourage continued production. As the season progresses, the spears will become thinner and less tender, signaling the end of the harvest.
How do I care for asparagus plants after the harvest?
After the harvest season, allow the asparagus ferns to grow and mature. These ferns are essential for replenishing the plant’s energy reserves for the following year. Water the plants regularly, especially during dry periods. Fertilize with a balanced fertilizer to provide the necessary nutrients. In the fall, after the ferns have turned brown, cut them back to about 2 inches above the ground. Mulch the asparagus bed with straw or compost to protect the crowns from winter cold and suppress weeds.
What are some common pests and diseases that affect asparagus?
Asparagus beetles are a common pest that can damage the spears and ferns. Handpicking the beetles or using insecticidal soap can help control them. Asparagus rust is a fungal disease that can cause orange pustules on the ferns. Planting rust-resistant varieties and ensuring good air circulation can help prevent rust. Crown rot is another disease that can affect asparagus, especially in poorly drained soils. Improving drainage and avoiding overwatering can help prevent crown rot.
Can I grow asparagus in containers?
Yes, you can grow asparagus in containers, but it requires a large container (at least 18 inches in diameter and depth) and well-draining potting mix. Choose a dwarf variety of asparagus that is better suited for container growing. Provide regular watering and fertilization. Container-grown asparagus may not be as productive as asparagus grown in the ground, but it can still provide a decent harvest.
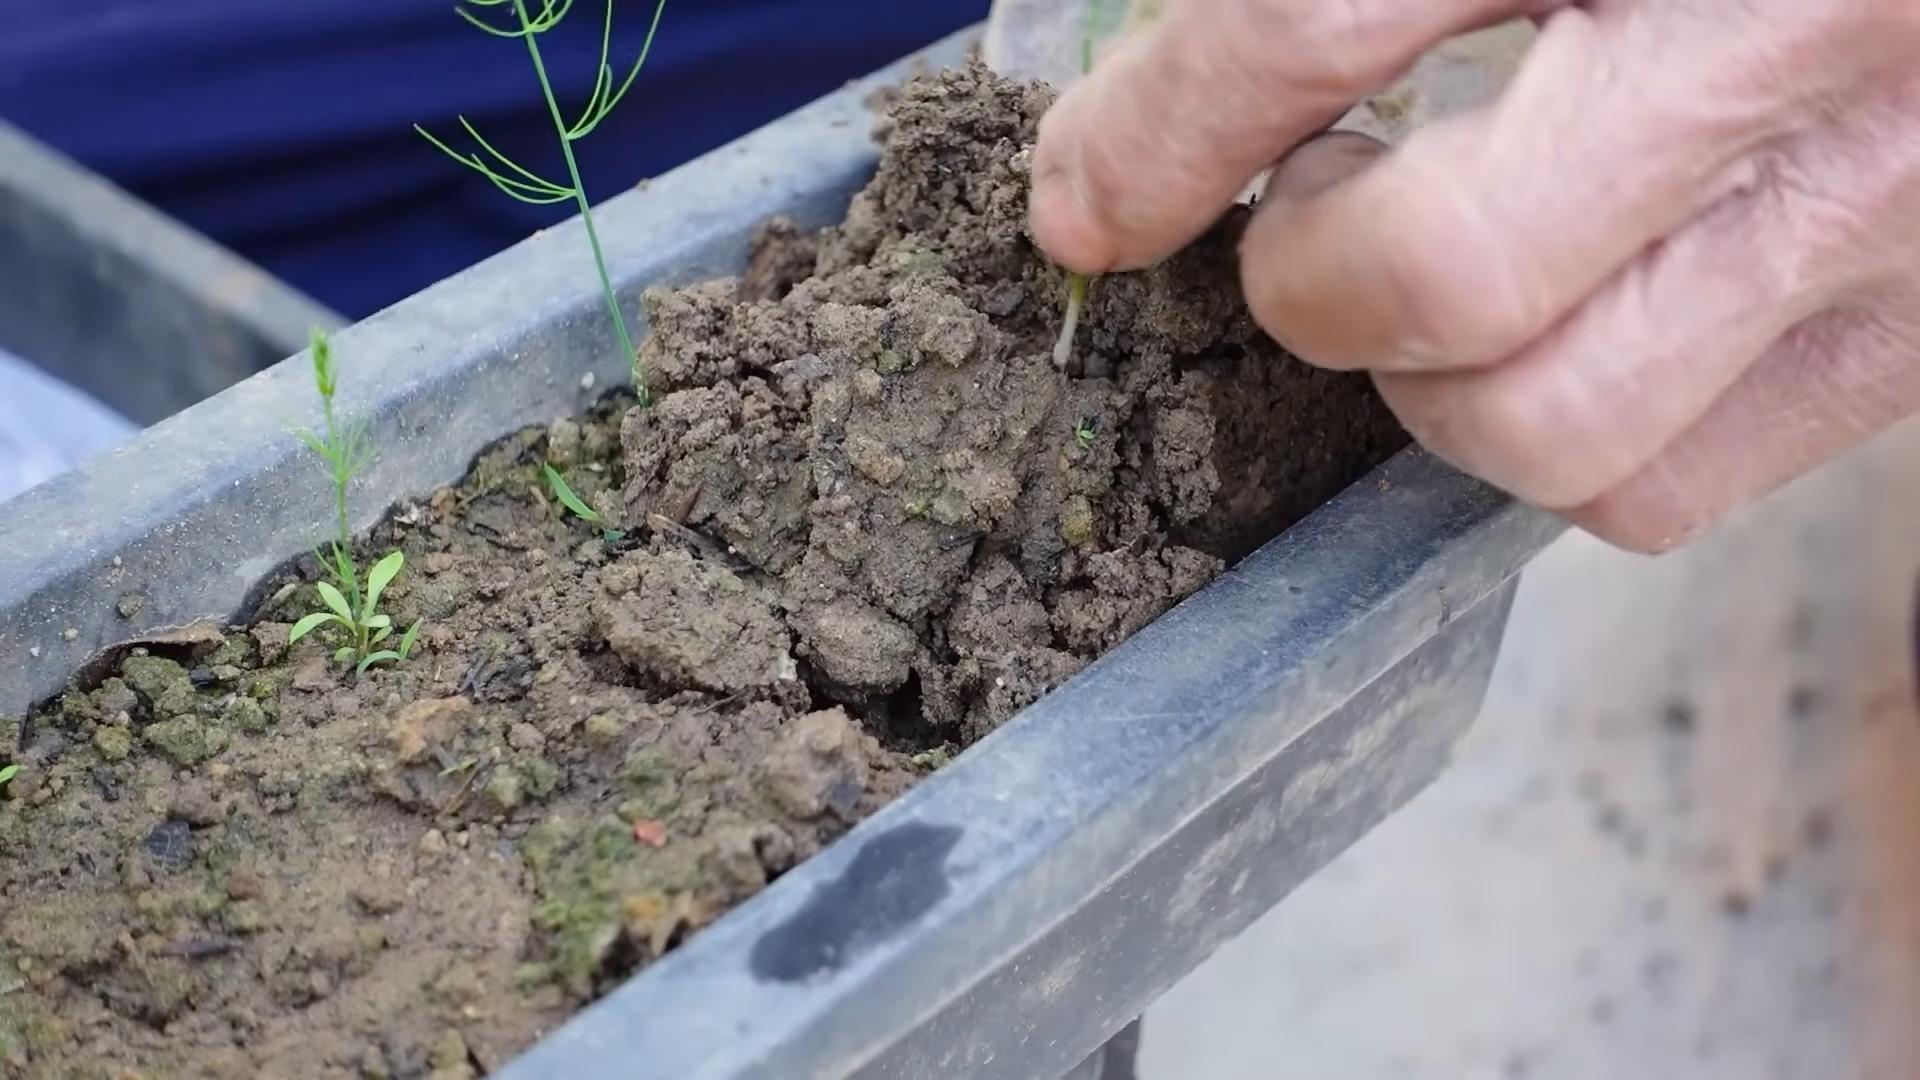
How do I blanch asparagus to get white asparagus?
To blanch asparagus and obtain white asparagus, you need to exclude sunlight from the spears as they grow. This can be done by mounding soil around the spears as they emerge, creating a ridge that covers them completely. The spears will continue to grow underground, shielded from the light, resulting in white asparagus. Harvest the spears when they reach the desired length, carefully digging them out from the soil.
Is growing asparagus at home worth the effort?
Absolutely! While it requires some initial investment of time and effort, growing asparagus at home is incredibly rewarding. You’ll enjoy years of fresh, delicious asparagus that tastes far superior to store-bought varieties. Plus, you’ll have the satisfaction of knowing that you grew it yourself, using sustainable practices. The flavor and freshness alone make growing asparagus at home a worthwhile endeavor.
Leave a Comment