
Grow Arugula at Home with ease! Have you ever dreamt of snipping fresh, peppery arugula leaves right from your own backyard for a vibrant salad or a zesty pizza topping? I know I have! For centuries, arugula, also known as rocket, has been a culinary staple, gracing the tables of ancient Romans and finding its way into modern kitchens worldwide. Its distinctive flavor adds a delightful kick to any dish, and the best part? You don’t need a sprawling farm to enjoy it.
This DIY guide is your passport to a thriving arugula patch, even if you’re a complete beginner. Let’s face it, store-bought arugula can be expensive and sometimes lacks that fresh, vibrant taste. By learning how to grow arugula at home, you’ll not only save money but also have access to the freshest, most flavorful greens imaginable. Plus, gardening is incredibly therapeutic! So, ditch the grocery store greens and get ready to embark on a rewarding journey of growing your own delicious arugula. I’m here to guide you every step of the way, with simple tricks and hacks that will have you harvesting a bountiful crop in no time!
Arugula zu Hause anbauen: Dein DIY-Guide für knackigen Salat
Hey Gartenfreunde! Habt ihr Lust auf frischen, pfeffrigen Arugula (auch bekannt als Rauke oder Rucola) direkt aus eurem eigenen Garten? Ich zeige euch, wie ihr das ganz einfach selbst machen könnt, egal ob ihr einen großen Garten, einen kleinen Balkon oder nur ein sonniges Fensterbrett habt. Arugula ist super pflegeleicht und wächst schnell, also perfekt für Anfänger und Ungeduldige wie mich!
Was du brauchst: Die Zutaten für deinen Arugula-Erfolg
Bevor wir loslegen, hier eine Liste mit allem, was du für deinen Arugula-Garten brauchst:
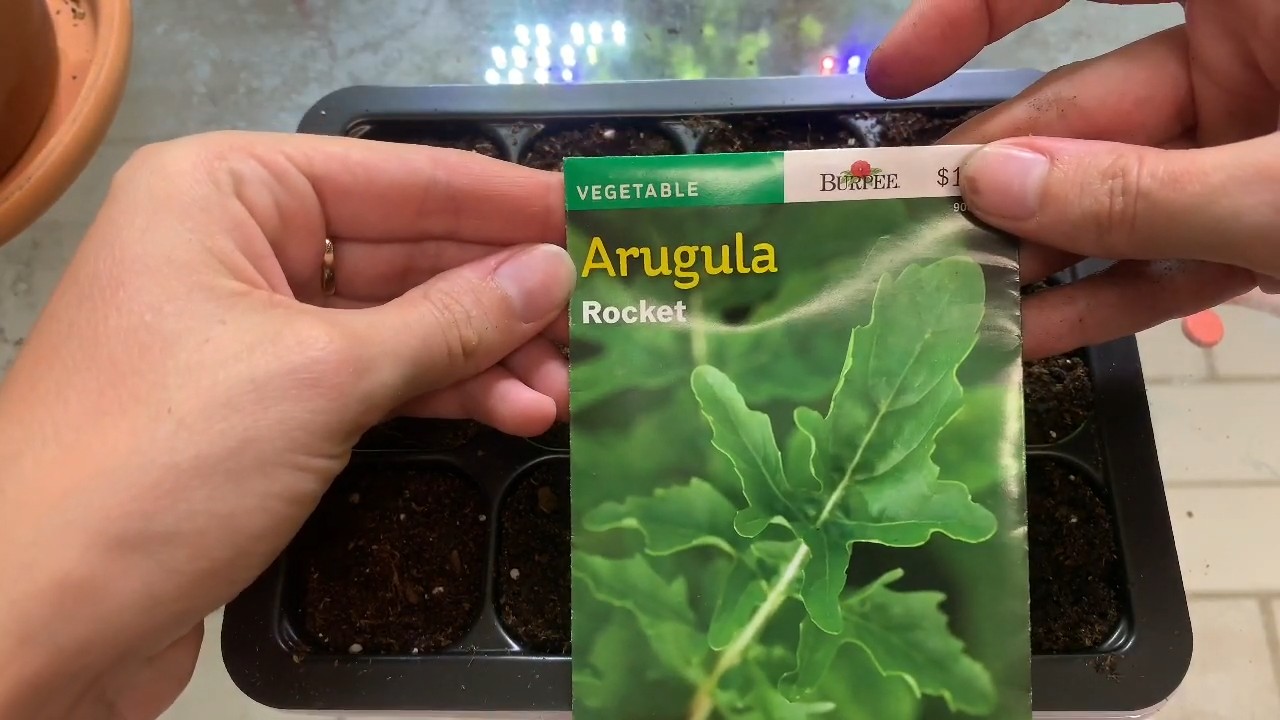
* Arugula-Samen: Die gibt’s im Gartencenter, online oder vielleicht sogar von einem netten Nachbarn. Achte auf frische Samen für eine gute Keimrate.
* Geeigneter Behälter: Das kann ein Topf, ein Balkonkasten, ein Hochbeet oder sogar ein alter Joghurtbecher sein (mit Löchern im Boden!). Wichtig ist, dass das Wasser gut ablaufen kann.
* Gute Erde: Am besten verwendest du eine lockere, nährstoffreiche Gemüseerde. Blumenerde geht auch, aber Gemüseerde ist speziell auf die Bedürfnisse von Salatpflanzen abgestimmt.
* Gießkanne oder Sprühflasche: Für die sanfte Bewässerung deiner kleinen Arugula-Pflänzchen.
* Sonniger Standort: Arugula liebt die Sonne, aber ein halbschattiger Platz geht auch.
* Optional: Ein kleiner Spaten oder eine Pflanzkelle, um die Erde zu lockern und die Samen zu verteilen.
Schritt-für-Schritt-Anleitung: So säst du Arugula richtig aus
Jetzt geht’s ans Eingemachte! Hier ist eine detaillierte Anleitung, wie du deine Arugula-Samen aussäst und ihnen den besten Start ins Leben ermöglichst:
1. Den Behälter vorbereiten: Fülle deinen gewählten Behälter mit der Erde. Lass oben etwa 2-3 cm Platz. Drücke die Erde leicht an, aber nicht zu fest. Sie sollte locker und luftig bleiben.
2. Die Samen aussäen: Arugula-Samen sind relativ klein, also sei vorsichtig beim Ausbringen. Du kannst sie entweder breitwürfig verteilen (einfach über die Erde streuen) oder in Reihen säen. Wenn du sie in Reihen säst, ziehe mit dem Finger oder einem kleinen Werkzeug flache Rillen in die Erde (etwa 0,5 cm tief) und lege die Samen hinein. Der Abstand zwischen den Reihen sollte etwa 5-10 cm betragen.
3. Die Samen bedecken: Bedecke die Samen mit einer dünnen Schicht Erde (etwa 0,5 cm). Du kannst dafür einfach etwas Erde über die Samen streuen oder sie leicht mit den Fingern andrücken.
4. Gießen: Gieße die Erde vorsichtig an. Am besten verwendest du eine Gießkanne mit Brauseaufsatz oder eine Sprühflasche, damit die Samen nicht weggeschwemmt werden. Die Erde sollte gut durchfeuchtet sein, aber nicht im Wasser stehen.
5. Der richtige Standort: Stelle den Behälter an einen sonnigen oder halbschattigen Platz. Arugula braucht mindestens 4-6 Stunden Sonnenlicht pro Tag, um gut zu wachsen.
6. Geduld ist eine Tugend: Jetzt heißt es warten! Arugula keimt in der Regel innerhalb von 5-10 Tagen. Halte die Erde feucht, aber vermeide Staunässe.
Pflege-Tipps: So bleibt dein Arugula glücklich und gesund
Arugula ist wirklich anspruchslos, aber ein paar kleine Dinge solltest du beachten, damit er optimal gedeiht:
* Regelmäßig gießen: Arugula braucht regelmäßig Wasser, besonders an heißen Tagen. Die Erde sollte immer leicht feucht sein, aber nicht nass. Am besten testest du mit dem Finger, ob die Erde trocken ist.
* Unkraut jäten: Entferne regelmäßig Unkraut, das um die Arugula-Pflanzen herum wächst. Unkraut konkurriert mit dem Arugula um Nährstoffe und Wasser.
* Schädlinge im Auge behalten: Arugula ist relativ resistent gegen Schädlinge, aber manchmal können sich Blattläuse oder Schnecken daran zu schaffen machen. Kontrolliere deine Pflanzen regelmäßig und entferne Schädlinge gegebenenfalls von Hand oder mit einem geeigneten biologischen Schädlingsbekämpfungsmittel.
* Düngen (optional): Wenn du möchtest, kannst du deinen Arugula ab und zu mit einem organischen Flüssigdünger düngen. Das ist aber nicht unbedingt notwendig, wenn du gute Erde verwendest.
Erntezeit: Endlich Arugula genießen!
Das Beste kommt zum Schluss: die Ernte! Arugula ist relativ schnellwüchsig und kann schon nach 3-4 Wochen geerntet werden.
1. Wann ernten?: Du kannst Arugula ernten, sobald die Blätter eine Größe von etwa 5-10 cm erreicht haben. Je jünger die Blätter, desto milder ist der Geschmack. Ältere Blätter können etwas schärfer sein.
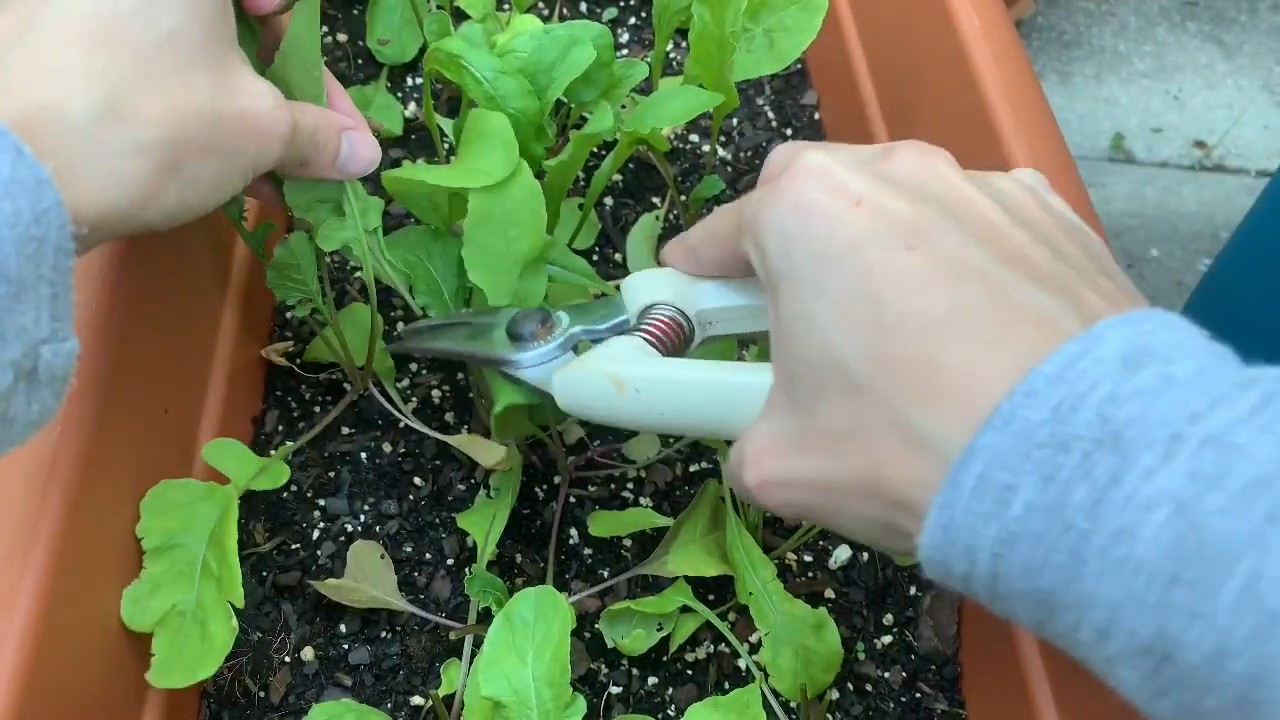
2. Wie ernten?: Schneide die Blätter mit einer Schere oder einem Messer ab. Du kannst entweder einzelne Blätter ernten oder die ganze Pflanze kurz über dem Boden abschneiden. Wenn du nur einzelne Blätter erntest, kann die Pflanze weiterwachsen und du kannst mehrmals ernten.
3. Arugula lagern: Frischer Arugula schmeckt am besten direkt nach der Ernte. Du kannst ihn aber auch im Kühlschrank lagern. Wickle ihn dafür in ein feuchtes Tuch oder lege ihn in eine Plastiktüte. So hält er sich ein paar Tage frisch.
Extra-Tipps für den Arugula-Profi
* Aussaatzeitpunkt: Arugula kann von Frühjahr bis Herbst ausgesät werden. Im Sommer solltest du ihn an einem halbschattigen Platz anbauen, da er sonst schnell in Blüte geht und die Blätter bitter werden können.
* Nachsaat: Säe alle paar Wochen neue Samen aus, um eine kontinuierliche Ernte zu gewährleisten.
* Arugula in Mischkultur: Arugula verträgt sich gut mit anderen Salatpflanzen, Radieschen, Karotten und Kräutern wie Dill und Petersilie.
* Blühender Arugula: Wenn dein Arugula blüht, kannst du die Blüten auch essen! Sie haben einen ähnlichen Geschmack wie die Blätter, sind aber etwas milder. Du kannst die Blüten auch für die Samengewinnung nutzen.
Arugula-Sorten: Vielfalt für deinen Gaumen
Es gibt verschiedene Arugula-Sorten, die sich in Geschmack, Blattform und Größe unterscheiden. Hier sind ein paar beliebte Sorten:
* ‘Rocket’: Die klassische Arugula-Sorte mit einem kräftigen, pfeffrigen Geschmack.
* ‘Wild Rocket’: Eine wildere Sorte mit kleineren, schärferen Blättern.
* ‘Wasabi Rocket’: Eine Sorte mit einem Wasabi-ähnlichen Geschmack.
* ‘Italian Cress’: Eine mildere Sorte mit einem leicht nussigen Geschmack.
Probiere verschiedene Sorten aus, um deinen Favoriten zu finden!
Arugula in der Küche: Vielseitig und lecker
Arugula ist ein echter Allrounder in der Küche. Du kannst ihn roh in Salaten verwenden, als Topping für Pizza oder Pasta, in Smoothies oder als Pesto. Er passt gut zu Käse, Nüssen, Früchten und vielen anderen Zutaten.
Ich hoffe, diese Anleitung hat dir geholfen, deinen eigenen Arugula-Garten zu starten. Viel Spaß beim Gärtnern und guten Appetit!
Conclusion
So, there you have it! Growing your own arugula at home is not only surprisingly simple, but it’s also incredibly rewarding. Forget those wilted, overpriced greens from the grocery store. Imagine stepping out to your balcony, patio, or even just a sunny windowsill and harvesting a handful of fresh, peppery arugula whenever you need it. The flavor is undeniably superior – a vibrant, crisp bite that store-bought arugula simply can’t match.
This DIY trick isn’t just about saving money; it’s about connecting with your food, understanding where it comes from, and enjoying the satisfaction of nurturing something from seed to table. Plus, you have complete control over the growing process, ensuring your arugula is free from harmful pesticides and chemicals.
But the benefits don’t stop there. Growing arugula at home is a fantastic way to add a touch of green to your living space, even if you don’t have a sprawling garden. It’s a low-maintenance project that’s perfect for beginners and experienced gardeners alike.
Looking for variations? Try experimenting with different types of arugula seeds. Some varieties are spicier than others, while others have a milder, more delicate flavor. You can also try growing arugula in different containers, from small pots to larger raised beds. Consider companion planting with herbs like basil or chives to deter pests and enhance the flavor of your arugula. For a continuous harvest, sow seeds every few weeks. This ensures you always have a fresh supply of this delicious green. You can even try growing arugula indoors during the colder months to enjoy fresh greens year-round.
Don’t be intimidated! This is a forgiving plant, and even if you make a few mistakes along the way, you’re likely to still end up with a bountiful harvest. The key is to provide adequate sunlight, well-draining soil, and consistent moisture.
We wholeheartedly encourage you to give this DIY trick a try. You’ll be amazed at how easy and enjoyable it is to grow your own arugula at home. Once you taste the difference between homegrown and store-bought, you’ll never go back!
And most importantly, we want to hear about your experience! Share your photos, tips, and challenges in the comments below. Let’s create a community of home gardeners who are passionate about growing their own fresh, delicious arugula. What growing medium did you find most successful? Did you encounter any unexpected pests? What are your favorite ways to use your homegrown arugula? Your insights will help others succeed and inspire even more people to embrace the joy of growing their own food. So, grab some seeds, get your hands dirty, and start growing your own arugula today!
Frequently Asked Questions (FAQ)
What is the best time of year to plant arugula?
Arugula is a cool-season crop, meaning it thrives in cooler temperatures. The best time to plant arugula is in early spring or late summer/early fall. Avoid planting during the hottest months of summer, as the heat can cause the leaves to become bitter and bolt (go to seed prematurely). In most regions, you can get two or even three harvests per year by planting in succession. If you live in a warmer climate, you can grow arugula throughout the winter.
How much sunlight does arugula need?
Arugula needs at least 6 hours of sunlight per day to thrive. However, it can tolerate partial shade, especially during the hottest part of the day. If you’re growing arugula indoors, place it near a sunny window or use a grow light to provide adequate light. Insufficient sunlight can result in leggy, weak plants with poor flavor.
What kind of soil is best for growing arugula?
Arugula prefers well-draining soil that is rich in organic matter. A slightly acidic to neutral pH (around 6.0 to 7.0) is ideal. Before planting, amend the soil with compost or other organic matter to improve drainage and fertility. Avoid heavy clay soils, as they can become waterlogged and inhibit root growth. If you’re growing arugula in containers, use a high-quality potting mix.
How often should I water arugula?
Arugula needs consistent moisture to thrive. Water regularly, especially during dry periods. The soil should be kept consistently moist but not waterlogged. Overwatering can lead to root rot, while underwatering can cause the leaves to wilt and become bitter. Check the soil moisture regularly and water when the top inch feels dry to the touch.
How long does it take for arugula to germinate?
Arugula seeds typically germinate within 5-7 days, depending on the temperature and moisture levels. Keep the soil consistently moist during the germination period. Once the seedlings emerge, thin them out to allow for adequate spacing.
When is arugula ready to harvest?
Arugula is typically ready to harvest about 3-4 weeks after planting. You can harvest the leaves when they are about 2-3 inches long. Harvest regularly to encourage continued growth. You can either harvest individual leaves or cut the entire plant back to about an inch above the soil. The plant will regrow, providing you with multiple harvests.
How do I prevent arugula from bolting?
Bolting is when a plant prematurely goes to seed, often due to stress from heat or lack of water. To prevent arugula from bolting, plant it in a cool, shady location, water it regularly, and harvest the leaves frequently. You can also try planting bolt-resistant varieties of arugula. If your arugula does bolt, you can still eat the leaves, but they may be more bitter.
What are some common pests and diseases that affect arugula?
Arugula is generally a pest-resistant plant, but it can be susceptible to certain pests and diseases, such as flea beetles, aphids, and downy mildew. Flea beetles can be controlled with insecticidal soap or by covering the plants with row covers. Aphids can be washed off with a strong stream of water or treated with insecticidal soap. Downy mildew is a fungal disease that can be prevented by providing good air circulation and avoiding overhead watering.
Can I grow arugula indoors?
Yes, you can grow arugula indoors, especially during the colder months. Choose a sunny location near a window or use a grow light to provide adequate light. Use a well-draining potting mix and water regularly. You may need to fertilize the plants occasionally to provide them with the nutrients they need.
What are some ways to use homegrown arugula?
Arugula is a versatile green that can be used in a variety of dishes. It can be added to salads, sandwiches, pizzas, and pasta dishes. It can also be used to make pesto or as a garnish. The peppery flavor of arugula adds a unique touch to any dish. Experiment with different recipes and find your favorite ways to use your homegrown arugula!


Leave a Comment