
Endless Celery Harvest – imagine a world where you never have to buy celery again! Sounds like a dream, right? Well, it’s a dream that can become a reality with a simple DIY trick. For generations, resourceful gardeners have sought ways to maximize their yields and minimize waste. From ancient Roman kitchen gardens to the victory gardens of World War II, the spirit of self-sufficiency has always been intertwined with the joy of growing your own food.
Celery, with its crisp stalks and refreshing flavor, is a staple in many kitchens. But let’s be honest, how often do you use the entire bunch before it starts to wilt in the fridge? This is where our endless celery harvest hack comes in! I’m going to show you a super easy way to regrow celery from the base you’d normally toss in the compost. Not only will you save money and reduce food waste, but you’ll also experience the satisfaction of nurturing new life from something you thought was destined for the bin.
This DIY project is perfect for beginner gardeners and seasoned pros alike. It’s a fun, educational activity for kids, and a fantastic way to add fresh, organic celery to your meals. So, ditch the grocery store celery and get ready to embark on your own endless celery harvest adventure! Let’s get growing!

Grow Celery Forever: A DIY Guide to Regrowing Celery from Scraps
Hey there, fellow gardening enthusiasts! Are you tired of buying celery from the grocery store only to use a few stalks and watch the rest wilt away in your fridge? I know I was! That’s why I’m so excited to share this super simple DIY hack that allows you to regrow celery from the base you’d normally toss in the compost. Get ready for an endless supply of crunchy, fresh celery!
This method is not only incredibly easy, but it’s also a fantastic way to reduce food waste and save money. Plus, it’s a fun project for kids (and adults!) to learn about plant propagation. So, grab that celery base and let’s get started!
What You’ll Need
Before we dive in, let’s gather our supplies. The beauty of this project is that you probably already have most of these items at home:
* **Celery Base:** This is the most important ingredient! Choose a celery bunch with a healthy-looking base, preferably one that still has some roots attached. The fresher, the better.
* **Shallow Dish or Bowl:** A small bowl or dish that can hold water and the celery base.
* **Water:** Tap water is perfectly fine.
* **Spray Bottle (Optional):** For misting the celery leaves.
* **Potting Soil:** A well-draining potting mix for planting the celery.
* **Pot or Container:** A pot that’s at least 6 inches in diameter and 6 inches deep. This will give your celery plant enough room to grow.
* **Sunny Location:** Celery loves sunlight, so choose a spot that gets at least 6 hours of direct sunlight per day.
* **Sharp Knife or Scissors:** For trimming the celery stalks.
Regrowing Celery in Water: Step-by-Step
This is where the magic happens! Follow these steps carefully, and you’ll be well on your way to regrowing your own celery.
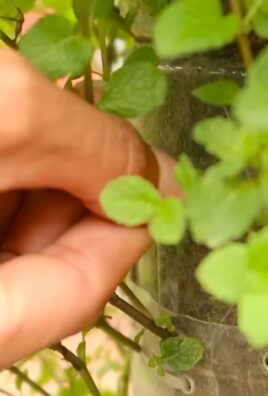
1. **Prepare the Celery Base:** Using a sharp knife or scissors, cut off the celery stalks about 2 inches from the base. Don’t throw away the stalks! You can use them in soups, salads, or as a healthy snack. The goal is to leave the base intact, as this is where the new growth will emerge.
2. **Place the Base in Water:** Fill your shallow dish or bowl with about an inch of water. Place the celery base, cut-side up, in the water. Make sure the bottom of the base is submerged, but the top is exposed to air.
3. **Find a Sunny Spot:** Place the dish with the celery base in a sunny location, such as a windowsill or countertop that receives plenty of sunlight.
4. **Change the Water Regularly:** This is crucial to prevent the water from becoming stagnant and attracting bacteria. Change the water every 1-2 days. This will also provide fresh nutrients to the celery base.
5. **Observe and Wait:** Over the next few days, you should start to see small roots emerging from the bottom of the celery base and new leaves sprouting from the top. This is a sign that your celery is successfully regrowing!
6. **Mist the Leaves (Optional):** To keep the leaves hydrated, you can mist them with water using a spray bottle every day or two. This is especially helpful if you live in a dry climate.
7. **Be Patient:** It may take a week or two for the roots and leaves to develop sufficiently for planting. Don’t get discouraged if you don’t see results immediately. Just keep changing the water and providing plenty of sunlight.
Transplanting Your Celery to Soil
Once your celery base has developed a good root system and several new leaves, it’s time to transplant it to soil. This will provide the celery plant with the nutrients it needs to grow into a full-sized plant.
1. **Prepare the Pot:** Fill your pot or container with well-draining potting soil, leaving about an inch of space at the top.
2. **Create a Hole:** Use your finger or a small trowel to create a hole in the center of the soil that’s large enough to accommodate the celery base and its roots.
3. **Carefully Remove the Celery Base:** Gently remove the celery base from the water, being careful not to damage the roots.
4. **Plant the Celery Base:** Place the celery base in the hole, making sure the top of the base is level with the soil surface. Gently backfill the hole with soil, pressing lightly to secure the plant.
5. **Water Thoroughly:** Water the soil thoroughly until water drains out of the bottom of the pot. This will help settle the soil and provide the celery plant with the moisture it needs to get established.
6. **Return to Sunny Location:** Place the pot in the same sunny location where you were regrowing the celery in water.
Caring for Your Regrown Celery Plant
Now that your celery plant is in soil, it’s important to provide it with the proper care to ensure it thrives.
1. **Water Regularly:** Celery needs consistent moisture to grow well. Water the plant whenever the top inch of soil feels dry to the touch. Avoid overwatering, as this can lead to root rot.
2. **Fertilize Occasionally:** To provide your celery plant with extra nutrients, you can fertilize it every few weeks with a balanced liquid fertilizer. Follow the instructions on the fertilizer label.
3. **Monitor for Pests and Diseases:** Keep an eye out for common garden pests, such as aphids and slugs. If you notice any pests, you can treat them with insecticidal soap or other organic pest control methods. Celery can also be susceptible to certain diseases, such as celery blight. If you notice any signs of disease, such as yellowing or browning leaves, remove the affected leaves and treat the plant with a fungicide.
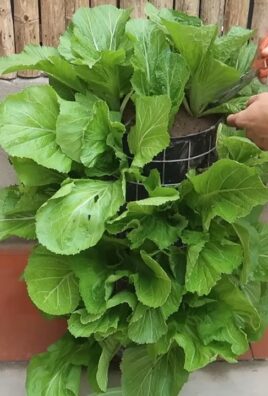
4. **Harvesting Your Celery:** You can start harvesting your celery stalks once they reach a desirable size. Simply cut off the stalks you need, leaving the rest of the plant to continue growing. You can harvest individual stalks or the entire plant at once.
5. **Consider Succession Planting:** To ensure a continuous supply of celery, consider starting new celery bases every few weeks. This way, you’ll always have a fresh batch of celery ready to harvest.
Troubleshooting Tips
Even with the best care, you may encounter some challenges when regrowing celery. Here are a few troubleshooting tips to help you overcome common problems:
* **Celery Base Not Rooting:** If your celery base isn’t rooting, make sure it’s getting enough sunlight and that you’re changing the water regularly. You can also try adding a small amount of rooting hormone to the water.
* **Leaves Turning Yellow:** Yellowing leaves can be a sign of overwatering, underwatering, or nutrient deficiency. Adjust your watering schedule and fertilize the plant if necessary.
* **Plant Wilting:** Wilting can be caused by lack of water or excessive heat. Make sure the soil is moist and provide shade during the hottest part of the day.
* **Pests Infestation:** Regularly inspect your plant for pests. Treat any infestations promptly with appropriate pest control methods.
Enjoy Your Homegrown Celery!
Congratulations! You’ve successfully regrown celery from a scrap. Now you can enjoy fresh, homegrown celery in your favorite recipes, knowing that you’ve reduced food waste and saved money in the process. This is a rewarding and sustainable way to enjoy this versatile vegetable. Happy gardening!

Conclusion
So, there you have it! The secret to an endless celery harvest, right from your kitchen scraps. This isn’t just about saving money; it’s about reducing food waste, connecting with the growing process, and enjoying the unparalleled freshness of homegrown celery. Forget those limp, store-bought stalks that have traveled miles – imagine crisp, vibrant celery, bursting with flavor, ready whenever you need it.
This DIY trick is a must-try for several reasons. First, it’s incredibly simple. You don’t need a green thumb or any special equipment. If you can chop celery, you can do this. Second, it’s sustainable. You’re giving new life to something that would otherwise end up in the compost bin, contributing to a more eco-friendly lifestyle. Third, it’s rewarding. Watching your celery regrow is a surprisingly satisfying experience, a small victory in the realm of self-sufficiency.
But the best part? You can experiment! Try different varieties of celery to see which regrows best in your environment. Consider planting your regrown celery in different types of soil or containers to optimize its growth. You can even try this method with other vegetables like lettuce or bok choy, expanding your kitchen garden even further.
Don’t be afraid to get creative! Once your celery is established, you can start harvesting individual stalks as needed, allowing the plant to continue producing. Or, if you prefer, you can let it fully mature and harvest the entire head. The choice is yours!
We’re confident that once you try this simple DIY trick, you’ll be hooked. The satisfaction of growing your own food, the savings on your grocery bill, and the reduced environmental impact all add up to a truly worthwhile endeavor.
So, grab that celery base, give it a little water and sunshine, and prepare to be amazed. We encourage you to try this endless celery harvest method and share your experiences with us! Let us know in the comments how your celery is growing, any tips or tricks you’ve discovered, and any variations you’ve tried. We can’t wait to hear your success stories and learn from your experiences. Happy growing!
Frequently Asked Questions (FAQ)
How long does it take for celery to regrow using this method?
The initial regrowth, where you see new green shoots emerging from the celery base, typically takes about 5-7 days. However, to get a substantial celery stalk that’s ready for harvesting, it can take anywhere from 4-6 weeks, depending on the conditions. Factors like sunlight, water, and temperature all play a role in the speed of growth. Be patient, and you’ll be rewarded with fresh celery!
What kind of light does the celery need to regrow?
Celery needs bright, indirect sunlight to thrive. Avoid placing it in direct sunlight, especially during the hottest part of the day, as this can scorch the leaves. A spot near a sunny window that receives filtered light is ideal. If you don’t have a naturally sunny spot, you can supplement with a grow light.
How often should I water the celery base?
Keep the celery base consistently moist, but not waterlogged. Check the soil daily and water when the top inch feels dry to the touch. Overwatering can lead to root rot, so ensure the pot has good drainage. A good rule of thumb is to water every 2-3 days, but adjust based on your local climate and the humidity levels in your home.
What kind of soil is best for regrowing celery?
A well-draining potting mix is best for regrowing celery. You can use a standard potting mix or create your own by combining equal parts of potting soil, perlite, and compost. The perlite helps with drainage, while the compost provides essential nutrients for healthy growth. Avoid using garden soil, as it can be too heavy and compact, hindering root development.
Can I regrow celery indoors permanently, or will I eventually need to plant it outside?
You can successfully regrow celery indoors permanently, provided you meet its needs for light, water, and nutrients. However, celery generally thrives better outdoors in a garden setting, where it has access to more sunlight and space to grow. If you live in a climate with mild winters, you can transplant your regrown celery outdoors in the spring. If you live in a colder climate, you can keep it indoors year-round, but be sure to provide adequate light and fertilizer.
What if my celery base starts to rot?
If you notice that your celery base is starting to rot, it’s likely due to overwatering or poor drainage. Remove any rotten parts and repot the celery base in fresh, well-draining soil. Ensure the pot has drainage holes and avoid overwatering in the future. You can also try adding a small amount of hydrogen peroxide to the water to help kill any bacteria or fungi that may be causing the rot.
Can I use this method to regrow celery from organic or non-organic celery?
Yes, you can use this method to regrow celery from both organic and non-organic celery. However, using organic celery is generally recommended, as it will be free from pesticides and other chemicals. Regardless of whether you use organic or non-organic celery, be sure to wash the base thoroughly before planting it.
How do I harvest the regrown celery?
Once your celery has grown to a desired size, you can harvest it by cutting off the outer stalks with a sharp knife. Leave the inner stalks intact, and the plant will continue to produce more celery. Alternatively, you can harvest the entire head of celery by cutting it off at the base.
Can I regrow celery from the individual stalks, or does it have to be the base?
You can only regrow celery from the base of the stalk, where the roots are located. Individual stalks will not regrow on their own. The base contains the necessary meristematic tissue that allows for new growth.
What are some common problems I might encounter when regrowing celery, and how can I fix them?
Some common problems include:
* Yellowing leaves: This can be caused by overwatering, underwatering, or a lack of nutrients. Adjust your watering schedule and fertilize with a balanced fertilizer.
* Stunted growth: This can be caused by insufficient light or poor soil. Move your celery to a sunnier location and repot it in fresh, well-draining soil.
* Pests: Celery can be susceptible to pests like aphids and spider mites. Inspect your plants regularly and treat any infestations with insecticidal soap or neem oil.
Is there a specific type of fertilizer that works best for regrowing celery?
A balanced, water-soluble fertilizer is ideal for regrowing celery. Look for a fertilizer with an NPK ratio (nitrogen, phosphorus, potassium) of around 10-10-10 or 20-20-20. Dilute the fertilizer according to the package instructions and apply it every 2-3 weeks during the growing season. Avoid over-fertilizing, as this can burn the roots.
Can I grow celery from seed after regrowing it from the base?
Yes, you can potentially grow celery from seed after regrowing it from the base. Celery is a biennial plant, meaning it typically takes two years to produce seeds. In the first year, it focuses on vegetative growth (producing stalks and leaves). If you allow your regrown celery to overwinter (either indoors or in a mild climate), it may bolt (send up a flower stalk) in the second year. These flowers will eventually produce seeds. However, keep in mind that celery can be challenging to grow from seed, and the resulting plants may not be identical to the parent plant.
What are some creative ways to use my homegrown celery?
Beyond the usual snacks and soups, get creative! Use your homegrown celery in smoothies for a refreshing boost, juice it for a healthy cleanse, or pickle it for a tangy condiment. You can also use the leaves in salads or as a garnish. Don’t forget to save the celery trimmings to make vegetable broth! The possibilities are endless.

Leave a Comment