
Easy Potato Growing Guide
I’ve always loved the taste of homegrown potatoes – that earthy, fresh flavor you just can’t get from the supermarket. That’s why I’m so excited to share my Easy Potato Growing Guide with you! This isn’t your grandma’s potato patch (though she might have some great tips too!). This guide is packed with simple, effective DIY tricks and hacks to help you cultivate a bountiful harvest, even if you’ve never grown a potato before. From choosing the right seed potatoes to harvesting your delicious crop, I’ll walk you through every step of the process.
Growing potatoes has a rich history, dating back thousands of years to the Andes Mountains in South America. These humble tubers have become a global staple, feeding billions and playing a vital role in countless cultures. But there’s something truly special about growing your own – it connects you to this ancient history and provides a rewarding experience.
Why bother with this Easy Potato Growing Guide and the effort of growing your own potatoes? Well, for starters, homegrown potatoes taste incredible! But beyond the deliciousness, there’s a sense of accomplishment that comes with nurturing a plant from a small seed potato to a flourishing plant yielding a generous harvest. You’ll also know exactly where your food comes from, avoiding pesticides and other potentially harmful chemicals. Plus, it’s a fantastically rewarding project for the whole family, especially kids who love getting their hands dirty!
So, whether you have a sprawling garden or just a small balcony, this Easy Potato Growing Guide will empower you to grow your own delicious potatoes. Let’s get started!
My Easy Potato Growing Guide: From Spud to Supper
I’ve always loved potatoes, and nothing beats the taste of homegrown ones. This guide will walk you through growing your own potatoes, even if you’ve never gardened before. It’s easier than you think!
Choosing Your Potatoes and Getting Started
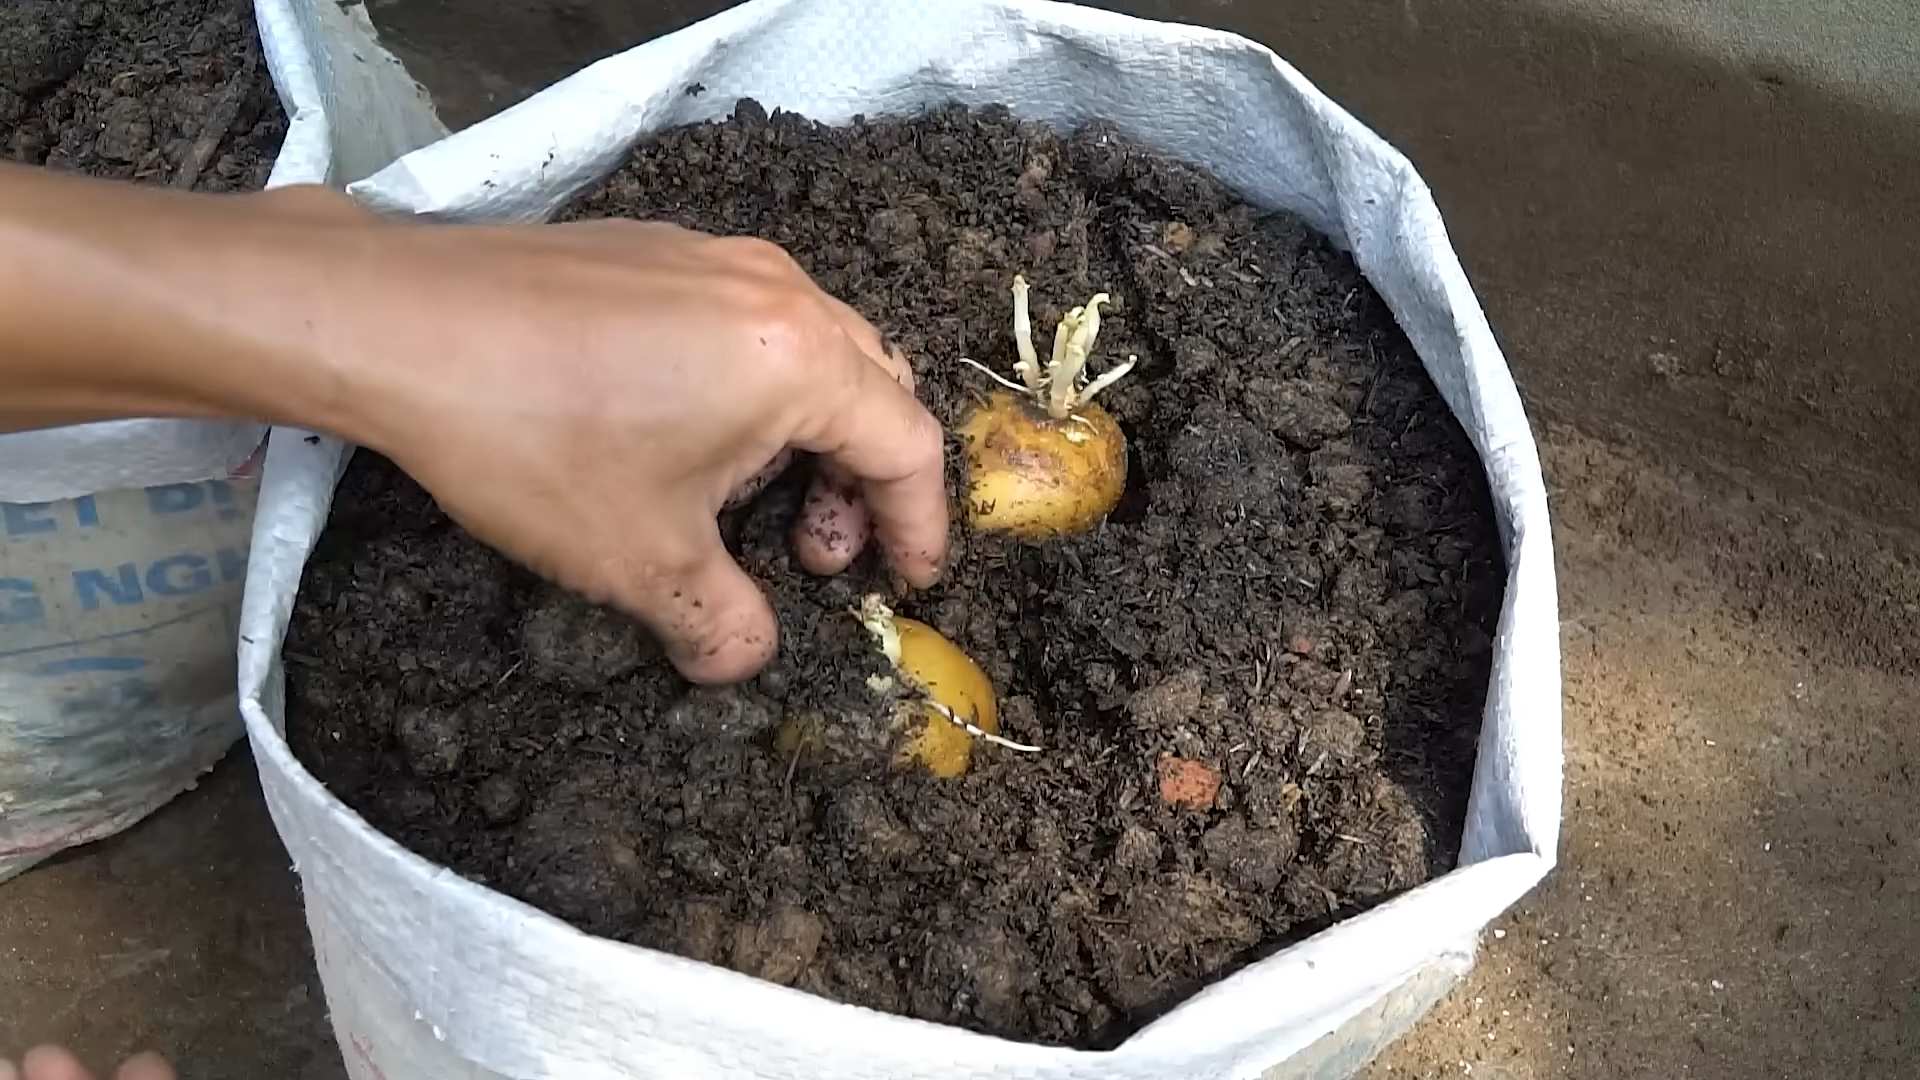
- Select Seed Potatoes: Don’t use potatoes from the grocery store unless specifically labeled as “seed potatoes”. These are treated to prevent sprouting, which is what we need! Certified seed potatoes are best, as they’re disease-free. Look for firm, healthy potatoes with no signs of rot or damage. I usually buy a few pounds, depending on how many potatoes I want to grow.
- Prepare Your Seed Potatoes: About 4-6 weeks before your last expected frost, it’s time to prepare your seed potatoes. Cut each potato into several pieces, ensuring each piece has at least one or two “eyes” (the little buds where sprouts will emerge). Make sure each piece is a decent size – about 2-3 inches. Let the cut pieces sit out for a day or two to allow the cut surfaces to callous over. This helps prevent rot.
- Choose Your Location: Potatoes need at least 6-8 hours of sunlight per day. Select a sunny spot in your garden with well-drained soil. Poor drainage can lead to rot. I usually amend my soil with compost before planting to improve drainage and fertility.
- Soil Preparation: Potatoes thrive in loose, well-drained soil. Amend heavy clay soils with organic matter like compost or well-rotted manure to improve drainage and aeration. Test your soil pH; potatoes prefer slightly acidic to neutral soil (pH 5.5-7.0).
Planting Your Seed Potatoes
- Digging the Planting Holes: Dig shallow trenches or holes, about 4-6 inches deep, spaced about 12-18 inches apart. The spacing depends on the variety of potato you’re growing; check the seed potato packaging for specific recommendations.
- Planting the Cuttings: Place the cut pieces of seed potato in the trenches or holes, eyes facing upwards. Cover them with about 4 inches of soil. Don’t bury them too deep; this can hinder sprouting.
- Watering: Water gently after planting to settle the soil around the potatoes. Avoid overwatering, which can lead to rot.
Potato Plant Care: Hilling and Weeding
- Hilling: As the potato plants grow, they will start to produce stems and leaves. Once the plants are about 6 inches tall, start “hilling”. This involves gradually adding more soil around the base of the plants, covering the lower stems. This encourages the potatoes to grow more tubers. I usually hill my potatoes a couple of times during the growing season, adding a few inches of soil each time.
- Weeding: Regularly remove weeds from around your potato plants. Weeds compete with the potatoes for nutrients and water. Mulching can help suppress weeds and retain moisture.
- Watering: Keep the soil consistently moist, but not waterlogged. Water deeply and less frequently rather than shallowly and often. The frequency of watering will depend on your climate and rainfall.
- Pest and Disease Control: Regularly inspect your plants for signs of pests or diseases. Common potato pests include Colorado potato beetles and aphids. If you find pests, you can try handpicking them or using an organic insecticide. For diseases, good soil drainage and proper spacing are key to prevention.
Harvesting Your Homegrown Potatoes
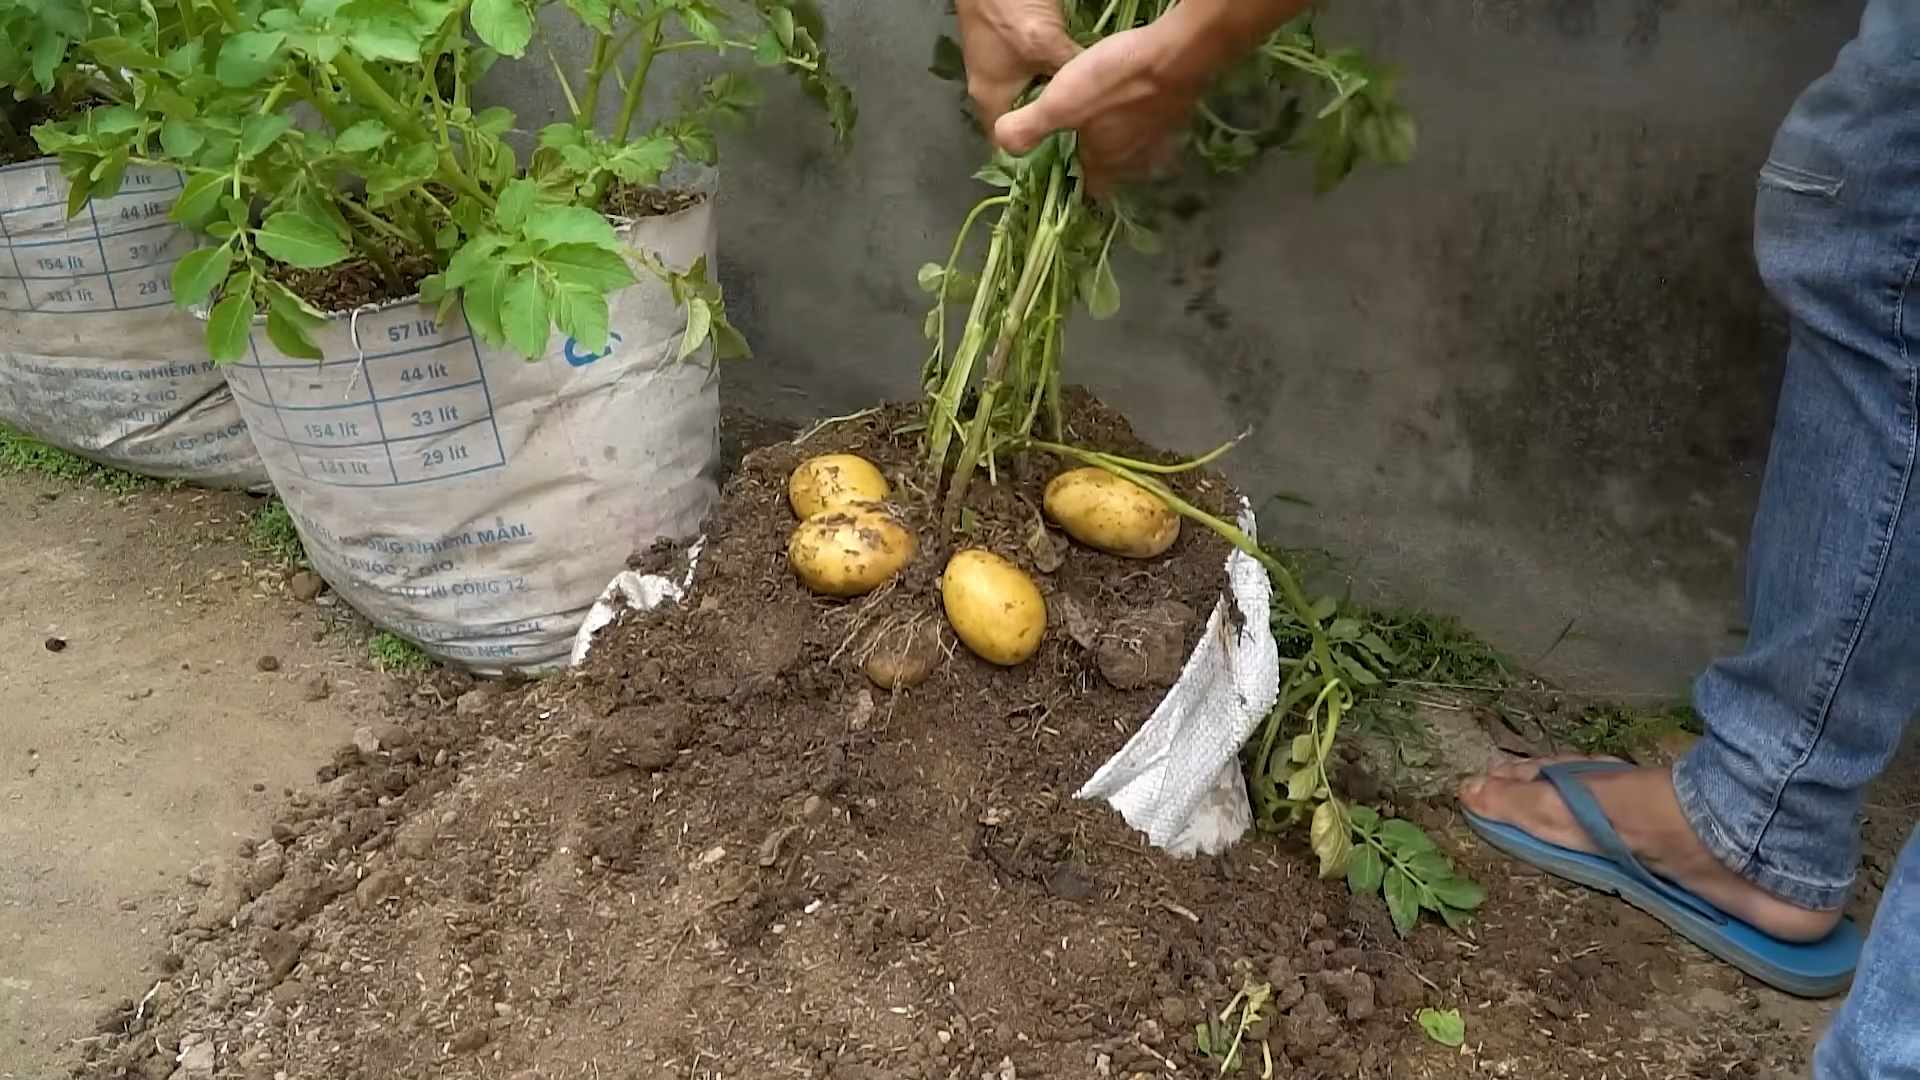
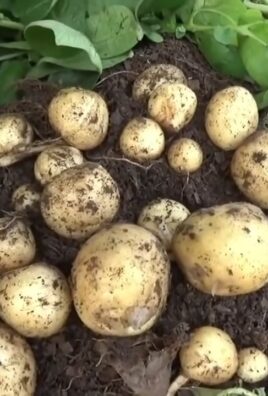
- Knowing When to Harvest: The harvesting time depends on the variety of potato you’ve planted and the growing season. Early potatoes are usually ready to harvest in about 70-80 days, while later varieties may take 90-120 days. The plants will start to flower, and then the foliage will begin to die back. This is a good indication that the potatoes are ready.
- Harvesting Techniques: Gently dig around the base of the plants to avoid damaging the potatoes. Use a garden fork or trowel to carefully lift the potatoes from the soil. Be careful not to bruise them.
- Cleaning and Curing: Once harvested, gently brush off any excess soil. Allow the potatoes to cure in a cool, dark, and well-ventilated area for a few days to a week. This allows the skins to toughen up and prevents them from spoiling quickly. I usually spread them out on a newspaper in a cool, dry place.
- Storing Your Potatoes: After curing, store your potatoes in a cool, dark, and dry p
I’ve always loved potatoes, and nothing beats the taste of homegrown ones. This guide will walk you through growing your own potatoes, even if you’ve never gardened before. It’s easier than you think!
Choosing Your Potatoes and Getting Started
- Select Seed Potatoes: Don’t use potatoes from the grocery store unless specifically labeled as “seed potatoes”. These are treated to prevent sprouting, which is what we need! Certified seed potatoes are best, as they’re disease-free. Look for firm, healthy potatoes with no signs of rot or damage. I usually buy a few pounds, depending on how many potatoes I want to grow.
- Prepare Your Seed Potatoes: About 4-6 weeks before your last expected frost, it’s time to prepare your seed potatoes. Cut each potato into several pieces, ensuring each piece has at least one or two “eyes” (the little buds where sprouts will emerge). Make sure each piece is a decent size – about 2-3 inches. Let the cut pieces sit out for a day or two to allow the cut surfaces to callous over. This helps prevent rot.
- Choose Your Location: Potatoes need at least 6-8 hours of sunlight per day. Select a sunny spot in your garden with well-drained soil. Poor drainage can lead to rot. I usually amend my soil with compost before planting to improve drainage and fertility.
- Soil Preparation: Potatoes thrive in loose, well-drained soil. Amend heavy clay soils with organic matter like compost or well-rotted manure to improve drainage and aeration. Test your soil pH; potatoes prefer slightly acidic to neutral soil (pH 5.5-7.0).
Planting Your Seed Potatoes
- Digging the Planting Holes: Dig shallow trenches or holes, about 4-6 inches deep, spaced about 12-18 inches apart. The spacing depends on the variety of potato you’re growing; check the seed potato packaging for specific recommendations.
- Planting the Cuttings: Place the cut pieces of seed potato in the trenches or holes, eyes facing upwards. Cover them with about 4 inches of soil. Don’t bury them too deep; this can hinder sprouting.
- Watering: Water gently after planting to settle the soil around the potatoes. Avoid overwatering, which can lead to rot.
Potato Plant Care: Hilling and Weeding
- Hilling: As the potato plants grow, they will start to produce stems and leaves. Once the plants are about 6 inches tall, start “hilling”. This involves gradually adding more soil around the base of the plants, covering the lower stems. This encourages the potatoes to grow more tubers. I usually hill my potatoes a couple of times during the growing season, adding a few inches of soil each time.
- Weeding: Regularly remove weeds from around your potato plants. Weeds compete with the potatoes for nutrients and water. Mulching can help suppress weeds and retain moisture.
- Watering: Keep the soil consistently moist, but not waterlogged. Water deeply and less frequently rather than shallowly and often. The frequency of watering will depend on your climate and rainfall.
- Pest and Disease Control: Regularly inspect your plants for signs of pests or diseases. Common potato pests include Colorado potato beetles and aphids. If you find pests, you can try handpicking them or using an organic insecticide. For diseases, good soil drainage and proper spacing are key to prevention.
Harvesting Your Homegrown Potatoes
- Knowing When to Harvest: The harvesting time depends on the variety of potato you’ve planted and the growing season. Early potatoes are usually ready to harvest in about 70-80 days, while later varieties may take 90-120 days. The plants will start to flower, and then the foliage will begin to die back. This is a good indication that the potatoes are ready.
- Harvesting Techniques: Gently dig around the base of the plants to avoid damaging the potatoes. Use a garden fork or trowel to carefully lift the potatoes from the soil. Be careful not to bruise them.
- Cleaning and Curing: Once harvested, gently brush off any excess soil. Allow the potatoes to cure in a cool, dark, and well-ventilated area for a few days to a week. This allows the skins to toughen up and prevents them from spoiling quickly. I usually spread them out on a newspaper in a cool, dry place.
- Storing Your Potatoes: After curing, store your potatoes in a cool, dark, and dry place. A root cellar is ideal, but a cool pantry or basement will also work. Avoid storing them in direct sunlight or in temperatures above 50°F (10°C). Proper storage can extend the shelf life of your potatoes for several months.
Tips for Success
Choosing the Right Potato Variety:
Different potato varieties have different characteristics, such as size, taste, and growing season. Research different varieties to find ones that suit your climate and preferences. Some varieties are better suited for early harvesting, while others are better for storage.
Fertilizing Your Potatoes:
While potatoes don’t require heavy fertilization, adding a balanced fertilizer can improve yields. Use a fertilizer specifically formulated for potatoes, following the package instructions carefully. Over-fertilizing can lead to poor quality potatoes.
Protecting Your Potatoes from Frost:
If you live in an area with late frosts, protect your potato plants by covering them with row covers or other frost protection measures. Frost can damage the plants and reduce yields.
Troubleshooting:
If you encounter problems with your potato plants, such as pests or diseases, consult a gardening resource or your local agricultural extension office for advice. Early detection and treatment are key to preventing major problems.
Conclusion
So there you have it – your comprehensive guide to effortlessly growing potatoes! This easy potato growing guide isn’t just about planting tubers in the ground; it’s about unlocking the potential of your backyard and experiencing the unparalleled satisfaction of harvesting your own homegrown spuds. This DIY trick is a must-try because it simplifies the process, making potato cultivation accessible to everyone, regardless of gardening experience. You’ll be amazed at how easy it is to nurture these versatile plants from humble seed potatoes to a bountiful harvest. The taste difference between homegrown and store-bought potatoes is remarkable – a freshness and earthiness that simply can’t be replicated. Beyond the delicious reward, growing your own potatoes is a rewarding and sustainable practice, reducing your carbon footprint and connecting you more deeply with the natural world.
Beyond the basic method outlined, there are countless ways to personalize your potato growing adventure. Experiment with different potato varieties – each boasting unique flavors and textures. Consider growing potatoes in containers if you have limited space; this method is surprisingly effective and allows for easy mobility. For those with larger gardens, explore the benefits of companion planting, incorporating herbs like rosemary or marigolds to deter pests and improve soil health. You can also try different growing methods, such as using straw bales or even growing potatoes in vertical systems to maximize space utilization. The possibilities are endless, and the journey of discovery is half the fun!
We strongly encourage you to embark on this rewarding journey and try your hand at growing potatoes using this easy potato growing guide. Share your experience with us! We’d love to hear about your successes, challenges, and the delicious recipes you create with your homegrown harvest. Post your photos on social media using #HomegrownPotatoes and tag us – let’s build a community of fellow potato enthusiasts! Remember, even small successes are significant steps towards a more self-sufficient and fulfilling lifestyle. Don’t be afraid to experiment, learn from your mistakes, and most importantly, enjoy the process. Happy growing!
Frequently Asked Questions
What type of potatoes are best for growing at home?
Many potato varieties are suitable for home gardening. Early-season varieties like ‘Red Pontiac’ and ‘Yukon Gold’ are excellent choices for shorter growing seasons, offering a quick harvest. For larger yields and later-season harvests, consider ‘Russet Burbank’ or ‘Kennebec’. When selecting seed potatoes, choose firm, disease-free tubers with multiple ‘eyes’ (buds) for optimal growth.
How much sunlight do potatoes need?
Potatoes thrive in full sun, meaning at least six to eight hours of direct sunlight per day. Adequate sunlight is crucial for healthy growth and a bountiful harvest. If you have limited sunlight, consider supplementing with grow lights, especially during the early stages of growth.
What kind of soil is best for growing potatoes?
Potatoes prefer well-drained, loose soil that is rich in organic matter. Amend heavy clay soils with compost or other organic materials to improve drainage and aeration. Sandy soils may require more frequent watering to retain moisture. A slightly acidic soil pH (around 6.0) is ideal.
How often should I water my potatoes?
Consistent moisture is essential for healthy potato growth, but avoid overwatering, which can lead to rot. Water deeply and regularly, especially during dry periods. The frequency of watering will depend on your climate and soil type. Check the soil moisture regularly by sticking your finger a few inches into the ground – if it feels dry, it’s time to water.
When should I harvest my potatoes?
The harvesting time depends on the potato variety and planting time. Early-season varieties are typically ready to harvest in 70-80 days, while later-season varieties may take 90-120 days. Signs of readiness include wilting foliage and the development of mature-sized tubers. Gently dig around the plants to check for mature potatoes. If the potatoes are firm and the skin is easily rubbed off, they are ready for harvest.
What are some common problems when growing potatoes and how can I solve them?
Common potato problems include pests like Colorado potato beetles and diseases like blight. Regularly inspect your plants for signs of infestation or disease. For pests, handpicking or using insecticidal soap can be effective. For diseases, ensure good air circulation, avoid overhead watering, and consider using disease-resistant varieties. Rotating your potato crops annually can also help prevent disease buildup in the soil.
Can I grow potatoes in containers?
Absolutely! Container gardening is a great option for those with limited space. Use large containers (at least 15 gallons) with drainage holes. Fill the containers with a well-draining potting mix and plant your seed potatoes as you would in the ground. Ensure the containers receive adequate sunlight and water regularly.
What should I do with my potato harvest?
Enjoy your homegrown potatoes! They’re delicious boiled, mashed, roasted, fried, or used in countless other recipes. For long-term storage, cure your potatoes in a cool, dark, and dry place for a few weeks before storing them in a cool, dark, and well-ventilated area. Avoid storing potatoes in the refrigerator, as this can affect their flavor and texture.

Leave a Comment