
Easy mushroom growing at home might sound like something reserved for seasoned gardeners, but trust me, it’s more accessible than you think! Forget those intimidating images of sprawling farms; we’re talking about bringing the magic of fungi right into your kitchen, balcony, or even a spare closet.
For centuries, mushrooms have held a revered place in various cultures, from ancient medicinal practices in the East to culinary delicacies in Europe. They’re not just delicious; they’re packed with nutrients and offer a unique flavor profile that elevates any dish. But beyond their culinary appeal, growing your own mushrooms is incredibly rewarding. Imagine the satisfaction of harvesting fresh, organic mushrooms that you nurtured from start to finish!
In today’s world, where we’re increasingly conscious of where our food comes from and the impact of our choices, easy mushroom growing offers a fantastic way to connect with nature and reduce our reliance on store-bought produce. Plus, let’s be honest, who wouldn’t want to impress their friends and family with their newfound fungal farming skills? This DIY guide will break down the process into simple, manageable steps, so you can start enjoying homegrown mushrooms in no time. I’m excited to share these tips and tricks with you, so let’s get started!
Pilzzucht für Anfänger: Dein eigener Pilzgarten zu Hause
Hallo liebe Pilzfreunde! Habt ihr euch jemals gefragt, wie es wäre, eure eigenen köstlichen Pilze zu züchten? Ich kann euch sagen, es ist einfacher als ihr denkt! Mit ein wenig Geduld und den richtigen Materialien könnt ihr schon bald eure selbstgezogenen Pilze genießen. In diesem Artikel zeige ich euch, wie ihr das ganz einfach zu Hause machen könnt. Los geht’s!
Was ihr für eure Pilzzucht braucht
Bevor wir loslegen, hier eine Liste der Dinge, die ihr benötigt:
* Pilzbrut: Das ist das “Saatgut” für eure Pilze. Ihr könnt sie online oder in Gartencentern kaufen. Achtet darauf, die richtige Sorte für eure Bedingungen auszuwählen. Austernpilze und Shiitake sind gute Anfängerpilze.
* Substrat: Das ist das Material, auf dem eure Pilze wachsen werden. Stroh, Holzspäne, Kaffeesatz oder sogar alte Zeitungen können verwendet werden.
* Behälter: Eimer, Plastiktüten oder spezielle Pilzzuchtbeutel eignen sich gut.
* Sprühflasche: Um das Substrat feucht zu halten.
* Desinfektionsmittel: Um alles sauber zu halten und Kontaminationen zu vermeiden.
* Handschuhe: Um eure Hände sauber zu halten.
* Optional: Ein Thermometer und Hygrometer, um Temperatur und Luftfeuchtigkeit zu überwachen.
Die Vorbereitung des Substrats
Das Substrat ist die Grundlage für eure Pilzzucht. Es muss sterilisiert werden, um unerwünschte Mikroorganismen abzutöten, die mit euren Pilzen konkurrieren könnten. Hier sind zwei gängige Methoden:
Methode 1: Pasteurisierung mit heißem Wasser
Diese Methode ist ideal für Stroh und Holzspäne.
1. Substrat vorbereiten: Schneidet das Stroh in kurze Stücke (ca. 5-10 cm) oder verwendet Holzspäne.
2. Einweichen: Gebt das Substrat in einen großen Behälter (z.B. einen Eimer oder eine Wanne) und übergießt es mit kochendem Wasser. Achtet darauf, dass das gesamte Substrat bedeckt ist.
3. Einwirkzeit: Lasst das Substrat für mindestens eine Stunde im heißen Wasser einweichen. Dadurch werden die meisten unerwünschten Mikroorganismen abgetötet.
4. Abkühlen und Abtropfen: Gießt das Wasser ab und lasst das Substrat abkühlen, bis ihr es anfassen könnt, ohne euch zu verbrennen. Drückt überschüssiges Wasser aus, sodass das Substrat feucht, aber nicht nass ist. Es sollte sich anfühlen wie ein ausgedrückter Schwamm.
Methode 2: Sterilisation im Dampfkochtopf
Diese Methode ist effektiver, aber auch aufwendiger. Sie eignet sich gut für Kaffeesatz und andere dichtere Substrate.
1. Substrat vorbereiten: Gebt das Substrat in hitzebeständige Behälter (z.B. Einmachgläser oder spezielle Pilzzuchtbeutel).
2. Dampfkochtopf vorbereiten: Füllt den Dampfkochtopf mit Wasser gemäß den Anweisungen des Herstellers.
3. Sterilisieren: Stellt die Behälter mit dem Substrat in den Dampfkochtopf und sterilisiert sie für mindestens 90 Minuten bei 15 PSI (Pound per Square Inch).
4. Abkühlen lassen: Lasst den Dampfkochtopf vollständig abkühlen, bevor ihr ihn öffnet. Die Behälter mit dem Substrat sollten ebenfalls vollständig abkühlen, bevor ihr sie weiterverarbeitet.
Das Beimpfen des Substrats
Jetzt kommt der spannende Teil: das Beimpfen des Substrats mit der Pilzbrut!
1. Arbeitsbereich vorbereiten: Reinigt euren Arbeitsbereich gründlich mit Desinfektionsmittel. Tragt Handschuhe, um Kontaminationen zu vermeiden.
2. Substrat und Brut vermischen: Nehmt das vorbereitete Substrat und die Pilzbrut. Mischt beides gründlich miteinander. Die Menge der Brut hängt von der Art des Pilzes und der Größe des Substrats ab. Als Faustregel gilt: etwa 5-10% Brut pro Substratmenge.
3. In Behälter füllen: Füllt das beimpfte Substrat in eure Behälter (Eimer, Tüten usw.). Achtet darauf, dass das Substrat nicht zu stark verdichtet wird, damit die Pilze gut wachsen können.
4. Löcher bohren (optional): Wenn ihr Eimer oder Tüten verwendet, bohrt kleine Löcher (ca. 5-10 mm Durchmesser) in die Seiten, um die Belüftung zu verbessern.
Die Inkubationsphase
In dieser Phase wächst das Myzel (das Pilzgeflecht) im Substrat.
1. Geeigneten Ort finden: Stellt die Behälter an einen dunklen, kühlen und gut belüfteten Ort. Die ideale Temperatur hängt von der Pilzart ab, liegt aber meist zwischen 18 und 24 Grad Celsius.
2. Luftfeuchtigkeit kontrollieren: Die Luftfeuchtigkeit sollte hoch sein (ca. 80-90%). Ihr könnt die Behälter mit Plastikfolie abdecken oder sie in einem Raum mit hoher Luftfeuchtigkeit aufstellen.
3. Wachstum beobachten: Überprüft regelmäßig, ob das Myzel wächst. Es sollte sich als weißes, flaumiges Geflecht auf dem Substrat ausbreiten.
4. Geduld haben: Die Inkubationsphase kann je nach Pilzart und Bedingungen einige Wochen dauern.
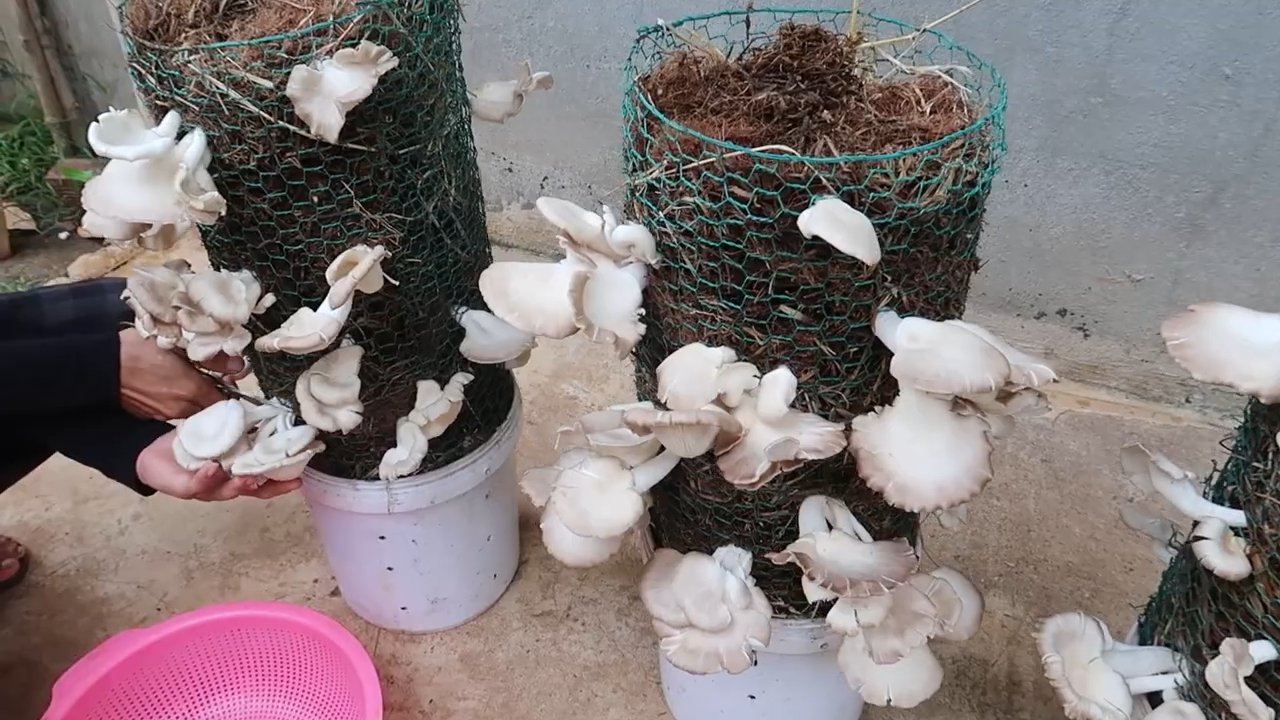
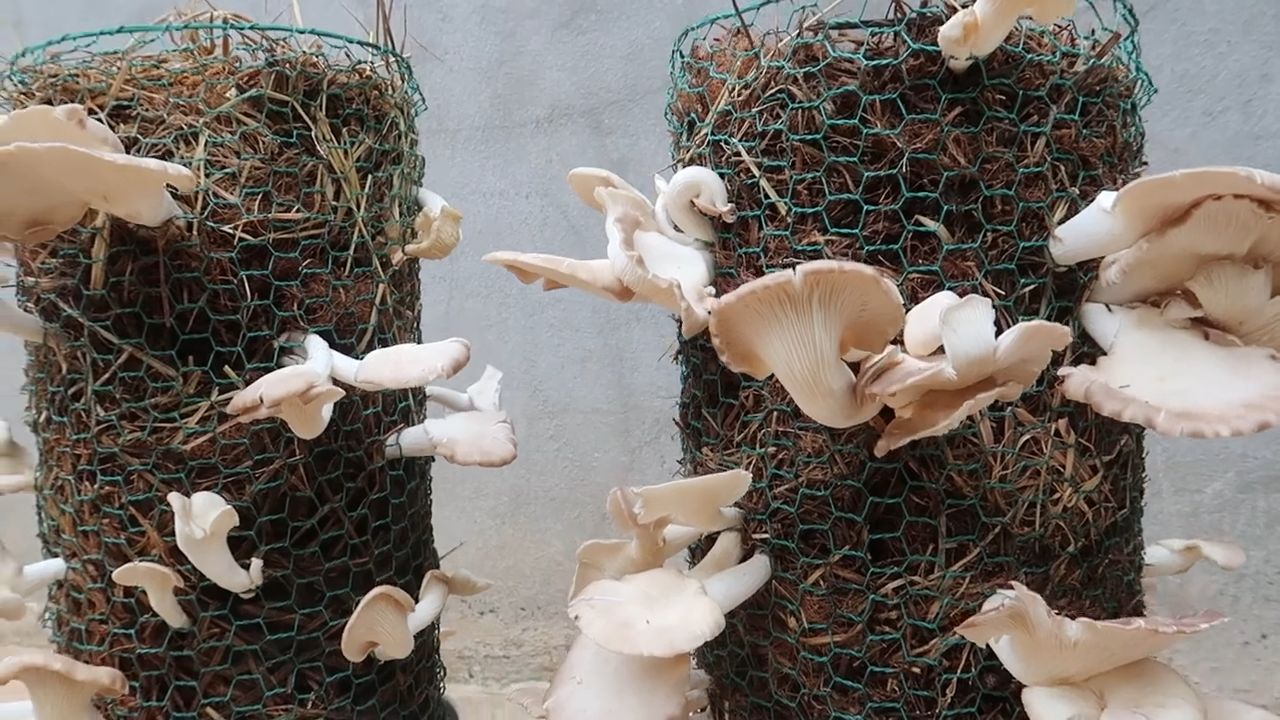
Die Fruchtungsphase
Wenn das Myzel das gesamte Substrat durchdrungen hat, ist es Zeit für die Fruchtungsphase, in der die Pilze wachsen.
1. Licht: Bringt die Behälter an einen Ort mit indirektem Licht. Pilze brauchen Licht, um zu wachsen, aber direktes Sonnenlicht kann sie austrocknen.
2. Luftfeuchtigkeit erhöhen: Erhöht die Luftfeuchtigkeit noch weiter, indem ihr die Behälter regelmäßig mit Wasser besprüht oder sie in einem Gewächshaus aufstellt.
3. Belüftung: Sorgt für gute Belüftung, um Schimmelbildung zu vermeiden.
4. Temperatur: Haltet die Temperatur im optimalen Bereich für eure Pilzart.
5. Pilze beobachten: Beobachtet, wie die Pilze wachsen. Sie sollten innerhalb weniger Tage ihre volle Größe erreichen.
Die Ernte
Endlich ist es soweit: Ihr könnt eure eigenen Pilze ernten!
1. Erntezeitpunkt: Erntet die Pilze, wenn sie ihre volle Größe erreicht haben, aber bevor sie anfangen, Sporen abzuwerfen.
2. Erntemethode: Dreht oder schneidet die Pilze vorsichtig vom Substrat ab.
3. Lagerung: Lagert die geernteten Pilze im Kühlschrank. Sie sind am besten, wenn sie innerhalb weniger Tage verzehrt werden.
Nach der Ernte
Nach der ersten Ernte könnt ihr oft noch weitere Ernten erzielen.
1. Substrat befeuchten: Befeuchtet das Substrat erneut, indem ihr es mit Wasser besprüht.
2. Bedingungen beibehalten: Haltet die gleichen Bedingungen wie in der Fruchtungsphase aufrecht.
3. Weitere Ernten: Mit etwas Glück könnt ihr noch mehrere Ernten von demselben Substrat erzielen.
Häufige Probleme und Lösungen
* Schimmelbildung: Wenn ihr Schimmel auf dem Substrat entdeckt, ist es wahrscheinlich kontaminiert. Entfernt den befallenen Bereich oder entsorgt das gesamte Substrat. Sorgt für bessere Belüftung und verwendet saubere Materialien.
* Keine Pilze: Wenn keine Pilze wachsen, kann das an verschiedenen Faktoren liegen: falsche Temperatur, zu wenig Licht, zu wenig Feuchtigkeit oder eine schlechte Brut. Überprüft eure Bedingungen und passt sie gegebenenfalls an.
* Kleine Pilze: Wenn die Pilze klein bleiben, kann das an Nährstoffmangel liegen. Versucht, dem Substrat etwas Kompost oder andere organische Materialien hinzuzufügen.
Zusätzliche Tipps
* Recherche: Informiert euch gründlich über die Pilzart, die ihr züchten möchtet. Jede Art hat ihre eigenen spezifischen Anforderungen.
* Sa
Conclusion
So, there you have it! Mastering the art of easy mushroom growing at home is not only achievable but also incredibly rewarding. We’ve walked you through a simple, effective method that transforms readily available materials into a thriving mushroom farm right in your own kitchen, basement, or garden shed. Forget the complicated setups and expensive equipment often associated with mushroom cultivation. This DIY approach is all about accessibility, sustainability, and, most importantly, delicious, fresh mushrooms.
Why is this a must-try? Because it empowers you to take control of your food source, reduce your reliance on store-bought produce, and enjoy the unparalleled flavor and nutritional benefits of homegrown mushrooms. Imagine the satisfaction of harvesting your own oyster mushrooms for a creamy pasta sauce, or adding shiitakes to a hearty stir-fry, all grown with your own hands. The possibilities are endless!
But the benefits extend beyond the culinary. Growing your own mushrooms is a fantastic way to recycle organic waste, turning coffee grounds, straw, and cardboard into a valuable resource. It’s an environmentally friendly practice that contributes to a more sustainable lifestyle. Plus, the process itself is fascinating and educational, offering a unique glimpse into the world of fungi and their vital role in our ecosystem.
Don’t be afraid to experiment! Once you’ve mastered the basic technique, you can explore different mushroom varieties. Try growing lion’s mane for its unique texture and brain-boosting properties, or experiment with different substrates to see how they affect the flavor and yield of your mushrooms. You can even try adding supplements to your substrate to boost growth and nutrient content. Consider adding a small amount of gypsum or agricultural lime to your substrate to help balance the pH and provide essential minerals.
Consider these variations to elevate your mushroom growing experience:
* **Vertical Gardening:** If space is limited, consider a vertical mushroom garden using stacked containers or hanging bags. This maximizes your growing area and adds a visually appealing element to your home.
* **Outdoor Mushroom Beds:** For a larger-scale operation, create an outdoor mushroom bed in a shady, moist area of your garden. This is ideal for growing wood-loving mushrooms like wine caps or oyster mushrooms.
* **Mushroom Logs:** Inoculate logs with mushroom spawn for a long-term, low-maintenance mushroom source. This method is particularly well-suited for shiitake and oyster mushrooms.
We are confident that you’ll find this DIY mushroom growing trick to be both enjoyable and fruitful. It’s a project that offers a tangible connection to nature, a delicious reward for your efforts, and a sustainable way to enhance your diet.
So, what are you waiting for? Gather your materials, follow the steps outlined in this guide, and embark on your mushroom growing adventure today! We encourage you to share your experiences, successes, and challenges with us. Post photos of your mushroom harvests, share your favorite recipes, and let us know what you’ve learned along the way. Your feedback will help us refine this guide and inspire others to discover the joys of easy mushroom growing. Happy growing!
Frequently Asked Questions (FAQ)
What are the best types of mushrooms to grow for beginners?
Oyster mushrooms are generally considered the easiest mushrooms to grow for beginners. They are fast-growing, relatively tolerant of different conditions, and can be grown on a variety of substrates, including straw, coffee grounds, and cardboard. Shiitake mushrooms are another good option, although they require a bit more patience as they take longer to fruit. Wine cap mushrooms are also a great choice for outdoor gardens. Avoid more demanding varieties like morels or truffles when you are starting out.
What is the best substrate for growing mushrooms?
The best substrate depends on the type of mushroom you are growing. Oyster mushrooms thrive on straw, coffee grounds, and cardboard. Shiitake mushrooms prefer hardwood logs or sawdust. Wine cap mushrooms do well in wood chips and straw. It’s important to research the specific substrate requirements of the mushroom variety you choose. Make sure your substrate is properly pasteurized or sterilized to eliminate competing organisms.
How do I pasteurize or sterilize my substrate?
Pasteurization involves heating the substrate to a temperature that kills most harmful microorganisms without completely sterilizing it. This can be done by soaking the substrate in hot water (around 160-180°F) for an hour or two. Sterilization involves heating the substrate to a higher temperature (usually in an autoclave or pressure cooker) to kill all microorganisms. Sterilization is generally recommended for more demanding mushroom varieties or when using substrates that are prone to contamination.
How long does it take for mushrooms to grow?
The time it takes for mushrooms to grow depends on the variety, the substrate, and the environmental conditions. Oyster mushrooms can typically be harvested within a few weeks of inoculation. Shiitake mushrooms may take several months to fruit, especially when grown on logs. Maintaining optimal temperature and humidity levels is crucial for faster growth.
What are the ideal temperature and humidity conditions for mushroom growing?
The ideal temperature and humidity conditions vary depending on the mushroom variety. Oyster mushrooms generally prefer temperatures between 60-75°F and high humidity (80-90%). Shiitake mushrooms prefer cooler temperatures (50-70°F) and moderate humidity (70-80%). Maintaining consistent humidity is essential to prevent the substrate from drying out. You can use a humidifier or mist the growing area regularly to increase humidity.
How do I prevent contamination in my mushroom grow?
Contamination is a common challenge in mushroom growing. To minimize the risk of contamination, it’s important to work in a clean environment, use sterile or pasteurized substrates, and maintain good hygiene practices. Avoid introducing contaminants by washing your hands thoroughly before handling the substrate or spawn. Keep the growing area free of dust and debris. If you notice any signs of contamination (e.g., mold, unusual odors), remove the affected area immediately.
How often should I water my mushrooms?
The frequency of watering depends on the humidity levels and the type of substrate. The goal is to keep the substrate moist but not waterlogged. Check the moisture level regularly by squeezing a handful of substrate. If water drips out, it’s too wet. If it feels dry, it needs to be watered. Mist the growing area regularly to maintain high humidity.
What do I do after harvesting my mushrooms?
After harvesting your mushrooms, you can often get multiple flushes (subsequent harvests) from the same substrate. To encourage further flushes, soak the substrate in water for a few hours and then drain it. This rehydrates the substrate and stimulates new growth. Continue to maintain optimal temperature and humidity conditions.
Can I use spent coffee grounds for mushroom growing?
Yes, spent coffee grounds are an excellent substrate for growing oyster mushrooms. They are rich in nutrients and have already been pasteurized during the brewing process. However, it’s important to use fresh coffee grounds (within a day or two of brewing) to prevent contamination. Mix the coffee grounds with other substrates like straw or cardboard for best results.
Is easy mushroom growing safe?
Yes, growing edible mushrooms at home is generally safe, as long as you properly identify the mushroom species and follow safe handling practices. Only consume mushrooms that you are 100% certain are edible. Avoid eating wild mushrooms unless you are an experienced forager. Wash your hands thoroughly after handling mushrooms or substrates. If you have any allergies or sensitivities, consult with a healthcare professional before consuming homegrown mushrooms.
Leave a Comment