
Easy banana growing method – sounds like a tropical dream, right? Well, it doesn’t have to be just a dream! Imagine stepping into your backyard and harvesting your own sweet, delicious bananas. No more trips to the grocery store for this potassium-packed fruit!
For centuries, bananas have been a staple food in many cultures, particularly in Southeast Asia, where they originated. They’ve been revered not only for their nutritional value but also for their versatility. From savory dishes to sweet treats, bananas have played a significant role in culinary traditions worldwide. But what if I told you that you could bring a piece of that tropical heritage right to your own home, regardless of your climate?
That’s where this DIY guide comes in. Many people believe that growing bananas is only possible in tropical climates, but I’m here to debunk that myth! With a few clever tricks and a little bit of effort, you can successfully cultivate your own banana plants, even if you live in a cooler region. This easy banana growing method will save you money, reduce your carbon footprint, and give you the immense satisfaction of nurturing your own food source. Plus, imagine the bragging rights! So, let’s dive in and unlock the secrets to growing your own banana bounty!
Grow Your Own Bananas: A Simple DIY Guide
Hey there, fellow plant enthusiasts! Ever dreamt of picking your own ripe, delicious bananas right from your backyard? Well, guess what? It’s totally achievable, even if you don’t live in a tropical paradise! I’m going to walk you through a super easy DIY method that’ll have you enjoying homegrown bananas before you know it.
Choosing the Right Banana Variety
Before we dive into the nitty-gritty, let’s talk bananas! Not all banana varieties are created equal, especially when it comes to growing them in non-tropical climates. You’ll want to choose a variety that’s relatively cold-hardy and doesn’t require scorching temperatures to thrive. Here are a few of my favorites:
* Dwarf Cavendish: This is a popular choice for home growers because it’s relatively small (hence the “dwarf”) and produces tasty, medium-sized bananas. It’s also fairly cold-tolerant.
* Rajapuri: Another dwarf variety, Rajapuri bananas are known for their sweet flavor and creamy texture. They’re also quite resilient.
* Ice Cream (Blue Java): If you’re feeling adventurous, try growing Ice Cream bananas! They have a unique flavor that’s often compared to vanilla ice cream. Plus, the fruit has a bluish tint when unripe, which is pretty cool.
* Orinoco: This variety is known for its cold hardiness and can withstand temperatures down to around 20°F for short periods. The bananas are shorter and thicker than Cavendish.
Important Note: Always check the specific hardiness zone for the variety you choose to ensure it’s suitable for your climate.
Getting Started: Planting Your Banana Plant
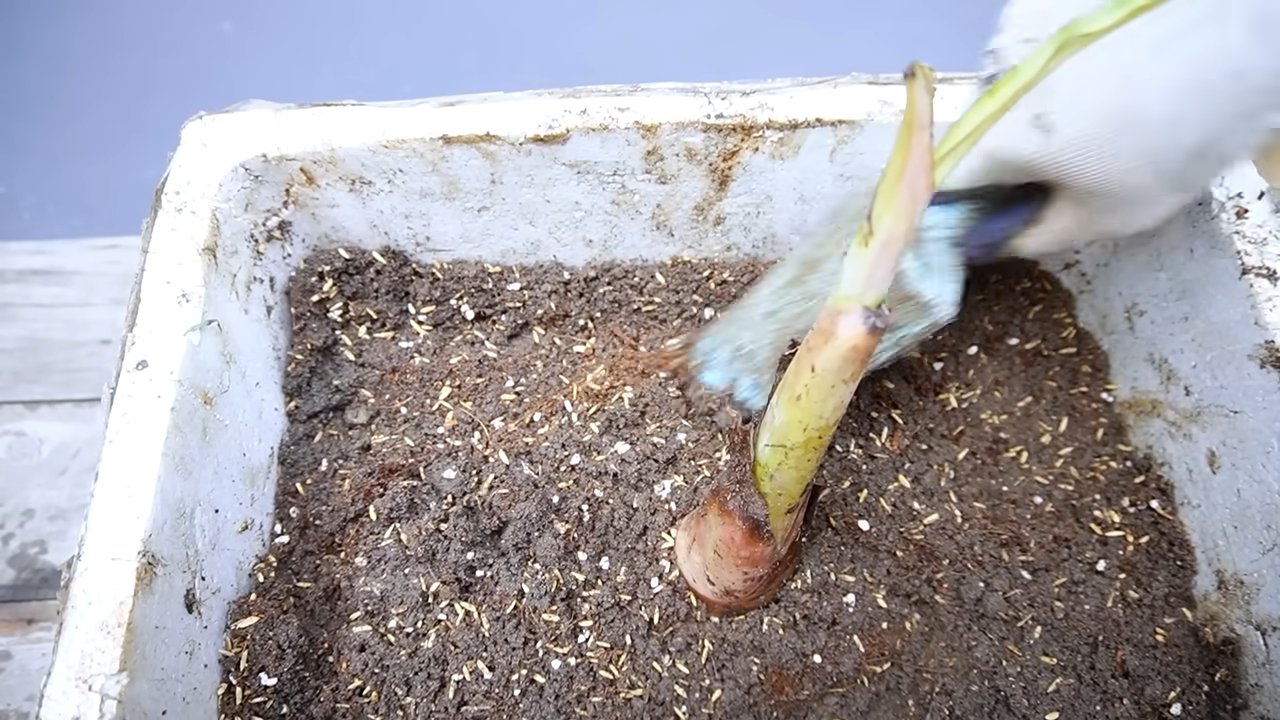
Okay, now that you’ve chosen your banana variety, let’s get planting! You can start with either a banana pup (a small offshoot from a mature plant) or a rhizome (an underground stem). I personally prefer starting with a pup because it’s usually easier to find and handle.
Step-by-Step Planting Instructions:
1. Prepare the Soil: Bananas are heavy feeders, so they need rich, well-draining soil. Amend your soil with plenty of compost, aged manure, and other organic matter. The ideal pH is between 6.0 and 7.0. I usually dig a hole that’s about twice as wide and deep as the pup’s root ball.
2. Choose the Right Location: Bananas need plenty of sunlight (at least 6-8 hours per day) and protection from strong winds. A south-facing location is ideal. Make sure there’s enough space for the plant to grow – banana plants can get quite large!
3. Plant the Pup: Carefully remove the pup from its container and gently loosen the roots. Place the pup in the hole, making sure the top of the root ball is level with the ground. Backfill the hole with your amended soil and gently firm it down.
4. Water Thoroughly: Water the newly planted pup deeply to help settle the soil and encourage root growth.
5. Mulch Around the Base: Apply a layer of mulch (such as straw, wood chips, or shredded leaves) around the base of the plant to help retain moisture, suppress weeds, and regulate soil temperature.
Caring for Your Banana Plant: The Key to Success
Planting is just the first step. To get those delicious bananas, you need to provide your plant with the right care. Here’s what you need to know:
Watering:
Bananas need consistent moisture, especially during the growing season. Water deeply whenever the top inch of soil feels dry to the touch. Avoid overwatering, as this can lead to root rot. I usually check the soil moisture every few days and adjust my watering schedule accordingly. During the winter months, reduce watering frequency.
Fertilizing:
As I mentioned earlier, bananas are heavy feeders. Fertilize your plant regularly with a balanced fertilizer (such as 10-10-10) or a fertilizer specifically formulated for bananas. Follow the instructions on the fertilizer label for application rates. I like to fertilize every 4-6 weeks during the growing season. You can also supplement with organic fertilizers like compost tea or fish emulsion.
Pruning:
Banana plants produce pups (offshoots) from their base. While these pups can be used to propagate new plants, they can also compete with the main plant for resources. To encourage fruit production, it’s important to prune away excess pups. I usually leave only one or two pups to develop alongside the main plant. Use a sharp knife or pruning shears to remove the unwanted pups at ground level.
Protecting from Cold:
If you live in an area with cold winters, you’ll need to protect your banana plant from frost and freezing temperatures. There are several ways to do this:
* Mulching Heavily: Apply a thick layer of mulch around the base of the plant to insulate the roots.
* Wrapping the Trunk: Wrap the trunk of the plant with burlap or blankets to provide extra insulation.
* Building a Frame: Construct a frame around the plant and cover it with plastic sheeting or frost cloth.
* Bringing it Indoors: If you’re growing your banana plant in a container, you can bring it indoors during the winter months. Place it in a sunny location and water sparingly.
Important Tip: Even if the leaves of your banana plant get damaged by frost, the rhizome (underground stem) may still survive. In the spring, new shoots will emerge from the rhizome.
From Flower to Fruit: The Exciting Part!
After about 9-15 months (depending on the variety and growing conditions), your banana plant will produce a large flower stalk, also known as an inflorescence. This is where the magic happens!
Pollination:
Banana flowers are typically self-pollinating, so you don’t need to worry about hand-pollinating them. However, if you want to ensure good fruit set, you can gently shake the flower stalk to help distribute the pollen.
Fruit Development:
After pollination, the flower petals will fall off, and tiny bananas will begin to develop. These bananas will gradually grow larger and plumper over the next few months.
Harvesting:
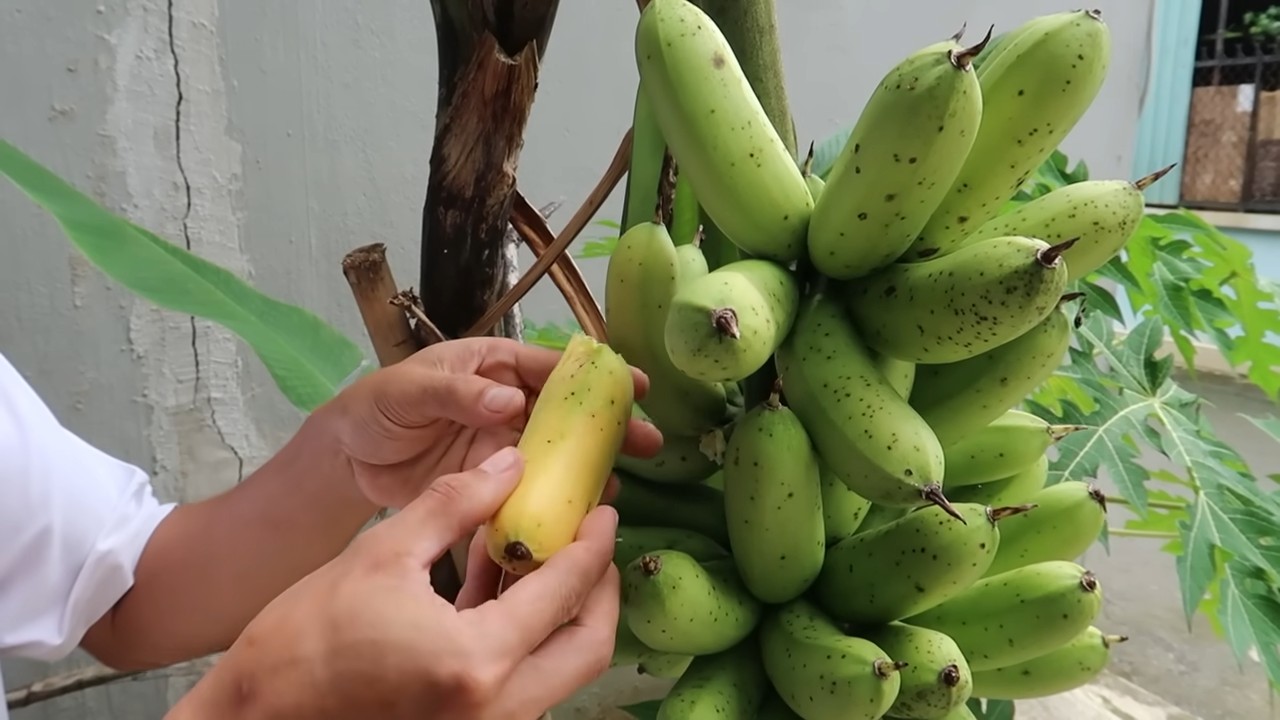
Bananas are typically harvested when they’re still green but have reached their full size. The exact timing will depend on the variety and your personal preference. A good indicator is when the ridges on the bananas become more rounded. To harvest, simply cut the entire bunch from the plant using a sharp knife.
Ripening:
After harvesting, you’ll need to ripen the bananas. You can do this by placing them in a paper bag at room temperature. Adding an apple or banana to the bag will speed up the ripening process. The bananas are ready to eat when they turn yellow and are slightly soft to the touch.
Dealing with Pests and Diseases
Like any plant, banana plants can be susceptible to pests and diseases. Here are a few common problems and how to deal with them:
* Aphids: These tiny insects can suck the sap from banana leaves, causing them to become yellow and distorted. Control aphids by spraying them with insecticidal soap or neem oil.
* Spider Mites: Spider mites are another common pest that can damage banana leaves. They’re tiny and difficult to see, but you’ll notice their webs on the undersides of the leaves. Treat spider mites with insecticidal soap or horticultural oil.
* Banana Weevils: These pests bore into the base of the plant and can cause significant damage. Prevent banana weevils by keeping the area around the plant clean and free of debris. You can also use nematodes to control them.
* Fusarium Wilt (Panama Disease): This fungal disease can be devastating to banana plants. It causes the leaves to wilt and turn yellow, and eventually kills the plant. Unfortunately, there’s no cure for Fusarium wilt. The best way to prevent it is to plant disease-resistant varieties and avoid planting bananas in soil that’s known to be contaminated.
* Black Sigatoka: This fungal disease causes leaf spots and can reduce fruit yield. Control Black Sigatoka by removing and destroying infected leaves. You can also spray with a fungicide.
Important Note: Always follow the instructions on the label when using any pesticide or fungicide.
Enjoying Your Homegrown Bananas
Congratulations! You’ve successfully grown your own bananas! Now it’s time to enjoy the fruits of your labor. Eat them fresh, use them in smoothies, bake them into bread, or make banana pudding. The possibilities are endless!
Growing bananas at home is a rewarding experience that anyone can enjoy. With a little bit of care and attention, you can have your own supply of delicious, homegrown bananas. So, what are you waiting for? Get planting!
Conclusion
So, there you have it! This simple, yet incredibly effective, method for growing bananas is a game-changer for both seasoned gardeners and those just starting out. We’ve walked you through the process, highlighting the ease and accessibility of this DIY trick. But why is this a must-try?
Firstly, it significantly increases your chances of success. Bananas, while tropical, can be surprisingly finicky. This method provides a protected and nurturing environment, giving your banana plant the best possible start. Imagine harvesting your own delicious, homegrown bananas, knowing you nurtured them from the very beginning. That feeling of accomplishment is truly rewarding.
Secondly, it’s cost-effective. You don’t need expensive equipment or specialized knowledge. Most of the materials are readily available, and the process itself is straightforward. This makes it an accessible option for anyone, regardless of their budget or gardening experience.
Thirdly, it’s adaptable. Feel free to experiment with variations to suit your specific climate and resources. For example, if you live in a colder region, consider using a larger container that can be easily moved indoors during the winter months. You could also try different types of banana varieties, each with its unique flavor and texture. Consider adding organic compost to the soil mixture for an extra boost of nutrients.
Don’t be afraid to get creative!
We encourage you to try this DIY banana growing method and witness the magic for yourself. It’s a rewarding experience that connects you with nature and provides you with a delicious and healthy treat.
But the journey doesn’t end here. We want to hear about your experiences! Share your photos, tips, and stories in the comments below. Let’s build a community of banana enthusiasts and learn from each other. What challenges did you face? What successes did you achieve? Your feedback is invaluable and will help others on their banana-growing journey.
Remember, gardening is a learning process, and every experience, whether positive or negative, is an opportunity to grow (pun intended!). So, grab your supplies, get your hands dirty, and embark on this exciting adventure. You might be surprised at how easy and rewarding it is to grow your own bananas. This DIY trick is more than just a method; it’s a gateway to a fulfilling and sustainable lifestyle. Happy growing!
Frequently Asked Questions (FAQ)
What type of banana variety is best suited for this method?
While many banana varieties can be grown using this method, dwarf varieties like Dwarf Cavendish, Williams, and Rajapuri are generally recommended, especially for container gardening. These varieties are smaller in size and mature relatively quickly, making them ideal for smaller spaces and shorter growing seasons. However, don’t be afraid to experiment with other varieties if you have the space and the right climate. Research the specific needs of each variety to ensure optimal growth. Consider the taste profile you prefer as well. Some varieties are sweeter, while others have a more subtle flavor.
How often should I water my banana plant?
Watering frequency depends on several factors, including the climate, the size of the container, and the type of soil. Generally, banana plants need consistent moisture but should not be waterlogged. Check the soil moisture regularly by sticking your finger about an inch into the soil. If it feels dry, it’s time to water. Water deeply until water drains out of the drainage holes. During hot and dry periods, you may need to water more frequently. Reduce watering during cooler months. Overwatering can lead to root rot, so it’s crucial to ensure proper drainage.
What type of fertilizer should I use for my banana plant?
Banana plants are heavy feeders and require regular fertilization to thrive. Use a balanced fertilizer with a ratio of 10-10-10 or 15-15-15. Apply the fertilizer according to the package instructions, typically every 4-6 weeks during the growing season (spring and summer). You can also supplement with organic fertilizers like compost tea or fish emulsion. Avoid over-fertilizing, as this can burn the roots. Look for fertilizers specifically formulated for fruit trees, as they often contain the necessary micronutrients.
How much sunlight does my banana plant need?
Banana plants thrive in full sun, requiring at least 6-8 hours of direct sunlight per day. If you live in a hot climate, some afternoon shade may be beneficial to prevent scorching. If you’re growing your banana plant indoors, place it near a sunny window or supplement with grow lights. Insufficient sunlight can lead to stunted growth and reduced fruit production. Observe your plant closely and adjust its location as needed to ensure it receives adequate sunlight.
How do I protect my banana plant from pests and diseases?
Regularly inspect your banana plant for signs of pests and diseases. Common pests include aphids, spider mites, and mealybugs. Treat infestations with insecticidal soap or neem oil. Preventative measures include maintaining good air circulation and avoiding overwatering. Common diseases include fungal infections like leaf spot. Remove affected leaves promptly and treat with a fungicide if necessary. Choose disease-resistant varieties whenever possible. Maintaining a healthy plant through proper watering, fertilization, and sunlight exposure will also help it resist pests and diseases.
How long does it take for a banana plant to produce fruit?
The time it takes for a banana plant to produce fruit varies depending on the variety, climate, and growing conditions. Generally, it takes about 9-12 months from planting to harvest. However, some varieties may take longer. Ensure your plant receives adequate sunlight, water, and fertilizer to promote fruit production. Once the flower stalk emerges, it takes about 3-6 months for the bananas to ripen.
Can I grow bananas indoors using this method?
Yes, you can grow bananas indoors using this method, especially with dwarf varieties. Choose a large container with good drainage and place it in a sunny location. Supplement with grow lights if necessary. Maintain consistent moisture and fertilize regularly. Be aware that indoor banana plants may not produce as much fruit as those grown outdoors.
What do I do with the banana plant after it fruits?
After a banana plant fruits, the main stem will die back. However, new shoots (called suckers) will emerge from the base of the plant. You can remove all but one or two of these suckers to allow the remaining ones to grow and produce fruit in the following season. The old stem can be cut down to the ground. This process ensures a continuous supply of bananas.
How do I know when my bananas are ripe?
Bananas are typically harvested when they are still green but have reached their full size. They can then be ripened indoors at room temperature. Signs of ripeness include a change in color from green to yellow, a softening of the fruit, and a fragrant aroma. You can also check the tips of the bananas; if they are easily broken off, the bananas are likely ripe.
What if I live in a cold climate? Can I still grow bananas?
Yes, you can still grow bananas in cold climates using this method. Choose a dwarf variety and grow it in a container that can be easily moved indoors during the winter months. Provide adequate sunlight and water while indoors. You may need to reduce watering and fertilization during the dormant period. With proper care, you can successfully grow bananas even in colder regions. Consider using a greenhouse or sunroom for added protection during the winter.

Leave a Comment