
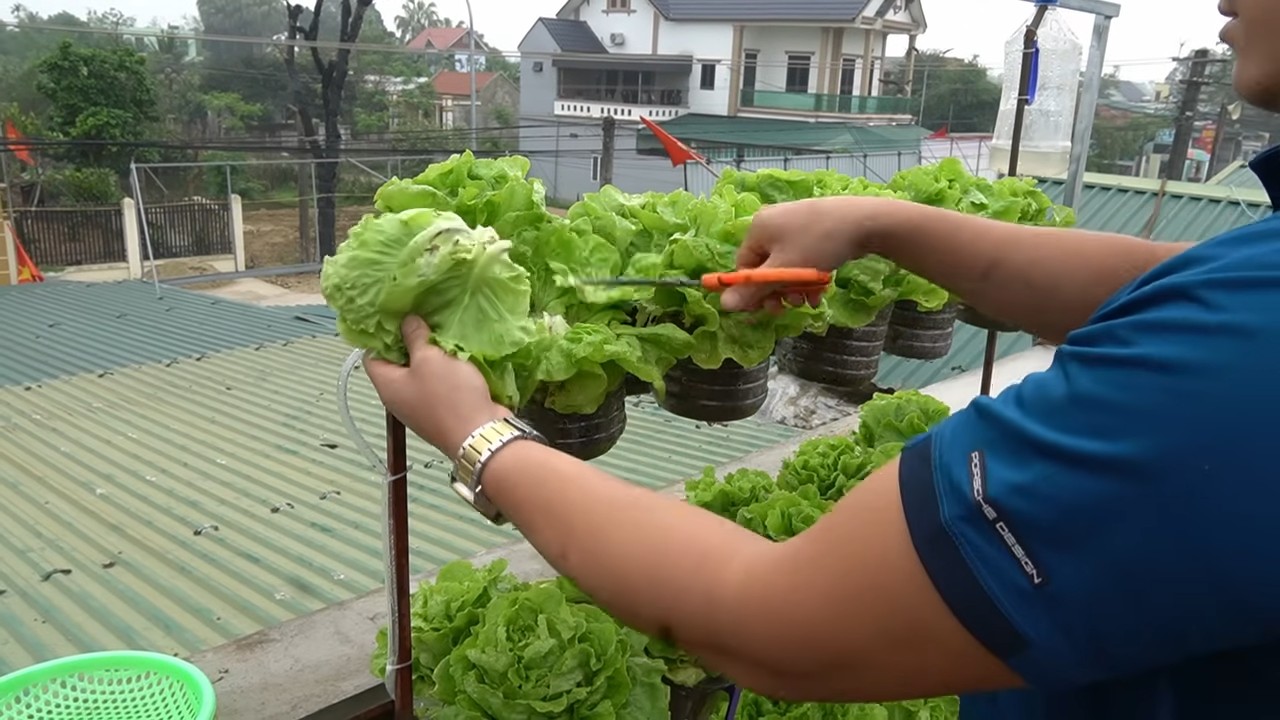
DIY lettuce drip system: sounds intimidating, right? Don’t worry, I promise it’s easier than assembling IKEA furniture! Imagine plump, juicy lettuce heads thriving in your garden, all thanks to a simple, cost-effective watering system you built yourself. No more parched leaves or wasted water – just vibrant, healthy greens ready for your salads and sandwiches.
The concept of drip irrigation isn’t new. In fact, rudimentary forms of it have been used for centuries in arid regions, with evidence suggesting its use in ancient China and by the Romans. These early systems, often involving clay pots buried near plants, slowly released water directly to the roots. While our modern take is a bit more sophisticated, the underlying principle remains the same: efficient and targeted hydration.
Why do you need a DIY lettuce drip system? Well, for starters, it’s a game-changer for water conservation. Traditional watering methods often lead to significant water loss through evaporation and runoff. A drip system delivers water precisely where it’s needed, minimizing waste and saving you money on your water bill. Plus, it helps prevent fungal diseases that can plague lettuce when the leaves are constantly wet. But most importantly, it frees up your time! No more daily watering chores – your lettuce will practically water itself, leaving you more time to enjoy the fruits (or, in this case, vegetables) of your labor. Let’s dive in and create a system that will have your lettuce thriving!
DIY Tropfbewässerungssystem für Salat: So baust du es selbst!
Hallo liebe Gartenfreunde! Ich zeige euch heute, wie ihr ein super einfaches und kostengünstiges Tropfbewässerungssystem für euren Salat bauen könnt. Damit spart ihr Wasser, Zeit und eure Salatköpfe werden es euch danken! Keine Sorge, es ist wirklich kinderleicht und auch für Anfänger geeignet.
Was du brauchst:
* Eine große Plastikflasche (2 Liter sind ideal, aber jede Größe geht)
* Einen Schraubenzieher oder eine dicke Nadel
* Ein Feuerzeug oder eine Kerze (optional, zum Erhitzen des Schraubenziehers)
* Ein Messer oder eine Schere
* Etwas Klebeband (optional, für zusätzliche Stabilität)
* Wasser
* Und natürlich: Salatpflanzen!
Schritt-für-Schritt-Anleitung:
1. Flasche vorbereiten: Zuerst musst du die Plastikflasche vorbereiten. Entferne das Etikett und spüle sie gründlich aus. Es sollten keine Rückstände von Limo oder Saft mehr drin sein.
2. Löcher bohren: Jetzt kommt der wichtigste Teil: das Bohren der Löcher. Hier gibt es zwei Möglichkeiten:
* Methode 1 (mit erhitztem Schraubenzieher/Nadel): Erhitze die Spitze des Schraubenziehers oder der Nadel mit dem Feuerzeug oder der Kerze. Sei dabei bitte vorsichtig und achte darauf, dich nicht zu verbrennen! Drücke dann die heiße Spitze vorsichtig durch die Plastikflasche, um kleine Löcher zu erzeugen. Ich empfehle, die Löcher im unteren Bereich der Flasche zu machen, da dort der Wasserdruck am größten ist.
* Methode 2 (mit Schraubenzieher/Nadel): Wenn du kein Feuerzeug oder keine Kerze zur Hand hast, kannst du die Löcher auch einfach mit dem Schraubenzieher oder der Nadel stechen. Das erfordert etwas mehr Kraft, aber es funktioniert auch.
Wichtig: Die Größe der Löcher bestimmt, wie schnell das Wasser austritt. Für Salat empfehle ich sehr kleine Löcher. Lieber zu klein als zu groß, denn du kannst sie später immer noch vergrößern. Ich mache meistens 5-7 Löcher pro Flasche, je nachdem wie groß die Flasche ist und wie viele Salatpflanzen ich damit bewässern möchte.
3. Flasche befüllen: Fülle die Flasche mit Wasser. Am besten verwendest du Regenwasser, wenn du welches hast. Leitungswasser geht aber natürlich auch.
4. Flasche platzieren: Jetzt kommt der spaßige Teil: Platziere die Flasche neben deinen Salatpflanzen. Stecke die Flasche mit dem Hals nach unten in die Erde, so dass die Löcher direkt über dem Wurzelbereich der Pflanzen sind. Du kannst die Flasche auch leicht schräg stellen, damit das Wasser besser verteilt wird.
5. Testen und anpassen: Beobachte, wie schnell das Wasser aus der Flasche austritt. Wenn es zu schnell geht, kannst du die Löcher mit etwas Klebeband verkleinern oder abdecken. Wenn es zu langsam geht, kannst du die Löcher mit dem Schraubenzieher oder der Nadel etwas vergrößern.
6. Regelmäßig nachfüllen: Fülle die Flasche regelmäßig mit Wasser nach, je nachdem wie schnell das Wasser verbraucht wird. Das hängt vom Wetter, der Größe der Flasche und der Anzahl der Löcher ab.
Zusätzliche Tipps und Tricks:
* Mehrere Flaschen verwenden: Wenn du ein großes Salatbeet hast, kannst du natürlich auch mehrere Flaschen verwenden. Platziere sie einfach in regelmäßigen Abständen zwischen den Pflanzen.
* Dünger hinzufügen: Du kannst dem Wasser auch etwas Flüssigdünger hinzufügen, um deine Salatpflanzen zusätzlich zu versorgen. Achte aber darauf, die richtige Dosierung zu verwenden.
* Flaschen verstecken: Wenn du die Plastikflaschen nicht so schön findest, kannst du sie mit etwas Erde oder Mulch abdecken. So fallen sie nicht so auf.
* Verschiedene Flaschengrößen: Experimentiere mit verschiedenen Flaschengrößen, um herauszufinden, welche am besten für deine Bedürfnisse geeignet ist.
* Alternative Platzierung: Anstatt die Flasche in die Erde zu stecken, kannst du sie auch auf einem kleinen Podest oder Stein platzieren. Das ist besonders nützlich, wenn der Boden sehr hart ist.
* Reinigung: Reinige die Flaschen regelmäßig, um Verstopfungen der Löcher zu vermeiden.
Optimierung für verschiedene Salatarten
Nicht jeder Salat ist gleich! Unterschiedliche Sorten haben unterschiedliche Bedürfnisse. Hier ein paar Tipps, wie du dein Tropfbewässerungssystem an die jeweilige Salatart anpassen kannst:
* Kopfsalat: Kopfsalat benötigt relativ viel Wasser, besonders während der Kopfbildung. Achte darauf, dass die Löcher in der Flasche etwas größer sind oder verwende mehrere Flaschen pro Pflanze.
* Pflücksalat: Pflücksalat ist etwas anspruchsloser als Kopfsalat. Hier reichen kleinere Löcher und weniger Wasser.
* Rucola: Rucola mag es nicht zu feucht. Achte darauf, dass die Erde zwischen den Bewässerungen gut abtrocknen kann. Verwende am besten sehr kleine Löcher und gieße nicht zu oft.
* Eissalat: Eissalat benötigt ebenfalls viel Wasser, besonders bei heißem Wetter. Achte auf eine gleichmäßige Bewässerung, um das Platzen der Köpfe zu vermeiden.
Problemlösung: Häufige Fehler und wie man sie behebt
Auch beim einfachsten DIY-Projekt können Fehler passieren. Hier sind ein paar häufige Probleme und wie du sie beheben kannst:
* Die Löcher sind verstopft: Das kann passieren, wenn du hartes Wasser verwendest oder wenn sich Algen in der Flasche bilden. Reinige die Löcher mit einer Nadel oder einem dünnen Draht. Du kannst auch etwas Essigwasser in die Flasche geben, um Kalkablagerungen zu lösen.
* Das Wasser läuft zu schnell aus: Verkleinere die Löcher mit etwas Klebeband oder verwende eine größere Flasche. Du kannst auch die Anzahl der Löcher reduzieren.
* Das Wasser läuft zu langsam aus: Vergrößere die Löcher mit dem Schraubenzieher oder der Nadel. Achte darauf, nicht zu große Löcher zu machen, sonst läuft das Wasser zu schnell aus.
* Die Flasche kippt um: Stecke die Flasche tiefer in die Erde oder verwende einen Stützpfahl, um sie zu stabilisieren. Du kannst auch einen größeren Stein um die Flasche legen, um sie zu beschweren.
* Die Salatpflanzen bekommen trotzdem gelbe Blätter: Das kann verschiedene Ursachen haben. Entweder bekommen sie zu viel oder zu wenig Wasser, oder sie haben einen Nährstoffmangel. Überprüfe die Bodenfeuchtigkeit und dünge die Pflanzen gegebenenfalls.
Langfristige Wartung und Pflege
Damit dein Tropfbewässerungssystem lange hält und optimal funktioniert, solltest du es regelmäßig warten und pflegen:
* Reinigung: Reinige die Flaschen regelmäßig, um Verstopfungen der Löcher zu vermeiden. Spüle sie mit klarem Wasser aus und entferne eventuelle Algenablagerungen.
* Überprüfung: Überprüfe regelmäßig die Löcher auf Verstopfungen und reinige sie gegebenenfalls.
* Anpassung: Passe die Größe und Anzahl der Löcher an die Bedürfnisse deiner Salatpflanzen an.
* Austausch: Tausche die Flaschen aus, wenn sie beschädigt oder spröde werden.
* Winterfest machen: Im Winter solltest du die Flaschen entfernen und reinigen. Lagere sie an einem trockenen Ort, um Frostschäden zu vermeiden.
Ich hoffe, diese Anleitung hilft dir dabei, dein eigenes Tropfbewässerungssystem für Salat zu bauen. Es ist wirklich eine einfache und effektive Methode, um deine Pflanzen mit ausreichend Wasser zu versorgen und gleichzeitig Wasser zu sparen. Viel Spaß beim Gärtnern! Und denk daran: Beobachte deine Pflanzen genau und passe das System an ihre Bedürfnisse an. Dann steht einer reichen Salat-Ernte nichts mehr im Wege!

Conclusion
So, there you have it! Creating your own DIY lettuce drip system isn’t just a fun project; it’s a game-changer for your garden. We’ve walked you through the steps, highlighted the benefits, and hopefully, inspired you to ditch the wasteful sprinkler and embrace a more efficient and sustainable watering method.
Why is this a must-try? Because it’s a win-win-win! You save water, which is crucial for our planet and your wallet. Your lettuce plants thrive, producing healthier, more vibrant greens. And you gain a sense of accomplishment knowing you’ve built something practical and beneficial with your own two hands.
But the beauty of this DIY project lies in its adaptability. Feel free to experiment with different container sizes for your reservoir, depending on the number of lettuce plants you have and the frequency you want to refill it. Consider using recycled materials like old buckets or plastic bins to further reduce your environmental impact. You can also adjust the drip rate by using different sized needles or adjusting the height of the reservoir. For larger lettuce patches, you might want to consider a more elaborate system with multiple drip lines branching out from a central reservoir.
Another variation to consider is adding a timer to your system. This allows you to automate the watering process, ensuring your lettuce receives consistent hydration even when you’re away. You can find inexpensive timers at most hardware stores or online retailers.
Don’t be afraid to get creative and personalize your DIY lettuce drip system to suit your specific needs and preferences. The most important thing is to get started and see the positive impact it has on your lettuce crop.
We’re confident that once you experience the benefits of this simple yet effective watering solution, you’ll wonder why you didn’t try it sooner. It’s a fantastic way to nurture your lettuce plants, conserve water, and connect with nature.
Now, it’s your turn! We encourage you to give this DIY project a try and share your experiences with us. Let us know what worked well for you, what challenges you encountered, and any modifications you made to the system. Your feedback will help others learn and improve their own DIY lettuce drip system. Share your photos and stories in the comments section below – we can’t wait to see your creations! Happy gardening!
Frequently Asked Questions (FAQ)
What type of container is best for the water reservoir?
The best container for your water reservoir depends on the size of your lettuce patch and how often you want to refill it. A 5-gallon bucket is a good starting point for a small garden. For larger gardens, consider using a larger plastic bin or even a repurposed rain barrel. Make sure the container is clean and food-grade if possible, especially if you’re growing organic lettuce. Opaque containers are preferable as they prevent algae growth. Also, ensure the container has a lid to prevent evaporation and keep debris out.
How often should I refill the water reservoir?
The frequency of refilling depends on several factors, including the size of your reservoir, the number of lettuce plants, the weather conditions, and the drip rate. In hot, sunny weather, you’ll need to refill more often than in cooler, cloudy weather. Monitor the water level in your reservoir and the moisture level in the soil around your lettuce plants. A good rule of thumb is to refill when the reservoir is about half empty or when the soil feels dry to the touch. Initially, check daily and adjust your refilling schedule based on your observations.
What size needle should I use for the drip emitters?
The size of the needle determines the drip rate. A smaller needle will result in a slower drip, while a larger needle will result in a faster drip. Experiment with different needle sizes to find the optimal drip rate for your lettuce plants. Start with a small needle (e.g., 25-gauge) and observe how quickly the soil around your lettuce plants becomes moist. If the soil is drying out too quickly, try a slightly larger needle. You can also adjust the drip rate by raising or lowering the reservoir – a higher reservoir will increase the water pressure and drip rate.
Can I add fertilizer to the water in the reservoir?
Yes, you can add water-soluble fertilizer to the water in the reservoir. This is a convenient way to provide your lettuce plants with essential nutrients. However, it’s important to use a fertilizer specifically formulated for leafy greens and to follow the instructions on the fertilizer package carefully. Over-fertilizing can damage your plants. Start with a diluted solution and monitor your lettuce plants for any signs of nutrient deficiency or toxicity. Organic liquid fertilizers are also a great option.
How do I prevent the drip emitters from clogging?
Clogging is a common issue with drip irrigation systems, especially when using unfiltered water. To prevent clogging, use clean water in your reservoir. If you’re using well water or water from a pond, consider filtering it before adding it to the reservoir. You can also add a small amount of vinegar to the water to help prevent mineral buildup. Regularly inspect the drip emitters and clean them if necessary. You can use a small brush or needle to clear any blockages.
Is this DIY lettuce drip system suitable for other plants besides lettuce?
Yes, this DIY lettuce drip system can be adapted for other plants that benefit from consistent, slow watering, such as spinach, kale, and other leafy greens. You may need to adjust the drip rate and the spacing of the emitters depending on the specific needs of the plants. For plants with deeper root systems, you may need to use longer drip lines to ensure the water reaches the roots.
How do I winterize my DIY lettuce drip system?
In areas with freezing temperatures, it’s important to winterize your DIY lettuce drip system to prevent damage. Disconnect the drip lines from the reservoir and drain all the water from the system. Store the reservoir and drip lines in a frost-free location, such as a garage or shed. This will prevent the water from freezing and expanding, which can crack the container and damage the drip lines.
What if I don’t have needles? Are there alternatives for drip emitters?
Yes, there are alternatives to using needles as drip emitters. You can purchase commercially available drip emitters from a garden supply store or online retailer. These emitters are designed to provide a consistent and controlled drip rate. Another option is to use small-diameter tubing with tiny holes punched in it. You can create the holes using a pin or a small drill bit. Experiment with different hole sizes to find the optimal drip rate.
How high should I place the water reservoir above the lettuce plants?
The height of the reservoir affects the water pressure and drip rate. A higher reservoir will increase the pressure and drip rate, while a lower reservoir will decrease them. Start with the reservoir about 1-2 feet above the lettuce plants and adjust the height as needed to achieve the desired drip rate. Monitor the soil moisture and adjust the height accordingly.
Can I automate this system with a timer?
Absolutely! Adding a timer to your DIY lettuce drip system is a great way to automate the watering process and ensure your lettuce receives consistent hydration, even when you’re away. You can purchase an inexpensive digital timer at most hardware stores or online. Simply connect the timer to the water source and set it to water your lettuce at specific intervals. Experiment with different watering schedules to find the optimal setting for your plants.
Leave a Comment