
Cowpea garden easy care doesn’t have to be a daunting task! Imagine harvesting baskets overflowing with fresh, delicious cowpeas right from your own backyard. Sounds amazing, right? Well, it’s more achievable than you think! For centuries, cowpeas have been a staple crop in many cultures, particularly in Africa and Asia, providing essential nutrients and playing a vital role in sustainable agriculture. These versatile legumes are not only packed with protein and fiber but are also incredibly resilient, making them perfect for beginner gardeners and those with limited space.
But let’s be honest, even the hardiest plants can benefit from a little extra TLC. That’s where our DIY tricks and hacks come in! I’m going to share some simple yet effective methods to ensure your cowpea garden thrives, even if you’re short on time or experience. From soil preparation secrets to pest control solutions, these tips will help you maximize your yield and enjoy a bountiful harvest. So, ditch the store-bought beans and get ready to experience the joy of growing your own cowpea garden easy care, made simple!
DIY: Einfache Pflege für deinen Kuhbohnen-Garten
Hey Gartenfreunde! Ich liebe es, frisches Gemüse direkt aus dem Garten zu ernten, und Kuhbohnen (auch bekannt als Augenbohnen) sind da keine Ausnahme. Sie sind nicht nur super lecker, sondern auch relativ pflegeleicht, was sie perfekt für Anfänger und erfahrene Gärtner macht. In diesem Artikel zeige ich dir, wie du deinen eigenen Kuhbohnen-Garten anlegen und pflegen kannst, damit du eine reiche Ernte genießen kannst. Los geht’s!
Vorbereitung ist alles: Der richtige Standort und Boden
Bevor wir mit dem Pflanzen beginnen, müssen wir sicherstellen, dass unsere Kuhbohnen den bestmöglichen Start haben. Das bedeutet, den richtigen Standort und Boden vorzubereiten.
* Sonnenschein satt: Kuhbohnen lieben die Sonne! Wähle einen Standort, der mindestens 6-8 Stunden direktes Sonnenlicht pro Tag erhält. Je mehr Sonne, desto besser die Ernte.
* Gut durchlässiger Boden: Kuhbohnen mögen keine “nassen Füße”. Der Boden sollte gut durchlässig sein, damit überschüssiges Wasser ablaufen kann. Staunässe kann zu Wurzelfäule führen.
* Bodenverbesserung: Auch wenn Kuhbohnen nicht besonders anspruchsvoll sind, profitieren sie von einem nährstoffreichen Boden. Arbeite vor dem Pflanzen Kompost oder gut verrotteten Mist in den Boden ein. Das verbessert die Bodenstruktur und liefert wichtige Nährstoffe.
* pH-Wert: Der ideale pH-Wert für Kuhbohnen liegt zwischen 6,0 und 7,0. Ein Bodentest kann dir helfen, den pH-Wert zu bestimmen und gegebenenfalls anzupassen.
Aussaat: Der Start in ein ertragreiches Leben
Jetzt, wo der Standort vorbereitet ist, können wir mit der Aussaat beginnen.
1. Der richtige Zeitpunkt: Kuhbohnen sind wärmeliebend und sollten erst nach dem letzten Frost ausgesät werden, wenn die Bodentemperatur mindestens 18°C beträgt. In kühleren Regionen kannst du sie auch in Töpfen vorziehen und später auspflanzen.
2. Direktsaat oder Vorziehen: Ich bevorzuge die Direktsaat, da Kuhbohnen nicht besonders gut mit dem Umpflanzen zurechtkommen. Wenn du sie vorziehen möchtest, verwende biologisch abbaubare Töpfe, um die Wurzeln beim Auspflanzen nicht zu beschädigen.
3. Aussaattiefe und Abstand: Säe die Samen etwa 2,5 bis 5 cm tief und halte einen Abstand von 5 bis 10 cm zwischen den Pflanzen in der Reihe ein. Zwischen den Reihen solltest du etwa 60 bis 90 cm Platz lassen.
4. Gießen: Gieße die Samen nach der Aussaat gründlich an. Halte den Boden feucht, aber nicht nass, bis die Keimung erfolgt ist.
Pflege: Damit deine Kuhbohnen prächtig gedeihen
Die Pflege von Kuhbohnen ist relativ einfach, aber ein paar Dinge solltest du beachten, um eine reiche Ernte zu erzielen.
* Gießen: Kuhbohnen sind relativ trockenheitstolerant, aber regelmäßiges Gießen ist besonders während der Blütezeit und der Hülsenbildung wichtig. Gieße am besten früh am Morgen, damit die Blätter vor der Nacht abtrocknen können.
* Unkrautbekämpfung: Halte den Bereich um die Kuhbohnen unkrautfrei. Unkraut konkurriert mit den Pflanzen um Nährstoffe und Wasser. Du kannst Unkraut manuell entfernen oder eine Mulchschicht auftragen, um das Unkrautwachstum zu unterdrücken.
* Düngung: Kuhbohnen benötigen nicht viel Dünger, da sie Stickstoff aus der Luft binden können. Wenn du jedoch feststellst, dass die Pflanzen schlecht wachsen, kannst du sie mit einem stickstoffarmen Dünger düngen.
* Schädlinge und Krankheiten: Kuhbohnen sind relativ resistent gegen Schädlinge und Krankheiten. Gelegentlich können Blattläuse oder Bohnenkäfer auftreten. Diese kannst du mit natürlichen Mitteln bekämpfen, z.B. mit einem Wasserstrahl oder mit Neemöl. Achte auf Anzeichen von Pilzkrankheiten wie Mehltau und behandle sie gegebenenfalls mit einem Fungizid.
Rankhilfe: Für einen aufrechten Wuchs
Einige Kuhbohnensorten wachsen buschig, während andere rankend sind. Rankende Sorten benötigen eine Rankhilfe, um optimal zu wachsen und eine gute Ernte zu erzielen.
* Arten von Rankhilfen: Es gibt verschiedene Arten von Rankhilfen, die du verwenden kannst, z.B. Bambusstäbe, Rankgitter oder Zäune. Wähle eine Rankhilfe, die stabil genug ist, um das Gewicht der Pflanzen zu tragen.
* Installation: Installiere die Rankhilfe, bevor die Pflanzen zu groß werden. Leite die Triebe der Kuhbohnen an der Rankhilfe entlang, damit sie sich daran festhalten können.
Ernte: Der Lohn deiner Mühe
Die Ernte ist der aufregendste Teil des Anbaus von Kuhbohnen!
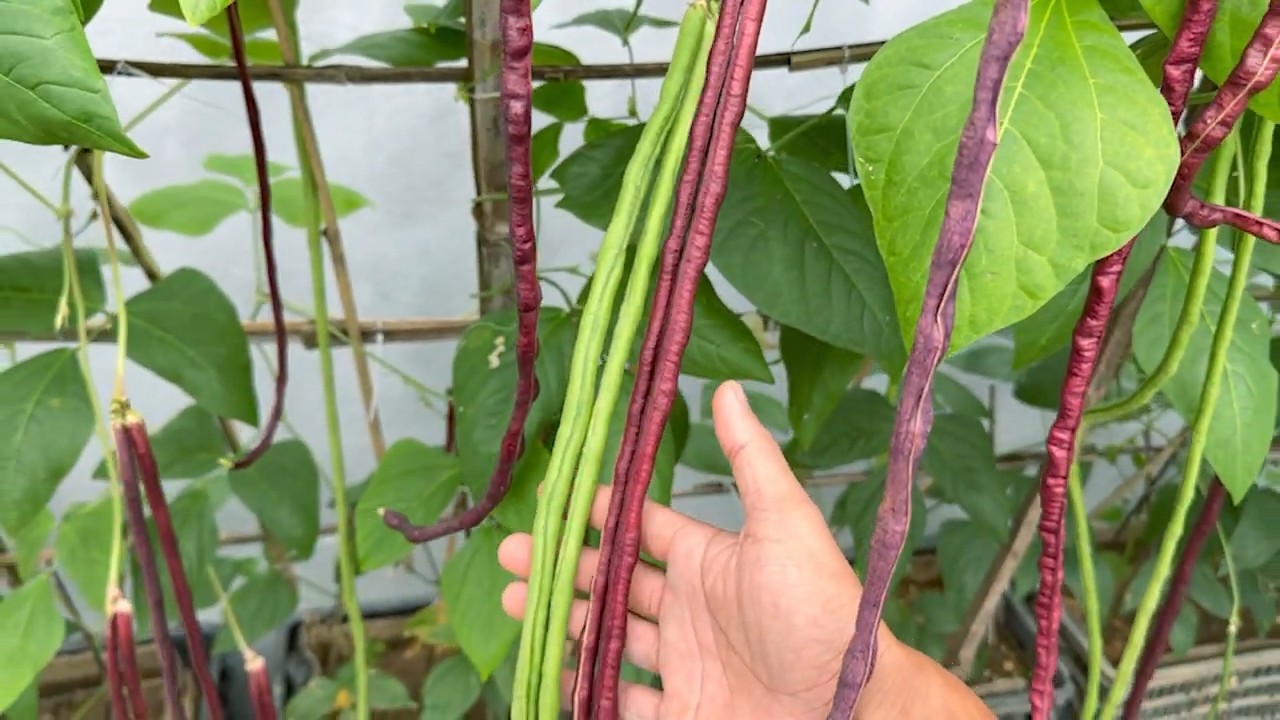
1. Der richtige Zeitpunkt: Der Zeitpunkt der Ernte hängt davon ab, ob du die grünen Hülsen oder die getrockneten Bohnen ernten möchtest. Für grüne Hülsen solltest du ernten, wenn die Hülsen prall und saftig sind, aber bevor die Bohnen darin zu groß werden. Für getrocknete Bohnen solltest du ernten, wenn die Hülsen trocken und braun sind und die Bohnen darin hart sind.
2. Erntemethode: Schneide die Hülsen mit einer Schere oder einem Messer ab. Ziehe nicht an den Hülsen, da du sonst die Pflanzen beschädigen könntest.
3. Lagerung: Grüne Hülsen können im Kühlschrank für einige Tage aufbewahrt werden. Getrocknete Bohnen können in einem luftdichten Behälter an einem kühlen, trockenen Ort für mehrere Monate aufbewahrt werden.
Sortenempfehlungen: Meine Favoriten
Es gibt viele verschiedene Kuhbohnensorten, jede mit ihren eigenen Vor- und Nachteilen. Hier sind ein paar meiner Favoriten:
* ‘Black Eyed Peas’: Die klassische Sorte mit den charakteristischen schwarzen “Augen”. Sie ist sehr ertragreich und vielseitig verwendbar.
* ‘Pink Eye Purple Hull’: Eine Sorte mit rosa-violetten Hülsen und einem milden Geschmack. Sie ist besonders gut für Salate und Eintöpfe geeignet.
* ‘Whippoorwill’: Eine alte Sorte mit gesprenkelten Bohnen und einem nussigen Geschmack. Sie ist sehr robust und widerstandsfähig gegen Krankheiten.
Zusätzliche Tipps für eine erfolgreiche Ernte
* Fruchtfolge: Baue Kuhbohnen nicht jedes Jahr am selben Standort an. Wechsle sie mit anderen Kulturen ab, um die Bodenqualität zu verbessern und Krankheiten vorzubeugen.
* Mulchen: Eine Mulchschicht hilft, den Boden feucht zu halten, Unkraut zu unterdrücken und die Bodentemperatur zu regulieren.
* Beobachtung: Beobachte deine Pflanzen regelmäßig auf Anzeichen von Schädlingen oder Krankheiten. Je früher du Probleme erkennst, desto einfacher ist es, sie zu beheben.
* Genießen: Vergiss nicht, deine harte Arbeit zu genießen! Frische Kuhbohnen aus dem eigenen Garten sind ein wahrer Genuss.
Ich hoffe, dieser Artikel hat dir geholfen, deinen eigenen Kuhbohnen-Garten anzulegen und zu pflegen. Mit ein wenig Mühe und Geduld wirst du bald eine reiche Ernte genießen können. Viel Spaß beim Gärtnern!

Conclusion
So, there you have it! Mastering the art of easy care for your cowpea garden is not just about saving time and effort; it’s about unlocking the full potential of these incredibly versatile and nutritious legumes. We’ve walked through the essential steps, from selecting the right variety and preparing the soil to implementing simple yet effective watering and pest control strategies. The beauty of this approach lies in its adaptability. You can tailor these techniques to suit your specific climate, soil type, and available resources.
Why is this DIY approach a must-try? Because it empowers you to take control of your food source, ensuring a bountiful harvest of fresh, delicious cowpeas without the need for harsh chemicals or complicated gardening practices. Imagine the satisfaction of serving a meal made with cowpeas you’ve grown yourself, knowing exactly where they came from and how they were nurtured.
But the journey doesn’t end here. Feel free to experiment with different companion plants to deter pests or improve soil health. Try succession planting to extend your harvest season. Explore various methods of trellising to maximize space and improve air circulation. The possibilities are endless!
We encourage you to embrace this easy care approach to cowpea gardening and discover the joy of growing your own food. Don’t be afraid to get your hands dirty, learn from your mistakes, and adapt your techniques as needed. The rewards – a thriving garden, a healthy harvest, and a deeper connection to nature – are well worth the effort.
And most importantly, we want to hear about your experiences! Share your tips, tricks, and triumphs in the comments below. Let us know what worked for you, what challenges you faced, and what you learned along the way. Together, we can create a community of passionate gardeners who are dedicated to growing healthy, sustainable food for themselves and their families. So, go ahead, give it a try, and let’s grow some amazing cowpeas together!
Frequently Asked Questions (FAQs)
What are the most common mistakes people make when trying easy care cowpea gardening, and how can I avoid them?
One of the biggest mistakes is neglecting soil preparation. Cowpeas thrive in well-drained soil with a slightly acidic to neutral pH. Failing to amend the soil with compost or other organic matter can lead to poor growth and reduced yields. Another common mistake is overwatering. Cowpeas are relatively drought-tolerant and can suffer from root rot if the soil is constantly soggy. Avoid overwatering, especially during the early stages of growth. Finally, neglecting pest control can quickly decimate your crop. Regularly inspect your plants for signs of pests and take appropriate action, such as hand-picking, using insecticidal soap, or introducing beneficial insects.
How often should I water my cowpea plants using this easy care method?
The frequency of watering depends on several factors, including the climate, soil type, and stage of growth. As a general rule, water deeply but infrequently, allowing the soil to dry out slightly between waterings. During hot, dry weather, you may need to water more frequently. However, avoid overwatering, as this can lead to root rot. A good way to check if your plants need water is to stick your finger into the soil about an inch deep. If the soil feels dry, it’s time to water.
What are some good companion plants for cowpeas that can help with pest control or improve growth?
Several companion plants can benefit cowpeas. Marigolds are known to repel nematodes and other soil pests. Basil can deter aphids and other insects. Corn can provide support for climbing varieties of cowpeas. Sunflowers can attract beneficial insects that prey on pests. Planting these companion plants alongside your cowpeas can help create a healthier and more productive garden.
Can I grow cowpeas in containers using this easy care approach?
Yes, you can definitely grow cowpeas in containers. Choose a large container with good drainage holes. Use a well-draining potting mix and amend it with compost or other organic matter. Select a bush variety of cowpea, as these are better suited for container gardening. Water regularly and fertilize as needed. Provide support for the plants if necessary.
What are some signs that my cowpea plants are not getting enough nutrients, and how can I fix it?
Signs of nutrient deficiency in cowpeas can include yellowing leaves, stunted growth, and poor pod development. Nitrogen deficiency can cause yellowing of the lower leaves. Phosphorus deficiency can cause stunted growth and purplish leaves. Potassium deficiency can cause yellowing or browning of the leaf edges. To fix nutrient deficiencies, amend the soil with compost or other organic matter. You can also use a balanced fertilizer specifically formulated for legumes.
How do I know when my cowpeas are ready to harvest?
The timing of harvest depends on the variety of cowpea and your intended use. For fresh eating, harvest the pods when they are plump and tender, but before the beans inside become too large and tough. For dried beans, allow the pods to dry completely on the plant before harvesting. The pods should be brittle and the beans should rattle inside.
What are some creative ways to use cowpeas in my cooking?
Cowpeas are incredibly versatile and can be used in a variety of dishes. They can be boiled, steamed, or fried. They can be added to soups, stews, salads, and side dishes. They can also be used to make fritters, patties, and dips. Some popular cowpea dishes include Hoppin’ John, black-eyed pea salad, and cowpea curry.
How can I store my harvested cowpeas to keep them fresh for longer?
For fresh cowpeas, store them in the refrigerator in a plastic bag or container. They will typically last for about a week. For dried cowpeas, store them in an airtight container in a cool, dry place. They can last for several years if stored properly.
What if I encounter specific pests or diseases that aren’t covered in this easy care guide?
If you encounter pests or diseases that aren’t covered in this guide, consult with your local extension office or a knowledgeable gardening expert. They can help you identify the problem and recommend appropriate solutions. You can also find a wealth of information online from reputable sources such as university extension websites and gardening forums. Remember to always use caution when applying pesticides or other chemicals to your garden.
Is this easy care method suitable for all climates and regions?
While the principles of easy care cowpea gardening are applicable to most climates and regions, you may need to make adjustments based on your specific conditions. For example, in colder climates, you may need to start your seeds indoors or choose a variety that is more tolerant of cool weather. In hotter climates, you may need to provide shade for your plants during the hottest part of the day. Be sure to research the specific needs of cowpeas in your region and adapt your gardening practices accordingly.
Leave a Comment